Managing Requests
The sections listed below provide details about how to manage requests using the ActivID CMS Operator Portal Help Desk.
Before you can check the identity of a user, the device must have been issued to the user.
Before you respond to requests over the telephone, it is recommended that you use the Check Identity feature to verify user identity.
-
Go to the Help Desk Overview page.
-
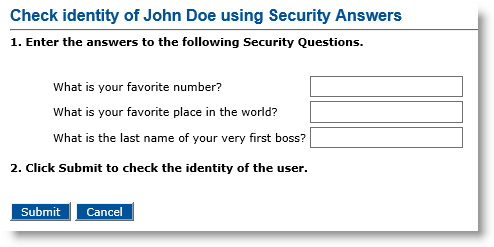
Under User Information, in the Action column, click Check User Identity. The Check Identity page appears:
-
Read the questions to the user.
-
Enter the user’s answers in the appropriate field.
-
Click Submit. A confirmation message appears.
If the user is required to answer new questions during the next logon, then you can reset the security answers.
-
Go to the Help Desk Overview page.
-
Under User Information, in the Action column, click Reset Security Answers. The Reset Security Answers page appears.
-
Click Submit.
Follow this procedure if a user has access to the ActivID CMS User Portal. When ActivID CMS is configured, the length of time for which an unlock request is valid is set in the request_validity.properties file (located in %PROGRAM DATA%\HID Global\Credential Management System\Shared Files\services\repositories). The default is 10 minutes. If the user does not unlock the device before the request expires, then you must post a new unlock request.
-
Go to the Help Desk Overview page.
-
In the Cards, Virtual Smart Cards, or YubiKeys section, under Applications, click the Create Unlock Request next to the appropriate PIN application.
-
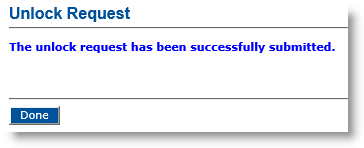
Click Done. The Help Desk Overview page reappears. Now, you can view the pending request in the Requests table of the device.
The user can unlock the device on the ActivID CMS User Portal.
If a user forgets his/her device, then you can request a temporary replacement device. If the user’s device is lost, stolen, or damaged, you can issue a permanent replacement device.
-
Go to the Help Desk Overview page.
-
In the Cards, Virtual Smart Cards, or YubiKeys section, locate the device you want to replace and click the associated Replace button.
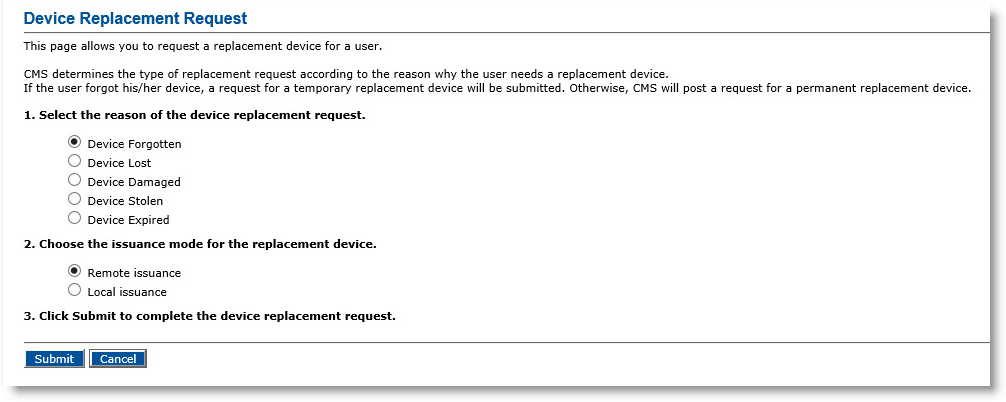
The Device Replacement Request page appears:
-
Select the reason for replacing the user’s device.
A damaged device cannot be recycled. Do not select the Device Damaged option unless the device is actually damaged and unusable.
-
Select the issuance mode for replacing the user’s device.
Note:-
This option only appears when the replacement request concerns a mobile smart card.
-
Support for mobile smart cards has been deprecated starting with ActivID CMS 5.4.
-
-
Click Submit. A confirmation message appears.
-
Click Done.
The Help Desk Overview page reappears. You can now issue the replacement device. In the Cards, Virtual Smart Cards, Mobile Smart Cards, or YubiKeys section, the replacement request appears under Requests.
Depending on the reason for the replacement device, ActivID CMS performs the following actions:
-
Forgotten device:
-
The device’s status is now INVALID/FORGOTTEN.
-
The device is still assigned to the user, but its certificates are set on hold in the CA The Certificate Authority (CA) issues and manages security credentials and public keys for message encryption in a networks environment..
- The device’s SKI Symmetric Key Infrastructure credentials are suspended in the ActivID AAA Server. ActivID CMS places a temporary replacement device request.
-
-
Lost, damaged, stolen or expired device:
-
The device’s status is now INVALID/LOST, INVALID/DAMAGED, INVALID/STOLEN, or INVALID/EXPIRED.
-
The device is still assigned to the user, but its PKI credentials are set on hold in the CA.
- The device’s SKI credentials are suspended in the ActivID AAA Server. ActivID CMS places a permanent replacement device request.
-
For a forgotten, lost, or stolen device, if the user finds his/her device before the request is approved, then you can cancel the request and restore the device’s credentials in the CA and in the ActivID AAA Server.
When you cancel a request, the request is removed permanently from ActivID CMS and cannot be processed. Alternatively, you can cancel a request from the Requests page. For more information, see Managing Device Requests.
There are five request types:
-
Issuance
-
Device replacement
-
Unlock
-
Applications update
-
Device re-issuance
To cancel a request:
-
Go to the Help Desk Overview page.
-
In the Cards, Virtual Smart Cards, Mobile App Certificates, or YubiKeys section, under Requests, locate the request you want to cancel.
-
In the Action column, click Cancel.
-
Click Submit. A confirmation message appears.
-
Click Done.
Before you can request an applications update, a primary device (smart card, VSC, YubiKey) must have been issued to the user. In addition, the target device policy must have the same device profile as the current device policy. Applications updates can also be requested for (derived) mobile app certificates.
-
Go to the Help Desk Overview page.
-
In the Cards, Virtual Smart Cards, Mobile App Certificates or YubiKeys section, click Request Applications Update.
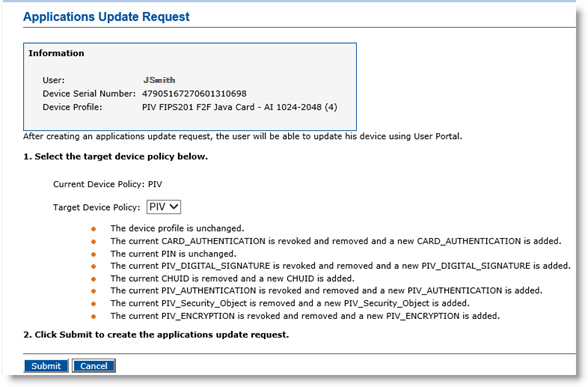
The Applications Update Request page appears:
-
From the Target Device Policy drop-down list, select the target device policy.
The policy you select represents the content of the device after the Applications Update request is approved. This is not the current content of the device.
-
Click Submit. A confirmation message appears.
-
Click Done.
You can now approve the issuance request. For more information, see Approving a Request. Alternatively, the user can execute the applications update through the ActivID CMS User Portal.
-
For mobile app certificates, applications updates are always performed through the User Portal.
-
ActivID CMS does not remove any mobile app certificates from the mobile device.
Note that the above is also true for virtual smart cards and YubiKeys (only one device policy at a time).
-
Go to the Help Desk Overview page.
-
In the Cards, Virtual Smart Cards, or YubiKeys section, click Request Re-Issuance.
Note:
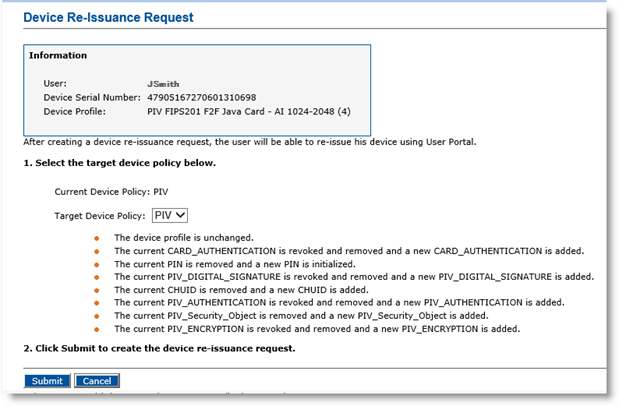
For virtual smart card deployments: When ActivClient is installed, virtual smart cards are listed both as “Microsoft Virtual: Microsoft Virtual Smart Card X” and “ActivClient: Microsoft Virtual Smart Card X”. Only the first option should be used.The Device Re-Issuance Request page appears:
-
From the Target Device Policy drop-down list, select the target device policy.
Lists of actions that affect the device appear beneath the drop-down list. These actions vary depending on the target device policy you select. The target device policy you select represents the content of the device after you run a device re-issuance request. This is not the current content of the device.
-
Click Submit. A confirmation message appears.
-
Click Done.
The user can now execute the device re-issuance request using the ActivID CMS User Portal. Alternatively, an operator can execute the request from the Operator Portal using the Device Update tab, if the user provides the device.


