Installing the Keyfactor EJBCA Server
This section provide some guidance as to how to configure the EJBCA server, but you also need to refer to the Keyfactor documentation for more details.
Prerequisites
-
The Keyfactor server must be up and running.
-
Some basic configuration must already be performed:
-
Network configuration
-
Database selection
-
HSM selection
-
-
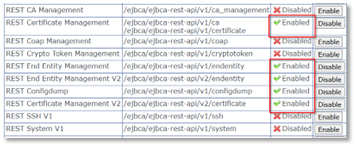
The following REST API endpoints must be enabled:
-
REST Certificate Management (v1 and v2)
-
REST End Entity Management (v1 and v2)
-
REST Configdump
-
Creating the CA in EJBCA
The CA creation is performed in two steps. For more information, refer to the EJBCA documentation.
-
Create a Crypto Token.
-
Create the CA using that token, with the following requirement:
-
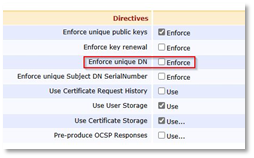
Uncheck Enforce unique DN:
-
-
The name of the CA will be used in the CMS configuration (EJBCA CA Name field in step 10 of Configuring the Keyfactor EJBCA Certificate Authority).
-
Download the CA PEM chain: it will be the “truststore file” used in the CMS configuration (Truststore file containing the CA Certificate field in step 11 of Configuring the Keyfactor EJBCA Certificate Authority).
-
Enroll a server certificate using this CA, and use this certificate in the EJBCA TLS configuration.
Enrolling the CMS Agent on the EJBCA Server
-
Using the CA created above, enroll a specific agent for CMS.
-
Either use EMPTY / ENDUSER, or a specific End Entity and Certificate profile (respectively, Certificate Type and Certificate Subtype in the RA web screen).
-
Key-pair generation must be set to By the CA.
-
Download the PKCS#12 for the new End Entity. Keep this .p12 file and its password, it will be used for the CMS configuration (the PKCS#12 file containing the client certificate and key and Password for the PKCS#12 file containing the client certificate and key fields in step 12 of Configuring the Keyfactor EJBCA Certificate Authority).
-
Copy the certificate serial number, and use it to register the user as a Super Administrator.
End Entity and Certificate Profiles
Certificate Profiles
Create the certificate profiles first.
End Entity Profiles
Create a dedicated End Entity profile and configure the following properties:
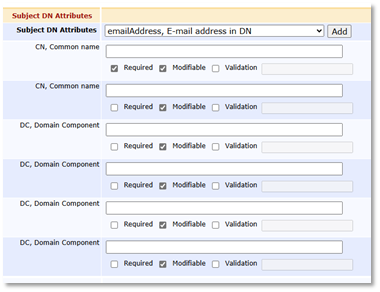
Subject DN Attributes
The structure of the Subject DN must be completely described, down to the maximum number of each attribute: CN, DC, OU, etc.
For example:
Main Certificate Data
-
Select the Certificate profiles that can be issued using the End Entity profile. You may group several certificate profiles in one End Entity profile, provided that they all share the same token configuration (see below).
-
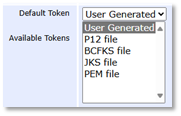
In ActivID CMS 6.3, the Default Token and the Available Tokens must be set to User Generated.
Other Data
-
Set the Number of allowed requests Default value to as many requests as needed; this depends on how many certificates of the same End Entity profile will be generated for a given device.
-
Do Not check Key Recoverable.

PIV/CIV Support
NACI
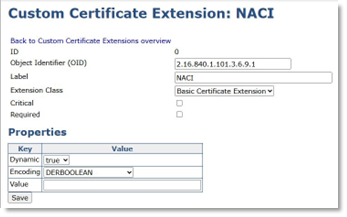
Add a Custom Certificate Extension: NACI
Its OID is: 2.16.840.1.101.3.6.9.1.
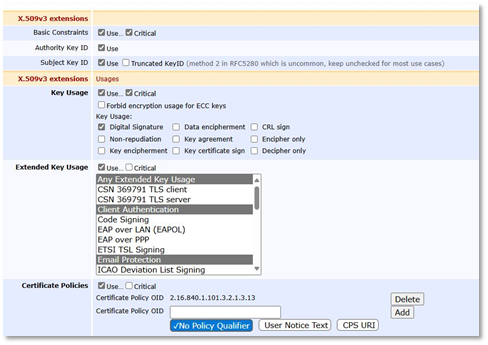
PIV_AUTHENTICATION Certificate Profile
Clone the ENDUSER certificate profile, and set the following properties:
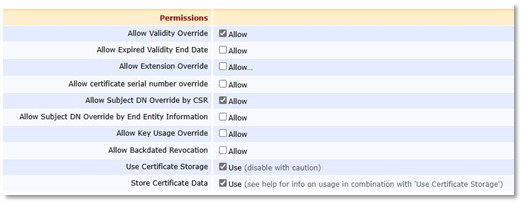
Permissions
-
Allow Validity Override
-
Allow Extension Override: 2.16.840.1.101.3.6.9.1
-
Allow Subject DN Override by CSR
-
Use Certificate Storage
-
Store Certificate Data

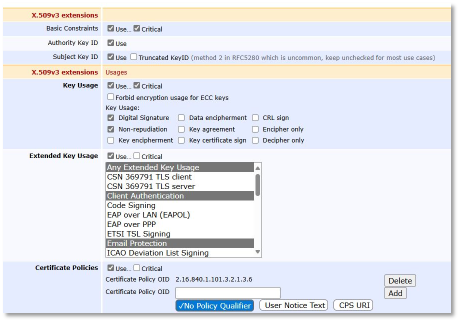
X.509v3 Extensions
-
Key Usage: Digital Signature
-
Extended Key Usage: Any Extended Key Usage, Client Authentication, Email Protection
-
Certificate Policies: 2.16.840.1.101.3.2.1.3.13
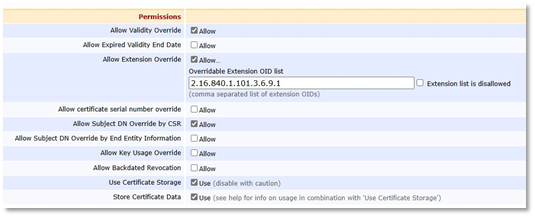
CARD_AUTHENTICATION Certificate Profile
Clone the ENDUSER certificate profile, and set the following properties:
Permissions
-
Allow Validity Override
-
Allow Extension Override: 2.16.840.1.101.3.6.9.1
-
Allow Subject DN Override by CSR
-
Use Certificate Storage
-
Store Certificate Data
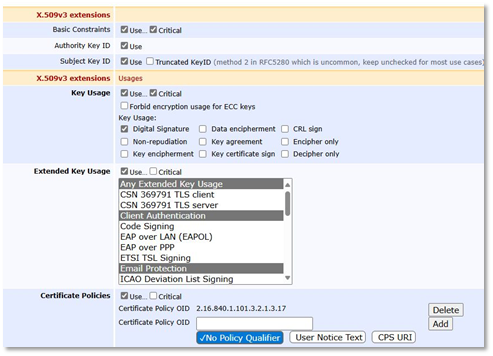
X.509v3 Extensions
-
Key Usage: Digital Signature
-
Extended Key Usage: Any Extended Key Usage, Client Authentication, Email Protection, PIV Card Authentication
-
Certificate Policies: 2.16.840.1.101.3.2.1.3.17
PIV_DIGITAL_SIGNATURE Certificate Profile
Clone the ENDUSER certificate profile, and set the following properties:
Permissions
-
Allow Validity Override
-
Allow Subject DN Override by CSR
-
Use Certificate Storage
-
Store Certificate Data
X.509v3 Extensions
-
Key Usage: Digital Signature, Non-repudiation
-
Extended Key Usage: Any Extended Key Usage, Client Authentication, Email Protection
-
Certificate Policies: 2.16.840.1.101.3.2.1.3.6
PIV Profile
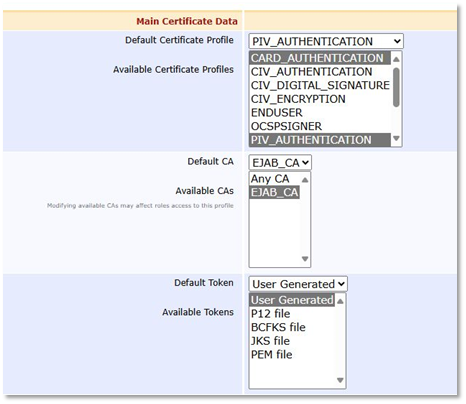
Create a new PIV End Entity profile, and set the following properties:
Main Certificate Data
-
Select CARD_AUTHENTICATION, PIV_AUTHENTICATION, and PIV_DIGITAL_SIGNATURE.
-
Select PIV_AUTHENTICATION as the Default Certificate Profile.
-
The Default Token and the Available Tokens must be set to User Generated.
CIV Support
-
For CIV, the Certificate Profiles to create are CIV_AUTHENTICATION and CIV_DIGITAL_SIGNATURE.
-
Start from the PIV equivalents, and remove:
-
NACI Support from CIV_AUTHENTICATION (2.16.840.1.101.3.6.9.1 Extension Override)
-
PIV OIDs in Certificate Policies
-
-
Create a similar CIV End Entity profile as well.


