Using ActivID KMS
This section describes the card issuer’s experience using ActivID KMS. It does not cover card manufacturer operations.
Before you perform the following tasks, the card manufacturer must have prepared the card security domains and installed the GP keys to protect access to each security domain.
You must perform a key ceremony for a Transport Key, to securely import key components into an HSM.
To ensure the integrity and security of the key, a key ceremony requires at least seven people (a Security Officer and three pairs of officers responsible for securely holding their key components).
In emergency situations, you can have an optional eighth person (another Security Officer) to memorize the administrator’s PIN. Each pair of officers (of the six) owns one key component (there are three components for each site key or transport key). Component owners must ensure that no other component owner or other entity intercepts or learns of their key components.
The following steps present an overview of the steps leading up to (and including) a site key Ceremony during the initialization of a Principal HSM. These are intended to present an overview only. Several different scenarios for ActivID KMS operations that require key ceremonies are described in detail later in this document.
-
For information on a key ceremony during the import or generation of a transport key, see Add or Import a Transport Key.
-
Security officer assembles at least six security team members.
-
The officer divides the six team members into pairs and asks them to temporarily leave the room.
-
The Security Officer launches ActivID KMS, creates the administrator and operator PIN and memorizes them. The Security Officer must create a new administrator PIN for every HSM to be initialized.
-
ActivID KMS automatically generates the key in the Principal HSM. ActivID KMS reveals the three components, one at a time. For each component, one pair of team members enters the room and takes note of the component, before leaving.
The first time you open the program, ActivID KMS automatically generates an ackms.log file and stores it in the current directory. Each time you open the program, ActivID KMS adds records to the existing log file. If you have any problems when you are using ActivID KMS in a production environment, view the log file for help.
-
To open ActivID KMS, double-click the ackms.exe file.
The command prompt welcome screen is displayed.
-
To continue, press any key. The command prompt ActivID KMS main menu is displayed. For details on the main menu, see Testing the Installation.
To exit ActivID KMS at any time, type Q (Quit).
Before you use ActivID KMS in a production environment, you must create a unique principal.cfg file. Use the principal.cfg sample file as the basis of your custom file.
The principal.cfg file specifies key parameters. ActivID KMS uses this file to initialize the Principal HSM. This file contains the information necessary for ActivID KMS to generate the card issuer's master keys.
Copy the principal.cfg file from the ActivID CMS distribution to a local directory.
The following is a sample key from the principal.cfg file:
KEY:
K_ACE_CRYPT_2
LEN:
32
TYPE:
12
VALUE:
new
EXPORTWRAPKEY:
none

END
Each keyword (KEY, LEN, TYPE, VALUE, and EXPORTWRAPKEY) must be followed by a colon (:). The actual values for the keywords are specified on the line following each keyword. The keyword END is required, even when the file contains no keys.
|
Term |
Definition |
|---|---|
|
KEY |
Defines the key label. The key label is a unique identifier for a key stored in an HSM. The key label enables the HSM to retrieve the key when required for use. |
|
LEN |
Defines the length of the key. This is an optional parameter. By default, if keyword LEN is not specified, then ActivID KMS assumes the keys are 2TDEA keys for 3DES keys, or AES 16-byte (128-bit) for AES keys. To generate a 3TDEA key or an AES 32-byte (256-bit) key, the keyword LEN must be used, and the associated value must be "triple" for the 3TDEA key and "32" for the AES 32-byte (256-bit) key. If the value is different from triple and 32, then ActivID KMS generates a 2TDEA key or AES 16-byte (128-bit) for AES keys (depending on the TYPE value). |
|
TYPE |
Specifies the type of key. The TYPE value has the following possible values:
A type 3 or type 12 key can be used by your credential management system to diversify keys, encrypt and decrypt data, and wrap and unwrap keys. Important: A type 103 or 112 key has the same properties as a type 3 or 12 key — except that these keys (103 and 112) can be extracted from the HSM, using HSM manufacturer tools.
|
|
VALUE |
Specifies the value of the key (if you know the value to use). To generate a random key during Principal HSM initialization or update, set the value to new. |
|
EXPORTWRAPKEY |
Deprecated parameter |
Perform this operation to initialize a new HSM. This HSM is the Principal HSM The first or main HSM. If you require multiple HSMs with the same master keys, use HSM manufacturer tools to duplicate the keys in the other HSM. that contains all the keys required by the credential management system.
For SafeNet Luna PCI-E, you can use any HSM (new or already initialized), but this operation deletes any existing keys and PINs. If you are using an Entrust Datacard nShield HSM for the initialization process, then just add the keys to the HSM from the principal.cfg file.
-
If your Luna PCI-E is new (from the factory), then the Security Officer (SO) PIN is set to default. Thus you must use "default" during the first step to initialize the Principal HSM.
-
If your Luna PCI-E is initialized already, then the SO PIN cannot be changed. Thus, you must use the same SO PIN or you can reset the HSM to its factory state using the SafeNet lunacm tool (hsm -f command). This will set the SO PIN back to "default."
-
For a Luna SA, the keys are just added (the partition must be cleaned using SafeNet tools).
-
Insert an HSM token into your SafeNet Luna Dock PC Card Reader, or if you are using a different HSM, make sure it is properly connected.
-
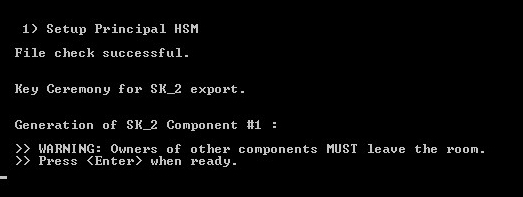
From the ActivID KMS main menu, type 1 (Setup Principal HSM). The following screenshot illustrates the Setup Principal HSM page for an Entrust Datacard nShield HSM.
 Note:
Note:-
You may be prompted for the Operator PIN if it has not been entered previously.
-
New HSMs might not support 2TDEA keys: when importing the principal.cfg, KMS will read the file to check if there are 2TDEA keys in the file. If such keys are present, the following prompt will appear:

Press “Y” to continue with the initialization. Press “N” to quit initialization process.
-
-
Press ENTER. ActivID KMS automatically erases the screen and then computes or imports the master keys according to the principal.cfg file.
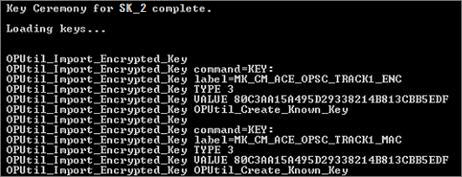 Note: Your command prompt might/will display different/other “Loading keys...” lines before the final prompt to Press <Enter> to return to the main menu.
-
Press ENTER to return to the main menu.
Add a transport key first as the master key is sent encrypted with a transport key.
For details, see Add or Import a Transport Key.
After you initialize the Principal HSM, you can add a transport key, if required.
If you want to re-initialize an existing HSM:
-
For SafeNet Luna PCI-E or Luna SA, the Initialize Principal HSM action completely resets the content of the HSM (or specific partition for SafeNet Luna SA).
-
For Entrust Datacard (formerly Thales) nShield HSMs, any key created during the first initialization of the HSM must be deleted manually using Entrust Datacard KeySafe.
-
For AEP Keyper, Initialize Principal HSM completely resets everything for a specific slot.
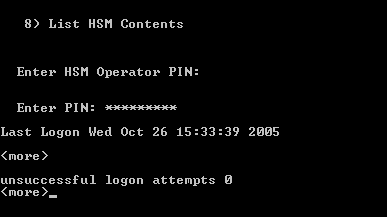
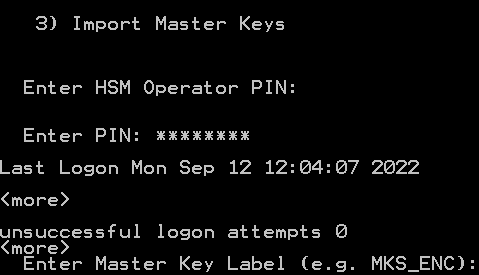
After a successful logon session, the HSM operator is notified of the date and time of the most recent logon session, and the number of unsuccessful logon attempts since the last successful logon session. The following image is a sample illustration of what the operator sees.
-
ActivID KMS requires an operator PIN only if a particular HSM session has been closed.
-
Import a transport key if you want to import master keys that were generated by another entity, such as the card manufacturer.
-
Insert or properly connect the Principal HSM (and ONLY the Principal HSM).
-
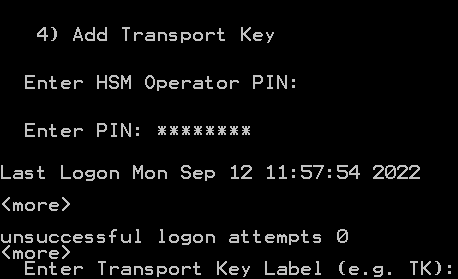
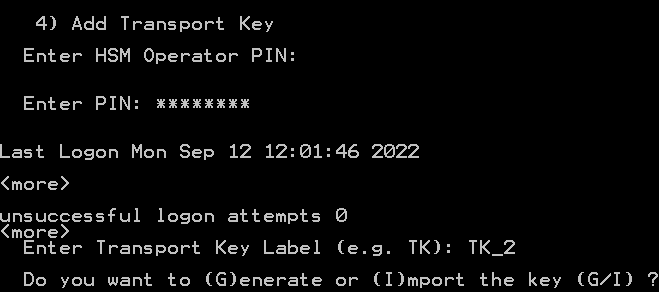
From the main menu, type 4 (Add Transport Key).

-
Enter the operator PIN.
Note:-
On some HSMs (for example, SafeNet Luna SA) you are required to enter the partition PIN first, and then key in the Operator PIN on the PIN Entry Device.
-
ActivID KMS requires an operator PIN only if a particular HSM session has been closed.
-
-
To continue, press ENTER.
-
Enter a new transport key label (for example, TK_2). This key label is for internal use only. “TK_2” is not the definitive name. Your transport key label can be different. This is just an example.
-
To continue, press ENTER.
-
To generate a new random transport key, see Generate New Random Transport Key.
-
To import an existing transport key, see Import Transport Key.
-
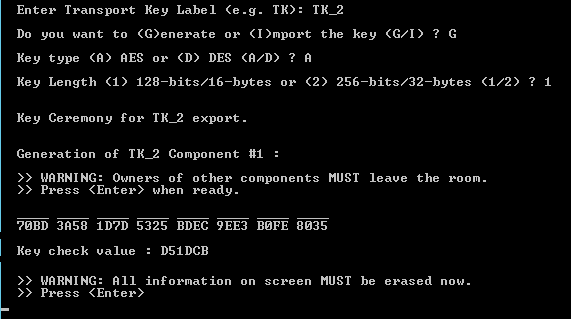
Type G or g (from the previous command prompt) in step 6 in Add or Import a Transport Key.
-
Select the key type (AES or 3DES).
-
Select the key length, between AES-128 and AES-256 (for AES keys), or between 2TDEA and 3TDEA keys (for 3DES keys).
-
Ask the first pair of transport key officers to enter the room.
-
To continue, press ENTER.

-
Ask the transport key officers to write down the component value and the key check value.
-
To continue, press ENTER.
-
Ask the first pair of transport key officers to leave the room.
-
Repeat the previous three steps for the second and third pairs of transport key officers.
-
When the three pairs of officers have finished their sessions, press ENTER. A success message is displayed.

-
Press the Enter key.

-
Press the Enter key to return to the main menu.
-
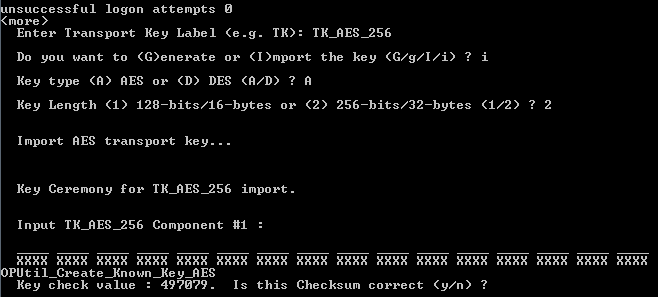
Type I or i (at the command prompt displayed in step 6 of Add or Import a Transport Key).
-
Chose the transport key type and its length.
-
Ask the first pair of transport key officers to enter the room.
-
The first pair of transport key officers enters their transport key components. When they finish entering the last hexadecimal character, ActivID KMS automatically generates the key check value (as shown in the previous illustration).
-
The transport key officers confirm that the key check value is correct. (They received the key check value when they received their key components.)
-
Press N to re-enter the TK component (if the key check value did not match).
-
Press Y to continue.
-
-
Ask the first pair of transport key officers to leave the room.
-
Repeat steps 3, 4, and 5 for the second and third pairs of transport key officers.
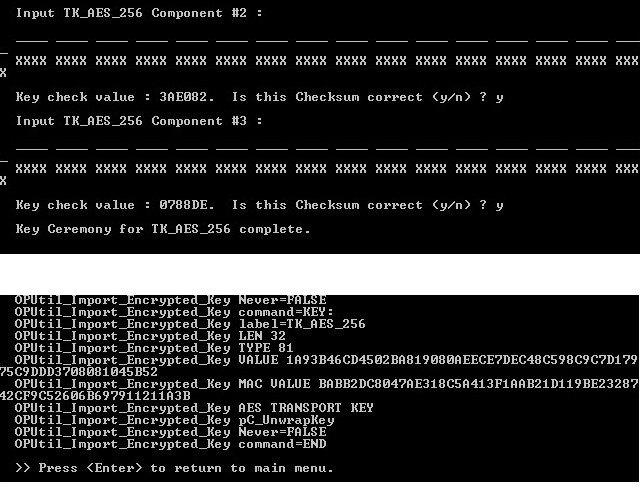
When all the transport key components have been entered and the key check values confirmed as accurate, ActivID KMS automatically generates (imports and locks) the transport key in the HSM. The following command prompt is displayed.
-
Press ENTER to return to the main menu.
Perform this operation to import into your Principal HSM a master key generated by another entity (for example, card manufacturer). For security reasons, the master key is encrypted with a transport key.
-
Insert or properly connect the Principal HSM.
-
From the main menu, type 3 (Import Master Keys).
-
Enter the master key label (for example, MKS_ENC).
-
To continue, press ENTER.
For an AES key:

-
Enter ‘y’ to confirm that you want to import an AES key. For a 3DES Key, enter “n”.
-
Confirm the AES key length (256-bit or 128-bit). For 128-bit length key, enter “n”.
-
(If applicable) Confirm if the key has been encrypted with CBC mode encryption. For ECB mode encryption, enter “n”.
-
(If applicable) Confirm if the key will be extractable. For non-extractable key, enter “n”.
For a DES key:

-
Enter ‘n’ to confirm that you want to import a DES key. For an AES key, enter “y”.
-
Confirm if you want to import a triple length 3DES key (24 bytes). For a 2TDEA key (16 bytes), enter “n”.
-
(If applicable) Confirm if the key will be extractable. For non-extractable key, enter “n”.

-
-
Enter the transport key label for that master key that you previously generated or imported.
-
Confirm if the transport key is an AES key. For DES key, enter “n”.
The following command prompt is displayed (without the key components entered).

-
Enter the hexadecimal string you received from the entity that generated the master key (for example, 1542, A568, BEF8).
Warning!
If you enter the wrong master key, you will not be able to access the smart cards that you received from the card manufacturer. -
Confirm that you have entered the string correctly.
-
Press N if you want to re-enter a value.
-
Press Y to continue.

-
-
Choose to continue importing keys or to end the session.
-
Enter Y to import another master key.
-
Enter N to end the Import Master Key session.
-
-
Press ENTER to return to the main menu.
To add new random keys to the Principal HSM, first add the keys to the principal.cfg file and then update your Principal HSM using ActivID KMS.
-
Properly connect the Principal HSM.
-
From the main menu, press 2 (Update Principal HSM).
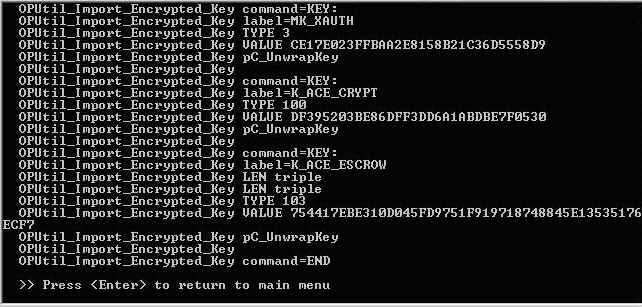
ActivID KMS automatically loads the new keys from the principal.cfg file.
Note: New HSMs might not support 2TDEA keys: when importing the principal.cfg, KMS will read the file to check if there are 2TDEA keys in the file. If such keys are present, the following prompt will appear:
Press Y to continue with the initialization. Press N to quit the initialization process.
The following page is displayed.
-
Press ENTER to return to the main menu.
Perform this procedure to view the content of an HSM. The Security Officer can perform this operation on any initialized HSM.
-
Properly connect/insert any HSM.
-
From the main menu, press 5 (List HSM Content).
A command prompt similar to the following is displayed
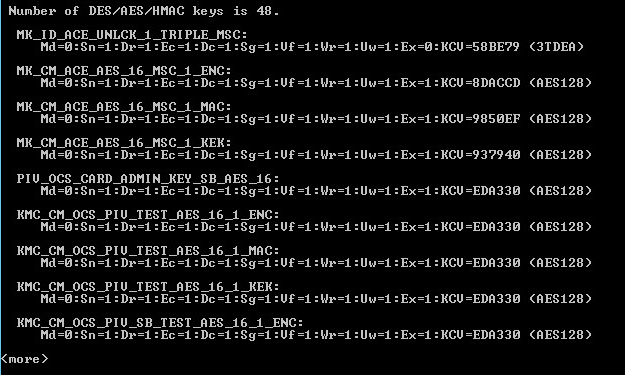
The List HSM Content operation lists the labels of the keys stored in the HSM and provides the key properties. The flags indicate if the key has a given property. The flag values are:
-
0 means false
-
1 means true
For example, if the “Key Extractable Flag” has a value of 0, the key is not extractable. If the value is 1, the key is extractable. The List HSM Content operation also displays each key’s check value (KCV).
Descriptions of Key Properties Flag
Description
Key Modifiable Flag
(Md) Specifies if the key value can change.
Key Sensitive Flag
(Sn) Specifies if a key value can be read in the clear. If “1” the key cannot be read in clear text.
Key Usage Derive Flag
(Dr) Specifies if the key can derive keys. If “1” the key can derive keys.
Key Usage Encrypt Flag
(Ec) Specifies if the key can encrypt data. If “1” the key can encrypt data.
Key Usage Decrypt Flag
(Dc) Specifies if the key can decrypt data. If “1” the key can decrypt data.
Key Usage Sign Flag
(Sg) Specifies if the key can sign data. If “1” the key can sign data.
Key Usage Verify Flag
(Vf) Specifies if the key can verify signatures. If “1” the key can verify signatures.
Key Usage Wrap Flag
(Wr) Specifies if the key can encrypt keys. If “1” the key can encrypt keys.
Key Usage Unwrap Flag
(Uw) Specifies if the key can decrypt keys. If “1” the key can decrypt other keys.
Key Extractable Flag
(Ex) If the Key Extractable Flag (a PKCS#11 attribute) is set to 0, the key cannot leave the HSM using PKCS#11 library, even if it is encrypted by another key.
Key Check Value
(KCV) is the checksum of the key value used to verify correct key initialization without knowing their actual values.
-
-
To return to the main menu, press ENTER.
Perform this procedure to change the HSM operator PIN. This is the PIN that protects unauthorized access to the keys stored in the HSM. You cannot change an administrator’s PIN (also known as the Security Officer’s PIN). If you lose or forget the administrator’s PIN, you can re-initialize the HSM to continue using it, but the operation erases all the existing HSM keys.
-
Insert/connect the HSM, whose operator PIN is to be changed.
-
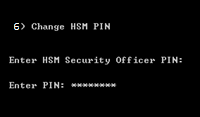
From the main menu, press 6 (Change HSM PIN).
-
Enter the Security Officer’s (administrator) PIN, and press ENTER.
-
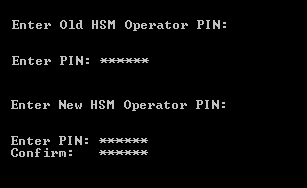
Enter the old HSM operator PIN.
-
Press ENTER.
-
Enter and confirm the new HSM operator PIN.
-
To return to the main menu, press ENTER.


