Administrator Operations - User Accounts
View User Accounts Page
This page lists user accounts that have the permission to log on to the Management Console.

From the Administrator menu, click User Accounts.
When Multi-Person Control is enabled, the User Accounts page lists active accounts (those which have been sponsored by the required number of administrator accounts) and inactive accounts (those which have not been sponsored by the required number of administrator accounts).
It also shows which accounts the current user has sponsored (My Sponsorships).
User Account Restrictions
Validation Authority stores credential revocation status information for credentials issued by multiple organizations. You can manage credential revocation status by partitioning responsibilities. To accomplish this, you can restrict user accounts based on the following criteria:
-
Issuer Restrictions - You can restrict the actions that a user account with the officer or auditor role can perform to a set of certificates issued by one or more specific issuers.
-
Distinguished Name Substring Restrictions - You can restrict the actions that a user account with the officer role can perform to those certificates whose subject name contains specific distinguished name substring(s). This type of restriction is useful when a single CA issues certificates to multiple organizations and you want to create separate officer accounts for each organization.
Note: You cannot enforce restrictions on the Administrator role.
Create New Accounts
-
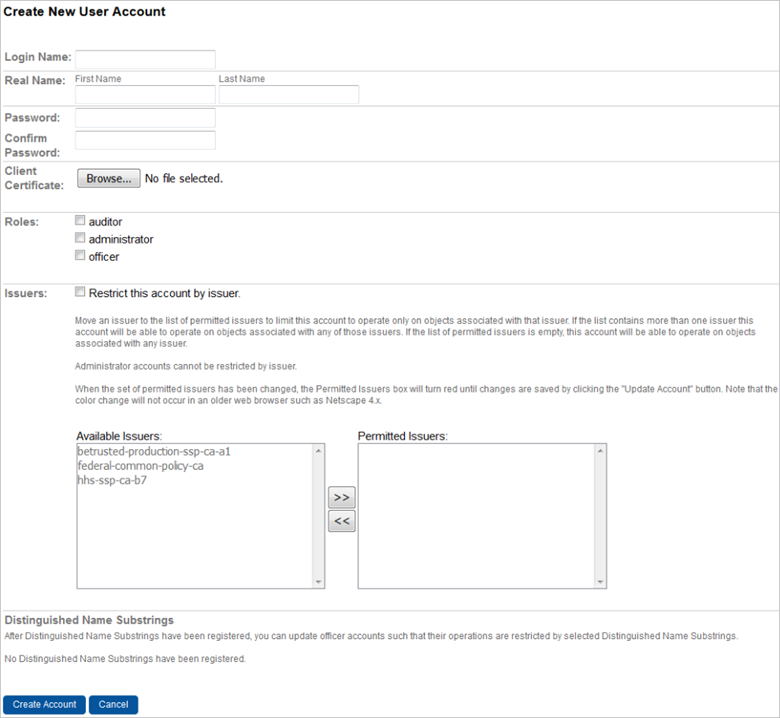
To create new accounts, click create an account.
-
Enter a unique Login Name for the account. This field is required.
-
In the Real Name area, enter the user’s First Name and Last Name.
-
Enter and confirm an initial Password.
Note: Characters entered in these fields will appear as asterisks. These fields are required. -
To specify an SSL client authentication certificate for this account, enter the filename in the Client Certificate field. Alternatively, click Browse to locate the appropriate file.
When making an SSL connection, users are allowed to log on if they present this certificate. If a client authentication certificate is required for an account, the user will only be able to connect to the Management Console using a HTTPS connection.
-
To specify a PKI authentication for this account, in the Client Certificate field, click Browse to locate the appropriate public certificate.
When making a smart card connection, users are allowed to log on if they present the corresponding private key certificate. Refer Smart Card Login for more information.
-
To add or remove the appropriate role(s) for the user, select the respective Roles.
-
If you want to restrict the set of certificate issuers that the user is allowed to manage revocation status for, select the Restrict this account by issuer option. Then, use the left-arrow or right-arrow buttons to move the name of the issuer to be changed in the Available Issuers and Permitted Issuers lists.
This limits the actions that the user can perform to those involving the set of certificates and CRLs issued by the issuer(s) contained in the Permitted Issuers list.
Alternatively, to remove any issuer restrictions, clear the Restrict this account by issuer option.
-
To specify the distinguished name(s) that the account should be restricted to, select the Distinguished Name Substring to be changed in the Available Distinguished Name Substrings and Permitted Distinguished Name Substrings lists and use the left arrow or right arrow buttons to move the selected substring(s) to the appropriate list. This limits the actions that the user can perform to those involving certificates with a subject distinguished name containing a Distinguished Name Substring contained in the Permitted Distinguished Name Substrings list. To remove any Distinguished Name Substrings restrictions, clear the Restrict this account by Distinguished Name Substring option.
-
When you have made all appropriate changes, click Create Account to save the changes. A success message is displayed.
Alternatively, click Cancel to return to the User Accounts page without saving the changes. A success message is displayed.
Note: When Multi-Person Control is enabled, the new user account does not become active until it has been sponsored by the required minimum number of Management Console user accounts.
Update an Existing Account
-
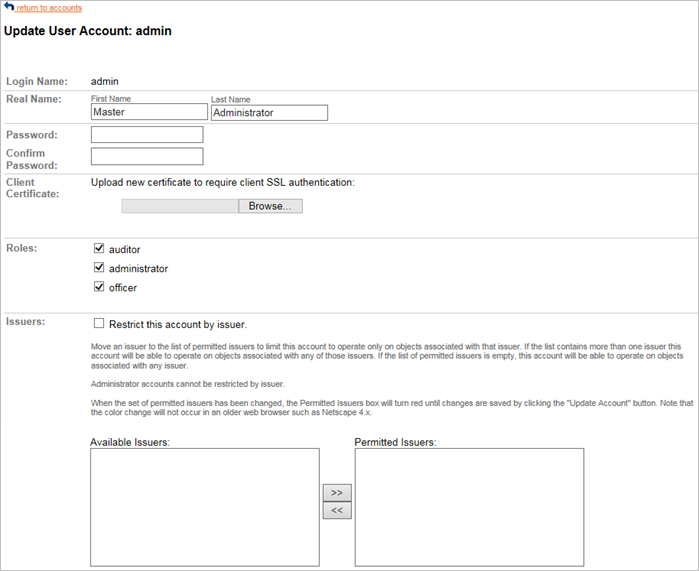
To update an existing user account, click the magnifying glass icon to the left of a Login Name. The Update User Account page for that user account is displayed.
Alternatively, click return to accounts to return to the User Accounts page.
-
On the Update User Account page, you can modify a user account as follows:
-
Upload a new SSL client certificate.
-
Remove the SSL client authentication requirement.
-
Change the user’s roles.
-
Modify account restrictions.
-
-
When Multi-Person Control is enabled, the Update User Account page lists the sponsors for this account. Users can log on to their accounts when Multi-Person Control is required but not yet enabled regardless of the number of sponsors their account has. After Multi-Person Control is enabled, only accounts that have the required number of sponsors are enabled and allowed logon.
-
When you have made all appropriate changes, click Update Account to save the changes and return to the User Accounts page. Click Cancel to return to the User Accounts page without saving the changes.
Setup Complex Password
The complex password feature is disabled by default, however operator can set up a complex password which is the combination of at least one lower case, and upper case and non-alphanumeric character in the password text.
To setup a complex password, follow the below steps:
-
Stop the Validation Authority services.
-
Go to the directory /<VA-Home>/authority/server/WEB-INF/conf.
-
Open the security.bml configuration file from the directory.
-
Add the below lines in the security.bml configuration file.
Copy<add>
<bean class="com.corestreet.util.security.PasswordPattern">
<property name="pattern" value="(.[a-z].){1,}"/>
<property name="message" value="Password must contain at least one lowercase character"/>
</bean>
</add>
<add>
<bean class="com.corestreet.util.security.PasswordPattern">
<property name="pattern" value="(.[A-Z].){1,}"/>
<property name="message" value="Password must contain at least one uppercase character"/>
</bean>
</add>
<add>
<bean class="com.corestreet.util.security.PasswordPattern">
<property name="pattern" value="(.[^0-9a-zA-Z].){1,}"/>
<property name="message" value="Password must contain at least one non-alphanumeric character"/>
</bean>
</add> -
Re-Start the Validation Authority services.
View Sponsorship Details
If Multi-Person Control is enabled, then you can view the sponsorship status for the issuer certificate, including how many sponsors a certificate has and who the sponsors are. After Multi-Person Control is enabled, only active issuers are used when generating OCSP response lists or certification path data.
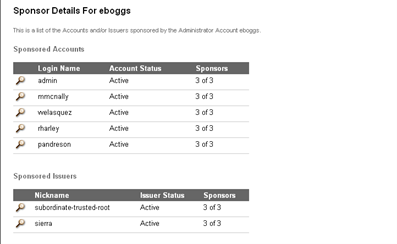
When Multi Person control is enabled, click Sponsor Details.
The Sponsor Details page lists the user accounts and nicknames for the issuer certificates that have been endorsed by the user who has a given account.
Click return to account details to return to the Update User Account page for the account.
Sponsor a User Account
-
To sponsor a user account, click Sponsor This Account.
A success message is displayed. The account is only enabled when it has been sponsored by the required number of sponsoring administrator accounts.
The Details for Certificate Issuer page is displayed again with a message indicating that the issuer was successfully sponsored and whether the issuer is active or inactive.
-
To remove sponsorship from an account, click Remove Sponsorship.
This action does not remove other sponsorships for this account.
A success message is displayed indicating that account sponsorship was removed. The account becomes inactive if it no longer has the required number of sponsoring administrator accounts. The Details for Certificate Issuer page is displayed again with a message indicating that the sponsorship was successfully removed and whether the issuer is active or inactive.
-
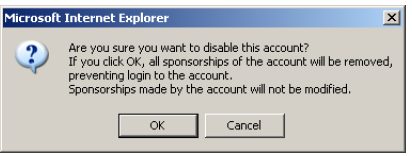
To disable an existing user account, click Disable Account.

This action removes all current sponsorships for the user account so that no one can log into it, without removing any certificate issuer or user account sponsorships that the disabled account made. The Update User Account page is redisplayed with messages indicating that account is disabled and inactive. The disabled user account can later be enabled by sponsoring it again.
Delete an Account

-
On the User Accounts page, click delete next to an account name.
-
When prompted, click OK to confirm deletion.
Alternatively, click Cancel to cancel the operation and make no changes.


