OTP (One-Time Passwords)
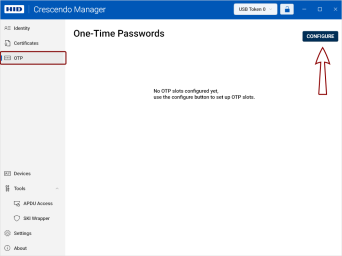
If your token supports the one-time password (OTP One-Time Password. A password that is valid for only one login session or transaction, used to provide an additional layer of security.) generation function, you can access it from the OTP section in the left navigation pane.
Configuring One-Time Passwords
OTP Configuration Using QR Code
If you have a one-time password configuration QR code available, displayed on your screen, follow these steps to configure your OTP:
-
Go to OTP in the left navigation pane and click the Configure button in the top-right corner of the screen.
-
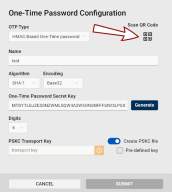
Click the button with the QR code icon
 in the top-right corner of the dialog to launch the snipping tool.
 -
Capture the QR code into the clipboard using the snipping tool.
Note: If you already have a QR code captured in your clipboard, this action will use the content of the clipboard without activating the snipping tool. -
Crescendo Manager will automatically read the captured QR code and fill in the necessary details for you.
-
For Crescendo 4000 family tokens, click the
 Access Control Configuration dropdown to select the default access control behavior for your token when generating OTPs in contact and contactless modes.
 -
Click Submit to finalize the OTP configuration.
-
The configured OTP will appear as a new tile in the OTP view.
Manual OTP Configuration
To configure your OTP manually:
-
Go to OTP in the left navigation pane and click the Configure button in the top-right corner of the screen.
-
Select the OTP type:
-
HMAC-Based One-Time Password (HOTP): Generates a password based on a cryptographic hash function and a counter that increments each time a new OTP is generated. The password remains valid until it is used.
-
Time-Based One-Time Password (TOTP): Generates a password based on the current time and valid only for a short window of time.
-
OATH Challenge-Response: Generates a response based on a challenge sent by an authentication server, using the configured parameters.
-
-
Enter a friendly name for your HOTP.
-
Select the algorithm for generating the HOTP from the secret. The available algorithms are SHA-1, SHA-256, and SHA-512.
-
Select the encoding of the HOTP secret. The available encoding methods are Base32, Base64, Hexadecimal, and SKI Secure Key Injection is a FIPS certification-compliant protocol that ensures data protection when importing private keys, OTP secrets, and management keys. Wrapped. Default values are selected as SHA-1 and Base32.
Tip! To learn more about SKI secret wrapping, see SKI Wrapper. -
Enter the HOTP secret key or click the Generate button to generate one.
-
Select the number of digits for the OTP: six, eight, or ten digits. The default value is six digits.
-
For Crescendo 4000 family tokens, click the
 Access Control Configuration dropdown to select the default access control behavior for your token when generating OTPs in contact and contactless modes.
 -
Use the toggle to choose whether to create a PSKC file Files used to securely transport and provision symmetric keys to cryptographic devices or software, following the Portable Symmetric Key Container (PSKC) format.. (The default selection can be set in Settings.)
-
If creating a PSKC file, enter the PSKC transport key or use the pre-defined key, which you can set in Settings.
-
Click Submit to finalize the OTP configuration.
A new tile representing the HOTP slot will be created in the OTP view, and if selected, a PSKC file will be generated in the directory specified in Settings.
-
Enter a friendly name for your TOTP.
-
Select the algorithm for generating the TOTP from the secret. The available algorithms are SHA-1, SHA-256, and SHA-512.
-
Select the encoding of the TOTP secret. The available encoding methods are Base32, Base64, Hexadecimal, and SKI Secure Key Injection is a FIPS certification-compliant protocol that ensures data protection when importing private keys, OTP secrets, and management keys. Wrapped. Default values are selected as SHA-1 and Base32.
Tip! To learn more about SKI secret wrapping, see SKI Wrapper. -
Enter the OTP secret key or click the Generate button to generate one.
-
Select the number of digits for the OTP: six, eight, or ten digits. The default value is six digits
-
Set the validity time window in seconds. The maximum allowed time interval is 60 seconds.
-
For Crescendo 4000 family tokens, click the
 Access Control Configuration dropdown to select the default access control behavior for your token when generating OTPs in contact and contactless modes.
 -
Use the toggle to choose whether to create a PSKC file Files used to securely transport and provision symmetric keys to cryptographic devices or software, following the Portable Symmetric Key Container (PSKC) format.. (The default selection can be set in Settings.)
-
If creating a PSKC file, enter the PSKC transport key or use the pre-defined key, which you can set in Settings.
-
Click Submit to finalize the OTP configuration.
A new tile representing the TOTP slot will be created in the OTP view, and if selected, a PSKC file will be generated in the directory specified in Settings.
-
Enter a friendly name for your OATH Challenge-Response OTP.
-
You can set the OTP parameters manually in the OCRA Suite A configuration string used in OATH Challenge-Response Authentication (OCRA) that defines the parameters for generating one-time passwords. field or select the parameters in the dialog. The field will update accordingly.
-
Select the algorithm for generating the OTP from the secret. The available algorithms are SHA-1, SHA-256, and SHA-512.
-
Select the encoding of the OTP secret. The available encoding methods are Base32, Base64, Hexadecimal, and SKI Secure Key Injection is a FIPS certification-compliant protocol that ensures data protection when importing private keys, OTP secrets, and management keys. Wrapped. Default values are selected as SHA-1 and Base32.
Tip! To learn more about SKI secret wrapping, see SKI Wrapper. -
Enter the OTP secret key or click the Generate button to generate one.
-
Select whether the OTP should be six, eight or ten digits. The default value is set to six digits.
-
Click the Use Time toggle to include the current time as a factor in generating the OTP.
-
Set the validity time window in seconds, minutes or hours. The maximum allowed time interval is 48 hours.
-
-
Click the Use Counter toggle to include a counter as a factor that increments each time a new OTP is generated.
-
Click the Use Password drop-down to include a SHA-1, SHA-256 or SHA-512 hashed password in the OTP generation.
-
Click the Use Session Information drop-down to include 64-, 128-, 256-, or 512-byte session information in the OTP generation.
-
In the Question (Challenge) Format drop-down, select whether the challenge should be alphanumeric, numeric, or hexadecimal.
-
In the Max Question Length field, enter the limit for the challenge length. The maximum allowed value is 64.
-
For Crescendo 4000 family tokens, click the
 Access Control Configuration dropdown to select the default access control behavior for your token when generating OTPs in contact and contactless modes.
 -
Use the toggle to choose whether to create a PSKC file Files used to securely transport and provision symmetric keys to cryptographic devices or software, following the Portable Symmetric Key Container (PSKC) format.. (The default selection can be set in Settings.)
-
If creating a PSKC file, enter the PSKC transport key or use the pre-defined key, which you can set in Settings.
-
Click Submit to finalize the OTP configuration.
A new tile representing the challenge-response OTP slot will be created in the OTP view, and if selected, a PSKC file will be generated in the directory specified in Settings.
Generating OTPs
Once you have configured an OTP, you can generate it by clicking on the respective slot in the OTP view.
-
A generated HOTP or TOTP will automatically be copied into your clipboard.
-
For an OCRA OTP, you will be prompted to provide a challenge. A password and session data may also be required, if configured.
Viewing OTP Details
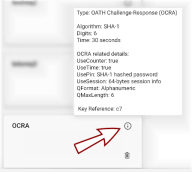
To view the OTP details, hover over the information icon in the top-right corner of the OTP tile.
The configuration details will appear in a pop-up.
Deleting Configured OTPs
To delete a configured OTP, click the trash bin icon ![]() in the bottom-right corner of the OTP tile in the OTP view.
in the bottom-right corner of the OTP tile in the OTP view.
A dialog will open prompting you to confirm the deletion.


