Using the Password Manager Admin Tool
The Password Manager Admin Tool enables administrators to provide controlled access to websites, programs and network resources by adding a variety of authentication mechanisms (such as passwords, fingerprints and access cards) to their logon and change password screens.
It is an optional component of DigitalPersona Premium that administrators can use to create managed logons for websites, programs and network resources.
About Managed Logons and Personal Logons
Managed logons are created, administered and deployed by an administrator using the Password Manager Admin Tool. They are used to store attributes such as the user name, password, the submit button, and other required fields and screen information for Logon and Change Password screens.
These managed logons are stored in a shared folder specified in a GPO setting in Active Directory. From there they can be deployed to specific groups of users managed by the server. Users of the companion product, Password Manager, on computers managed by DigitalPersona, will then automatically have access to the managed logons.
These managed logons can then be automatically deployed to computers where the Password Manager application is installed and which are being managed by a DigitalPersona Server:
-
After managed logons are deployed, they are made available to managed computers after their next restart, or after a specified time interval as configured by the administrator.
-
Managed logons are downloaded to client computers as soon as they are set up to be managed, and at intervals specified by the administrator.
When users connect to the domain through a VPN, there will be a period of 30 minutes from their login to the current Windows session before their managed logons will be shown on the Managed Logons tab of the DigitalPersona Console, Password Manager page.
They must be connected to the domain (through VPN) before the 30 minutes is up in order to gain access to their managed logons.
The Password Manager Admin Tool includes intuitive wizards that will guide you through the few steps necessary to automatically create a managed logon and an optional change password screen for most websites and programs. For more complex screens, there is also a manual mode that provides more sophisticated options for matching the logon or change password process to non-standard screens.
Personal logons are created by an individual for their own use. Account data is entered during the creation of the logon, and filled in automatically during subsequent use of the logon.
User Experience
The Password Manager icon ![]() displays on screens that have had managed logons created for them.
displays on screens that have had managed logons created for them.
The user is guided through the process of logging on or changing their password.
Each time that a user accesses the “trained” website, program or network resource, the Password Manager icon shown below is displayed in the upper left corner of the screen (Internet Explorer) or to the right of the first recognized entry field (Chrome, Firefox or Edge), indicating that they can use any of their enrolled credentials to log on.
|
|
Password Manager Icon for Internet Explorer web browser and Windows applications |
|
|
Password Manager Icon for Internet Explorer web browser and Windows applications as displayed on Change Password screens |
|
|
Password Manager Icon for Chrome, Firefox, and Edge web browsers |
|
|
Password Manager Icon for Chrome, Firefox, and Edge web browsers as displayed on Change Password screens |


Depending on the settings applied by the administrator, the user may be prompted for account data, such as user name, password, and other information during the first logon. During subsequent logons, the account data is provided by Password Manager after the user's identity is confirmed by supplying the credentials required by the Session Authentication Policy in effect.
Logging On
After creating managed logons and deploying them, users will then be able to launch a logon screen and verify their identity with their specified credentials.
Logon screens that have a logon created for them display the Password Manager icon on the screen.
Depending on the attributes defined by the logon administrator, the logon process may vary.
|
|
Internet Explorer |
|
|
Chrome, Firefox, and Edge web browsers |
A user can be automatically logged on, with all fields populated and submitted, simply by verifying their identity. The user may need to supply information for required fields the first time they use the logon, but be automatically logged on subsequently.
If the user has set up multiple sets of account data, they will be prompted to select the account they wish to log on to in the Choose Logon Account dialog box.
Changing Passwords
After creating logons and deploying them to users, managed password screens display the Change Password icon on the screen. After verifying their identity, the user is asked to provide an old password, a new password and to confirm the new password.
Depending on the logon attributes, the change password process may vary:
-
The user can be allowed to choose a new password with or without constraints on the password content.
-
A new random password can be automatically generated, in which case the user must log on with alternate credentials.
Creating Managed Logons
Setting up a managed logon screen is as simple as specifying attributes (such as the user name, password, the submit button and other required fields) in a logon for the website or program. The DigitalPersona Password Manager Admin Tool also provides many configurable options for defining and reusing information for logon and change password screens.
Password Manager Admin Tool managed logons are used to store attributes such as the user name, password, the submit button, and other required fields and screen information for Logon and Change Password screens.
Beginning with the DigitalPersona 3.4 release, an administrator can create managed logons using most modern web browsers that support browser extensions.
This includes Google Chrome, Mozilla Firefox and Microsoft Edge web browsers, as well as the previously supported Internet Explorer.
In addition to the DigitalPersona Password Manager Admin Tool, the following packages should also be installed on the same computer in order to communicate with the web browsers when creating managed logons:
Password Manager extension version 3.4.215, or newer, for web browsers, excluding Internet Explorer
One of the following two DigitalPersona clients as appropriate to your environment:
DigitalPersona AD Workstation 3.4.0 or later
DigitalPersona LDS Workstation 3.4.0 or later
Logons created by the administrator (also called managed logons) take precedence over any personal logons created for the same screen by the application. The personal logon will no longer be able to be used to log on, but can be opened from the Personal tab by right-clicking the logon and selecting Edit (or selecting the logon and then choosing Edit from the Manage button) in order to retrieve the account information.
If more than one administrator is using Password Manager Admin Tool at the same time, they should make sure not to make changes to logons at the same time, as only the last applied changes will be deployed.
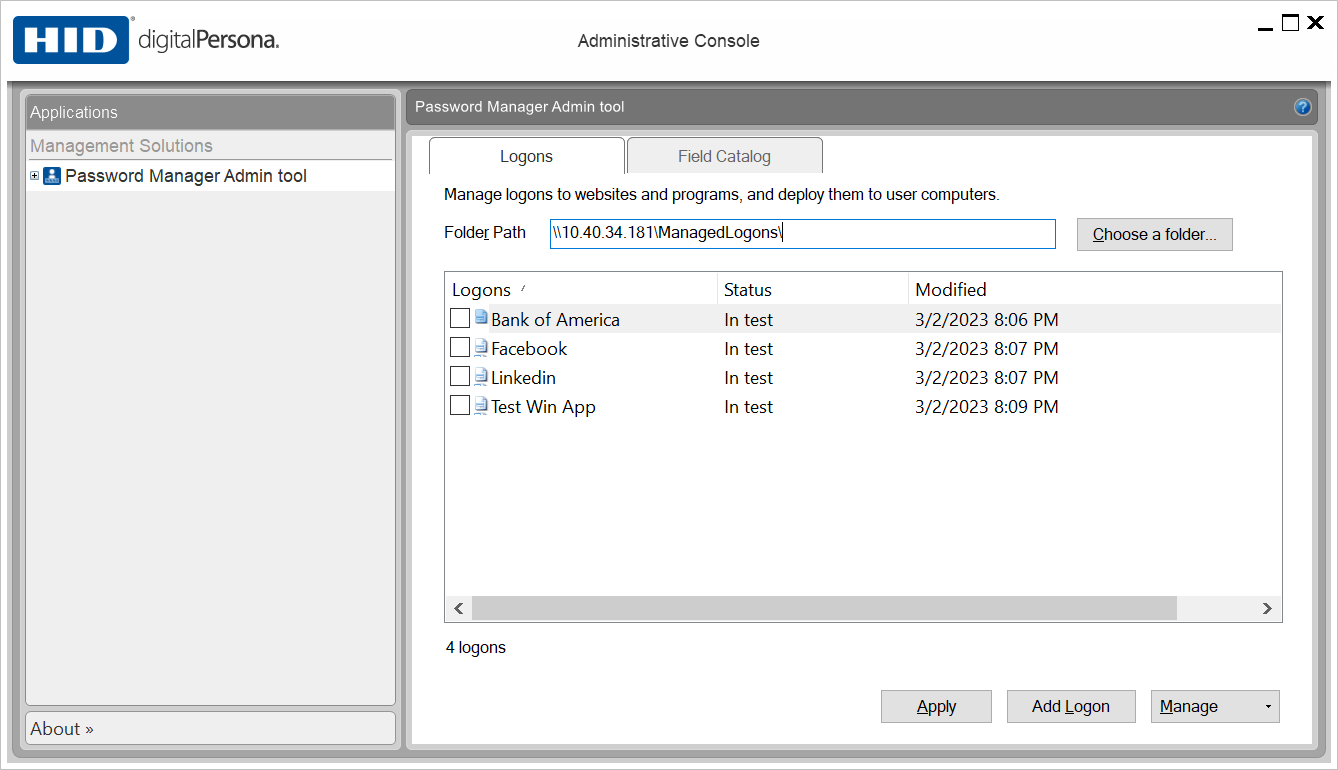
Create a Managed Logon Automatically
-
Launch the Password Manager Admin Tool. The following screen displays.
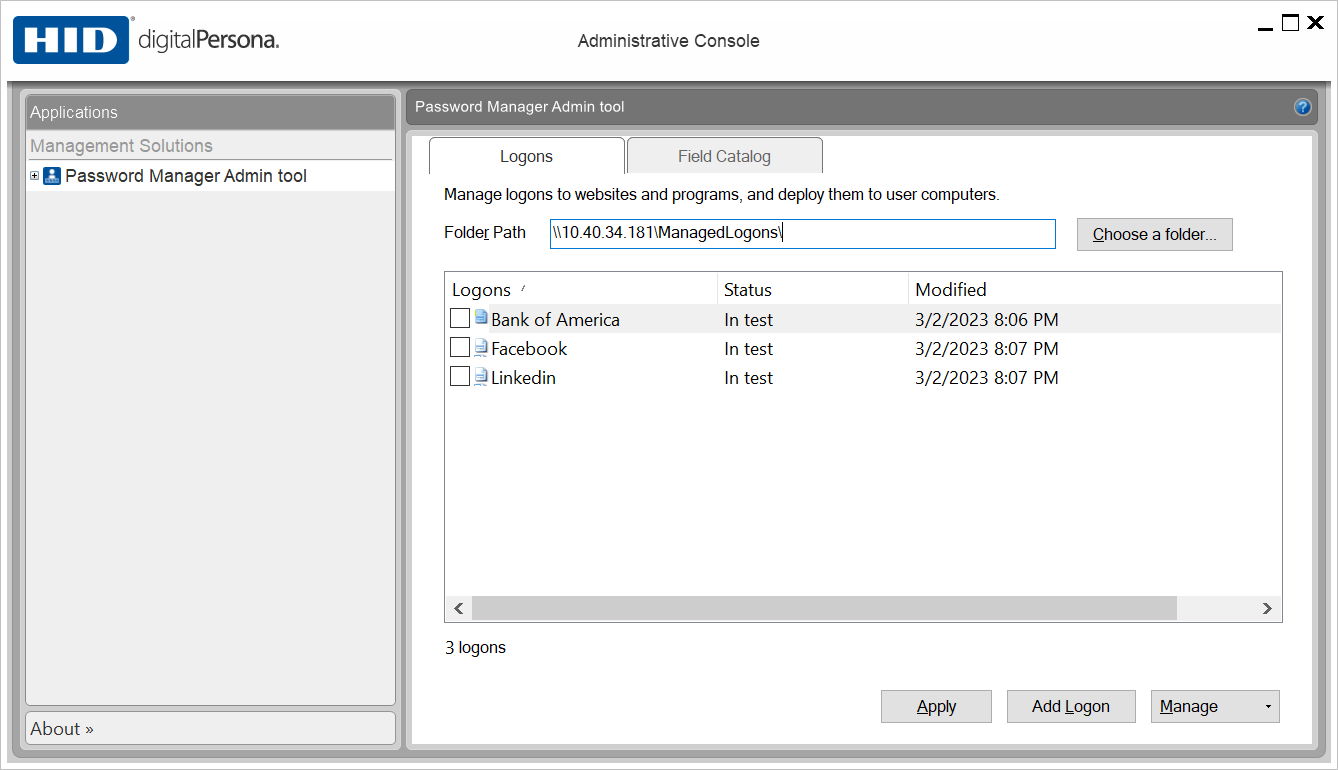
-
On the Logons tab, select Choose a folder.
-
In the Choose a folder dialog, select a previously created folder, or specify a path to a folder.
Or choose Browse for folder to navigate to a folder or create a new one. This can be a local folder for testing, or a shared network folder where managed logons are made available to DigitalPersona Workstation or Kiosk users. Then click Choose.
You can only work with one folder of managed logons at a time. However, you can define multiple folders, which you can then choose to work with as described above.
To define multiple folders, add their paths (separated by a vertical bar “|”) in the GPO setting Path to the managed logons folder(s).
-
Click Add Logon. The Password Manager Admin Tool Logon Screen wizard launches.
-
Launch the logon screen for the password-protected website or program.
Note: Troubleshooting tip - If an error message No input fields displays in the wizard, it may indicate that you are inadvertently attempting to create a logon from a Windows session other than the one where the Password Manager Admin Tool is running. For example, right-clicking on an application and selecting the Run as different user option would run the application in a separate Windows session where it could not be accessed by the Password Admin Tool.A resource used to create the logon must be in the same Windows session that the Password Manager Admin Tool is running in. So, when creating logons for applications that require elevated privileges (i.e. such as Domain Admin), they must be created in a Windows session where the logged on user has the same, or higher, privileges.
-
On the first page of the wizard, confirm that the logon screen has been detected and verify the title of the logon screen. Click Next.

For websites or programs that are difficult for the wizard to detect automatically, such as terminal emulator programs, you can create a logon manually by selecting Create a Managed Logon Manually. This provides additional control for specifying the fields and keystrokes required for logon.
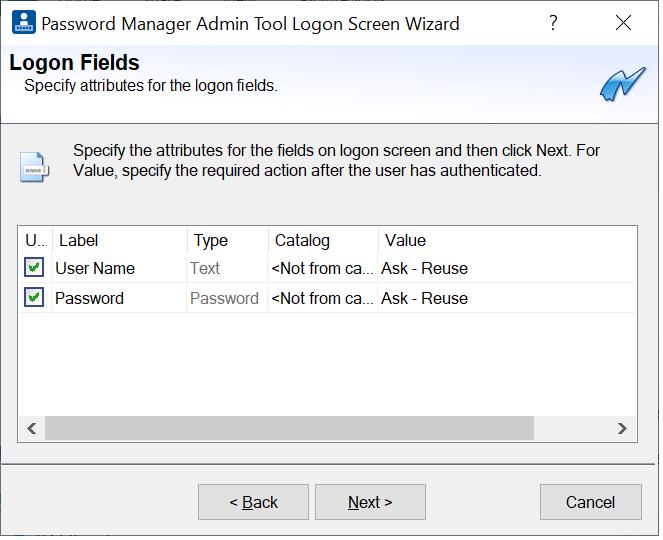
Define the Logon Fields
The Logon Fields page displays all the fields on the logon screen, using the nearest label to identify each field.
-
Select which fields are required for logon, set their desired attributes and values.
Logon Fields attributes are used in the Logon Screen Wizard during the creation of managed logons and Change Password screens.

Column headings specify the attributes for each field on a Logon Screen or Change Password screen.
Field Description Use
Check the Use checkbox for each field used for log on. Some fields discovered by the wizard may not be relevant to log on, such as a search field on a website logon page. Leave these unchecked.
Label
If the label for a field shown on the Login Credentials dialog is not intuitively related to the corresponding field on the logon screen, you can type a new label. The labels are displayed when users are prompted to type a value for a logon field.
Type
The type of field, either text or password, is displayed in the Type text box. This value is not editable. Password hides the password on the logon screen so it cannot be viewed. Text displays readable text.
Catalog
For added convenience, you can create specifications for frequently used fields using the Field Catalog which is a collection of frequently-used fields and their specifications. If the field is in the Field Catalog, you can click and then choose it from the drop-down list. The specified data will be filled in automatically.
Value
Type a value for the logon field or use the Value drop-down menu to indicate a value specified by the user or provided by the program. A typed value is stored in the logon in clear (unencrypted) text and is shared by all of those using the logon.
Logon Field and Password Field values are used on the Logon Fields page of the Logon Screen Wizard during the creation of managed logons and Change Password screens.
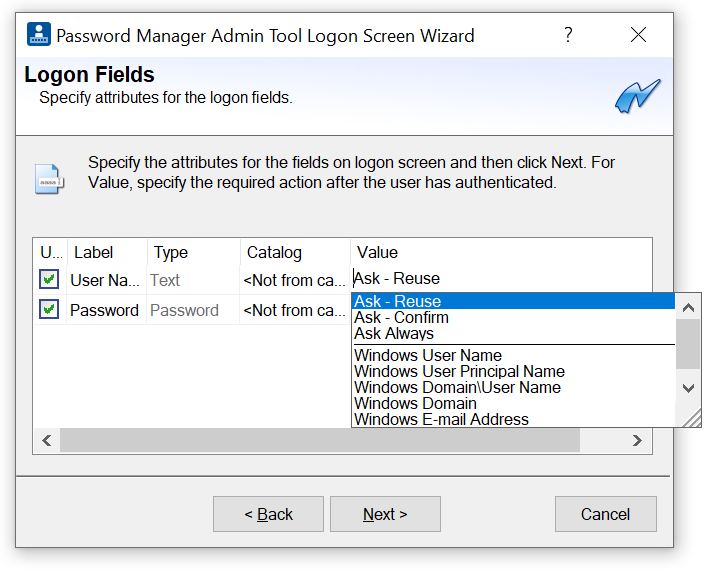
A Value drop-down menu provides a list of options for specifying values to be supplied by the user or automatically by Password Manager Admin Tool. The available options vary depending on the type of field selected.
Option Description Ask-Reuse
Prompts the user to enter a value for a logon field the first time they use the logon. This value is automatically submitted for them on each subsequent logon without prompting the user again.
Ask-Confirm
Prompts the user to enter a value for a logon field the first time they use it. However, on subsequent logons, the value is automatically entered and they are then prompted to confirm this value or change it.
Ask Always
Prompts the user to enter a value for a logon field each time they use the logon.
Windows User Name
Password Manager Admin Tool provides the Windows user name.
Windows User Principal Name
Password Manager Admin Tool provides the user name and domain values in UPN format. Example: [user name]@[domain].
Windows Domain\ User Name
Password Manager Admin Tool provides the domain of the user followed by a backslash and the user name. Example: [domain]\[user name].
Windows Domain
Password Manager Admin Tool provides the user domain name only.
Password Manager Admin Tool provides the registered E-Mail address for the Windows user account currently logged on.
Windows User Password
Password Manager Admin Tool provides the password used for Windows logon.
Write Only
Always prompts a user for the value.
-
Click Next.
Define the Submit Option
-
On the Submit Option page, choose the button that submits the logon data.
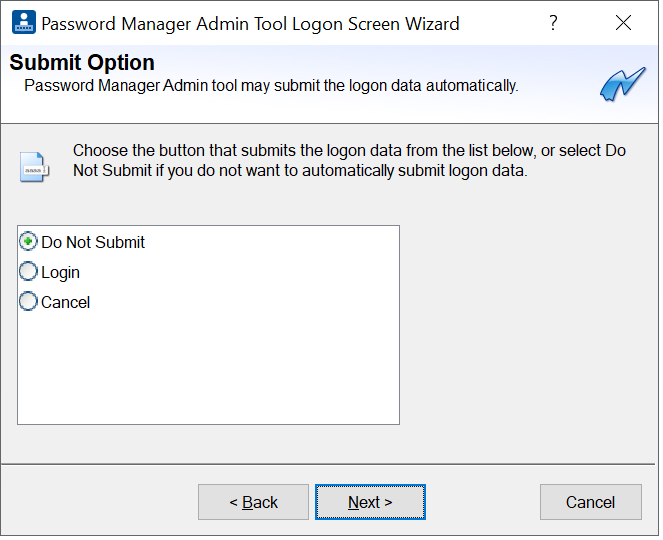
You can edit the button labels by clicking the label and typing a new name.
If you want the user to manually submit the logon data, select Do Not Submit.
-
Click Next.
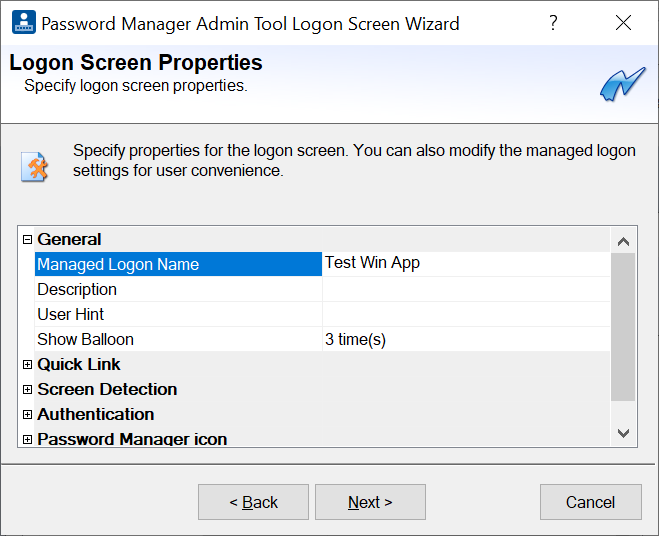
Define the Login Screen Properties
In the Logon Screen Properties page, view and modify the various properties for detailed descriptions of the Logon Screen properties.
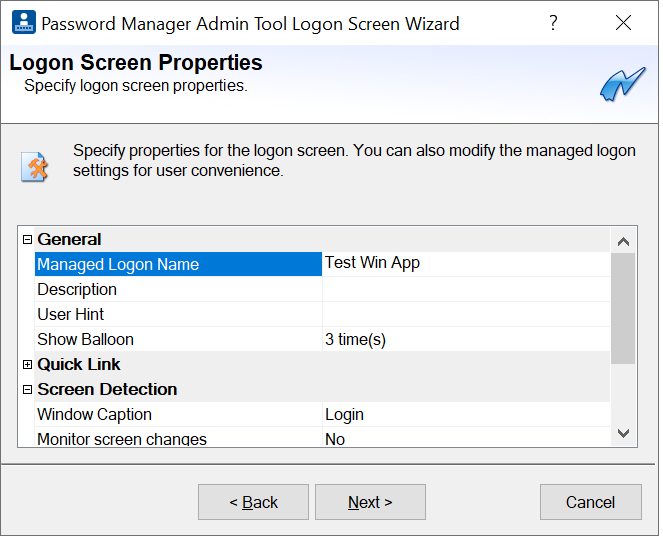
In the Logon Screen Wizard, both Logon Screens and Change Passwords Screens have associated Properties pages where you can edit the properties for the screen.
| Category | Property | Description |
|---|---|---|
|
General |
Managed Logon Name |
The name of the logon. |
|
Description |
Can be used to enter optional information about the managed logon that is only viewable on the Password Manager Admin Tool Logons tab. By default, this column is hidden. To display the column, right click anywhere in the column headings area and select Description. |
|
|
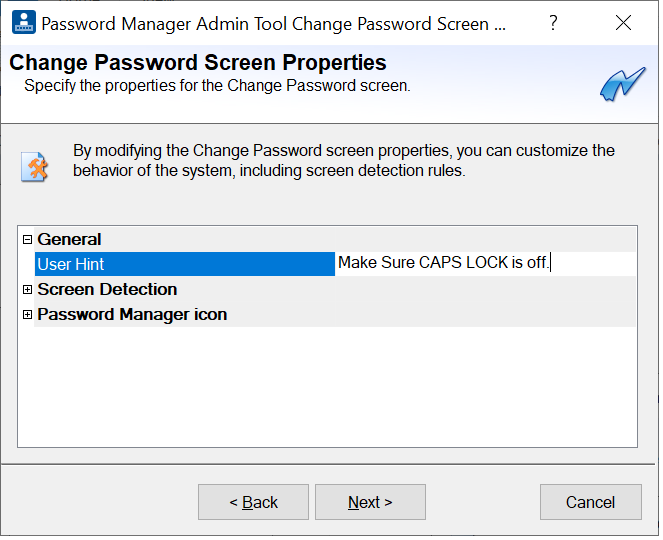
User Hint |
Type a message to be displayed when the managed logon is used. For example, a custom prompt to type values for the logon fields. To add more detailed user assistance, type a URL that a user can click to be directed to a web page. |
|
|
Show Balloon |
(Logon screens only) Once this managed logon is created and deployed, a balloon tip will automatically display (up to three times) when the user accesses the logon screen. Use this setting to select how many times the balloon is displayed. |
|
|
Screen Detection |
Window Caption |
Title of the screen as detected by the wizard; used to match the managed logon to the specified screen. If portions of the window caption will change, you can use wildcards (*) at the beginning, middle or end of the caption. Only one wildcard can be used per caption. The portion of the string that does not change will be used to recognize the screen. For example: *Some Application Login Some Company*Login My Bank Login* |
|
Monitor screen changes |
When enabled, Password Manager Admin Tool continually monitors the title bar, URL and content of the specified web page for changes that may affect the logon. When disabled, only the title bar and the URL are monitored. For example, if a page were using frames, and a link in one frame changes another frame in the page in such a way that it changes to a logon page, with this setting on, the change is recognized and appropriate action taken. With the setting disabled, the change would not be recognized. Use of this setting is resource intensive, and it is disabled by default. |
|
|
URL |
Used by Password Manager to choose the correct credentials for the website. The trained login URL must match the URL on the screen. URL matching can be defined in different ways. The drop-down menu allows you to specify the matching strategy for the URL. The options are: Do Not Match - URL matching will not be performed. This setting is only effective for Windows applications and has no effect for web applications (in this case, the String Match option will be used for web pages). This is the default for Windows applications. String Match - The domain of the web page must exactly match the domain of the login URL. Wildcard Match - You can replace parts of the login URL with an asterisk (*, aka star) or a question mark (?) to match the URL of the web page.
Regular Expression - The specified string is a regular expression (see Regular Expression Syntax). Case Sensitive - Consider case when matching, i.e. uppercase and lowercase letters are treated as distinct. This setting is only effective for Windows applications and has no effect for web applications. Restore Defaults - Return to the default URL settings. |
|
|
Extended Match |
Displayed only when creating a logon for a program, not a website. Click the button next to the Extended Match field and select any labels that should be used for matching when recognizing the screen. Click the checkbox next to the labels to use. After making selections and clicking OK, you can select the type of matching to perform by selecting it from the dropdown list. The options are the same as those listed above for the URL. |
|
|
Authentication |
Start Authentication Immediately |
If set to Yes, the user is prompted for their credential immediately after the logon screen displays. The default setting is No. |
|
Lock out logon fields |
If set to Yes, the user is prevented from typing data in the logon fields. The default setting is No. |
|
|
Password Manager icon |
Location ID |
Identifies the location selected in the Location field (below) so that it can be shared with other logon screens. |
|
Location |
From the drop-down menu, select the initial location where the Password Manager icon will appear on the logon screen. The default is the top left corner of the screen. |
Complete the Wizard
-
Click Next, and then click Finish to create the logon and close the wizard.
-
In the Administrative Console’s Logon tab, click Apply to save your changes to the server.
Note: You do not have to click Apply after making each change, but be aware that you do need to click Apply before any new logons or changes to logons will be saved to the server.
Create a Managed Logon Manually
If Password Manager Admin Tool does not detect fields automatically in websites and programs, you can create a managed logon for a logon screen by manually specifying the fields.
Creating logons manually can include using additional controls besides specifying fields and field contents, such as adding keystrokes, forcing delays between actions, and specifying the positions of fields.
To create a logon manually for a logon screen:
-
From within the Administrative Console, launch the Password Manager Admin Tool.
-
On the Logons tab, select Choose a folder.
-
Click one of the recently used locations, or specify a path and click Browse for folder to add a folder to the list, and then click Choose.
-
Click Add Logon. The Password Manager Admin Tool Logon wizard starts.

-
Launch the logon screen for the password-protected website or program.
-
On the first page of the wizard, confirm that the logon screen has been detected and verify the title of the logon screen.
-
Select Set up a managed logon manually and then click Next.
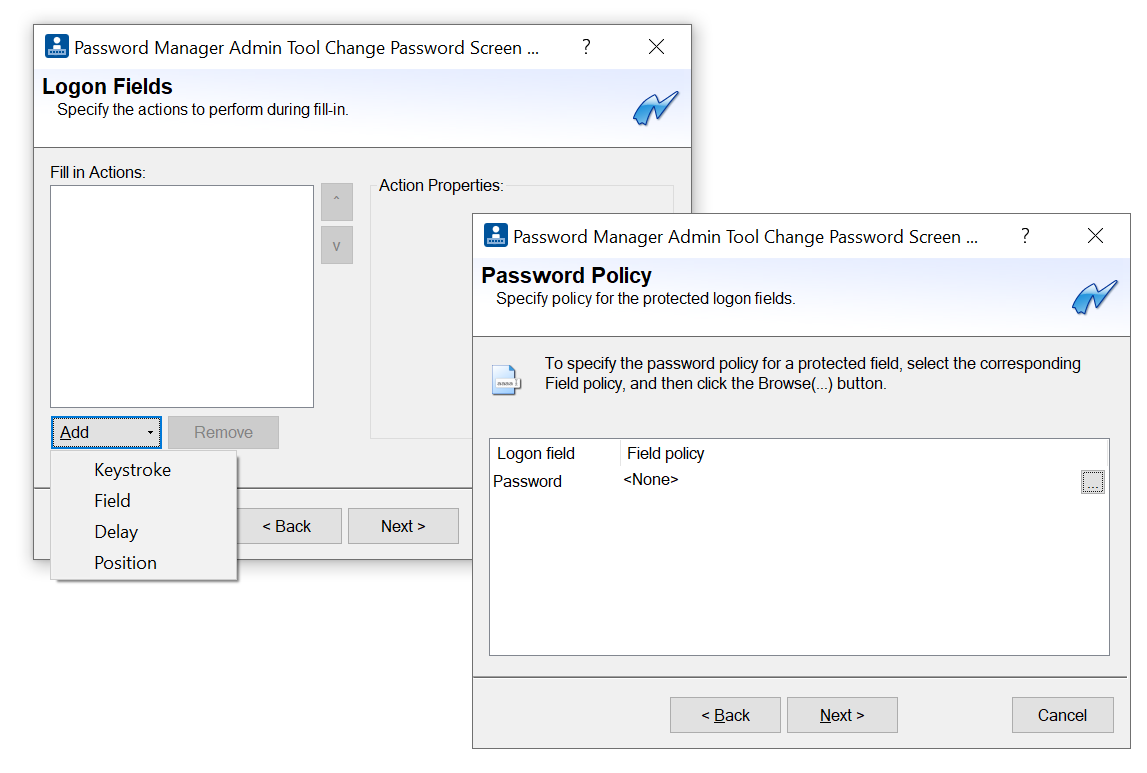
Define the Logon Fields Actions
Logon Fields actions are used when creating logons manually in Password Manager Admin Tool Logon Screen Wizard and Password Manager Admin Tool Change Password Screen Wizard.
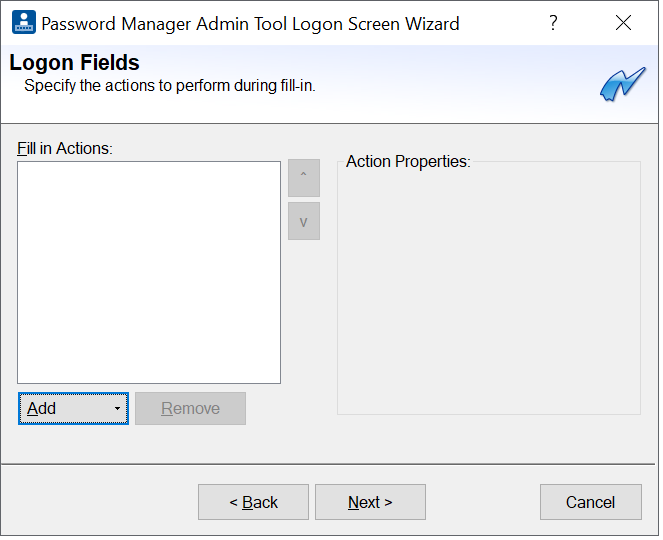
-
On the Logon Fields page, click Add and select an action from the drop-down menu.
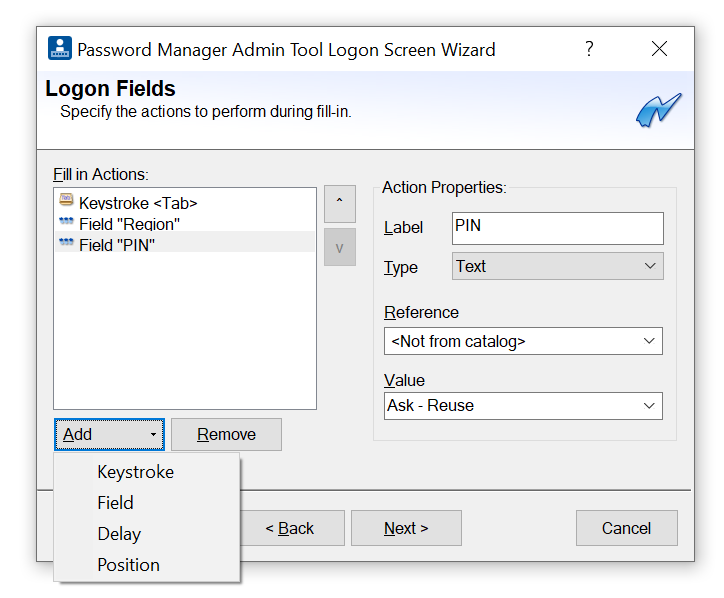
An Actions drop-down menu provides a list of actions that are used to build a script for those logon and change password screens that cannot be automatically configured by Password Manager Admin Tool.
Action Description Keystroke
This sequence of keys will be placed in the keyboard buffer. Keystroke properties are:
Key - Select the main key to be entered.
Repeat - Specify the number of times the key sequence is entered.
Shift, Control, Alt - Optionally, select one of these keys in combination with the main key. You may specify the exact use of a Generic, Left or Right key as well.
Field
Label - Type a label name for the corresponding field on the logon screen. The labels are displayed when users are prompted to type a value for a logon field.
Type - Select the type of field, either text or password. Choosing password hides the password on the logon screen; choosing text displays readable text.
Reference - Optionally, select a field previously defined on the Field Catalog tab.
Value - Type a value for the logon field or use the dropdown menu to indicate a value specified by the user or provided by the program. If you type a value for the logon field, it is stored in the logon in clear (unencrypted) text and is shared by all users using the logon.
Specify how many seconds to wait before the next action in the list is performed.
Position
Specify a location where the system will perform a mouse click. Position is measured from the top left corner of the client window area.
Client X - Type a number of pixels for the X axis position for the action.
Client Y - Type a number of pixels for the Y axis position for the action.
 Instead of typing X and Y coordinates, you can drag the target icon to the actual logon screen field to specify the position. When you release the target icon at the location you want to specify, the Client X and Y positions will be captured.
 A Value drop-down menu provides a list of options for specifying values to be supplied by the user or automatically by Password Manager Admin Tool. The available options vary depending on the type of field selected.
Option Description Ask-Reuse
Prompts the user to enter a value for a logon field the first time they use the logon. This value is automatically submitted for them on each subsequent logon without prompting the user again.
Ask-Confirm
Prompts the user to enter a value for a logon field the first time they use it. However, on subsequent logons, the value is automatically entered and they are then prompted to confirm this value or change it.
Ask Always
Prompts the user to enter a value for a logon field each time they use the logon.
Windows User Name
Password Manager Admin Tool provides the Windows user name.
Windows User Principal Name
Password Manager Admin Tool provides the user name and domain values in UPN format. Example: [user name]@[domain].
Windows Domain\ User Name
Password Manager Admin Tool provides the domain of the user followed by a backslash and the user name. Example: [domain]\[user name].
Windows Domain
Password Manager Admin Tool provides the user domain name only.
Password Manager Admin Tool provides the registered E-Mail address for the Windows user account currently logged on.
Windows User Password
Password Manager Admin Tool provides the password used for Windows logon.
Write Only
Always prompts a user for the value.
-
Add additional actions as required. If necessary, use the arrow buttons to modify the order in which the actions are performed.
Define the Logon Screen Properties
-
Click Next to display the Logon Screen Properties page.
-
View and modify the various properties for the logon screen.
Category Property Description General
Managed Logon Name
The name of the logon.
Description
Can be used to enter optional information about the managed logon that is only viewable on the Password Manager Admin Tool Logons tab. By default, this column is hidden. To display the column, right click anywhere in the column headings area and select Description.
User Hint
Type a message to be displayed when the managed logon is used. For example, a custom prompt to type values for the logon fields. To add more detailed user assistance, type a URL that a user can click to be directed to a web page.
Show Balloon
(Logon screens only) Once this managed logon is created and deployed, a balloon tip will automatically display (up to three times) when the user accesses the logon screen. Use this setting to select how many times the balloon is displayed.
Screen Detection
Window Caption
Title of the screen as detected by the wizard; used to match the managed logon to the specified screen.
If portions of the window caption will change, you can use wildcards (*) at the beginning, middle or end of the caption. Only one wildcard can be used per caption. The portion of the string that does not change will be used to recognize the screen.
For example:
*Some Application Login
Some Company*Login
My Bank Login*
Monitor screen changes
When enabled, Password Manager Admin Tool continually monitors the title bar, URL and content of the specified web page for changes that may affect the logon. When disabled, only the title bar and the URL are monitored.
For example, if a page were using frames, and a link in one frame changes another frame in the page in such a way that it changes to a logon page, with this setting on, the change is recognized and appropriate action taken. With the setting disabled, the change would not be recognized.
Use of this setting is resource intensive, and it is disabled by default.
URL
Used by Password Manager to choose the correct credentials for the website.
The trained login URL must match the URL on the screen. URL matching can be defined in different ways. The drop-down menu allows you to specify the matching strategy for the URL. The options are:
Do Not Match - URL matching will not be performed. This setting is only effective for Windows applications and has no effect for web applications (in this case, the String Match option will be used for web pages). This is the default for Windows applications.
String Match - The domain of the web page must exactly match the domain of the login URL.
Wildcard Match - You can replace parts of the login URL with an asterisk (*, aka star) or a question mark (?) to match the URL of the web page.
* The asterisk character matches zero or more characters. For example, doc* matches doc and document but not dodo.
? The question mark matches exactly one character. The password manager engine automatically converts the expression to a regular expression before use.
Regular Expression - The specified string is a regular expression (see Regular Expression Syntax).
Case Sensitive - Consider case when matching, i.e. uppercase and lowercase letters are treated as distinct. This setting is only effective for Windows applications and has no effect for web applications.
Restore Defaults - Return to the default URL settings.
Extended Match
Displayed only when creating a logon for a program, not a website.
Click the button next to the Extended Match field and select any labels that should be used for matching when recognizing the screen. Click the checkbox next to the labels to use.
After making selections and clicking OK, you can select the type of matching to perform by selecting it from the dropdown list. The options are the same as those listed above for the URL.
Authentication
Start Authentication Immediately
If set to Yes, the user is prompted for their credential immediately after the logon screen displays. The default setting is No.
Lock out logon fields
If set to Yes, the user is prevented from typing data in the logon fields. The default setting is No.
Password Manager icon
Location ID
Identifies the location selected in the Location field (below) so that it can be shared with other logon screens.
Location
From the drop-down menu, select the initial location where the Password Manager icon will appear on the logon screen. The default is the top left corner of the screen.
Complete the Wizard
-
Click Next, and then click Finish to create the logon and close the wizard.
-
In the Administrative Console’s Logon tab, click Apply to save your changes to the server.
Note: You do not have to click Apply after creating each logon or making every change, but you do need to click Apply before any new logons or changes to logons will be saved to the server.
Deploying Managed Logons
-
Check the boxes next to logons to change their status from In Test to In Use.
Only logons with an In Use status will be visible to your end users.

-
Click Apply.
After a managed logon is deployed to a computer, the Password Manager Admin Tool icon on the user’s screen indicates that the user should add their account credentials to the logon.
Afterwards, any time the user launches the resource, they can log in by simply verifying their identity with any enrolled credential.
Create an Extended Authentication Policy
The authentication credentials required for users to access resources (websites, programs, etc.) through managed logons is defined by the DigitalPersona Session Authentication Policy.
However, an additional second factor can be defined for specific resources as necessary by creating an extended authentication policy in the Password Manager Admin Tool.
To create an extended authentication policy:
-
Create or select a managed logon for the resource.
-
Click the Manage button.
-
From the context menu, select Edit, Extended authentication policy.
-
Select the credential(s) to use as a second authentication factor for this resource.
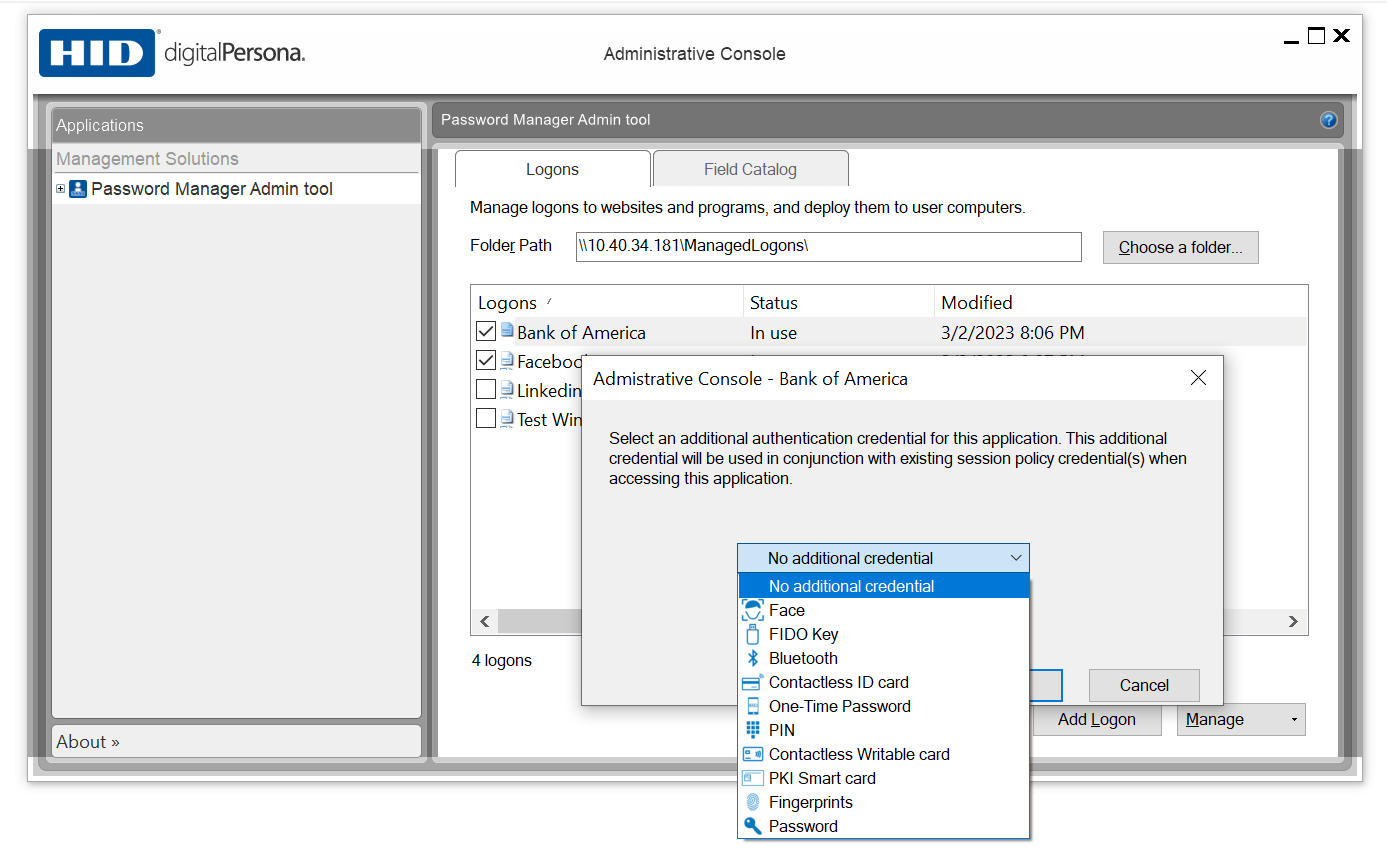
-
Click OK.
Examples :
-
Session Policy is “Fingerprint or Password," and extended policy is “PIN.”
-
User may authenticate with “Fingerprint + PIN" or "Password + PIN.”
-
Session Policy is “Fingerprint or Password,” and extended policy is “PIN, Bluetooth.”
-
User may authenticate with “Fingerprint + PIN" or "Password + PIN" or "Fingerprint + Bluetooth" or "Password + Bluetooth.”
Any session policy elements already having two factors will not be changed. If none are selected, the session authentication policy will be used as is.
Setting Up Change Password Screens
By managing a change password screen, you can specify the fields required by the application for changing passwords, implement password policies and automate the entire process for the end user.
The change password process can also be automated and controlled, by specifying constraints such as the minimum and maximum password length, letters or numbers only, and other format restrictions.
The change password screen should be recognized, as indicated by the presence of the Change Password icon on the screen.
The user clicks on the icon and provides a new password.
Upon successful authentication, the new password will be stored in the user record and is available to the user for future activities.
Set up a Change Password Screen Automatically
Launch the password-protected website or program for which you want to set up a Change Password Screen. Move to that site’s or program’s Change Password screen.
-
In Password Manager Admin Tool, select the logon for that website or program.
-
Right-click to display that logon’s context menu, then click Add Change Password Screen. The Change Password Screen wizard starts.
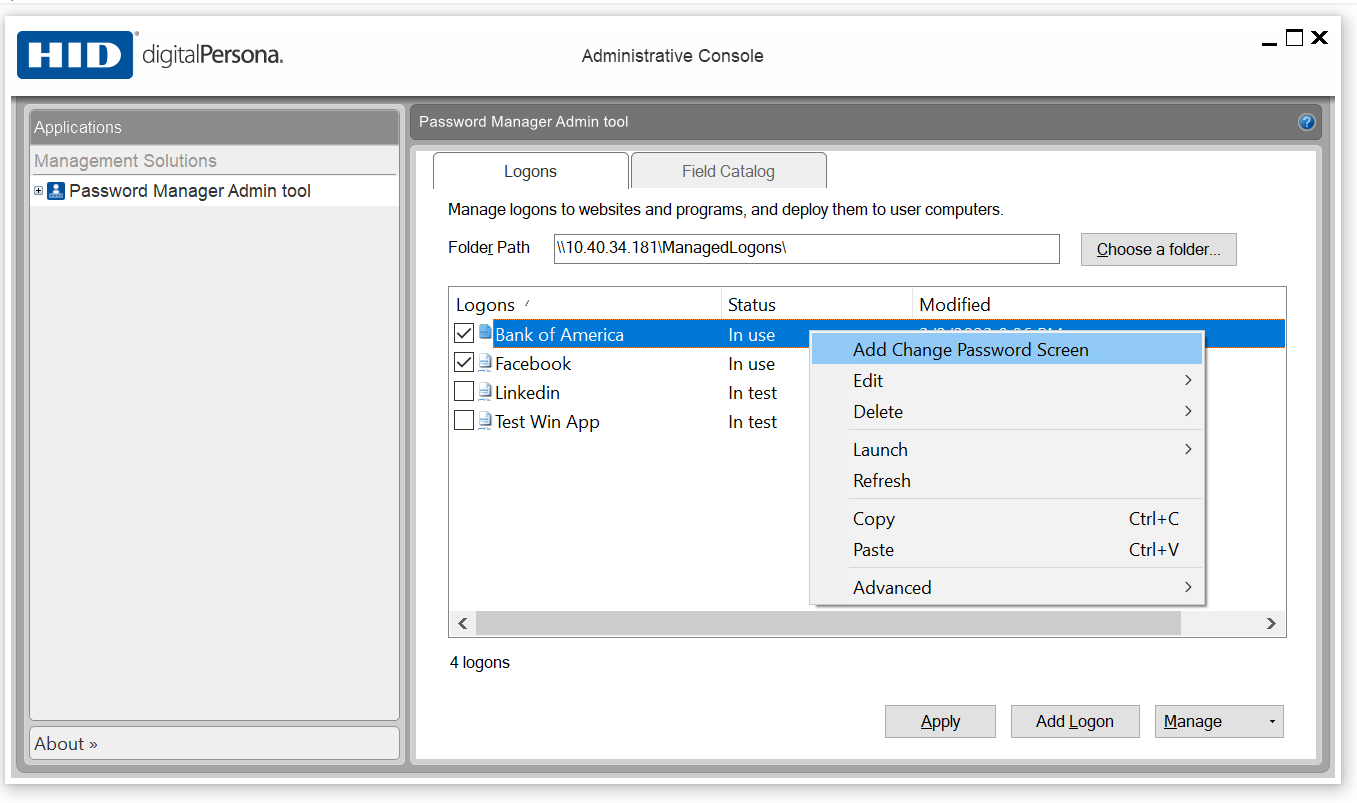
-
On the Welcome page of the wizard, click Next.
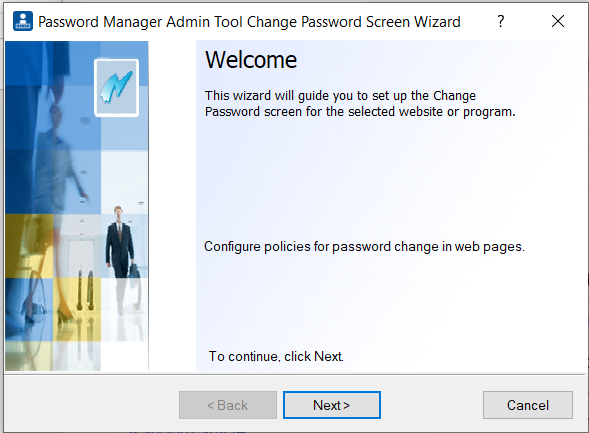
-
On the Password Policy page, optionally, click (...) to specify changes to the password policy. The password policy defined in the wizard should generally be the same as that used on the website or in the program. The default is none.
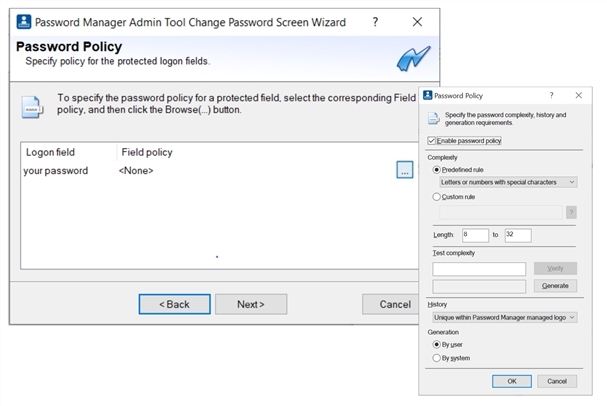
Define the Password Policy
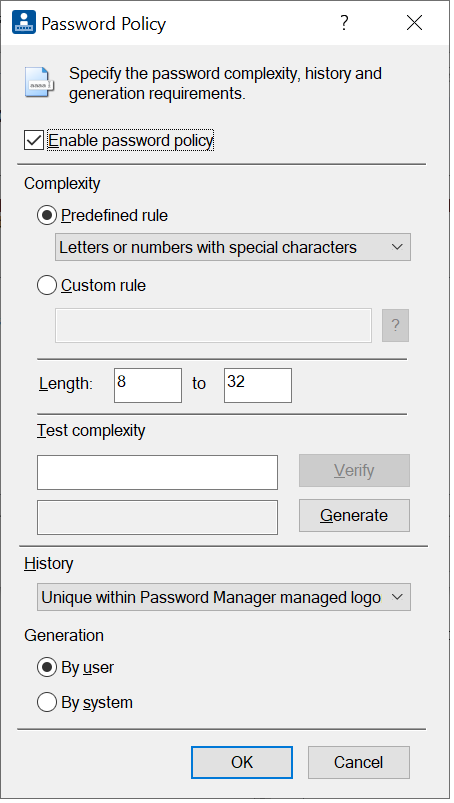
Password policies for passwords that are generated by the Password Manager Admin Tool or entered by a user at a Change Password screen are enabled and defined in the Password Policy dialog.
Here, you can also verify proposed passwords against specified password complexity requirements.
| Option | Description |
|---|---|
|
Enable password policy |
When enabled:
|
|
Complexity
|
|
|
Predefined rule |
The password must conform to the predefined rule selected from the drop-down menu. These include:
|
|
Custom rule |
Enter a pattern for verifying or generating a password using the following notation: A = UPPERCASE LETTERS, i.e. A through Z a = lowercase letters, i.e. a through z d = digits, i.e. 0 through 9 s = special characters, i.e. !”#$%&’()*+,‐./:;?@[\]^_`{|}~ ( ) = Use the enclosed indicators in random order.
[ ] = Define a custom character set i.e. [abcdef] would limit the user to only those letters in the specified position.
{n,m} Define a range of acceptable occurrences of the previously indicated character set.
~ = Prevent two identical consecutive characters
& = Prevent a character being in the same position as in the most recent password
|
|
Length |
Select the minimum and maximum length for the password. Note: Any custom rule defined must fall within the range between the minimum and maximum lengths specified here.
|
|
Test Complexity |
This area includes two fields and buttons which can be used to verify that a specific password meets the defined complexity requirements or generate a new password that will meet the requirements. Verify - Enter a password in the text field to the left of the Verify button and it will be verified against the defined complexity rule. Click the Generate button and the system will generate a password that conforms to the defined complexity requirements and display it in the field to the left of the button. |
|
History |
From this drop-down menu, you can select additional password constraints relating to the history of the password. None - No other constraints are applied to the password contents. Different than the Windows password - The new password must be different than the current Windows password. Unique within Password Manager managed logons - The new password must be different from any other password associated with this managed logon for a specified user account. Different than the current password - The new password must be different than the current password for this website or program Note: The History constraints are not applied when verifying or generating passwords within this dialog, but only on an actual Change Password screen.
|
|
Generation |
By User - Password Manager does NOT provide password information to a Change Password screen and the user has the option to log on by entering their password or another allowed credential. If a password is used, it is verified against the defined complexity rules. By System - Password Manager generates the password automatically. An alternate credential must be used to log on. |
-
On the Setup Complete page, click Finish to close the wizard.
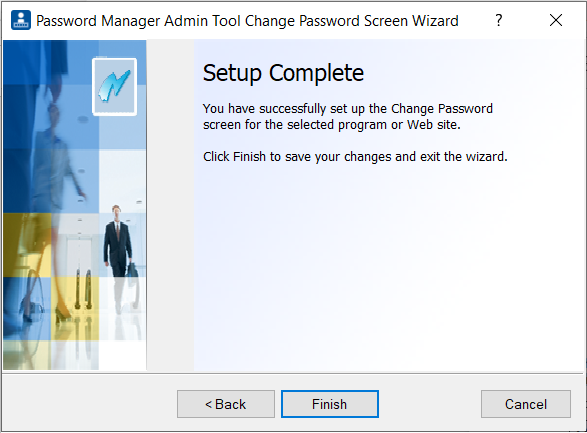
-
Click Apply to save your changes to the server.
Managed change password screens are deployed at the same time as the managed logons that they are associated with. After they are deployed, they will display the Change Password icon, indicating that the user should verify their identity to begin the change password process.
Set up a Change Password Screen Manually
If the Password Manager Admin Tool does not detect fields automatically in Change Password screens, you can manually specify the fields and actions required.
Creating a Change Password screen manually allows you to include additional controls such as adding keystrokes, forcing delays between actions, and specifying positions of fields.
To set up a Change Password screen manually:
-
Launch the password-protected website or program for which you want to set up a Change Password Screen. Move to that site’s or program’s Change Password screen.
-
In the Password Manager Admin Tool, select the logon for that website or program.
-
Right-click to display that logon’s context menu, then click Add Change Password Screen.

The Password Manager Admin Tool Change Password Screen Wizard starts.
-
On the first page of the wizard, confirm that the correct screen has been detected.
-
Select Set up change password screen manually and click Next.
-
On the Logon Fields page, click Add and select an action from the drop-down menu.
For example, you might study a Change Password screen and discover that it takes nine presses of the tab key to get to the first input field (Change Password).
You could choose Keystroke, select the Tab key, and specify "Repeat 9 times" to get the user where they need to be; or you could choose to use the Position action to place the cursor in the right location to change the password.
-
Add additional actions as required. If necessary, use the arrow buttons to modify the order in which the actions are performed.
-
On the Password Policy page, optionally, click (...) to specify changes to the password policy. The password policy defined in the wizard should generally be the same as that used on the website or in the program. The default is None.
-
Click Next to display the Change Password Screen Properties page.
-
Modify any of the listed properties to customize behavior of the Change Password screen.
-
On the Setup Complete page, click Finish to close the wizard.
-
Click Apply to save your changes to the server.
Managed change password screens are deployed at the same time as the managed logons that they are associated with. After they are deployed, they will display the Change Password icon, indicating that the user should verify their identity to begin the change password process.
Regular Expression Syntax
Both Logon Screens and Change Passwords Screens can use regular expressions in the URL field of the Properties page to define the part of a URL that should be matched when determining if the page has changed.
A regular expression is a sequence of characters that specifies a search pattern in text. They are used by DigitalPersona Password Manager to distinguish login and password change screens from other content and to limit the scope of pages on which credentials can be applied. A typical case is when you have multiple services running on the same domain.
For example, consider the two URLs www.mybank/user/login and www.mybank/accounting/login. They each may require different credentials. In such cases, regular expressions can help. The regular expression for www.mybank/user/login could be defined as */login$ (i.e. match the word login at the end of the URL), and for www.mybank/accounting/login it can be just the single word accounting. These regular expressions will only be effective for the domain of the website URL, even if the domain is not part of the regular expression.
Regular expressions are an industry standard, and more information can be found on Wikipedia at https://en.wikipedia.org/wiki/Regular_expression.
Both Logon Screens and Change Passwords Screens can use regular expressions in the URL field of the Password Manager Admin Tool Properties page.
In a regular expression, most characters are treated as literals, i.e. they match only themselves ("a" matches "a", "(bc" matches "(bc", etc). The exceptions are called metacharacters (MC in the table below).
| MC | Description |
|---|---|
|
. |
Matches any single character |
|
[ ] |
Matches a single character that is contained within the brackets. For example, [abc] matches "a", "b", or "c". [a-z] matches any lowercase letter. These can be mixed: [abcq-z] matches a, b, c, q, r, s, t, u, v, w, x, y, z, and so does [a-cq-z]. The '-' character should be literal only if it is the last or the first character within the brackets: [abc-] or [-abc]. To match an '[' or ']' character, the easiest way is to make sure the closing bracket is first in the enclosing square brackets: [][ab] matches ']', '[', 'a' or 'b'. |
|
[^ ] |
Matches a single character that is not contained within the brackets. For example, [^abc] matches any character other than "a", "b", or "c". [^a-z] matches any single character that is not a lowercase letter. As above, these can be mixed. |
|
^ |
Matches the start of the line (or any line, when applied in multiline mode) |
|
$ |
Matches the end of the line (or any line, when applied in multiline mode) |
|
( ) |
Defines a "marked subexpression". What the enclosed expression matched can be recalled later. See the next entry, \n. Note: A "marked subexpression" is also a "block."
|
|
Where n is a digit from 1 to 9; matches what the nth marked subexpression matched. This construct is theoretically irregular and has not been adopted in the extended regular expression syntax. |
|
|
* |
A single character expression followed by "*" matches zero or more copies of the expression. For example, "[xyz]*" matches "", "x", "y", "zx", "zyx", and so on. |
|
\n* |
Where n is a digit from 1 to 9, matches zero or more iterations of what the nth marked subexpression matched. For example, "\(a.\)c\1*" matches "abcab" and "abcabab" but not "abcac". An expression enclosed in "\(" and "\)" followed by "*" is deemed to be invalid. In some cases (e.g. /usr/bin/xpg4/grep of SunOS 5.8), it matches zero or more iterations of the string that the enclosed expression matches. In other cases (e.g. /usr/bin/grep of SunOS 5.8), it matches what the enclosed expression matches, followed by a literal "*". |
|
{x,y} |
Match the last "block" at least x and not more than y times. For example, "a\{3,5\}" matches "aaa", "aaaa" or "aaaaa". |
|
+ |
The + operator will match the preceding atom (a single character, a marked sub-expression, or a character class) one or more times. For example, the expression a+b will match any of the following: ab But will not match: |
|
| |
The | operator will match either of its arguments. For example, abc|def will match either "abc" or "def". Parenthesis can be used to group alternations. For example, ab(d|ef) will match either of "abd" or "abef". |
|
? |
The ? operator will match the preceding atom (a single character, a marked sub-expression, or a character class) zero or one times, for example the expression ca?b will match any of the following: cb But will not match: caab |
Search for Logons
Use the Tools page to search for logons, or check for duplicate logons.
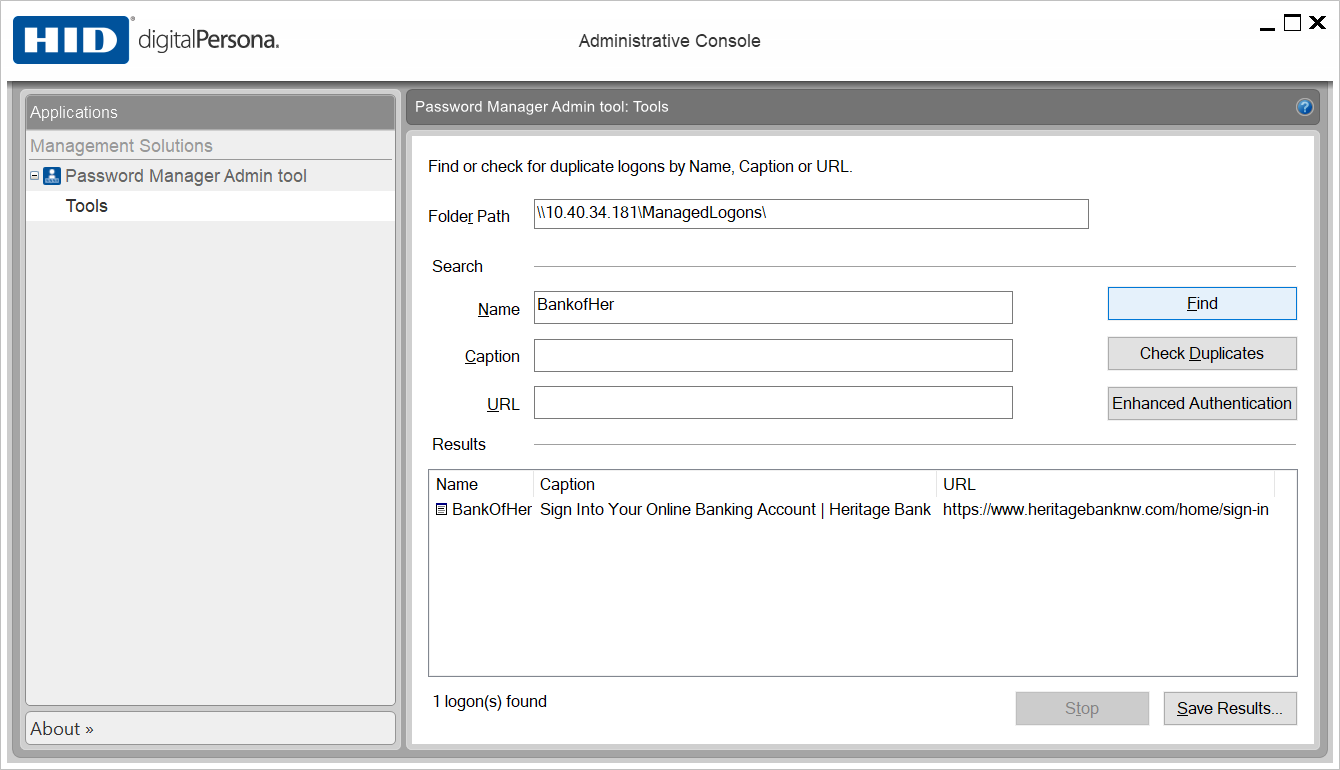
Find a Logon
-
On the Tools page, enter a logon Name, Caption or URL in one of the associated text fields to search for it.
Use ? or * wild cards to indicate individual or multiple characters.
-
Click Find to display the search results.
-
(Optionally) Click Stop to cancel the search.
-
In the Results area, right-click on any of the displayed logon names to display a shortcut menu with options to edit or delete the duplicate managed logon.
-
(Optionally) Click Save Resultsto save the results to an HTML file.
Find Duplicate Logons
Duplicate logons are multiple copies of logons for a single logon or change password screen.
On the Tools page, click Check Duplicates.
(Optionally) Click Stop to cancel the search.
Optionally) Click Save Resultsto save the results to an HTML file.
In the Results area, right-click on any of the displayed logon names to display a shortcut menu with options to edit or delete the duplicate managed logon.
Find Logons with Enhanced Authentication Policies
-
On the Tools page, click Enhanced Authentication.
-
(Optionally) Click Stop to cancel the search.
-
In the Results area, right-click on any of the displayed logon names to display a shortcut menu with options to edit or delete the duplicate managed logon.
-
Optionally, click Save Results to save the results to an HTML file.
Editing Managed Logons
The Password Manager Admin Tool makes managing logons easy. Most management features can be accessed through either of two means available on the Logons tab:
-
Right-click on a logon to display the shortcut menu for that logon
-
Select a logon and click Manage to display available commands for that logon.
-
After making any changes to your managed logons, deploy them so they can be seen and used by the end user.
-
Select a logon to edit and click Manage.
-
Click Edit and select from the following options: Logon Screen, Change Password Screen or Extended Authentication Policy.
-
In the corresponding wizard, make any desired changes to the logon. For details on specific wizard pages, see one of the following topics:
-
When editing is complete, click Finish to exit the wizard.
-
Click Apply to save your changes to the server.
Deleting Logons
-
On the Logons tab, select the folder that contains the logon you want to delete.
-
Select a logon to remove and click Manage, or just right-click the logon to display the shortcut menu.
-
Click Delete. Then click All Screens to delete the logon and any associated Change Password screens, or click Change Password Screen to delete only the Change Password screen.
-
Click Apply to save your changes to the server.
Using the Advanced Features
The Password Manager Admin Tool's Advanced features provide a means for the administrator to further debug and adjust managed logons.
Copy template files to clipboard
Use this menu item to copy one or more selected template files to the clipboard. You can then paste them into any directory, email, or document that can accept pasting files from the clipboard.
Compare template files
Using this menu item will open two templates in a compare/merge tool. This may be useful to copy information between old and new templates when an application changes and a new template needs to be created to support the changed application.
A compare/merge tool must be installed separately from DigitalPersona; there are number of such tools available, some of them free. The tool must be able to accept paths of the two files being compared as command line parameters.
When using this feature for the first time, the user will have to provide the path to the executable file of the compare/merge tool.
Of course, the compare/merge tools will show the raw text of the templates, so editing them will require some understanding of the format of the Template files.
Manually edit template file
Opens a Template file for manual editing in Notepad (or any other application associated with the .dpm extension).
Must be saved as plain text files (they are XML files). When using editors like MS Word, make sure to save the Template files as plain text.
Will be modified locally, and not in the shared folder. An administrator can test the desired change from the local location and then copy it to the shared folder manually
Using the Field Catalog
You can use the Field Catalog to store logon field values and attributes that can be reused in creating managed logons for logon screens that share common fields.
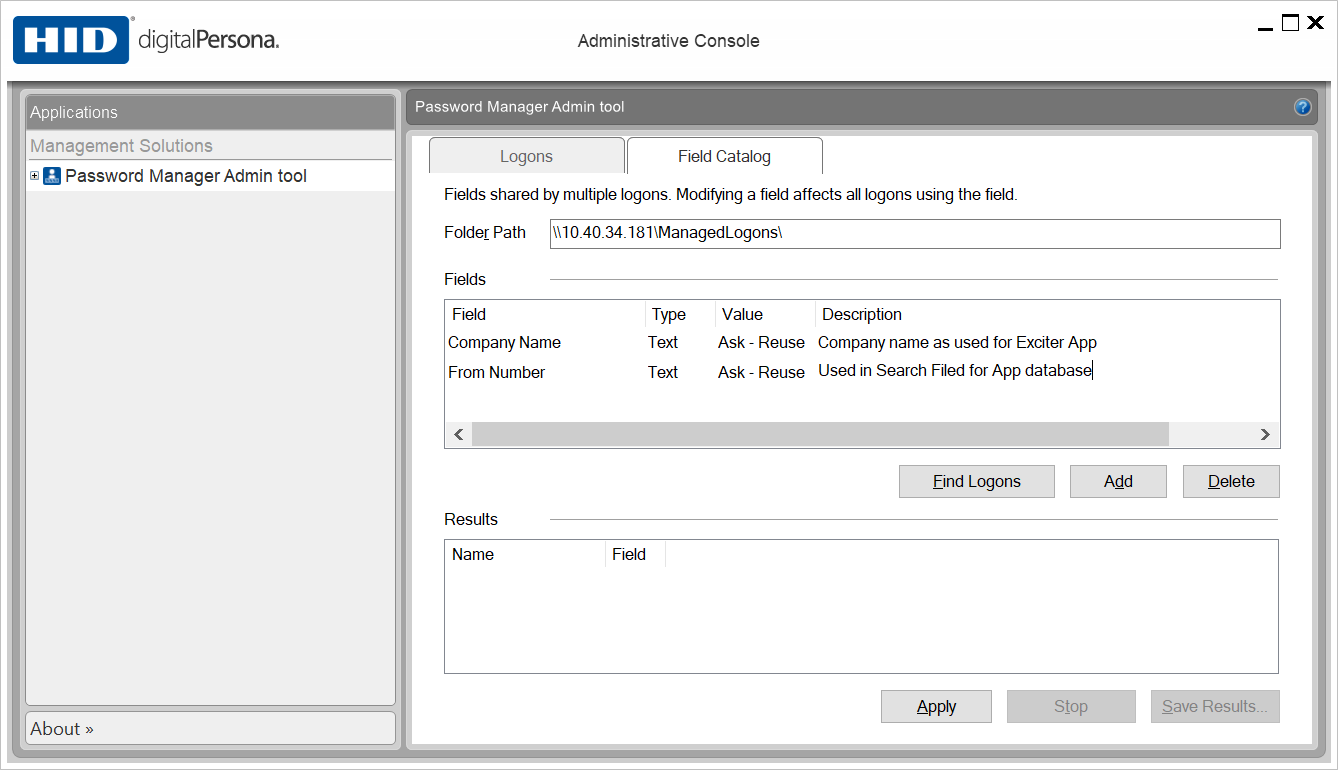
By storing frequently used logon fields in the catalog, you can add commonly used fields to additional logons without setting values or attributes each time. Later changes made to fields in the catalog will then also be propagated to all logons that use the field.
Managing Shared Fields in the Field Catalog
To add a field to the Field Catalog:
-
On the Field Catalog tab, click Add to create a new field in the table.
-
In the Field column, type a name for the field you are adding to the catalog.
-
Specify the type of the field by selecting Password or Text in the Type drop-down list.
-
Specify the value of the field from the Value drop-down menu.
-
Add any comments related to this field in the Description text box.
To delete a field from the Field Catalog:
-
On the Field Catalog tab, select a field.
-
Click Delete.
Using a Field Catalog for Password
-
Add a field to the catalog, and select Password as the type (see previous topic).
-
On the Logon Fields page of the wizard, from the Add drop-down menu, select Field.
-
In the Action Properties area, enter a label for the field.
-
From the Type drop-down menu, select Password.
-
From the Reference drop-down menu, select the name of the field that you added above.
-
Continue creation of the logon as described in Create a Managed Logon Manually.
Find Fields in Logons
You can search for managed logons that contain fields selected from the Field Catalog.
-
On the Field Catalog tab, select the fields to search for and click Find Logons to display the search results.
-
Optionally, click Save Results to save the results to an HTML file.
The results are saved as an HTML table that includes the caption, logon name, created date, modified date and file name.
Password Manager Actions
Password Manager Actions are operations that may be performed when any assigned DigitalPersona Hot Key combinations are pressed, or a specified credential or credential combination is presented.
Password Manager Actions may be assigned to the DigitalPersona Hot Key, credential or credential combination through the Quick Actions policy setting on the DigitalPersona Server.
The Password Manager Action that will be performed depends on the context. One of the following operations will be performed, in the listed order of preference:
-
When the active window is a website, program or other resource associated with a previously created personal or managed logon - trained fields will be filled in with user account data.
-
If the active window does not have a previously created personal or managed logon - The Create Logon dialog is displayed allowing creation of a personal logon for the resource. This action also requires that the “Allow creation of personal logons” policy setting in Active Directory must be enabled or not configured.
Define the User Policy Settings
The following Active Directory policy settings are available in Active Directory on the DigitalPersona Server and apply to DigitalPersona AD users only.
-
Allow creation of personal logons - When enabled, allows users to create personal logons. However, when managed logons and personal logons are created for the same screen, only the managed logon is functional.
-
Managed Logons - When enabled, the following options can be configured.
-
Allow users to view managed logon passwords - When selected, allows users to see passwords when providing account data. By default, passwords are hidden.
-
Allows users to edit account data - Enabled by default.
-
Allow users to add account data - Enabled by default.
-
Allow users to delete account data - Enabled by default.
-
Path(s) to the managed logons folder(s) - Must be enabled and a folder path entered in order to deploy managed logons to specified computers.
These settings can be configured in the Group Policy Management Editor under the node User Configuration\Policies\Administrative Templates\DigitalPersona Client\Managed Applications\Password Manager. More detailed explanations are provided on the Explain tab for each of the settings and in the Policies and Settings.


