Workflows
The following sections illustrate the DigitalPersona workflows showing a generic authentication workflow (irrespective of the authentication method/credential used), and a few specific examples of authentication data flows for key credentials.
Enrollment Architecture and Workflow
The illustration below provides an overview of the DigitalPersona User Console and Attended Enrollment architecture and workflow. The enrollment application exposes a user interface running on the client computer, however the actual enrollment is performed on the DigitalPersona Server, which must be accessible to enroll any credentials.
There are two means for enrolling authentication methods/credentials - user (self) enrollment within the DigitalPersona User Console, and supervised enrollment through a dedicated Attended Enrollment application. Both share similar architectures.
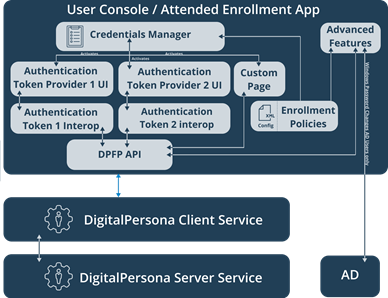
Credential Manager
In both cases, enrollment begins with the Credential Manager, which displays a series of tiles representing the credentials available for enrollment. Each tile also provides a visual cue to the current state of the credential, i.e. enrolled, not enrolled or (in Attended Enrollment only) omitted.
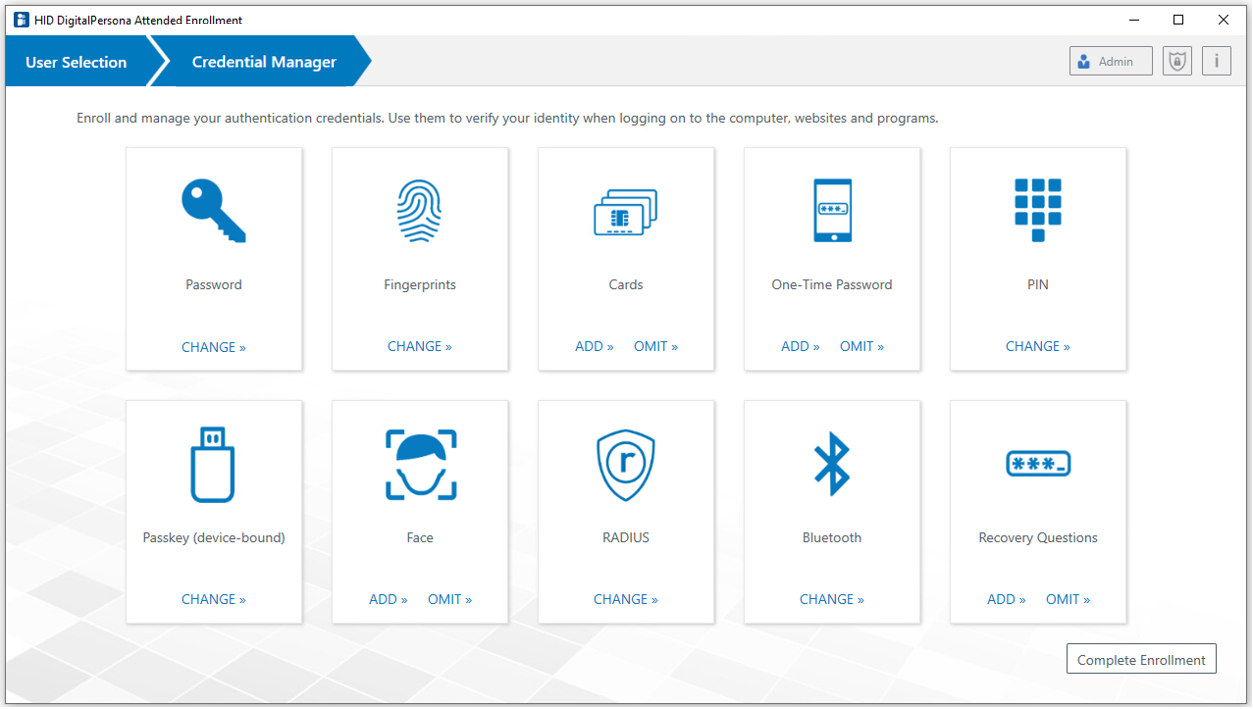
When the user selects a tile, the UI for the selected credential is loaded and the user is guided through enrolling the credential. Enrollment may be as simple as entering a PIN twice to enroll a PIN credential, or more involved, such as when enrolling fingerprints or One-Time Passwords.
DigitalPersona Enrollment Workflow
The general workflow of the enrollment process is shown in the following diagram.

-
The user selects a credential tile on the Credential Manager page.
-
The Credential Manager activates the Token Provider and the user is presented with the UI for enrollment of the selected credential.
-
The user interacts with the Token Provider, enrolling, changing or deleting the credential. This may include multiple interactions, for instance collecting several fingerprint images.
-
The user completes the necessary interactive actions and the desired changes to the credential are passed to the local service.
-
The local service passes new or changed credential data to the DigitalPersona Server.
-
The DigitalPersona Server verifies the information (access control, etc.) and saves the new credential information in the LDS or AD database.
-
After confirmation from the DigitalPersona Server, the local service caches the credential in the local database.
User Console/Attended Enrollment App
The User Console and Attended Enrollment components serve as UI containers for the Credential Manager. In order for users to utilize the User Console for credential enrollment and maintenance, the Self Enrollment permission must be enabled for those users. The Attended Enrollment component can be used by Security Officers, or other delegated persons, to enroll other users.
Credential Manager
The Credential Manager is a part of the User Console and Attended Enrollment components that provides the interface for enrolling and modifying user credentials.
The Credentials Manager enforces enrollment policies, such as:
-
The list of credentials permitted and those required to be enrolled
-
When authentication by a Security Officer is required
-
When user authentication is required
-
Whether omitting credentials is allowed without providing an omitting message.
Advanced Features
Within Attended Enrollment, the Credentials Manager also contains an Advanced Features page, where the Security Officer can randomize or reset a user's password (for AD users, this would also be their Windows password).
Enrollment Token Providers
Every authentication method (credential), i.e. fingerprint, Smart Card, PIN, etc., implements its own Enrollment Token Provider.
Each Enrollment Token Provider is loaded by the Credential Manager and is responsible for displaying the UI for enrollment of that credential. It uses the underlying architecture (Interop components) for conducting actual enrollment.
Interop Components
Each authentication method, i.e. credential, such as fingerprint, Smart Card or PIN, implements its own Interop Component, which encapsulates the business logic for the enrollment and in general drives the enrollment process, communicating with the enrollment UI on one side and with DPFP API functions on the other side for accomplishing the actual enrollment with the system.
Enrollment Policies
Enrollment Policies are read from the XML config file which must be in the same directory as the executable file of the Attended Enrollment application. It contains all the necessary policies, such as:
-
The type of authentication to use for the Security Officer
-
Which credentials to enroll
-
When to authenticate the Security Officer and the user
-
Constraints on omitting credentials
-
The content of the Custom Page
-
Whether to randomize a user's password, etc.
These policies can be changed by editing the config file in an XML or plain text editor such as Notepad.
Authentication Workflows
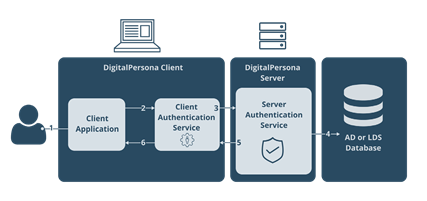
Generic Authentication Workflow in Connected Mode
The following diagram shows the generic authentication workflow, i.e. irrespective of the authentication factor used, when a DigitalPersona Client is connected to the DigitalPersona Server.
-
The user is asked to provide one or more supported credentials.
-
The Client Authentication Service receives the credential data from the Client Application.
-
The Client Authentication Service sends the request to the Server Authentication Service, including the user name, credential data and the name of the requested resource.
-
The Server Authentication Service receives the request, acquires the user credential data and obtains the requested resource from the AD or AD LDS database.
-
The Server Authentication Service matches the user credential data received from the Client Authentication Service with data from AD or AD LDS storage, and verifies that the user is authorized to access the requested resource.
-
Upon verification, the Client Authentication Service returns the requested resource data to the Client Application.
Generic Authentication Workflow in Disconnected Mode
The following diagram shows the generic authentication workflow, i.e. irrespective of the authentication factor used, when the DigitalPersona Client is not connected to a DigitalPersona Server.
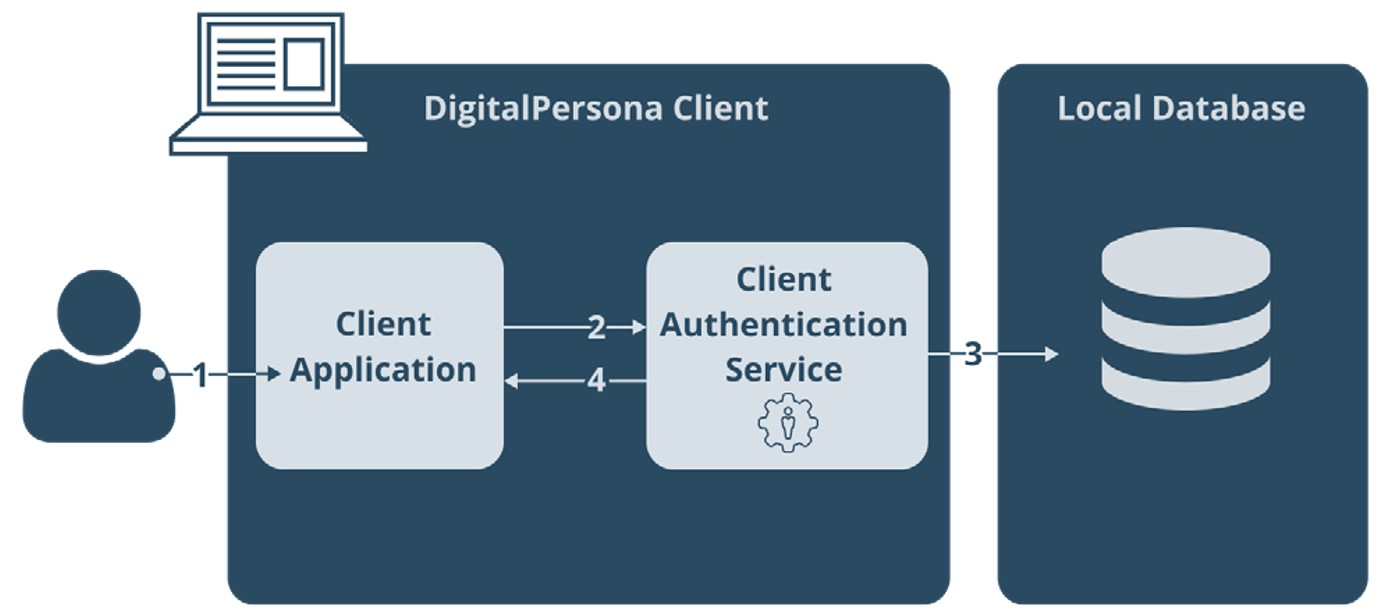
If a DigitalPersona Server is not accessible (and user data caching has not been prohibited through use of a GPO policy), the Client Authentication Server will perform in Disconnected Mode, returning the requested resource from the local machine's read-only cache storage.
The administrator can prohibit local data caching by disabling the Cache user data on local computer setting in the governing GPO.
-
The user is asked to provide their credential.
-
The Client Application sends user credential data to the Client Authentication Service.
-
The Client Authentication Service requests the user's stored credential data and the requested resource from the Local Data Storage.
-
The Client Authentication Service compares the user's credential data received from the user with their credential data from the Local Data Storage and verifies that the user is authorized to access the requested resource.
-
If the credential data matches and the user is authorized for the requested resource, the Client Authentication Service returns the requested resource data to the Client Application.
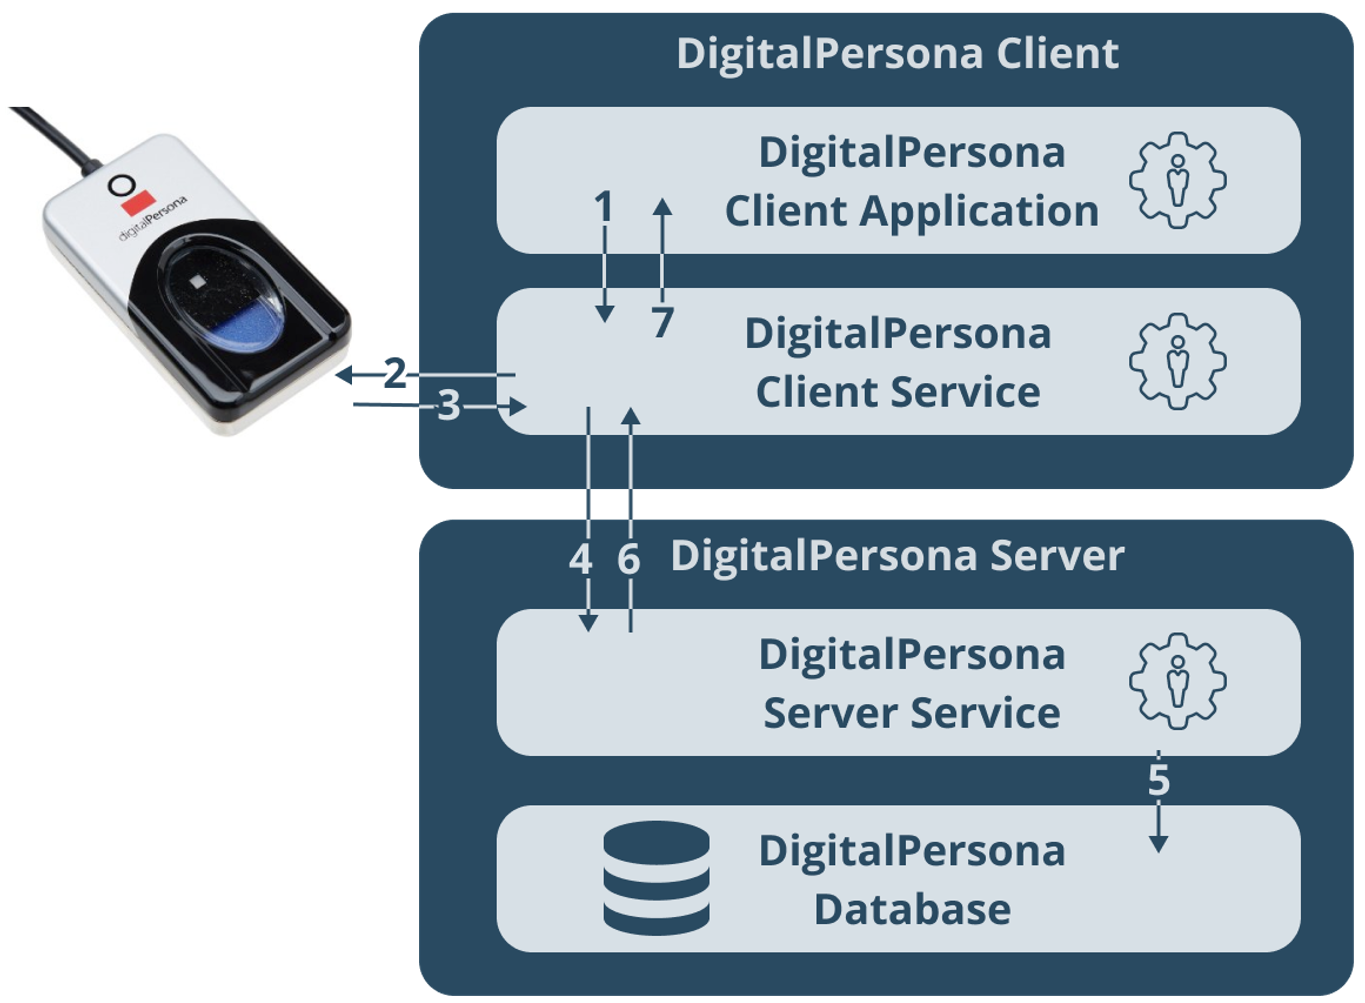
Fingerprint Authentication Workflow
The following illustration shows an example of Authentication Data flow using Fingerprint Authentication.
-
The Client Application requests fingerprint authentication. The request is directed to the Client Service. The Client Application uses DPFP API UI to display a GUI prompting the user to touch/swipe the fingerprint device.
-
The Client Service establishes a connection with the fingerprint device(s) attached to the PC and waits for feedback.
-
When a user touches/swipes the fingerprint reader, the reader sends a fingerprint image back to the Client Service, which then processes the fingerprint image and creates the fingerprint feature set.
-
The Client Service sends the created fingerprint feature set to the Server Service for fingerprint matching.
-
The Server Service receives the fingerprint authentication request from the Client Service. It retrieves the user fingerprint templates stored in the database during enrollment.
-
The Server Service compares the fingerprint feature set received from the Client Service with the fingerprint templates stored in the Database and returns the match result back to the Client Service.
-
The Client Service returns the match result received from the Server Service to the Client Application. fingerprint matching.
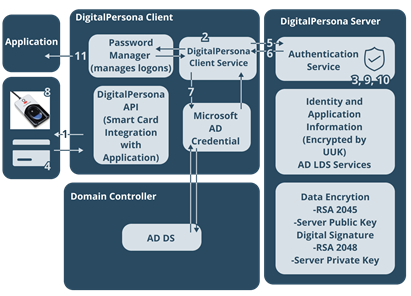
Smart Card and Fingerprint Authentication Data Flow
-
The user inserts a smart card. The DigitalPersona Client detects that the card has been inserted and prompts the user for a PIN.
-
After the PIN is entered, the DigitalPersona Client performs Microsoft Kerberos Certificate Authentication to verify the Smart Card.
If the authentication succeeds, the DigitalPersona Client requests the Unified User Key (UUK) associated with the user account from the DigitalPersona Server for authentication.
The UUK is encrypted with the public key from the smart card and provides access to the identity information held in the DigitalPersona Server.
-
The DigitalPersona Server identifies the UUK and returns the encrypted UUK to the DigitalPersona Client.
-
The DigitalPersona Client forwards the encrypted UUK to the smart card, where it is decrypted by the private key on the card and returned to the DigitalPersona Client.
-
The decrypted UUK is then encrypted and signed by the DigitalPersona Client and returned to the DigitalPersona Server for authentication.
-
Once the UUK is authenticated, the DigitalPersona Server sends the authentication back to the DigitalPersona Client.
-
The DigitalPersona Client checks the policy rules, and if biometric authentication is required, waits for authentication with this second factor.
-
Once the user enters their PIN, they touch/swipe their finger using the fingerprint reader. Using DCOM communication procedures, the DigitalPersona Client sends the fingerprint template to the DigitalPersona Server (signed and authenticated by Kerberos).
-
The DigitalPersona Server checks its database for a fingerprint template associated with the account linked to this user. If the templates match, there is biometric authentication.
-
The DigitalPersona Server sends the biometric authentication to the DigitalPersona Client. With smart card and biometric authentication complete, the DigitalPersona Server provides access to the identity information for the appropriate application.
-
Identity information is then returned to the DigitalPersona Client.
One-Time Password (OTP) Push Notification
A One-Time Password (OTP) credential uses an automatically generated time-sensitive numeric code for authentication.
With OTP Push Notification, a software token is generated by the DigitalPersona software and sent to a mobile device where the user can Accept or Deny its use for authentication.
The OTP credential can be used for authentication at Windows logon and within a Windows session as defined by the Logon or Session Policy in force, as well as for DigitalPersona Password Manager trained applications, websites or network resources and SAML-compliant portals such as Office 365.
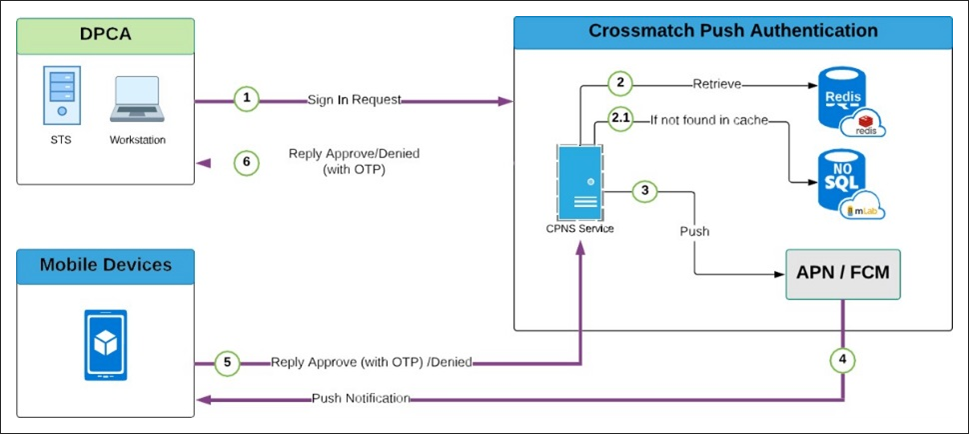
OTP Push Notification workflow.
The diagram below describes the basic architecture and workflow for OTP Push Notification.
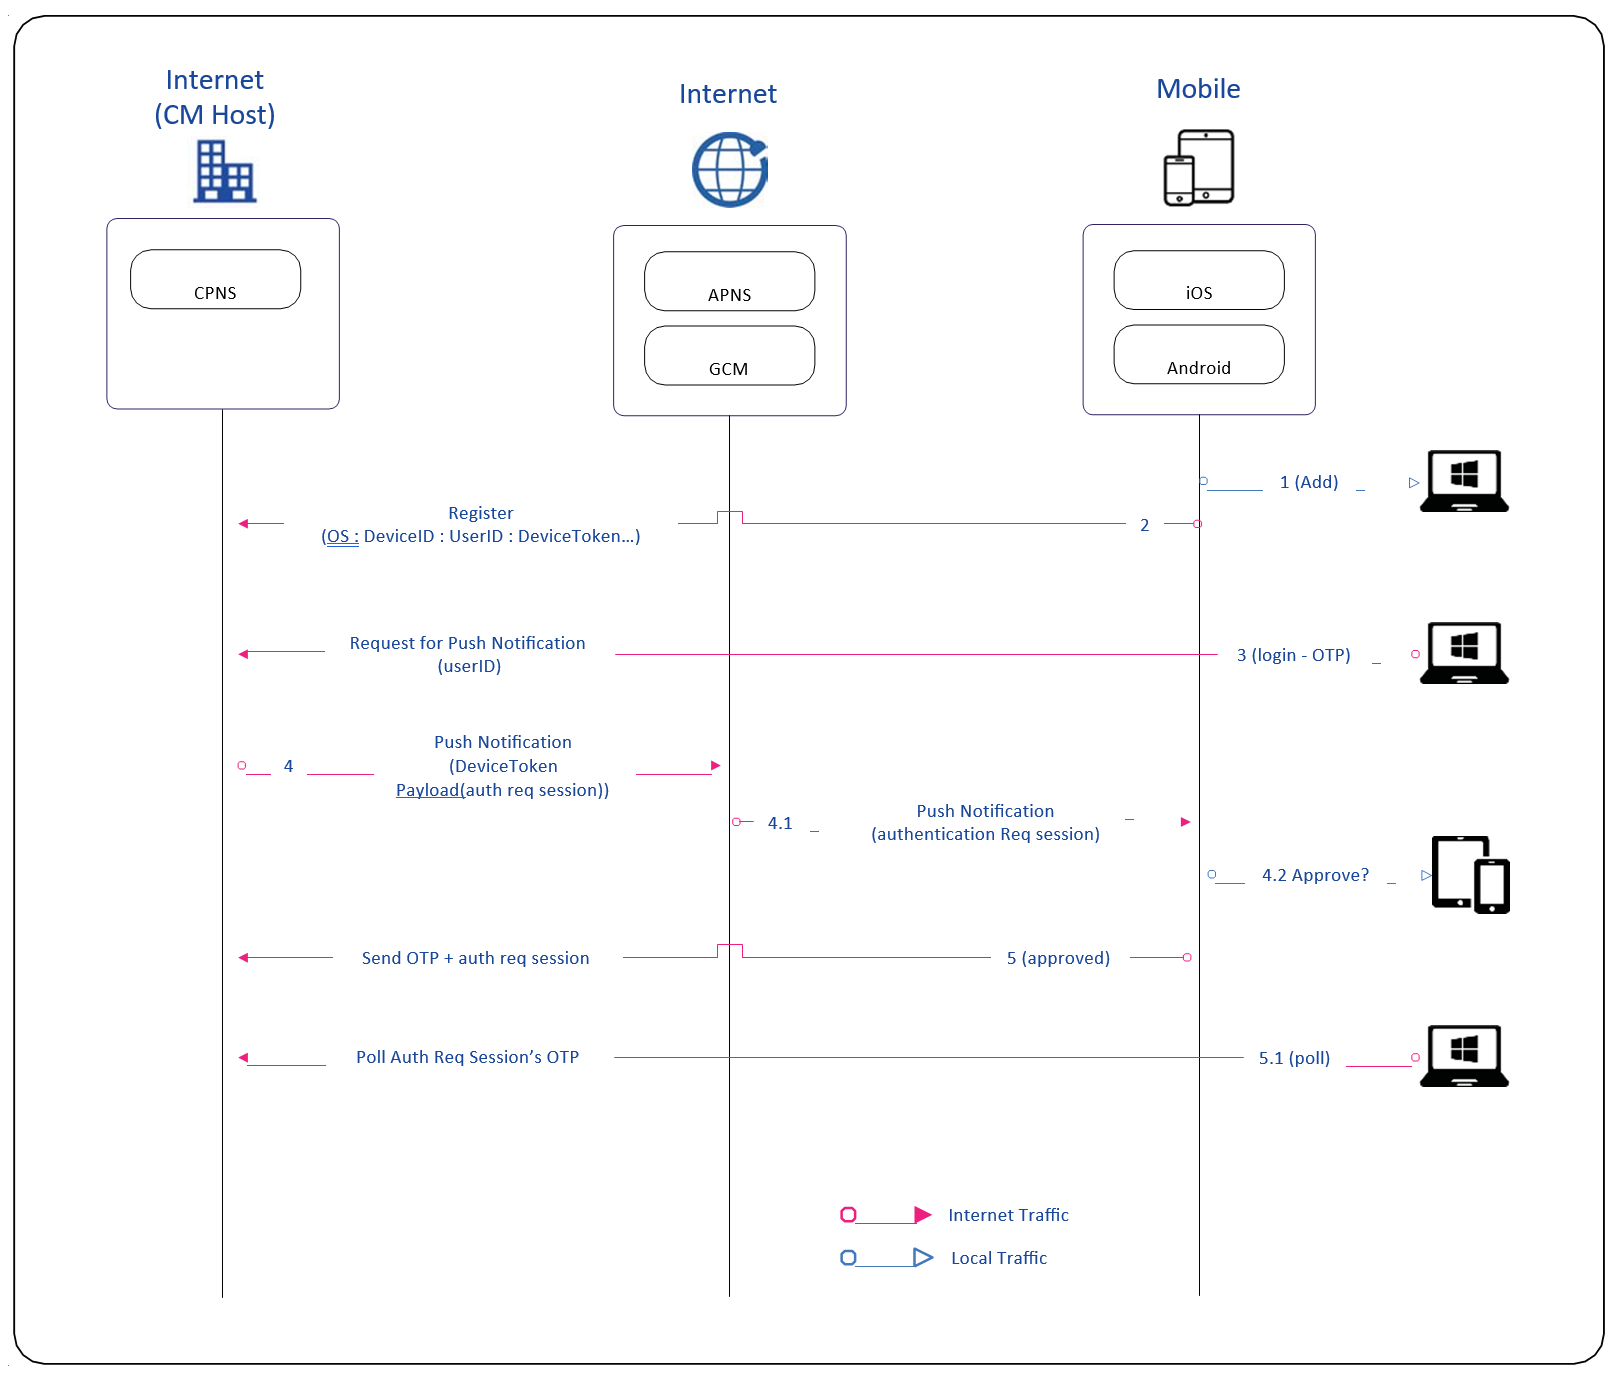
The steps that follow assume previous registration and configuration of the Crossmatch Push Notification Server (CPNS) address in the Crossmatch Mobile app.
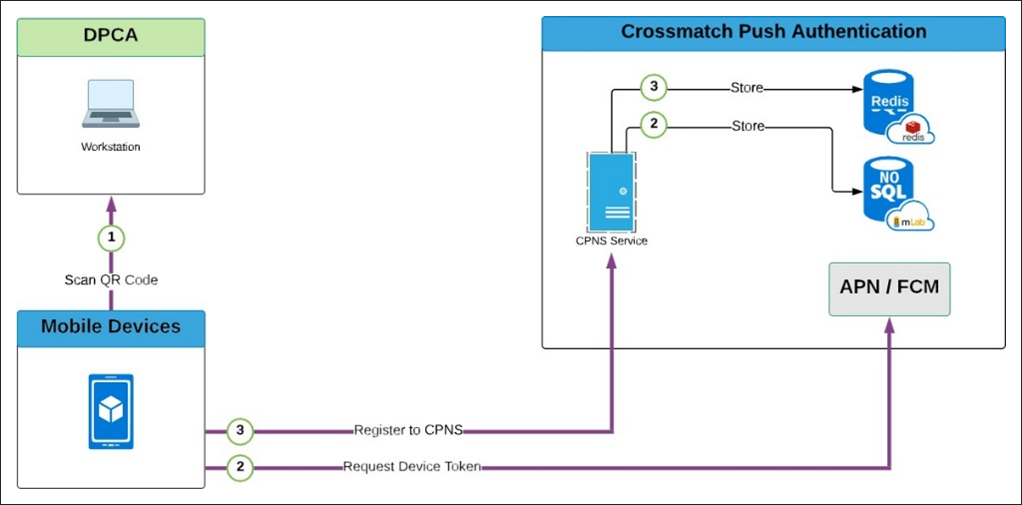
-
Register OTP authentication by scanning the provided QR Code, encoded with the Secret Key, Provider, User and BLE.
-
The app sends the registration information to DigitalPersona. It contains data specific to the device and an OTP code to validate the user who owns the account in the synchronous call.
-
The user begins login to the workstation using One-Time Password Push Notification. The DigitalPersona Client sends a request to the DigitalPersona Server - CPNS.
-
The DigitalPersona Server looks up the User ID and compiles a push notification message containing the Device Token to the Apple Push Notification Service (APNS) or Google's Firebase Cloud Messaging (FCM) service.
-
APNS/FCM push notification is sent to the mobile device.
-
The notification is received and displayed on the mobile device and if approved, the OTP is sent to the DigitalPersona CPNS.
-
The user approves the request on the mobile device and the OTP is submitted to the CPNS.
-
The DigitalPersona Client pulls the OTP code using the auth req session ID.
Crossmatch Push Notification Service (CPNS)
The Crossmatch Push Notification Service (CPNS) is a cloud based service provided by Crossmatch that delivers a Time-based One-Time Passcode (TOTP) to a device using the Push Notification mechanisms provided by the Apple Push Notification service (APNs) and Google's Firebase Cloud Messaging (FCM) solution.
The CPNS is used to process registration and notification requests for DigitalPersona's One-Time Password (OTP) credential.
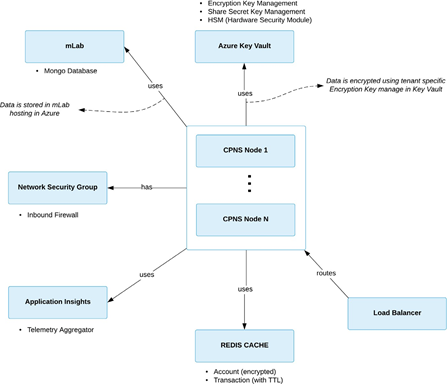
CPNS is currently hosted in Microsoft Azure (United States Region) and utilizes Microsoft Azure cloud services for data persistence, encryption, and caching. The image below illustrates the architecture of the CPNS.
Data Persistence
CPNS uses the Atlas MongoDB Database-as-a-Service deployed in a three-node cluster running in Microsoft Azure (United States Region). All sensitive data is stored encrypted (AES-256 bit) in the database and all communication between the MongoDB instance and CPNS is over HTTPS.
Data stored in the MongoDB is replicated with automatic failover on failure of the master node. Daily backups are stored in the Atlas account in Microsoft Azure (United States Region).
Data Caching
CPNS uses the Azure Redis cache service, hosted in Microsoft Azure (United States Region). It is deployed in a two-node (primary/secondary) configuration managed by Microsoft Azure.
DigitalPersona's configuration of the Redis cache is not persisted to any long-term storage (i.e. disk) and the user account data in the cache is encrypted (with AES-256 bits). The transaction data store in the Redis cache has a life span of 60 seconds TTL (Time to leave), it is the duration of a given Push Authentication request.
Encryption
Each tenant in CPNS generates their own unique 256 bit symmetric encryption key, which is then encrypted into KEK (Key Encryption Key) using the Azure Key Vault with HSM (Hardware Security Module). The KEK is processed by FIPS 140-2 Level 2 validated HSM.
Account Data Collection
CPNS collects a minimal amount of data for each tenant account. Data is encrypted using AES with the tenant's 256 bit encryption key before being persisted in the database. The table below describes the data collected and persisted in the database.
| Data | Description |
|---|---|
|
User ID |
The user id for the registering account, provided by the entity sending the push OTP request (e.g. user@crossmatch.com - AD's User UPN). This data is for display purposes only and is not used during the Push Authentication request. |
|
UserUUID |
The unique reference id for registering an account (e.g. AD ObjectGUID). This data is used for looking up the account for a given tenant during a Push Authentication request. |
|
TenantID |
The tenant id of the registering account (provided by Crossmatch when signing up for the Push Authentication service). |
|
OS |
The recipient device type (iOS or Android) of the device that the Push Authentication request will be delivered to. |
|
HwID |
Auto generated hardware id for the registering device (iOS, Android). It is generated by the DigitalPersona OTP Mobile App (the companion app for the Push Authentication Service). |
|
DeviceToken |
Unique device token provided by APNS (Apple Push Service) or FCM (Google Firebase Cloud Messaging). This is the ID that is required by APNS/FCM to deliver the push notification to the registering device. |
CPNS Workflows
Before a Push Authentication can be used, an individual account must be registered in the CPNS Service. The following images illustrate the CPNS registration workflow and the CPNS authentication workflow.
CPNS Registration Workflow
CPNS Authentication Workflow
Push OTP workflow (in DigitalPersona v3.5 and later)
-
The user initiates Push OTP authentication from an end-point DigitalPersona client.
-
The DigitalPersona client talks to the DigitalPersona Server.
-
The DigitalPersona Server talks to CPNS.
-
CPNS talks to the soft OTP token.
-
An Allow or Deny goes back to CPNS, then to the DigitalPersona Server and finally to the DigitalPersona client.
-
If step 2 or 3 above fails: for example a remote user is disconnected or the domain controller loses internet access, then:
-
The DigitalPersona client talks to CPNS.
-
CPNS talks to the soft OTP token, Allow or Deny goes back to CPNS, then to the DigitalPersona client.
-


