Using DigitalPersona Workstation
DigitalPersona Workstation is a robust and fully featured workstation client which allows you to significantly and easily increase the security of computers in your enterprise. Its specific features, options and behavior can be configured though Active Directory GPOs and other tools.
-
Attended Enrollment, an optional component of DigitalPersona Workstation, allows administrators to assign a specific user or group to supervise the credential enrollment process. See Using DigitalPersona Attended Enrollment.
-
DigitalPersona Kiosk, a separate DigitalPersona client with many of the same features, provides users with fast, convenient and secure multi-factor identification and authentication in environments where users share a common Windows account yet need separately controlled access to resources, applications and data. See Using DigitalPersona Kiosk.
Most of the content in this section is written from the end-user perspective, and can also be accessed from the various DigitalPersona help features.
It addition to the end-user features described in the following sections, DigitalPersona AD Workstation may be used to provide multi-factor authentication on supported versions of Microsoft Windows Server (sometimes referred to as Client On Server or COS).
However, only the AD Workstation is designed to be installed on a domain controller. The LDS Workstation is not designed with this capability and will not work on a domain controller due to the fact that all domain users will become local users if you run the software on the domain controller.
In the above scenarios, if DigitalPersona Server is installed on the machine, DigitalPersona Workstation must be installed after the DigitalPersona Server and it must only be used for authentication.
Getting Started
By default, DigitalPersona credentials are enrolled through the DigitalPersona Attended Enrollment component. However, a DigitalPersona administrator may optionally choose to allow Windows users to self-enroll (that is, enroll their credentials through the DigitalPersona AD Workstation).
User Onboarding
The first time that an unenrolled user attempts to log on to a computer where a DigitalPersona Workstation client is installed, self-enrollment is not disabled and a Multi-Factor Authentication policy is being enforced, the onboarding procedure is triggered.
For example:
-
The DigitalPersona Logon Policy is Password plus PIN and a user has never enrolled a DigitalPersona credential before.
-
The user attempts to log on using their password or a PKI Smart Card.
-
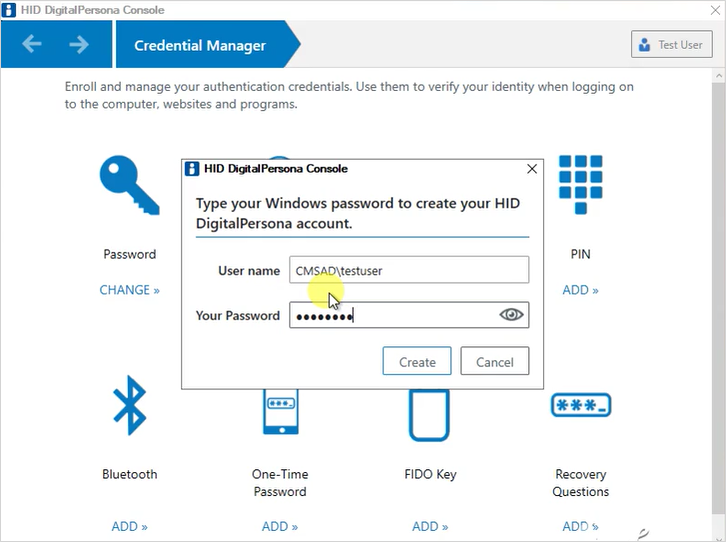
The HID DigitalPersona Console displays, with a window where the user can create a DigitalPersona account, needed in order to enroll the PIN credential.
-
The user enters their password and clicks Create in order to establish their HID DigitalPersona account.
Once the account is created, if the user is unable to enroll any credentials, the onboarding process will not appear again. In this case, an administrator may use Attended Enrollment to assist the user in enrolling any additional required credentials.
-
They close the Console by clicking on the Close (X) button in the upper right portion of the window.
-
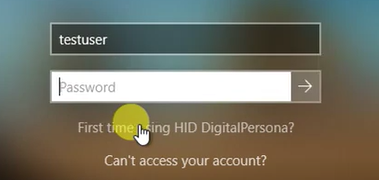
The Windows Logon screen redisplays, with a new link - First time using HID DigitalPersona?
-
The user clicks the link to redisplay the HID DigitalPersona Console.
-
They authenticate with their password and then click the PIN tile to enroll their personal PIN.
-
They close the Console by clicking on the Close (X) button in the upper right portion of the window.
A message displays that the user can now use their credentials for authentication.
-
The Windows Logon screen re-displays.
-
The user enters their password, the system requests their PIN, they enter it and are logged on to Windows.
The DigitalPersona Console
The DigitalPersona Console is the central location for primary access to DigitalPersona Workstation features and settings.
Password Manager (which includes Quick Actions) is an optional feature that may be installed by selecting Custom as the Setup Type during installation.
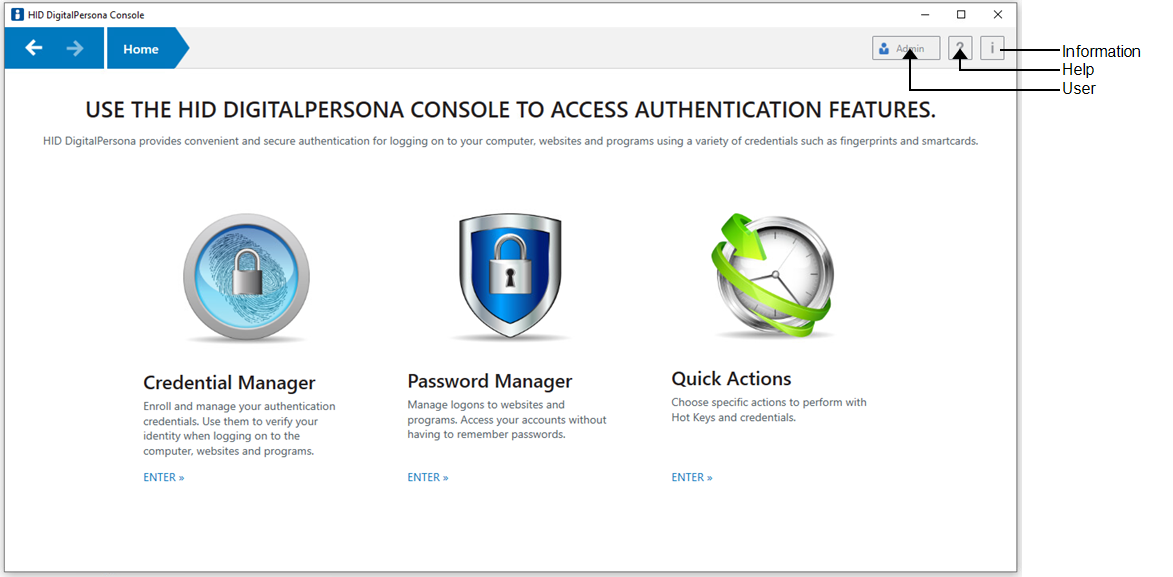
The DigitalPersona Console may include the following features.
-
Credential Manager - Enroll and manage DigitalPersona credentials and their settings.
-
Password Manager - (Optional) Create and manage Password Manager logons and accounts.
-
Quick Actions- Configure the DigitalPersona Hot Key sequence, and assign tasks to various credential and key+credential combinations. (Included with DigitalPersona Password Manager.)
-
Help - Displays online help for the DigitalPersona Console.
-
Information - Displays information about DigitalPersona Workstation, including the software version, copyright information and the DigitalPersona Server connection status.
-
User - Displays the Windows account name of the currently logged in user.
Microsoft Windows Authentication
Once your DigitalPersona Workstation client has been installed, logon (authentication) to Windows is controlled by the Logon Authentication Policy and Enhanced Logon Policy, which are set by GPOs in Active Directory. The path to these settings is: Computer Configuration\Policies\Software Settings\DigitalPersona Client/Security/Authentication
For a complete description of these policies, see Logon Authentication Policy.
Credentials that may be used to authenticate for Windows logon will be limited to those specified in the policy and supported by required hardware or software present on the workstation.
Some credentials, such as PKI Smart Cards, need to be previously formatted and initialized using the manufacturer’s middleware. Contactless Cards must be enrolled by the end-user, on their computer, or through the DigitalPersona Attended Enrollment components (see Using DigitalPersona Attended Enrollment).
The actual process of using your DigitalPersona credentials will vary slightly depending on the type of credential, but will generally follow Microsoft usage with the exceptions described in the following sections.
Multi-Factor Authentication
One of the primary benefits of the DigitalPersona solution is the easy implementation of multi-factor authentication (MFA), that is, requiring more than one credential in order to log on to Windows (and other resources as defined by the administrator).
When DigitalPersona MFA is enabled and you have logged on for the first time, the system will remember which credentials you have used to log on with, and the sequence they were used in. For example, if you used your Windows Password first and your fingerprints second, the next time you go to log on, you will not have to select these, but will automatically be presented with the UI necessary to authenticate with those credentials in that order.
Card Authentication
To use a Contactless ID card to log on to Windows, you must click your user tile on the Windows Logon screen before presenting the card. Then you can use a Contactless ID card in conjunction with another credential as specified by the Logon Authentication Policy in force.
A PKI smart card or Contactless Writable card may be presented directly from the Logon screen for immediate logon to Windows.
Locking/Unlocking
To lock a DigitalPersona-managed computer:
-
From the Start screen, click your user name and select Lock from the menu.
-
Press the Windows Logo key+L.
-
When configured by the DigitalPersona administrator, you can lock the computer by removing the card which was used to log on to Windows from the card reader.
To unlock a DigitalPersona-managed computer:
Use any authorized credential or required combination of credentials to unlock the computer and log on to the workstation.
Opening the DigitalPersona Console
You can open the DigitalPersona Console in any of the following ways:
-
From the Apps screen, under DigitalPersona, select DigitalPersona Console.
-
Double-click the DigitalPersona Workstation icon in the notification area, at the far right of the taskbar.
-
Right-click the DigitalPersona icon, and click Open DigitalPersona Console.
-
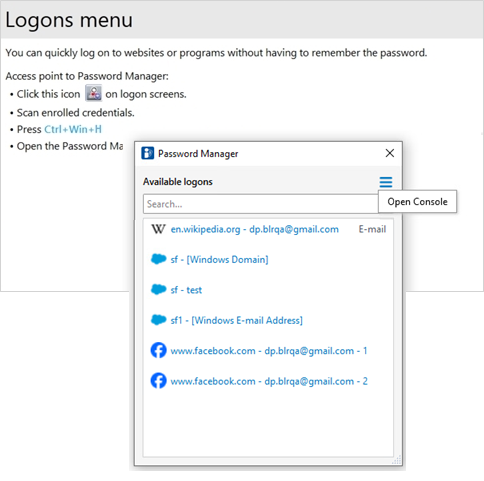
Press the hot key combination Ctrl+Win Logo Key+H to open the Logons menu and then click DigitalPersona Console (when no logons have been created yet) or Manage (after logons have been created.)