Identity Synchronization with Okta
Introduction
HID Visitor Manager provides the capability to automatically import and synchronize user information from Okta so that they are visible when searching for personnel, managing visits, and other activities related to the users within HID Visitor Manager. The following guide details steps to integrate the two systems. Note that SCIM protocol is used to handle the secure exchange of user identity data between the two systems.
Pre-Requisites
The following pre-requisites must be met before proceeding:
-
HID Visitor Manager account must be available with administrative access (assigned during account creation)
-
HID Visitor Manager account must be enabled with Okta add-on subscription.
-
Okta account and an administrator user account must be available (with privileges to create and manage applications)
Setup and Configuration
First, we will set up a new user source in HID Visitor Manager. Next, we will configure the Okta for SCIM provisioning. Lastly, we will focus on field mappings so that relevant identity data can be synced into HID Visitor Manager.
Step 1: Manage User Source in HID Visitor Manager
-
Login to HID Visitor Manager using your administrator account.
-
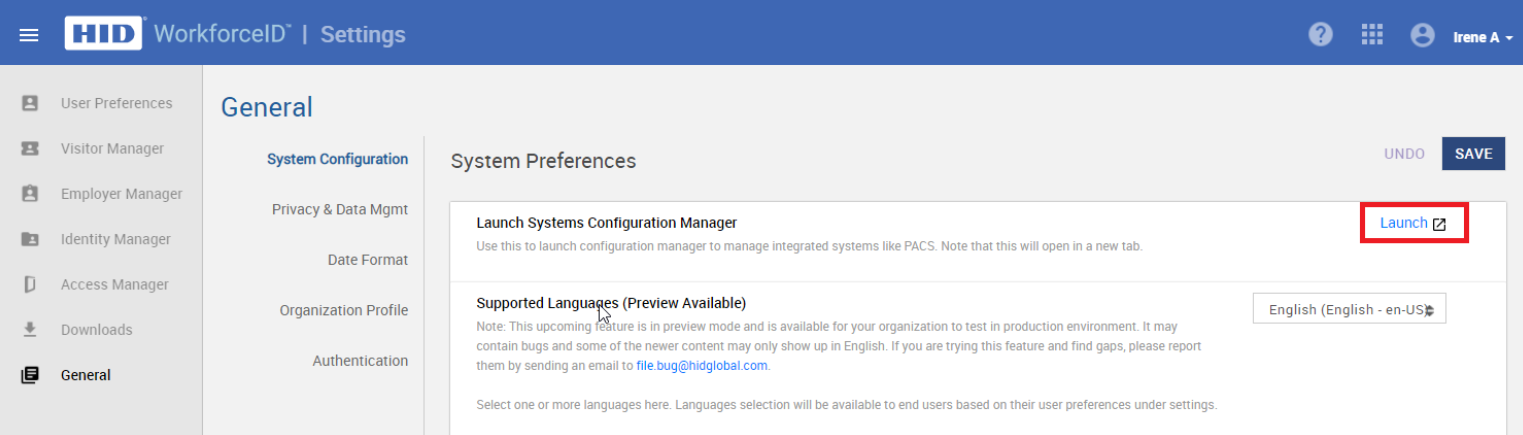
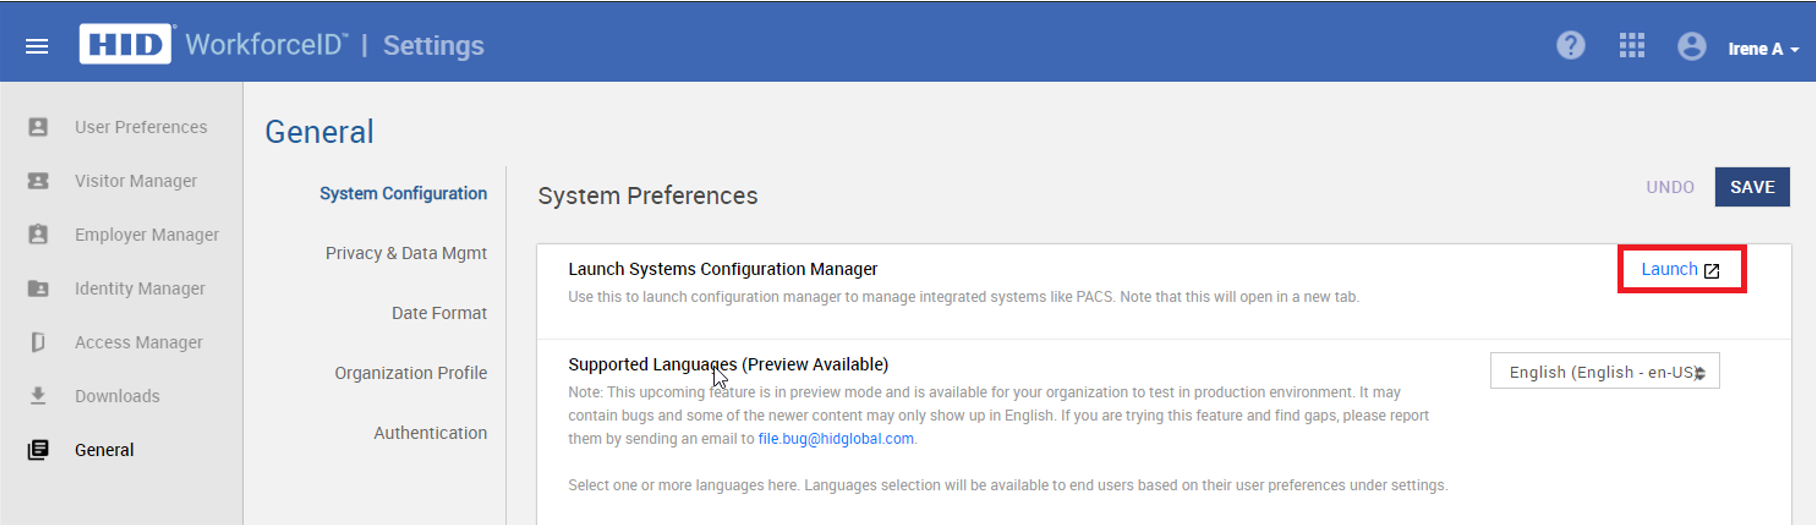
Navigate to Settings app luncher > General tab > System Configuration sub-tab.
-
Click Launch next to Launch Systems Configuration Manager.
-
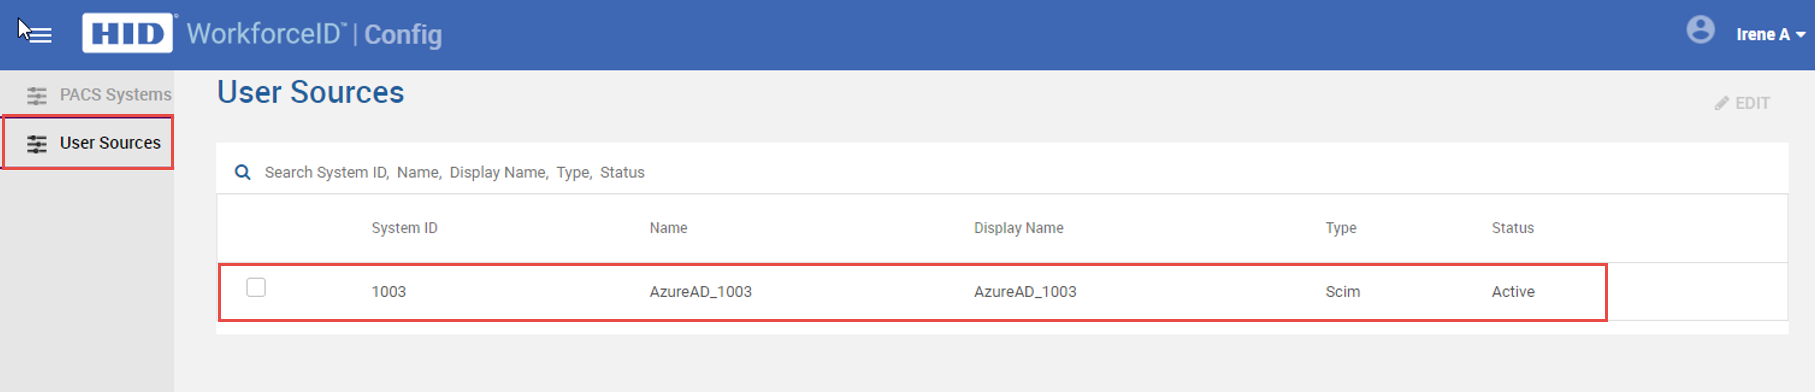
Click on User Sources and open the Azure AD configuration record. Note that this is only visible if the Azure AD add-on is enabled in HID Visitor Manager. Multiple user sources can be available here based on the license count.
-
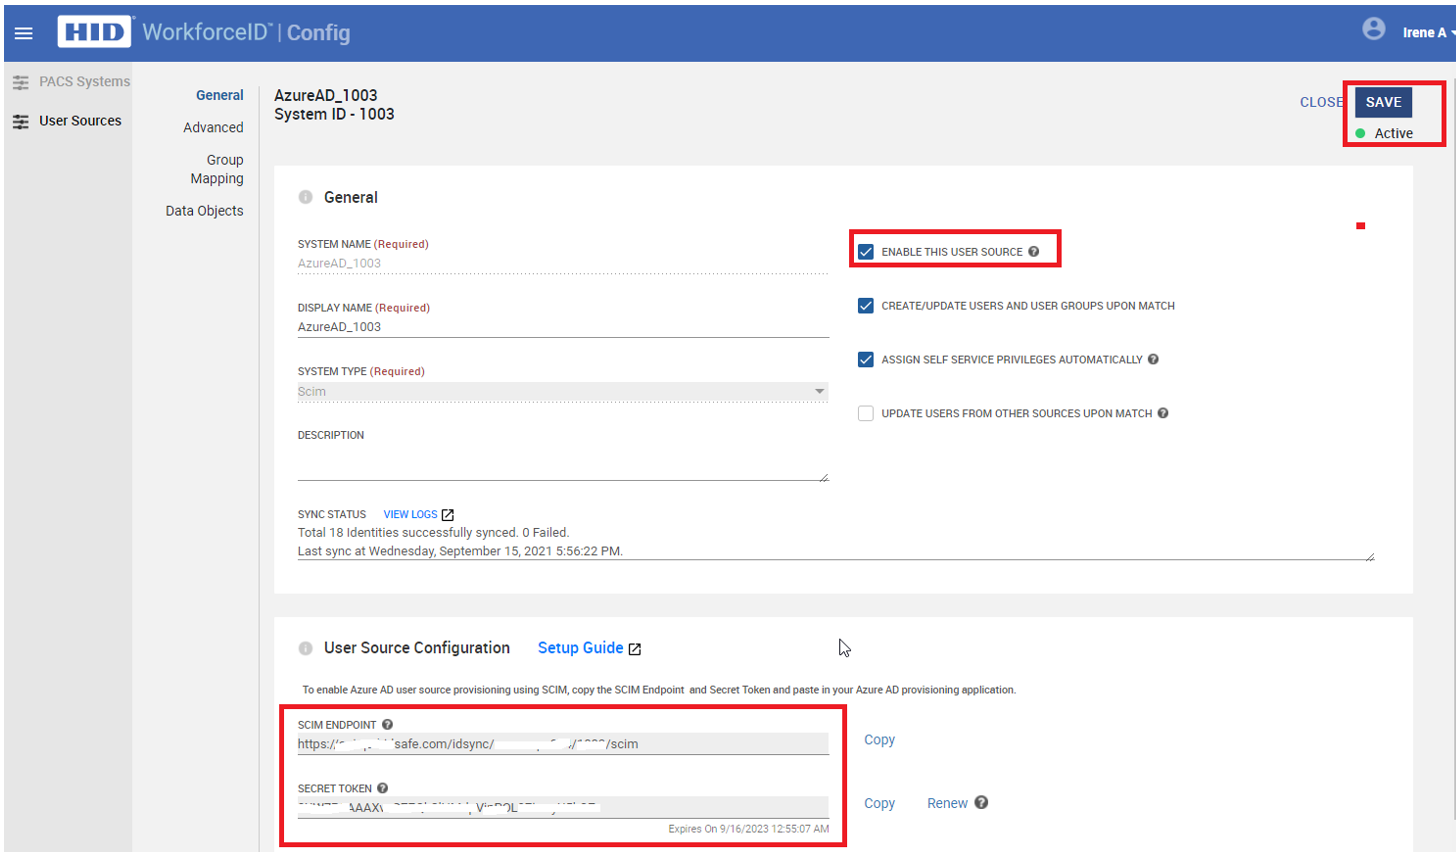
Enter the Display Name and Description as required and check the Enable this User Source checkbox. Do not change any other fields. Click SAVE.
-
After the new configuration is saved successfully, a new SCIM Endpoint and Secret Token are generated and displayed. These values will be used to configure the Okta provisioning connection described in the next section.
Note:-
All the options are checked by default except one. Below are brief explanations of each.
List of checkboxes Descriptions Enable this user source (checked by default)
Unchecking this will disable the ID sync feature for the user source. Create/update users and user groups upon match (checked by default) Unchecking this will temporarily stop syncing updates from Azure without disabling the whole ID sync feature. Assign self-service privileges automatically (checked by default)
If checked, this option will grant self-service privileges to the Identity by default. To learn more about self-service account and privileges, check out other help pages.
Update users from other sources upon match (Not checked by default)
By default, users from other user sources are not updated upon match and a sync failure would happen. If checked, any user in the system with matching attributes will be updated. This is typically used during migrations when users may exist in two directories for a brief duration. The flag must be turned off at other times to prevent overwrites.
-
Step 2 - Enable Okta SCIM Provisioning
Once User Source is setup in HID Visitor Manager using above steps, the single sign on has to be enabled by following the "Enable SAML Authentication in Okta" section in Single Sign On using SAML guide. After setting up SSO application can proceed further with following steps for setting up SCIM provisioning.
-
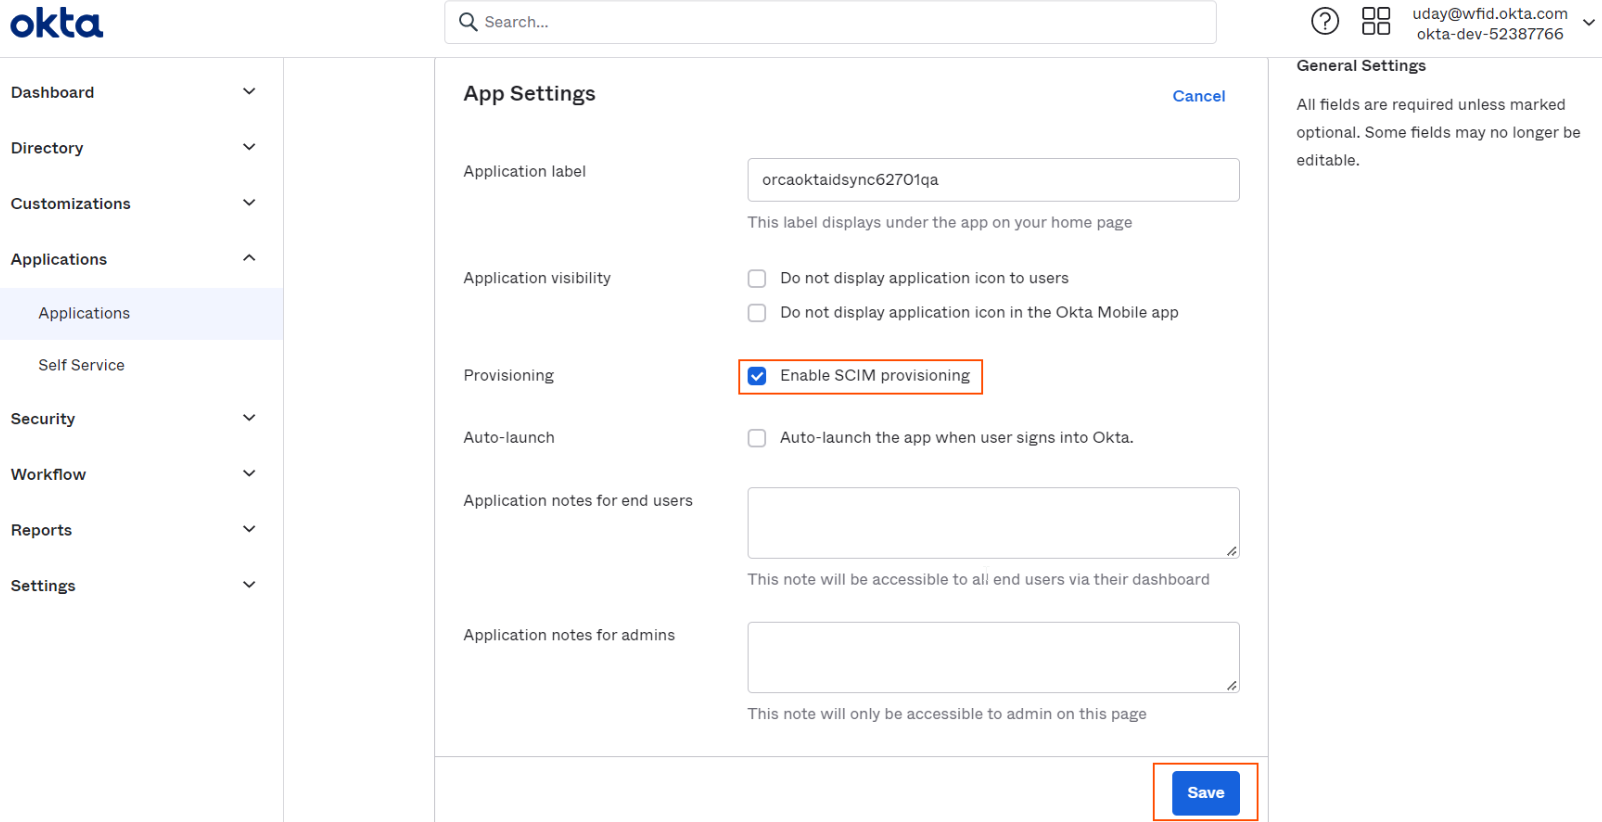
Login to Okta as administrator and go to Applications > Applications and select the application created using Enable SAML Authentication in Okta step.
-
Select the General tab and click on Edit button.

-
Click on Enable SCIM Provisioning and click on Save button.
-
On enabling SCIM provisioning, new tab Provisioning will be added to the application. Select Provisioning tab and click on Edit button under Integration Settings. Following settings for SCIM Connection has to be filled in.

-
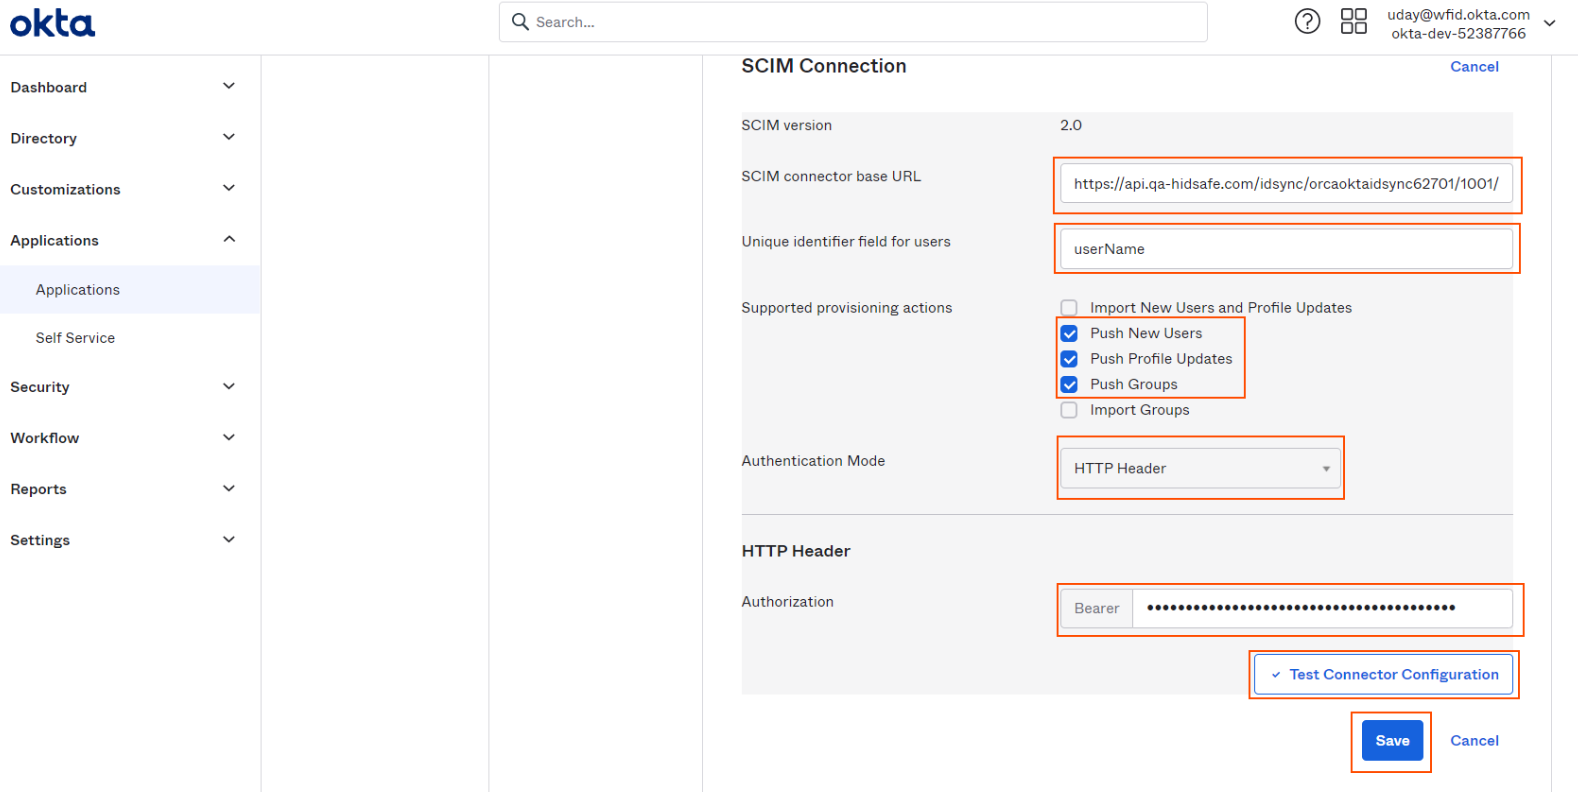
Following settings for SCIM Connection has to be filled in.
-
For SCIM connector base URL, copy "SCIM Endpoint" from HID Visitor Manager User Source (check Step 1, 6th statement)
-
Enter "userName" for "Unique identifier field for users"
-
Supported provisioning actions, select "Push New Users", "Push Profile Updates", "Push Groups"
-
Authentication Mode, select "Http Header" from the combo
-
For Authorization > Bearer token copy "Secret Token" from HID Visitor Manager User Source (check Step 1, 6th statement).
-
-
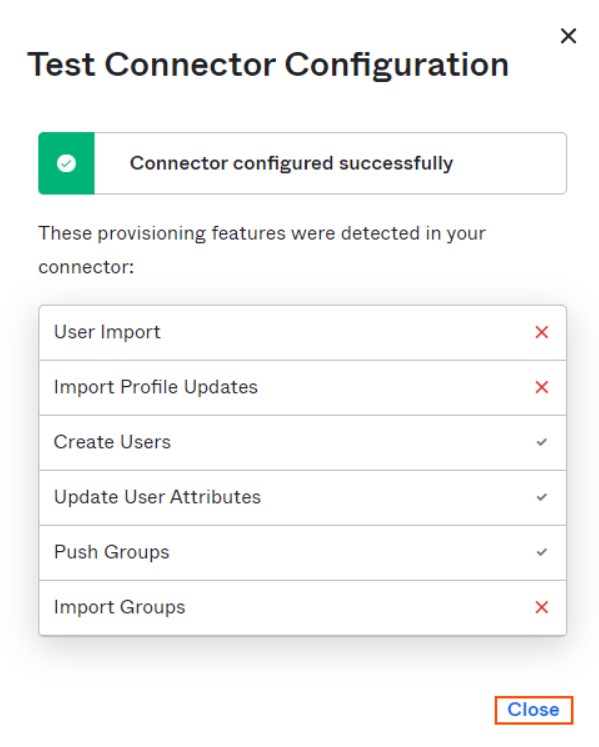
Click on Test Connector Configuration button for testing above settings.
-
On successful connection Okta will display following screen, click Close.
-
Click on Save button on SCIM connection screen.
-
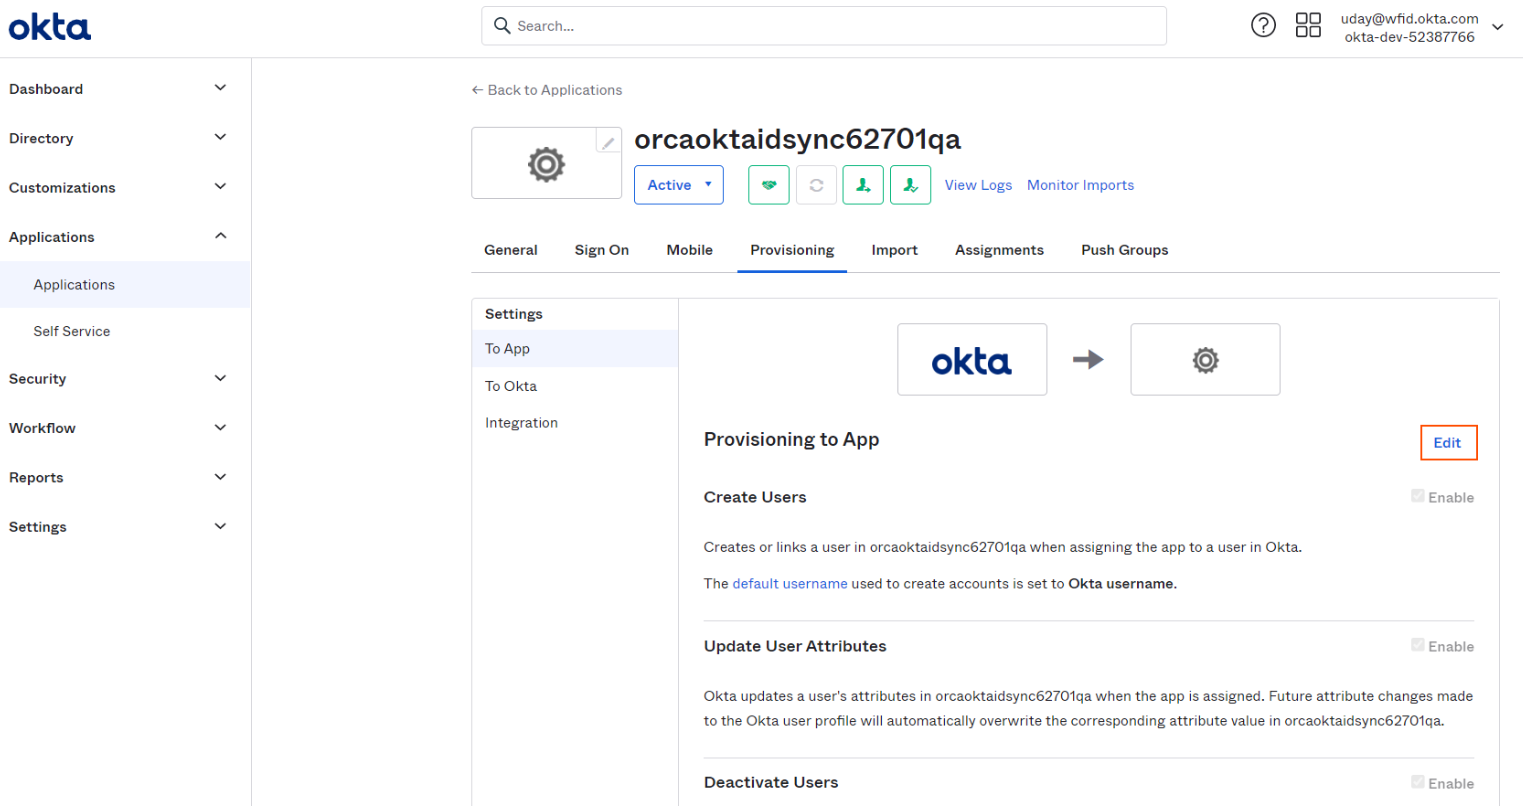
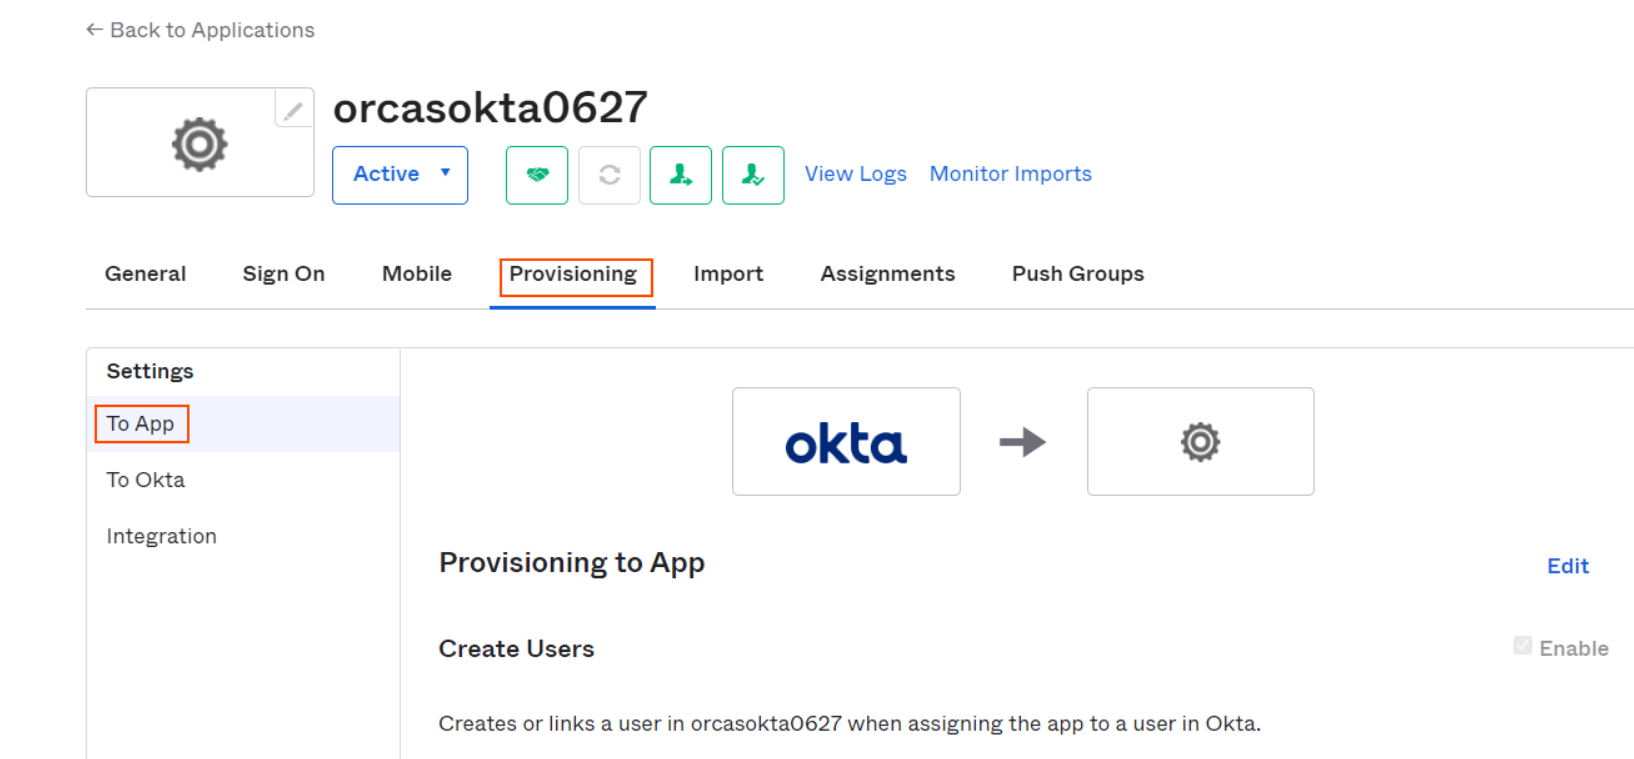
Go to To App tab and click on Edit button.
-
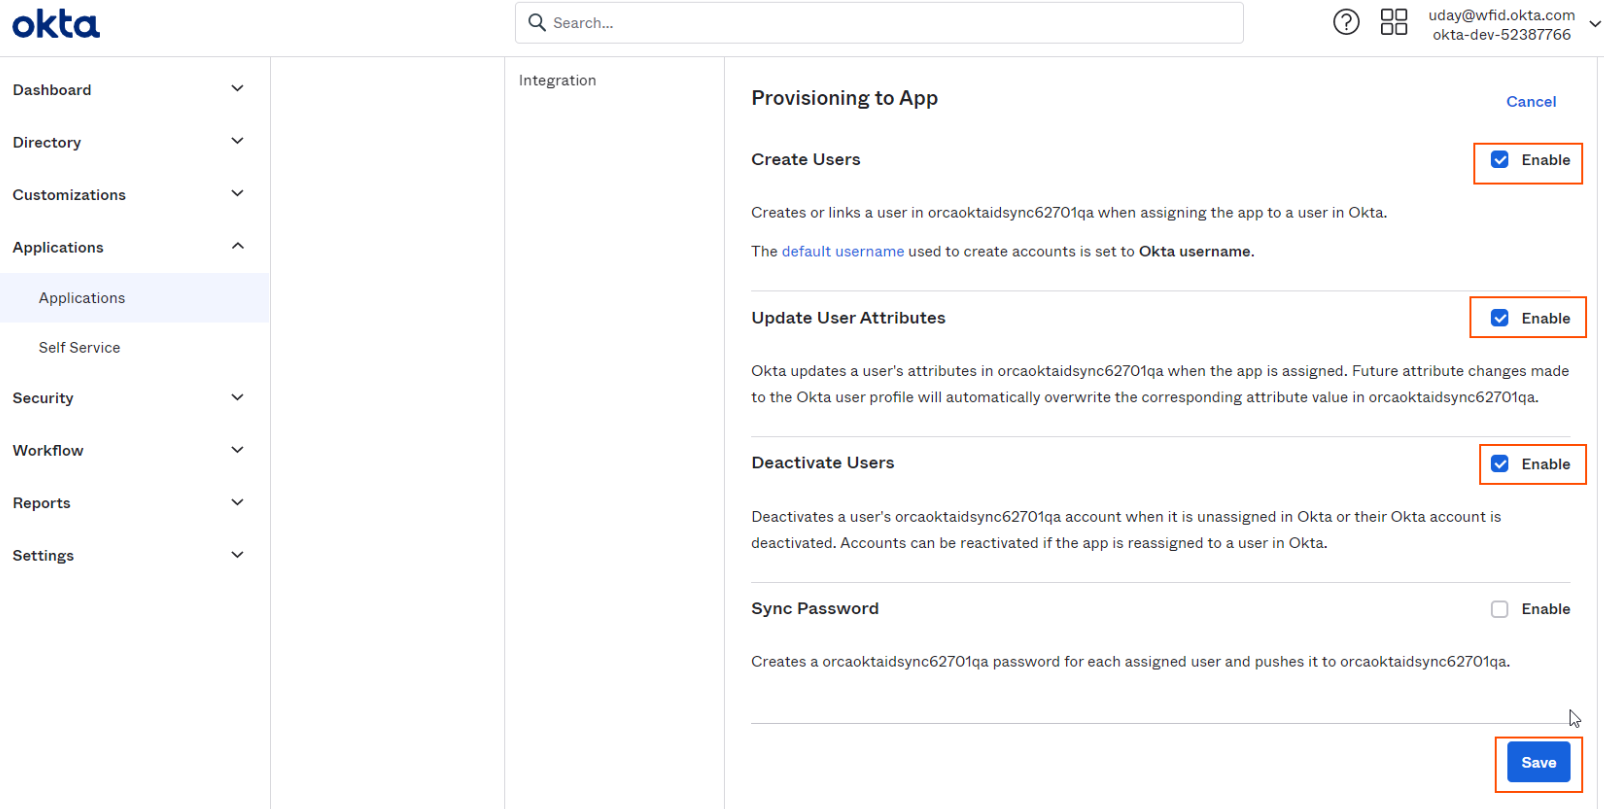
Click on Enable checkbox for Create Users, Update User Attributes, Deactivate Users and click on Save button.
-
After completing above steps Okta SCIM connection configuration is completed.
Step 3 - Okta Attribute Mapping
The following table shows mapping between Okta to SCIM Schema for identity related fields. For SCIM Schema to HID Visitor Manager mapping please see "Reference Mapping" section below.
| Attribute | Attribute Type | Value |
|---|---|---|
| Username | Personal | Configured while enabling SCIM Provisioning. Unique identifier field for users |
| userName | ||
| Given name | Personal | user.firstName title |
| givenName | ||
| Family name | Personal | user.lastName |
| familyName | ||
| Middle name | Personal | user.middleName |
| middleName | ||
| Honorific prefix | Personal | user.honorificPrefix |
| honorificPrefix | ||
| Honorific suffix | Personal | user.honorificSuffix |
| honorificSuffix | ||
| Personal | user.email | |
| Primary email type | Personal | (user.email != null && user.email != '') ? 'work':" |
| emailType | ||
| Title | Personal | user.title |
| title | ||
| DisplayName | Personal | user.displayName |
| displayName | ||
| Nickname | Personal | user.nickName |
| nickName | ||
| Profile Url | Personal | user.profileUrl |
| profileUrl | ||
| Primary phone | Personal | user.primaryPhone |
| primaryPhone | ||
| Primary phone type | Personal | (user.primaryPhone != null && user.primaryPhone != '') ? 'work' : '' |
| primaryPhoneType | ||
| Address type | Personal | (user.streetAddress != null && user.streetAddress != '') ? 'work' : '' |
| addressType | ||
| Street address | Personal | user.streetAddress |
| streetAddress | ||
| Locality | Personal | user.city |
| locality | ||
| Region | Personal | user.state |
| region | ||
| Postal Code | Personal | user.zipCode |
| postalCode | ||
| Country | Personal | user.countryCode |
| country | ||
| Formatted | Personal | user.postalAddress |
| formatted | ||
| Preferred language | Group | user.preferredLanguage |
| preferredLanguage | ||
| Locale Name | Group | user.locale |
| locale | ||
| Time zone | Group | user.timezone |
| timezone | ||
| User type | Group | user.userType |
| userType | ||
| Employee number | Personal | user.employeeNumber |
| employeeNumber | ||
| Cost center | Group | user.costCenter |
| costCenter | ||
| Organization | Group | user.organization |
| organization | ||
| Division | Group | user.division |
| division | ||
| Department | Group | user.department |
| department | ||
| Manager value | Personal | user.managerId |
| managerValue | ||
| Manager display name | Personal | user.manager |
| managerDisplayName |
-
Some additional mappings & important mappings to note.
-
User.PostalAddress is mapped to Location in HID Visitor Manager, this field value has to match with location values.
-
User.managerId is mapped to manager in HID Visitor Manager, this value has to be the object ID of the manager user.
-
Okta sends 2 character country codes (Alpha 2) for User.country, where as WFID expects 3 character country codes (Alpha 3). It is suggested that to add an extra attribute and mapping as described below.
-
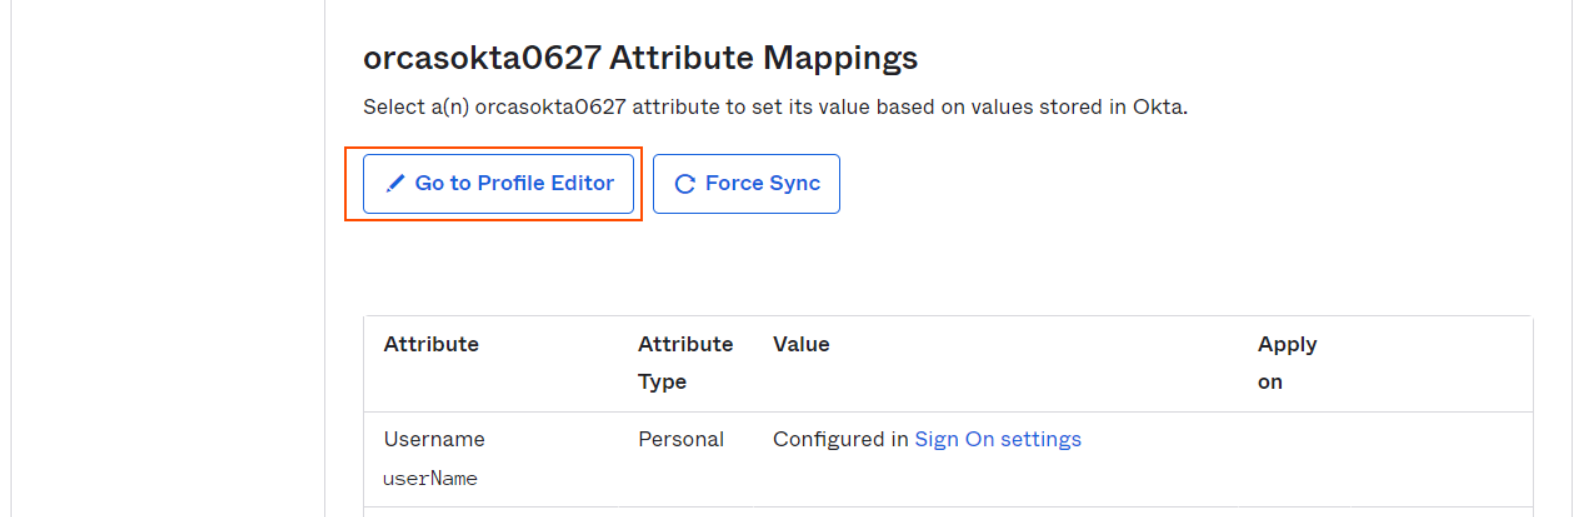
Go to Provisioning tab and click on To App and click on Go to Profile Editor
-
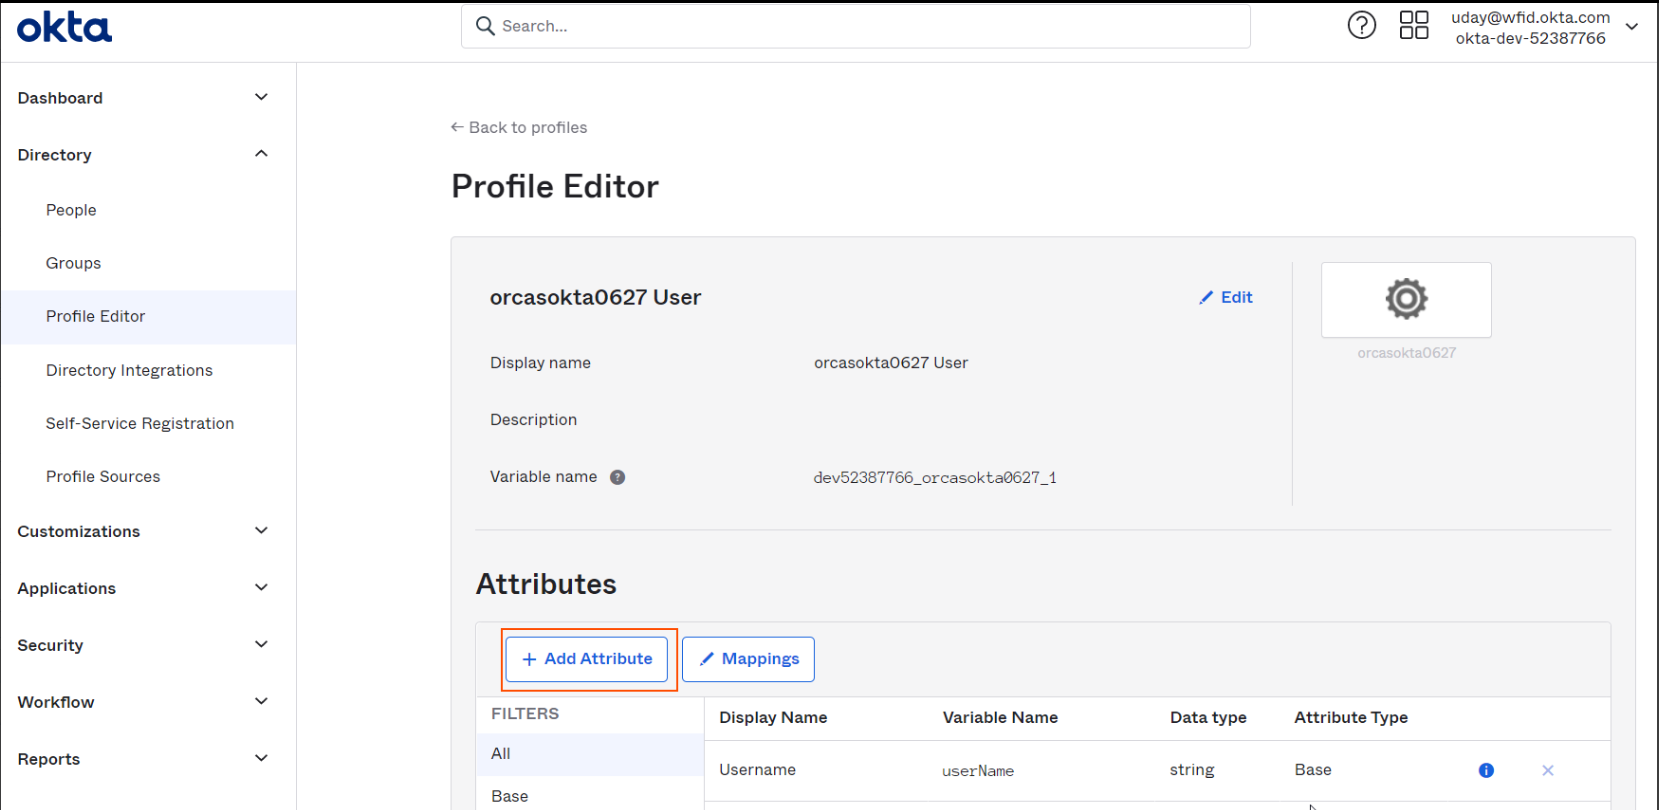
Click on Add Attribute button.
-
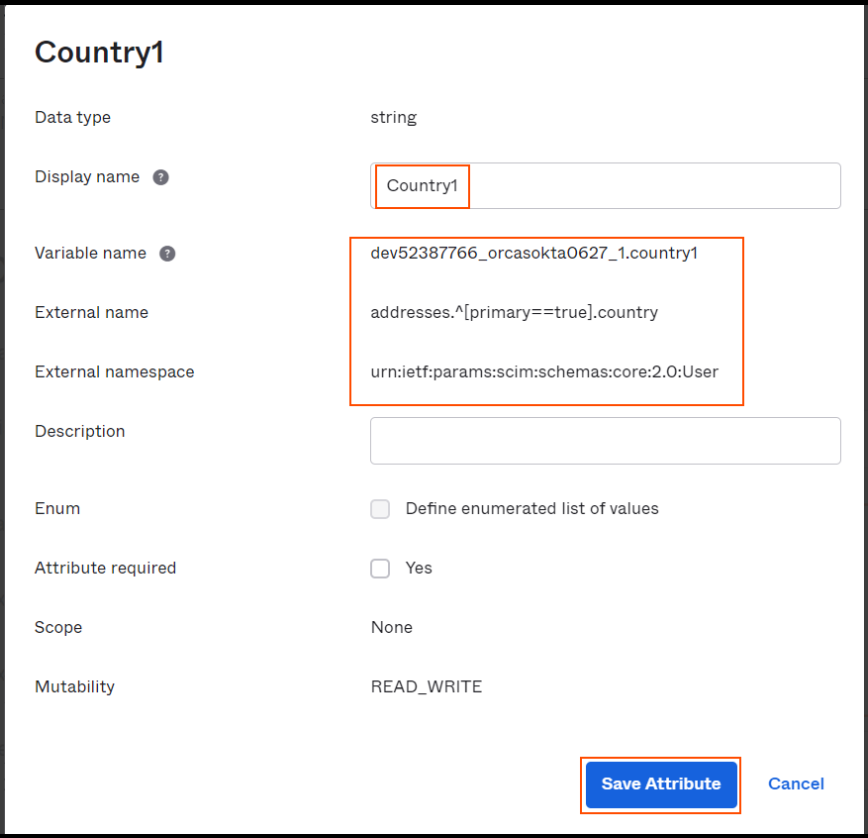
Add a custom attribute with following values and click on Save Attribute
-
Display Name : Country1 (or any name)
-
Variable Name : country1
-
External Name : addresses.^[primary==true].country
-
External namespace : urn:ietf:params:scim:schemas:core:2.0:User
-
-
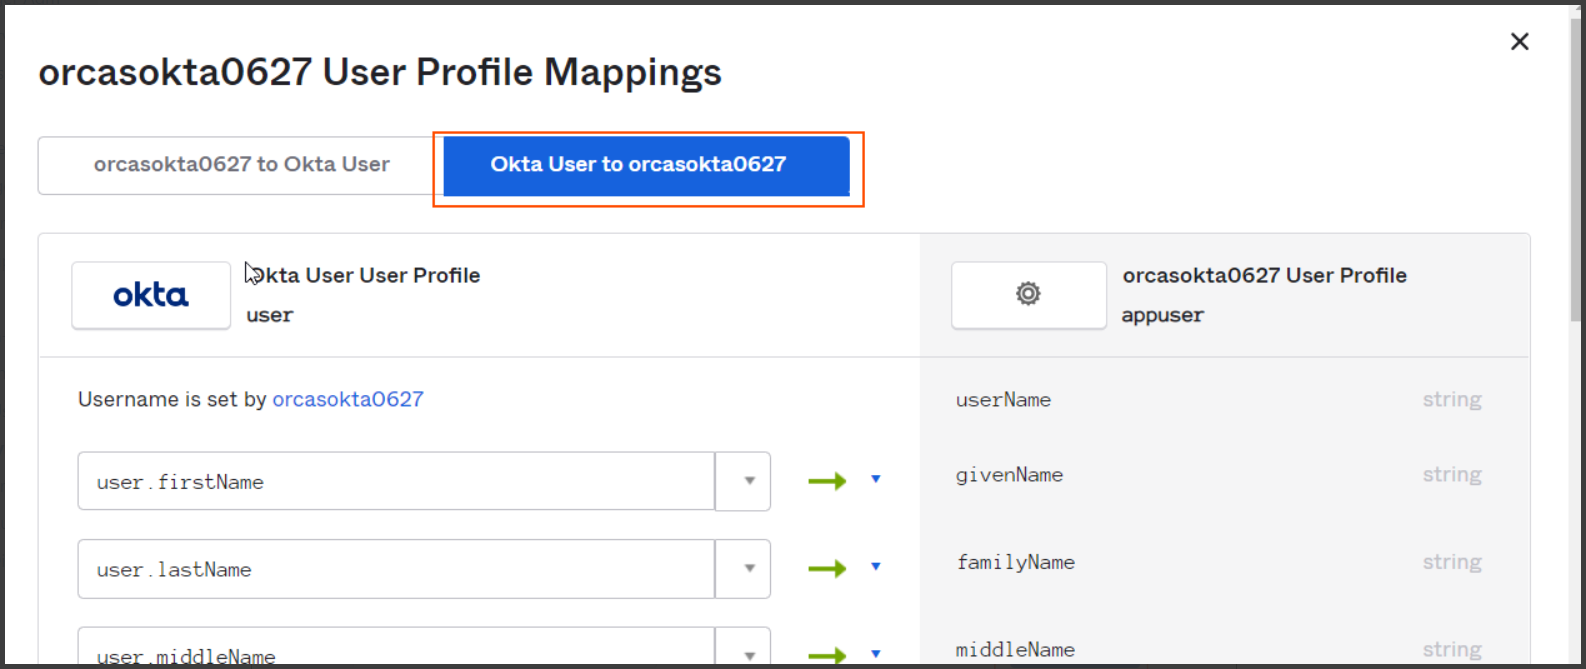
Then click on "Mappings" button and select "Okta User to {{ApplicationName}}" button as shown below
-
And add following expression as mapping for the newly created attribute for 3 character country code (Alpha 3) ("Iso3166Convert.toAlpha3(user.countryCode)") and click on "Save Mappings".

-
Step 4 - Okta Users Provisioning
Following section describes steps for provisioning individual users to HID Visitor Manager.
-
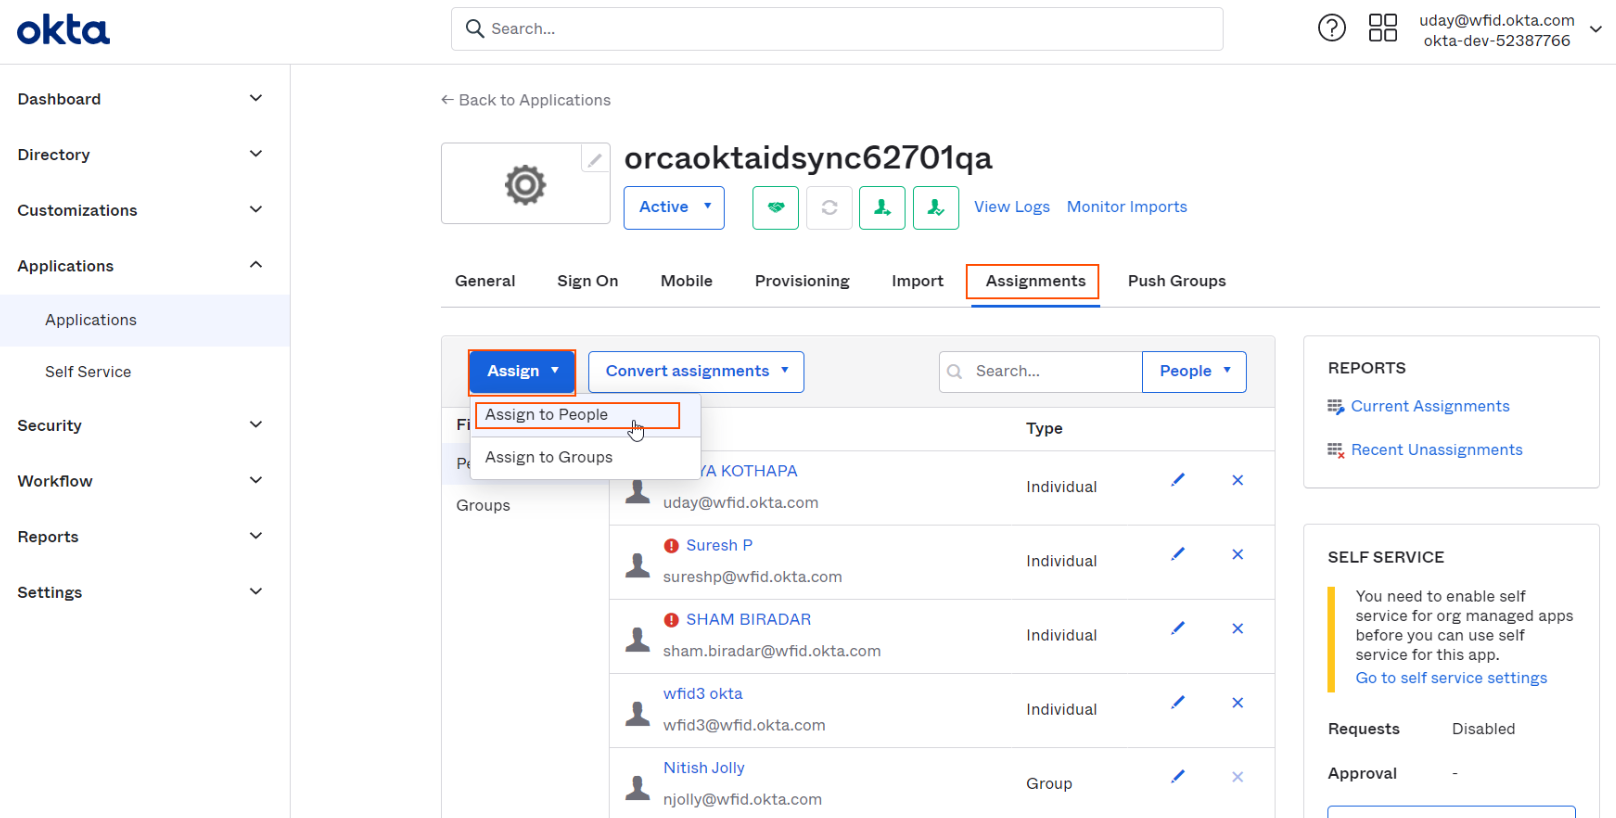
Select on Assignments tab and select "People" section and click on "Assign" button dropdown and select "Assign to People" to popup a people select dialog.
-
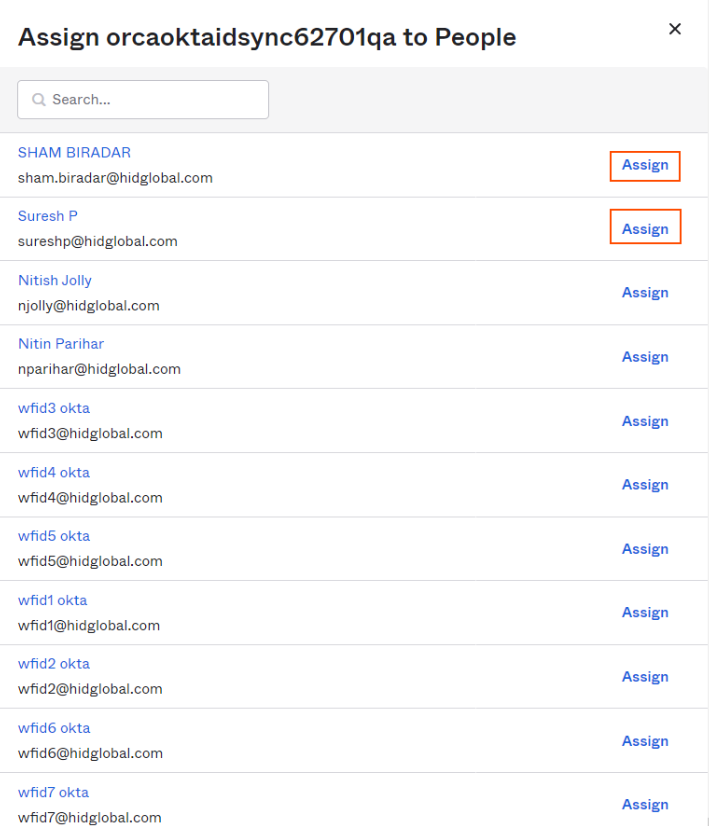
Click "Assign" on required users and click on "Done" button on the dialog.
-
Okta will start provisioning selected users as soon as dialog is closed.
Step 5: Okta Groups Provisioning
Following section describes steps for provisioning individual user groups to HID Visitor Manager.
-
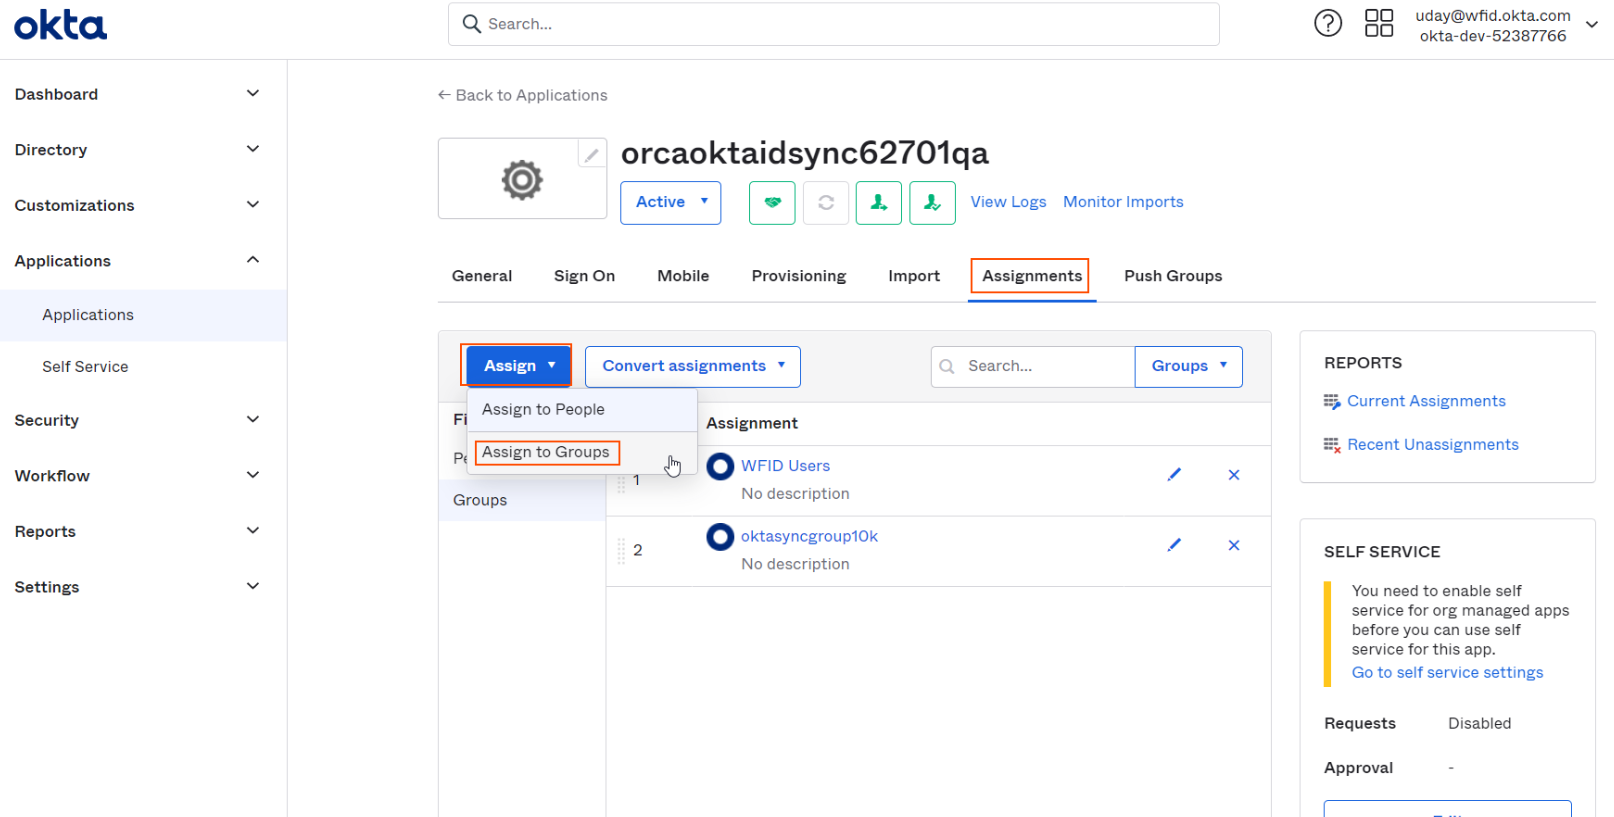
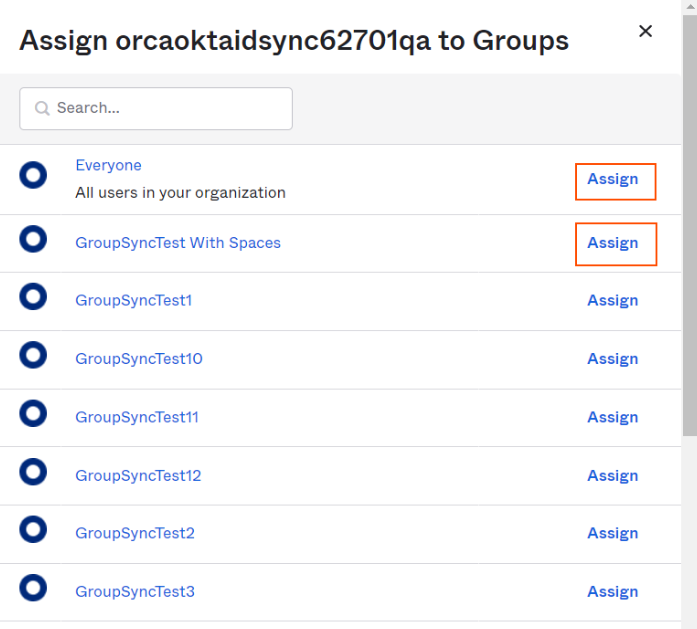
Select on Assignments tab and select "People" section and click on "Assign" button dropdown and select "Assign to Groups" to popup a groups select dialog.
-
Click "Assign" on required user groups and click on "Done" button on the dialog.
-
Okta will start provisioning selected groups users as soon as dialog is closed.
Step 6: Okta Push Groups
Following section details pushing groups to HID Visitor Manager.
-
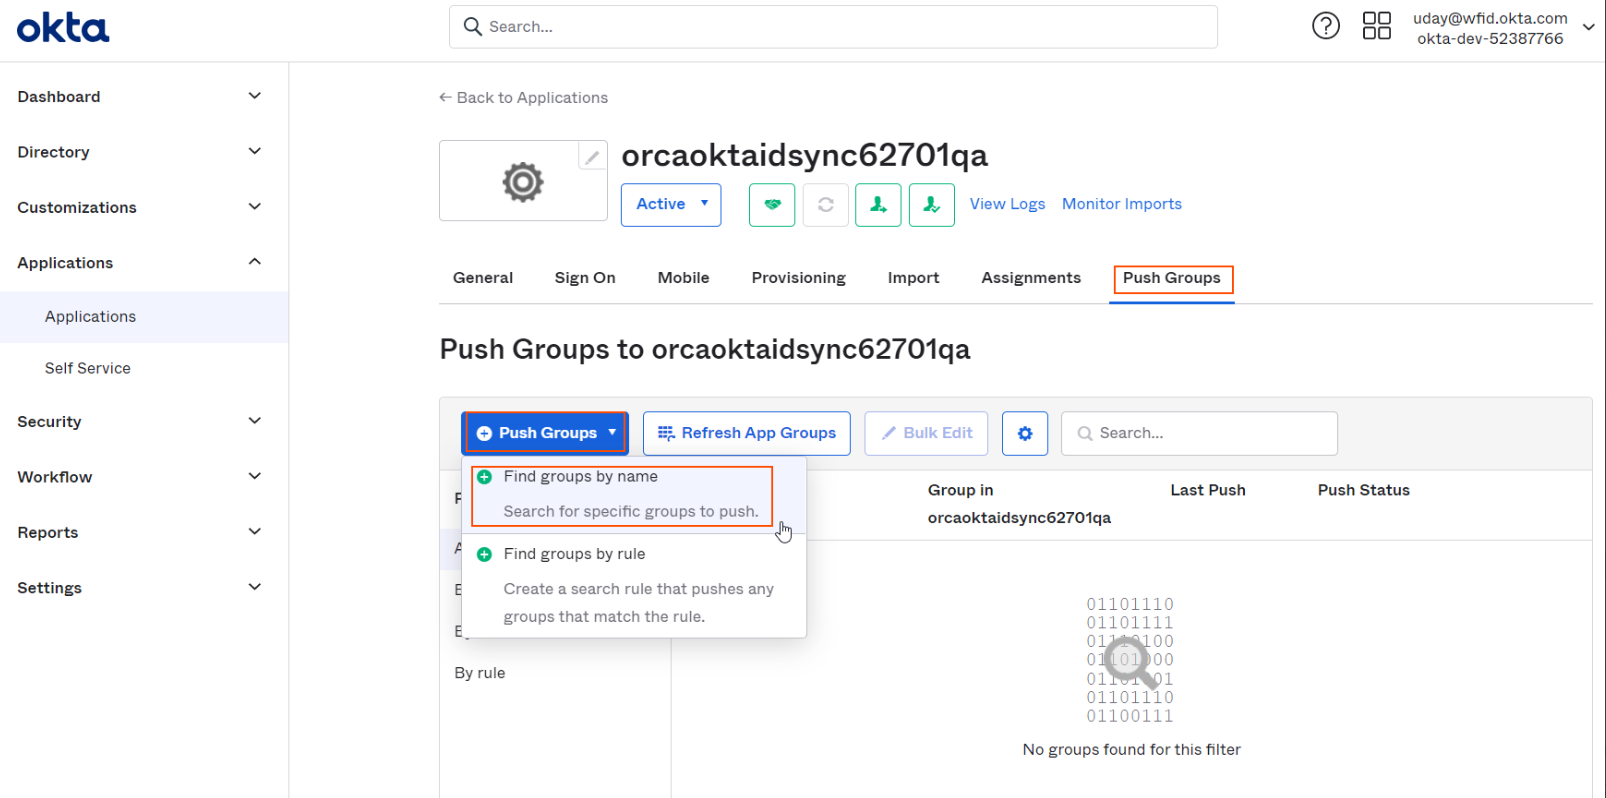
Click on "Push Groups" tab and click on "Push Groups" and select "Find groups by name" to open selection dialog.
-
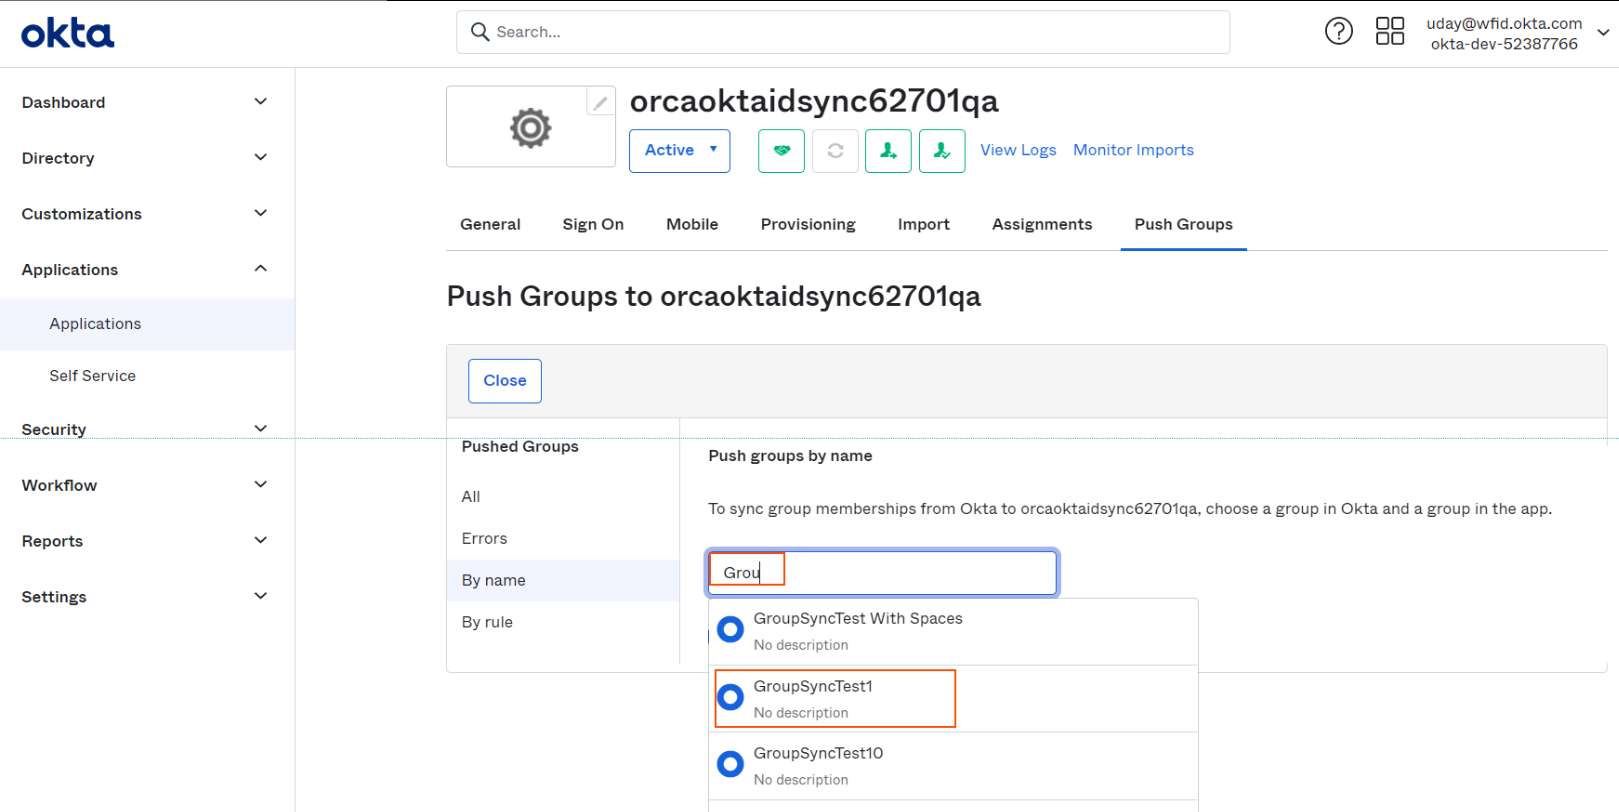
Type in some initial characters in the search box and select the required group.
-
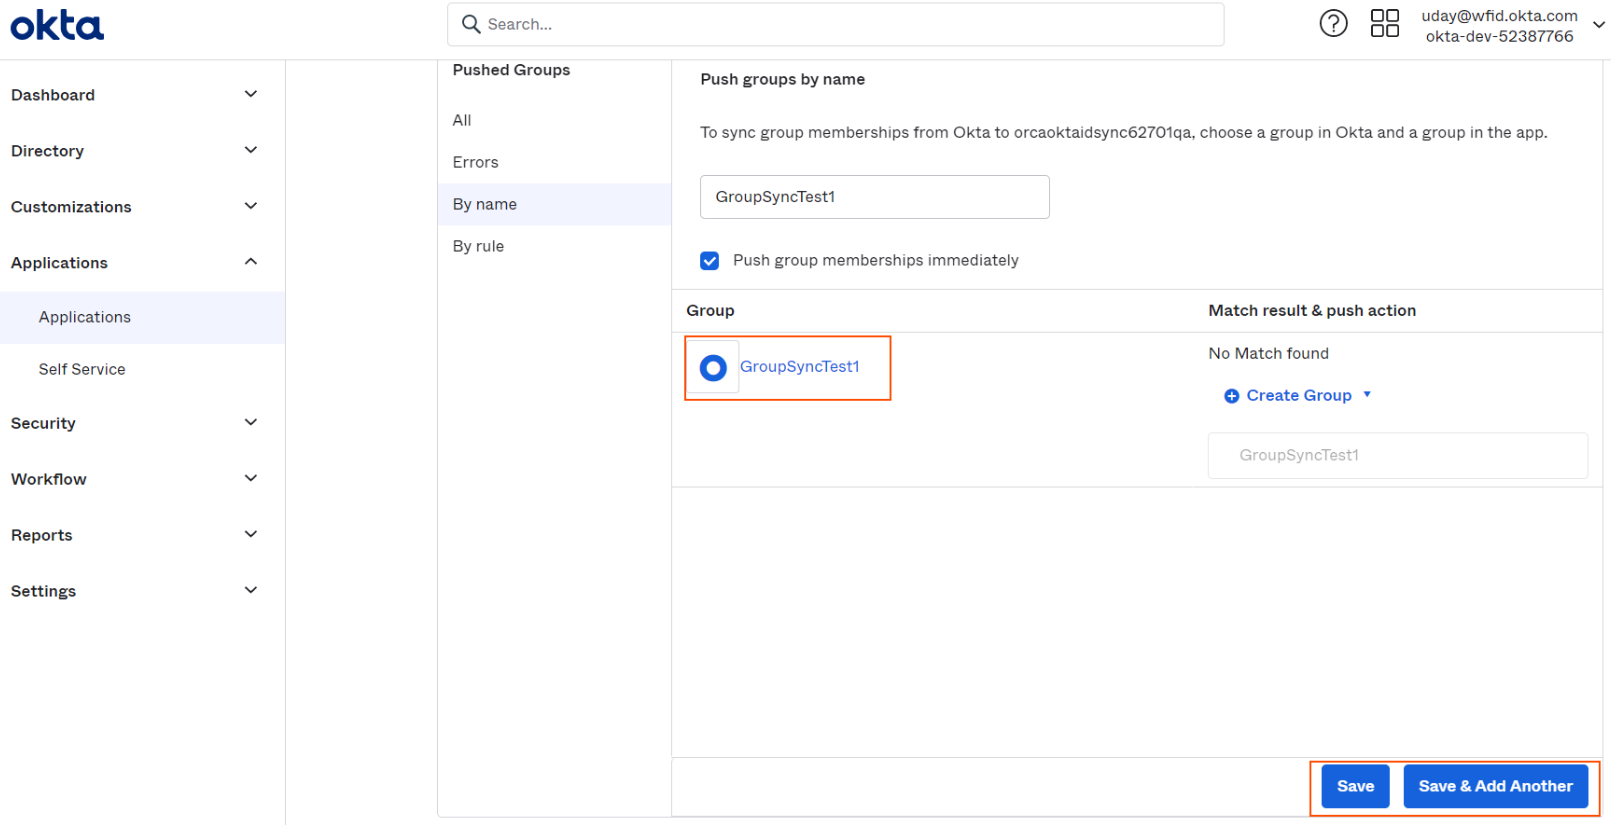
Selected group will appear in selection, click on "Save" or "Save & Add Another" for adding more groups.
-
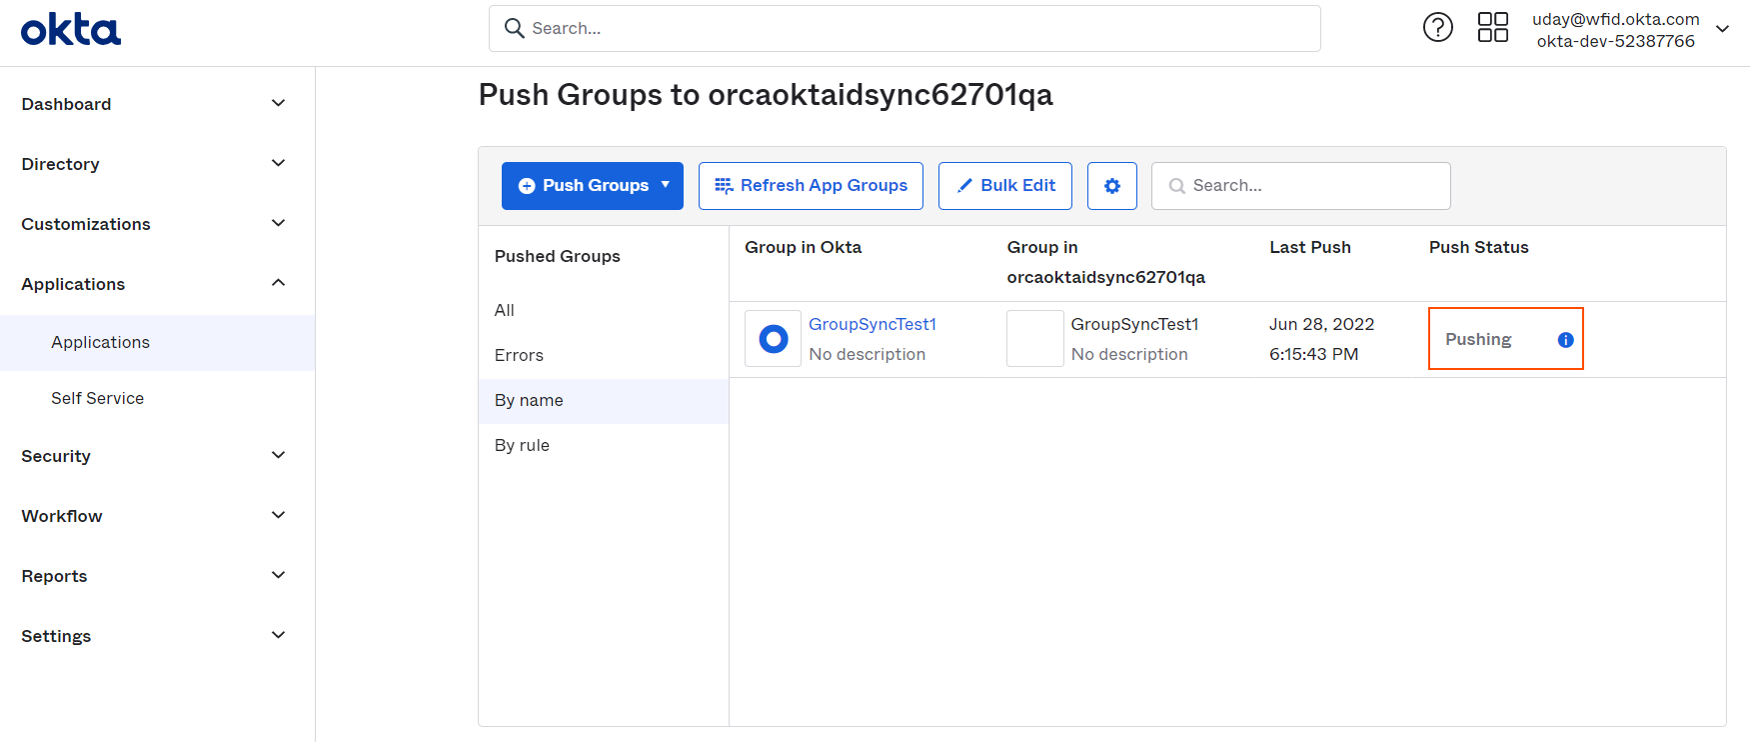
Okta will start pushing the group by showing the status as follows.
-
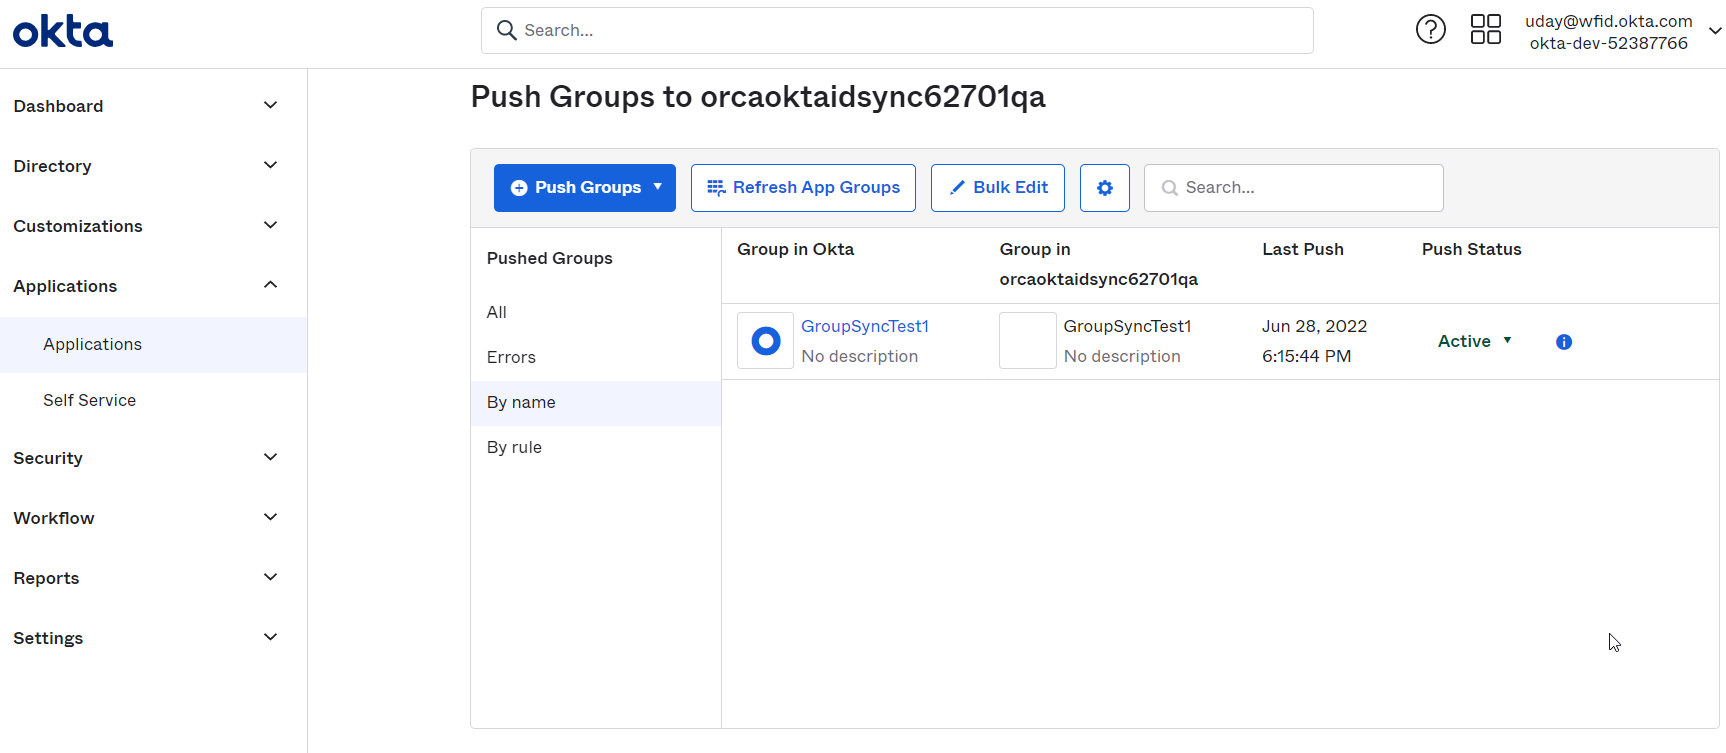
On successful completion of group push, it will show "Active" status.
Step 5: Review HID Visitor Manager users mappings
Note that if Azure AD mappings are done as above, no mapping changes are needed on the HID Visitor Manager side for the sync to happen.
To view/edit default mappings between HID Visitor Manager and Azure User source
-
Login to HID Visitor Manager using your administrator account.
-
Open the Settings app luncher > General tab > System Configuration.
-
Click Launch next to Launch Systems Configuration Manager.
-
Click on the user source to open its configuration.
-
Open the Data Objects tab and select Person. This section will list default mapping between HID Visitor Manager SCIM Schema to the HID Visitor Manager Application.
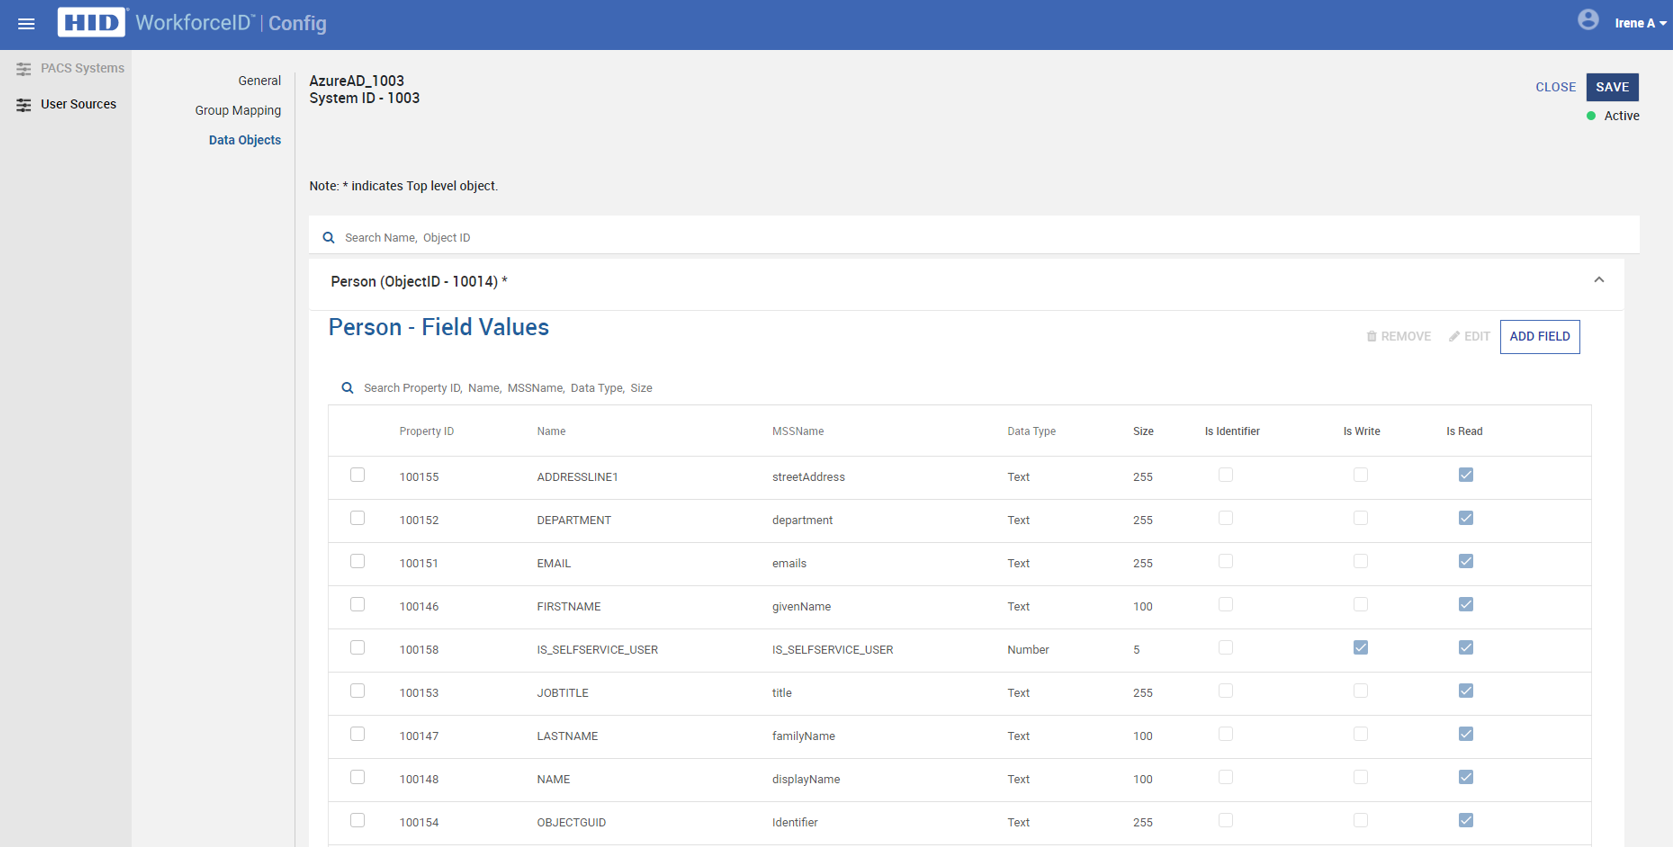
-
By default, all the mapped fields in HID Visitor Manager SCIM Agent are displayed as read-only in HID Visitor Manager Application. You may make the fields editable by enabling IS Write to respective fields based on the above screenshot.
Reference Mappings
The following table shows internal mappings between SCIM Schema attributes to HID Visitor Manager SCIM Agent for identity-related attributes. HID Visitor Manager SCIM Agent supports only the following attributes from SCIM Schema. Any extra attributes which are not listed below are ignored.
| SCIM Schema | HID Visitor Manager SCIM Agent | Additional Comments |
|---|---|---|
| externalId | externalId | Mandatory for the Identity sync to work. |
| userName | userName | Mapped to Login Name of the identity |
| active | active | Mapped to Status of the identity |
| emails[type eq "work"].value | emails | Mapped to Email of the identity |
| name.givenName | givenName | Mapped to First Name of the identity |
| name.familyName | familyName | Mapped to Last Name of the identity |
| addresses[type eq "work"].formatted | physicalDeliveryOfficeName | Mapped to the Location of the identity This value will populate only if there is an exact match to Location Name in HID Visitor Manager |
| addresses[type eq "work"].country | country | Mapped to the Country of the identity If there is a match for an Identity's Location, this value is derived from Location Information Azure AD country value has to match with the ISO3 country code present in HID Visitor Manager. Country Codes can be found in Admin → Master Data |
| addresses[type eq "work"].region | state | Mapped to the State of the identity If there is a match for an Identity's Location, this value is derived from Location Information Azure AD State value has to match with State code present in HID Visitor Manager |
| phoneNumbers[type eq "work"].value | telephoneNumber | Mapped to Phone field of the identity. Phone fields can be provided in the below formats including country code +1(510) 555-5555, 1.510.555.5555 Note: To map this field to the Alternate Phone field of the identity, edit the mapping and change the FIELDNAME to PHONE2. Changing it back to PHONE1 maps it back to the Phone field of the identity. |
| phoneNumbers[type eq "mobile"].value | mobile | Mapped to the Mobile Phone field of the identity Phone fields can be provided in the below formats including country code +1(510) 555-5555, 1.510.555.5555 |
| urn:ietf:params:scim:schemas:extension:enterprise:2.0:User:organization | companyName | Mapped to the Employer of the identity Organization will be added only if the exact match is found with Employer Name in HID Visitor Manager |
| urn:ietf:params:scim:schemas:extension:enterprise:2.0:User:department | department | Mapped to the Department of identity. Departments can be Managed in Admin → Master Data Note: New Department will be added by default if the exact match is not found. To change this behavior and to only assign department when an exact match is found in HID Visitor Manager, edit this mapping in HID Visitor Manager and unselect "MARK THIS AS MASTER DATA FIELD". Note: Department Name is case sensitive. For example, Customer Support Department is not the same as customer support department. |
| urn:ietf:params:scim:schemas:extension:enterprise:2.0:User:manager | manager | Mapped to the Manager Name of the identity. Manager Name will be added only if a match is found in HID Visitor Manager. Manager Email and Manager ID will be derived from the manager's profile in HID Visitor Manager. Note: If the Manager is removed in Azure AD, after the provisioning, the manager in HID Visitor Manager will stay the same as before. |
Notes on other fields in the Identity UI:
-
PrimaryID field in the Identity UI is auto-populated by HID Visitor Manager.
-
Employee type is defaulted to 'Employee'
-
Building, Floor, Suite, Prefix, Suffix, Gender, and Date of Birth attributes cannot currently be mapped. These fields can be managed directly within HID Visitor Manager.
Frequently Asked Questions
Q. What is the number of identities tested by this integration?
A: The integration has been tested with up to 10000 (ten thousand) users, 10 (ten) user groups, and 5 (five) user groups assigned per user.
Q: How long does it usually take to synchronize the users?
A: For approximately 15000(fifteen thousand) users in our testing, it took approximately 1 .hour 53 minutes to perform the initial provisioning and synchronization.
Q: What if 'Test Connection' in the provisioning profile fails?
A: If 'Test Connection' in the provisioning profile fails try the below options and if it still fails contact customer support.
Check for any trailing spaces in the secret token field and try again after removing any spaces.
Regenerate the secret token and try again with the latest token.
Q:What if the test 'User Provision' fails?
A: If the test fails, look for errors in the provisioning logs in the Okta app.
Q:What if 'User Provision' test is successful on the Okta side but Identity is still not visible on HID Visitor Manager side?
A: Sync logs are available at User Source Level. Navigate to Web Configurator => User Source. In General Tab, there is an area called Sync Status which shows details about Total Identities successfully synced or failed. It also shows when the Last Sync happened. To view more details about Identities sync click on View Logs.
Q: What if a Failure is reported in Audits?
A: If a Failure is reported in Audits and the error is due to misconfiguration of attribute mapping, review the "HID Visitor Manager - Attribute mapping" section to make the corrections and try to sync the identities again. If the error is not clear, please contact customer support.


