Single Sign-On (SSO) using SAML
Introduction
Security Assertion Markup Language (SAML) is an open standard that allows Identity Providers (IdP) to securely pass authorization credentials to Service Providers (SP). SAML simplifies federated authentication and authorization processes for users, identity providers and service providers. HID Visitor Manager (SP) provides a single sign-on capability with various SAML supported Identity Providers, such as AzureAD and Okta. This document provides a step-by-step guide to enable SAML based authentication in HID Visitor Manager with Azure AD and Okta.
Pre-Requisites
The following pre-requisites must be met before proceeding:
-
HID Visitor Manager account must be available with administrative access.
-
HID Visitor Manager account must be enabled with SAML add-on subscription.
-
Microsoft Azure AD or Okta account must be available with administrator access (with privileges to create applications and set up SSO)
Setup and Configuration
First, we will document SAML settings in HID Visitor Manager and then set up SAML configuration on the IDP side. Finally, we will configure SAML settings in HID Visitor Manager.
Section 1 : SAML Authentication Settings from HID Visitor Manager
-
Log in to HID Visitor Manager using your administrator account.
-
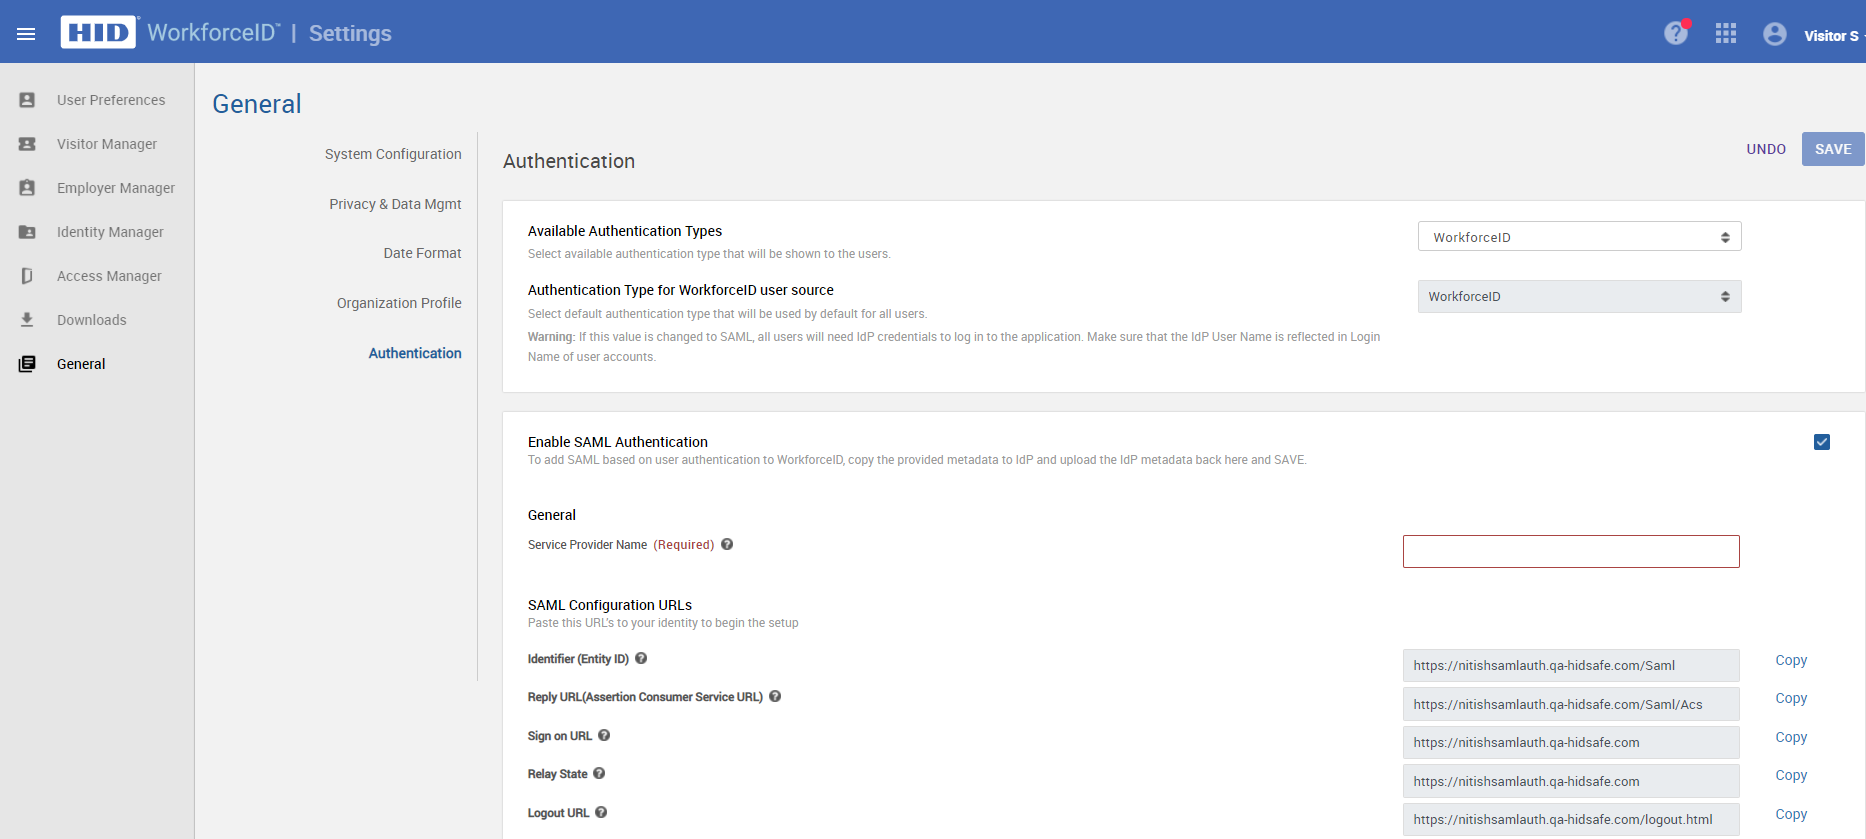
Open the Settings app launcher, navigate to General > Authentication sub-tab.
-
On the Authentication sub-tab, values in the following fields will already be populated. Please use the 'Copy' button to retrieve the configuration URLs and store them in a text editor.
Field Value Identifier (Entity ID) https://<yoursite.com>/Saml Reply URL (Assertion Consumer Service URL) https://<yoursite.com>/Saml/Acs Sign on URL https://<yoursite.com> Relay State https://<yoursite.com> Logout URL https://<yoursite.com>/api/SamlSignout
Section 2 (a): Enable SAML Authentication in Azure AD
-
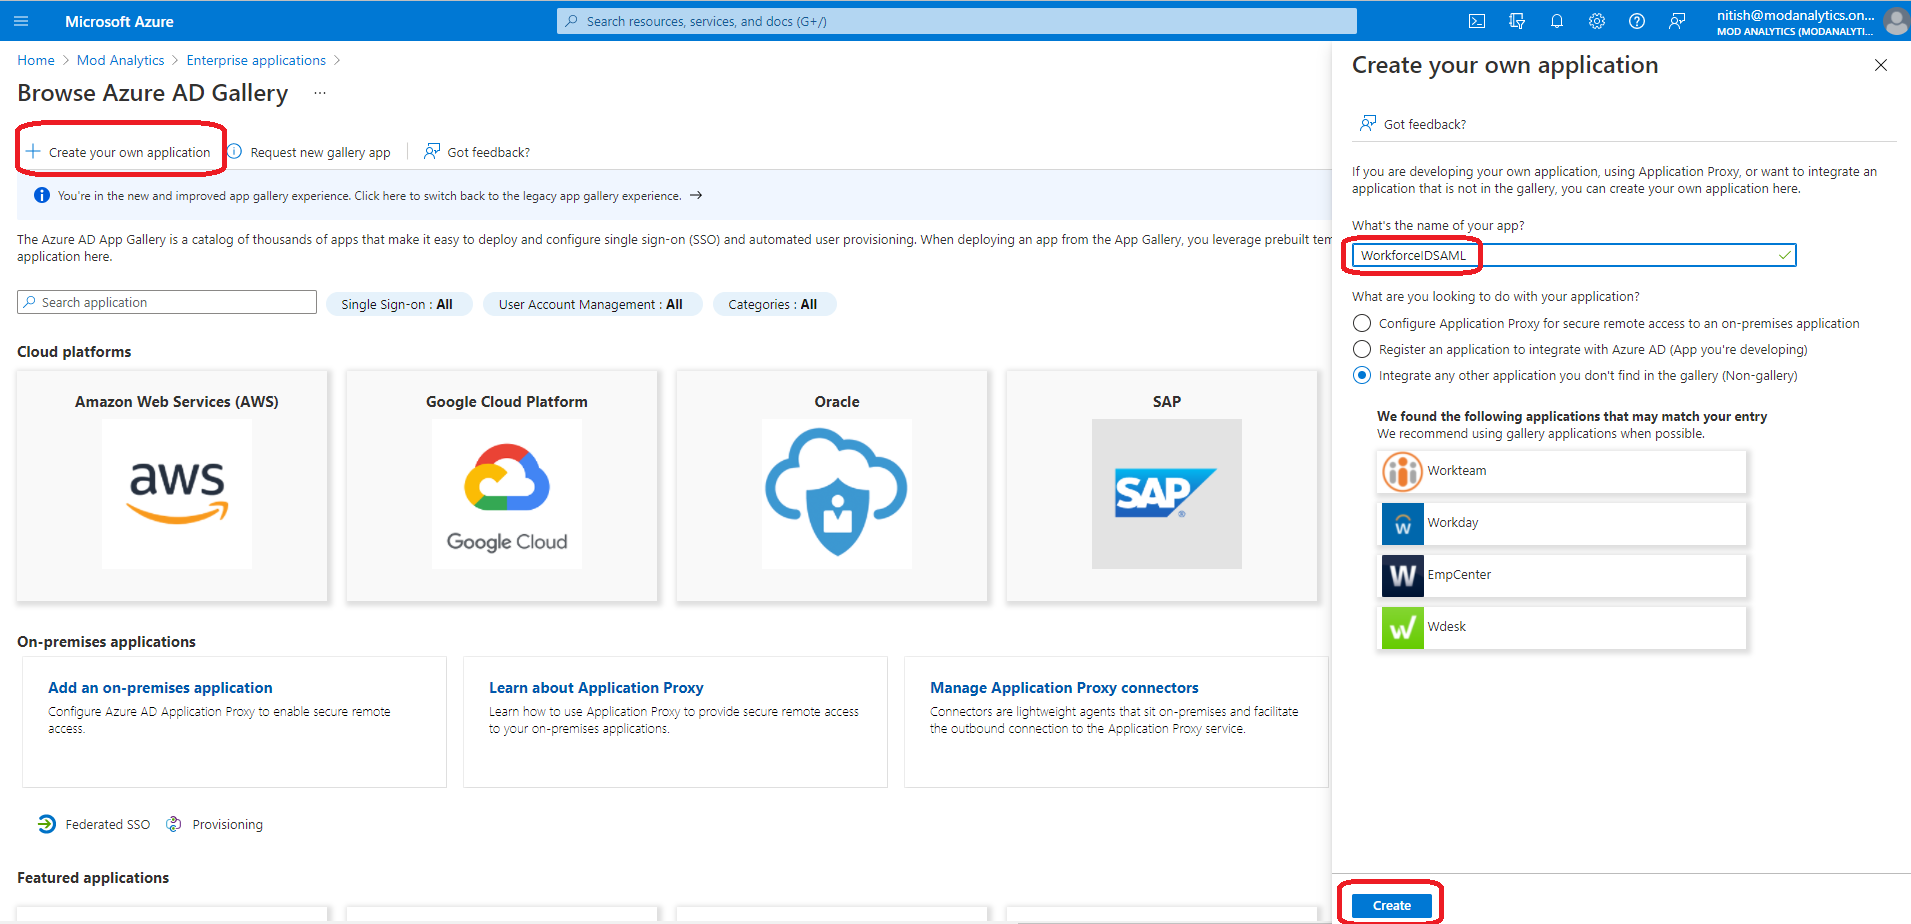
Go to the Azure AD Tenant home page. Click Enterprise Applications on the left navigation menu and click +New Applications.
-
Click Create your own application on the top menu. Provide the name of the application, for example, HID Visitor Manager SAML. Click on the Create Button. A confirmation message is displayed once the process is completed successfully.
-
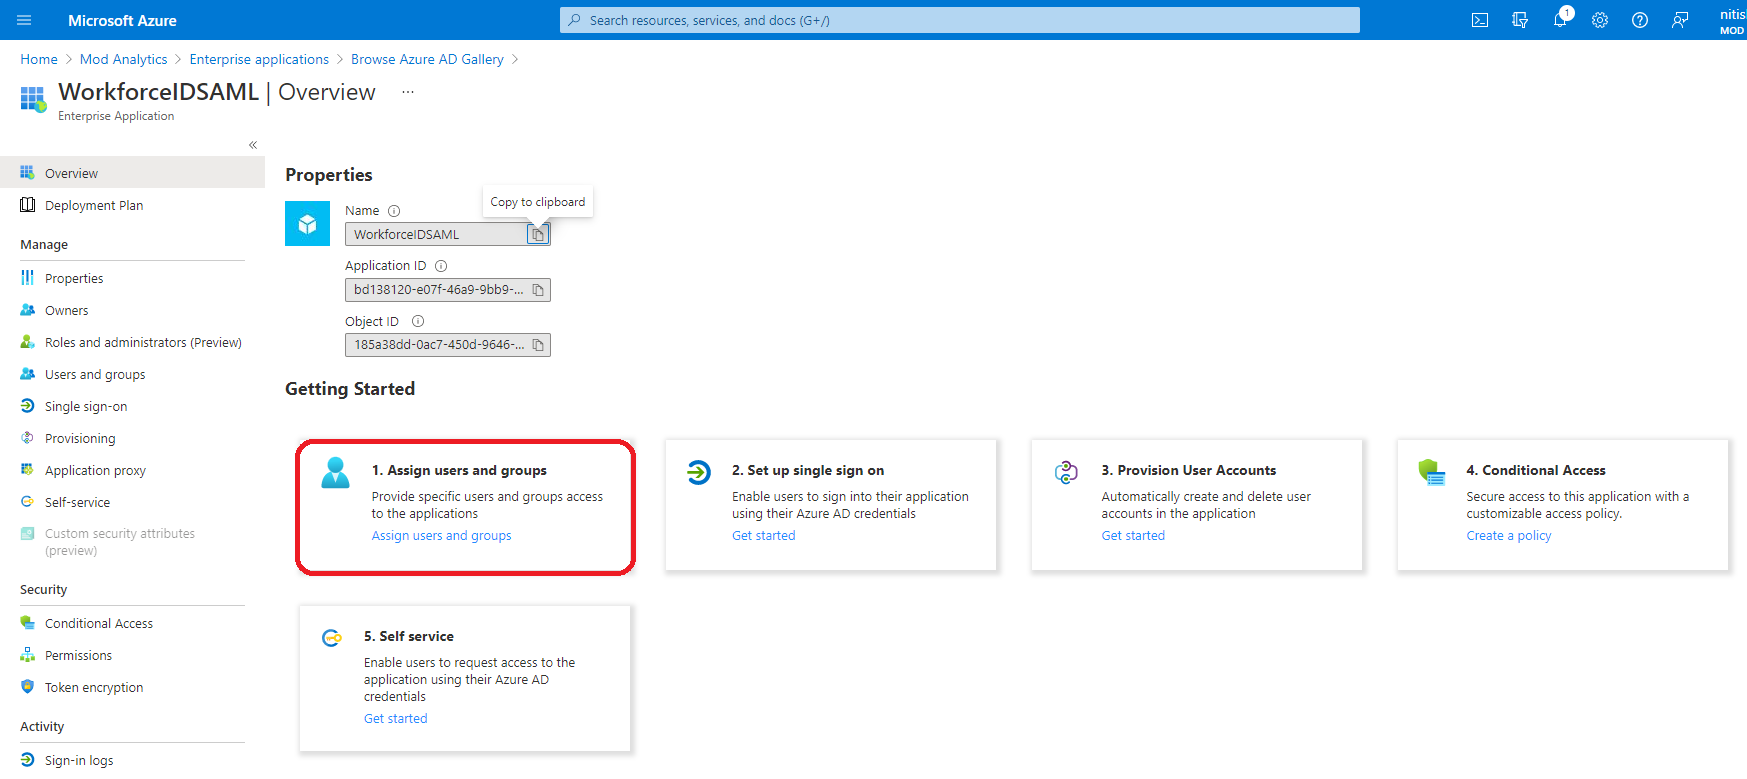
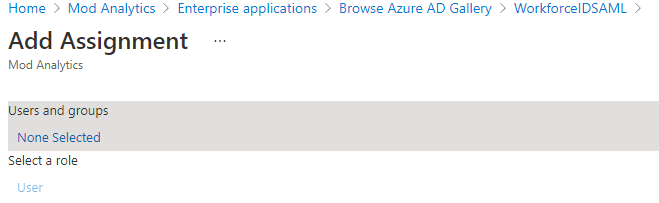
Click Assign users and groups.
-
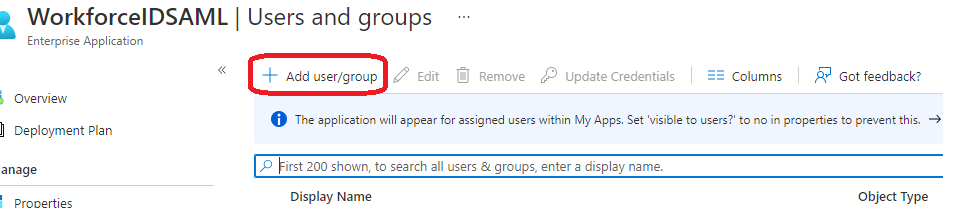
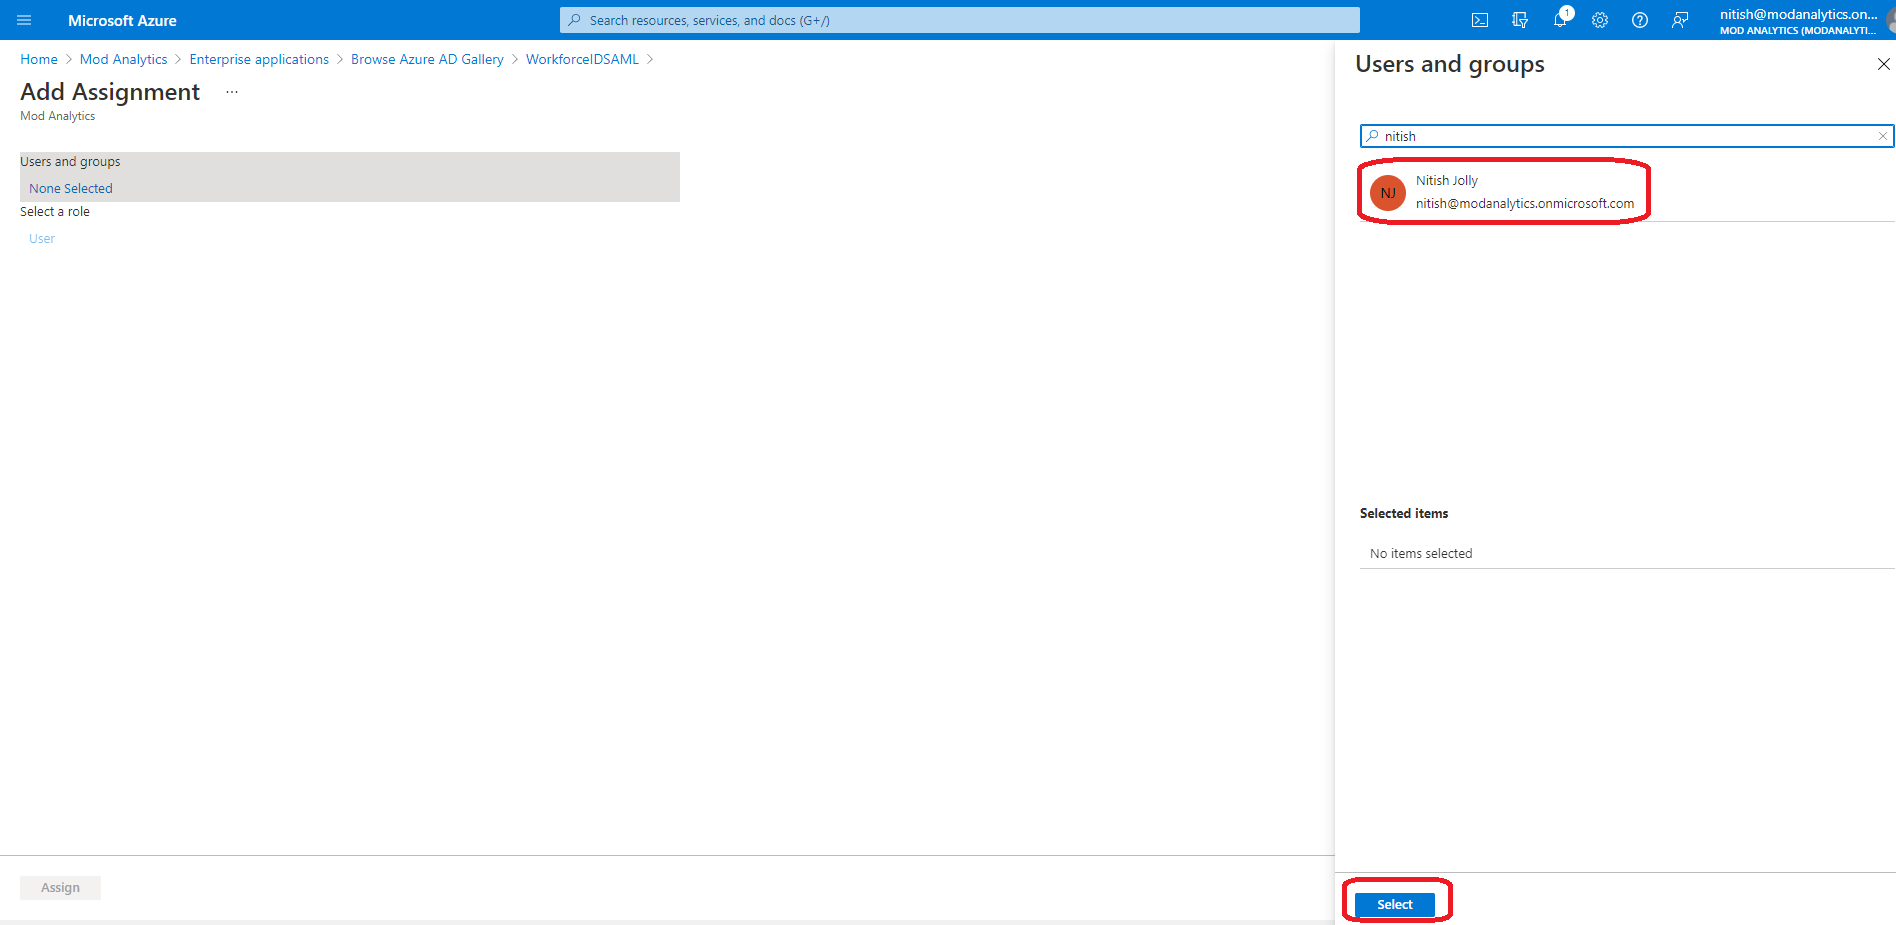
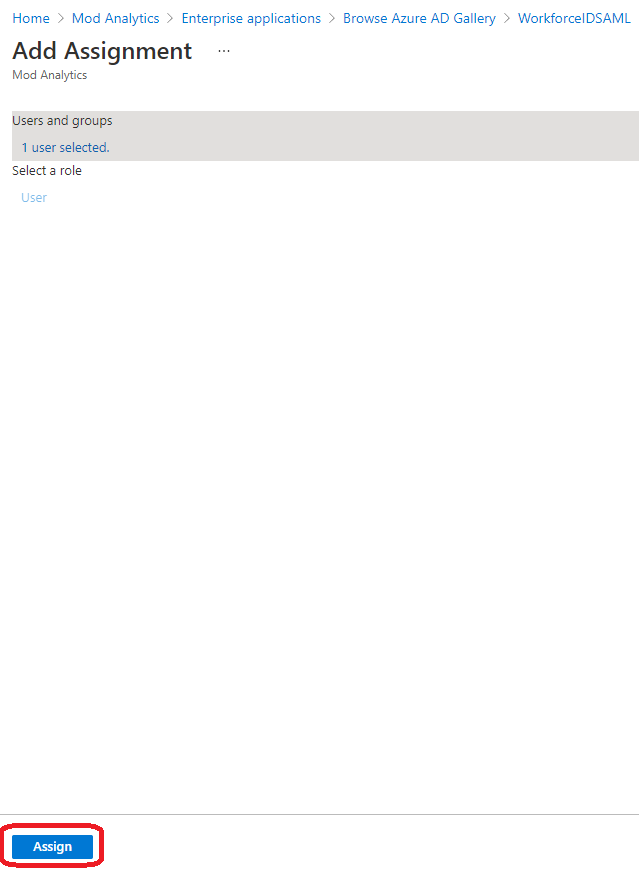
Select users/groups that need to be provisioned to HID Visitor Manager by clicking on each item. Click Select on the bottom. Click Assign when done. A confirmation message is displayed once the users or user groups are successfully assigned.
-
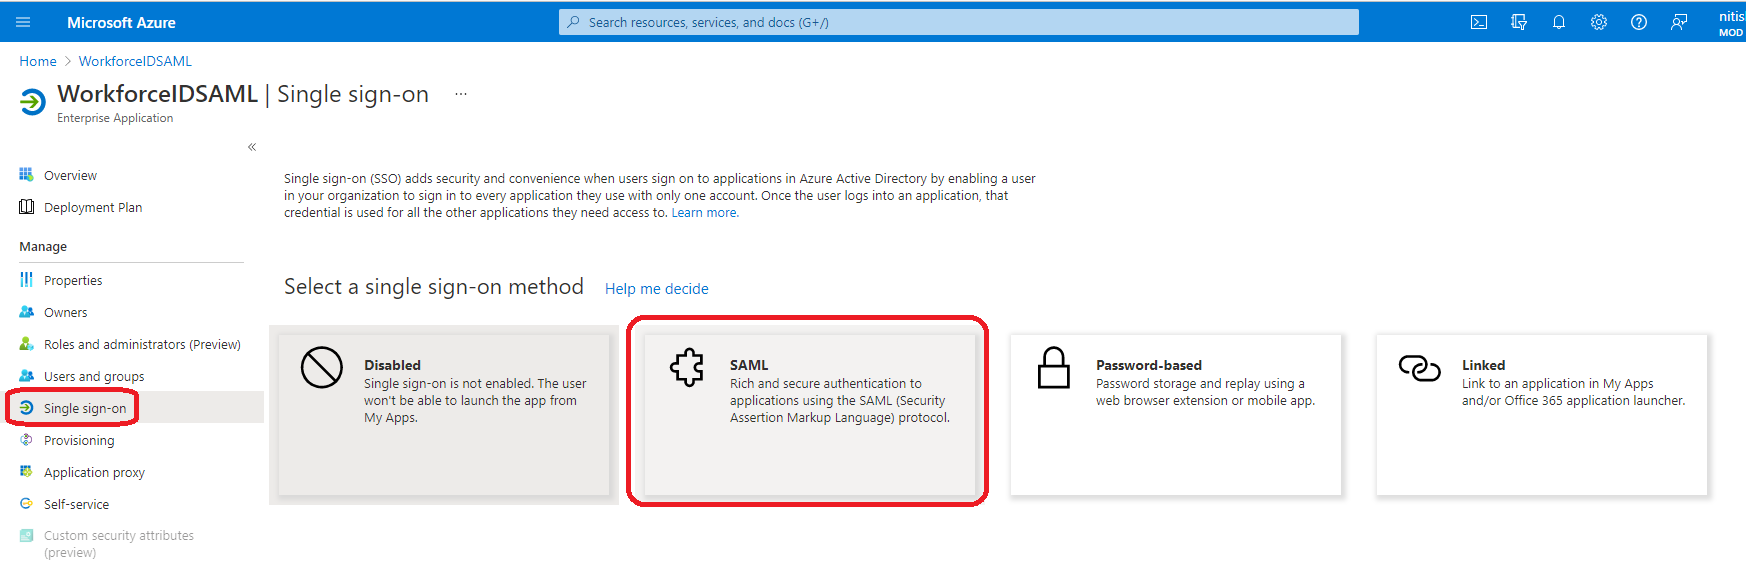
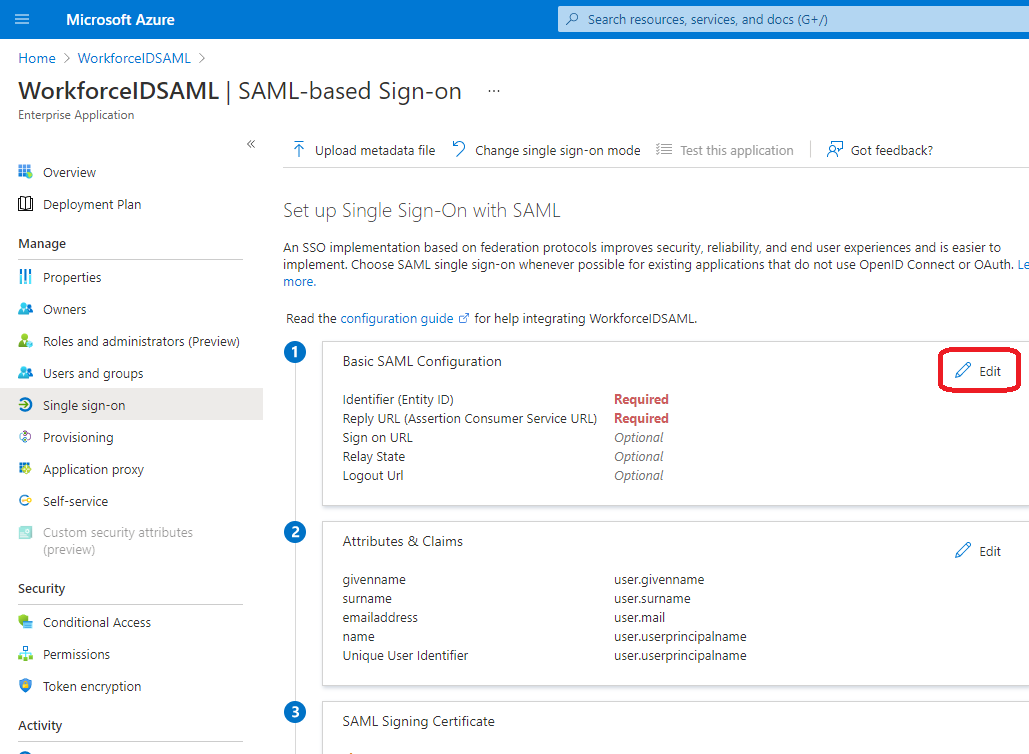
From the menu on left-hand side, click on Single sign-on and then select SAML.
-
In the first section (Basic SAML Configuration) of the Set up Single Sign-On with SAML page, click Edit
-
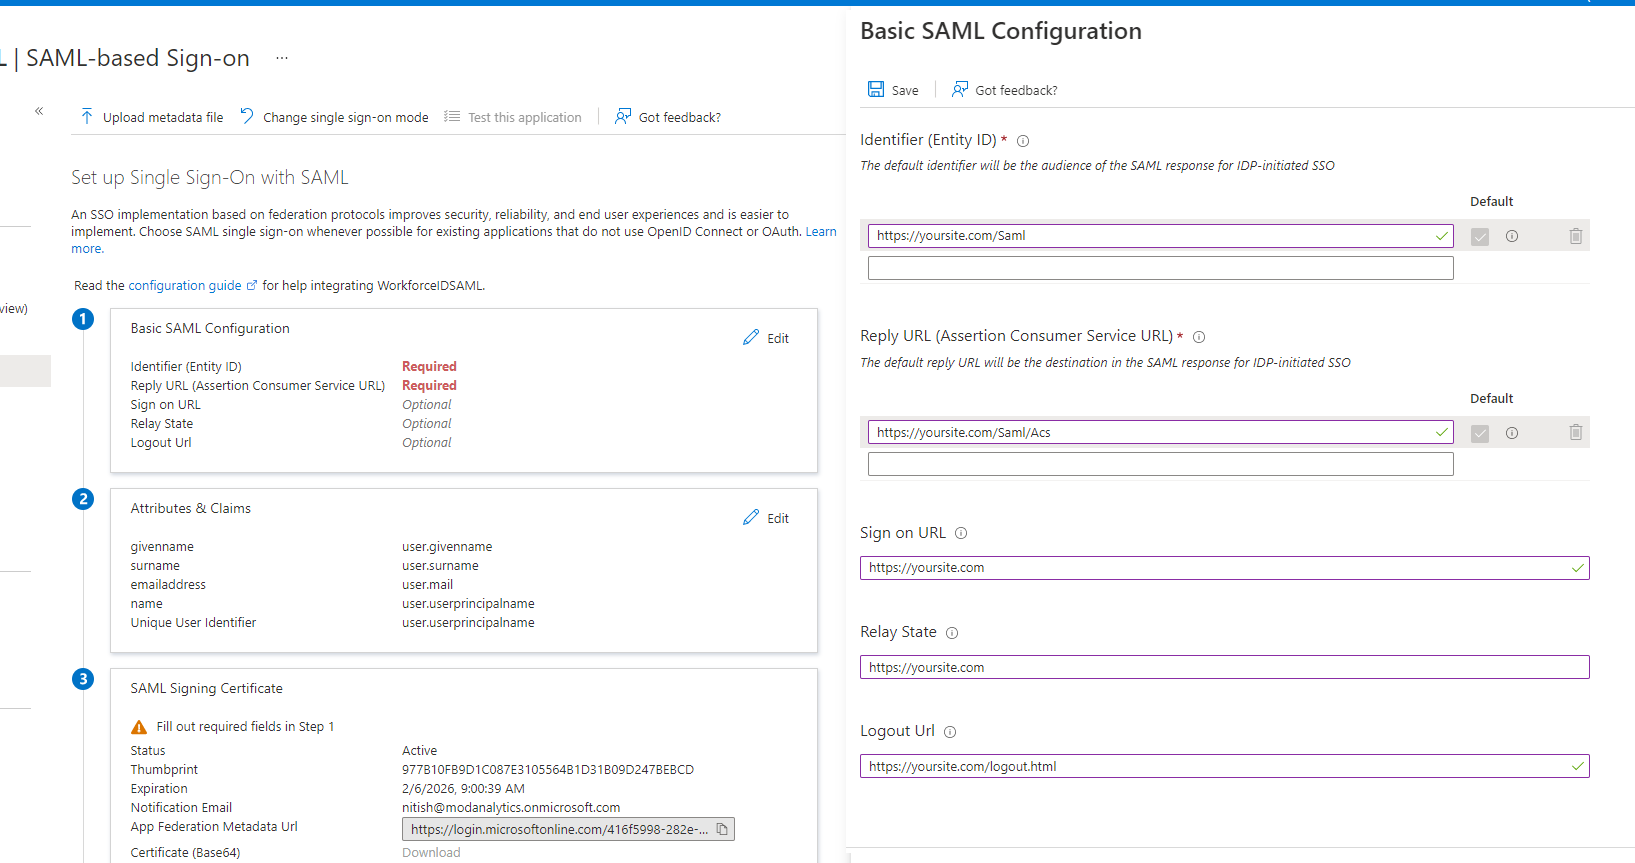
Use the values stored in Section 1 : SAML Authentication Settings from HID Visitor Manager Step 3, and enter them here.
Field Value Identifier (Entity ID) https://<yoursite.com>/Saml Reply URL (Assertion Consumer Service URL) https://<yoursite.com>/Saml/Acs Sign on URL https://<yoursite.com> Relay State https://<yoursite.com> Logout URL https://<yoursite.com>/api/SamlSignout -
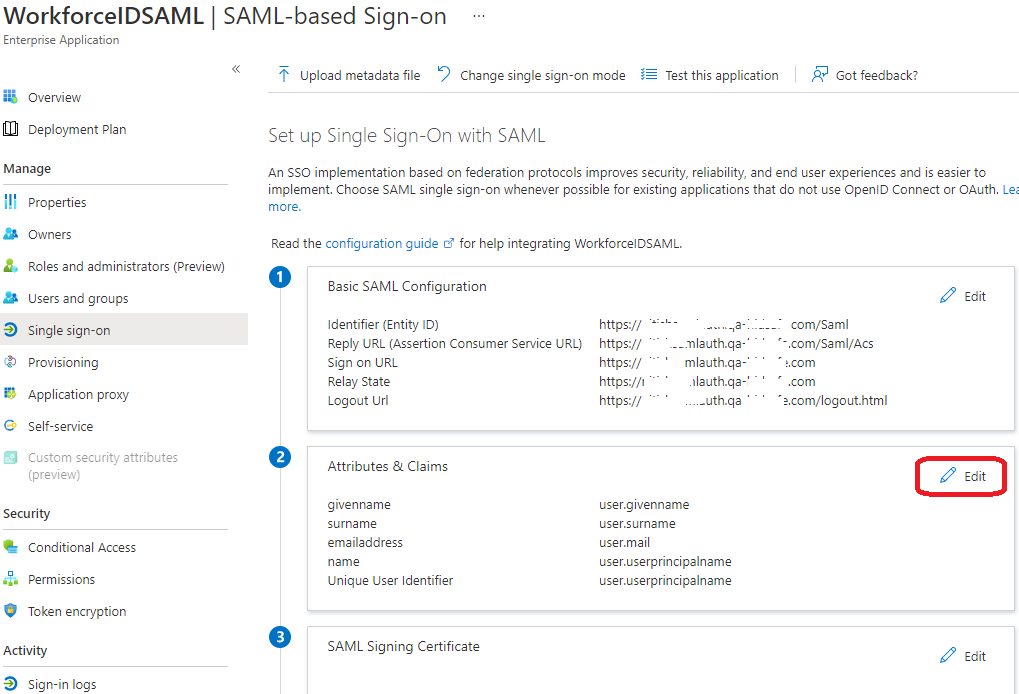
In the second section (Attributes & Claims) of the Set up Single Sign-On with SAML page, click Edit.
-
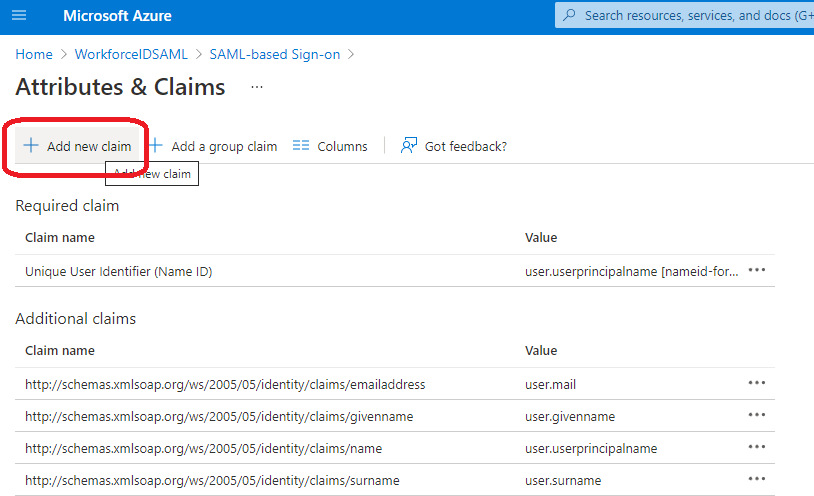
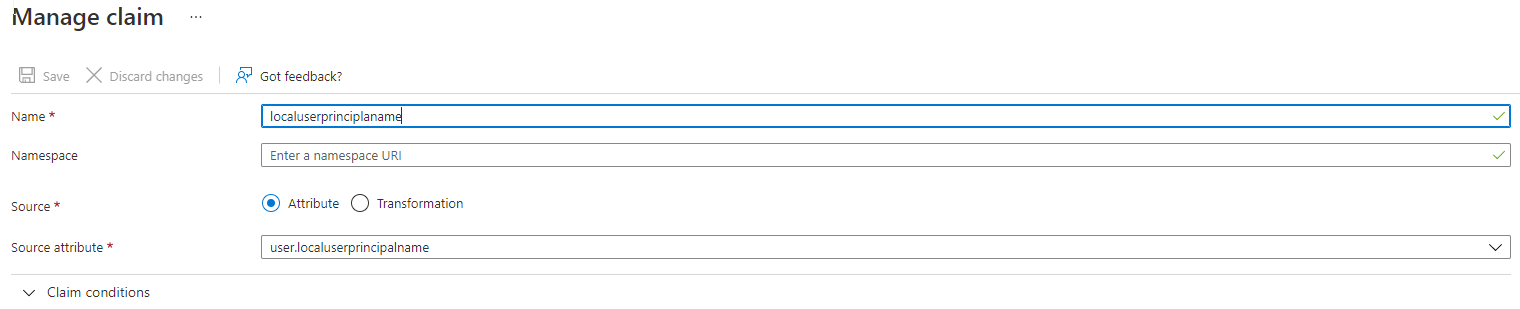
Click on Add new claim to add matching attribute.
-
In the Name field, type a name of your choice, for eg: localuserprincipalname. Please note down this value as it will be used in HID Visitor Manager configuration in Section 3 of this document.
-
From the Source attribute drop-down menu, select the option that will be used to send the localuserprincipalname value to Service Provider. Eg: user.localuserprincipalname.
-
Click Save.
-
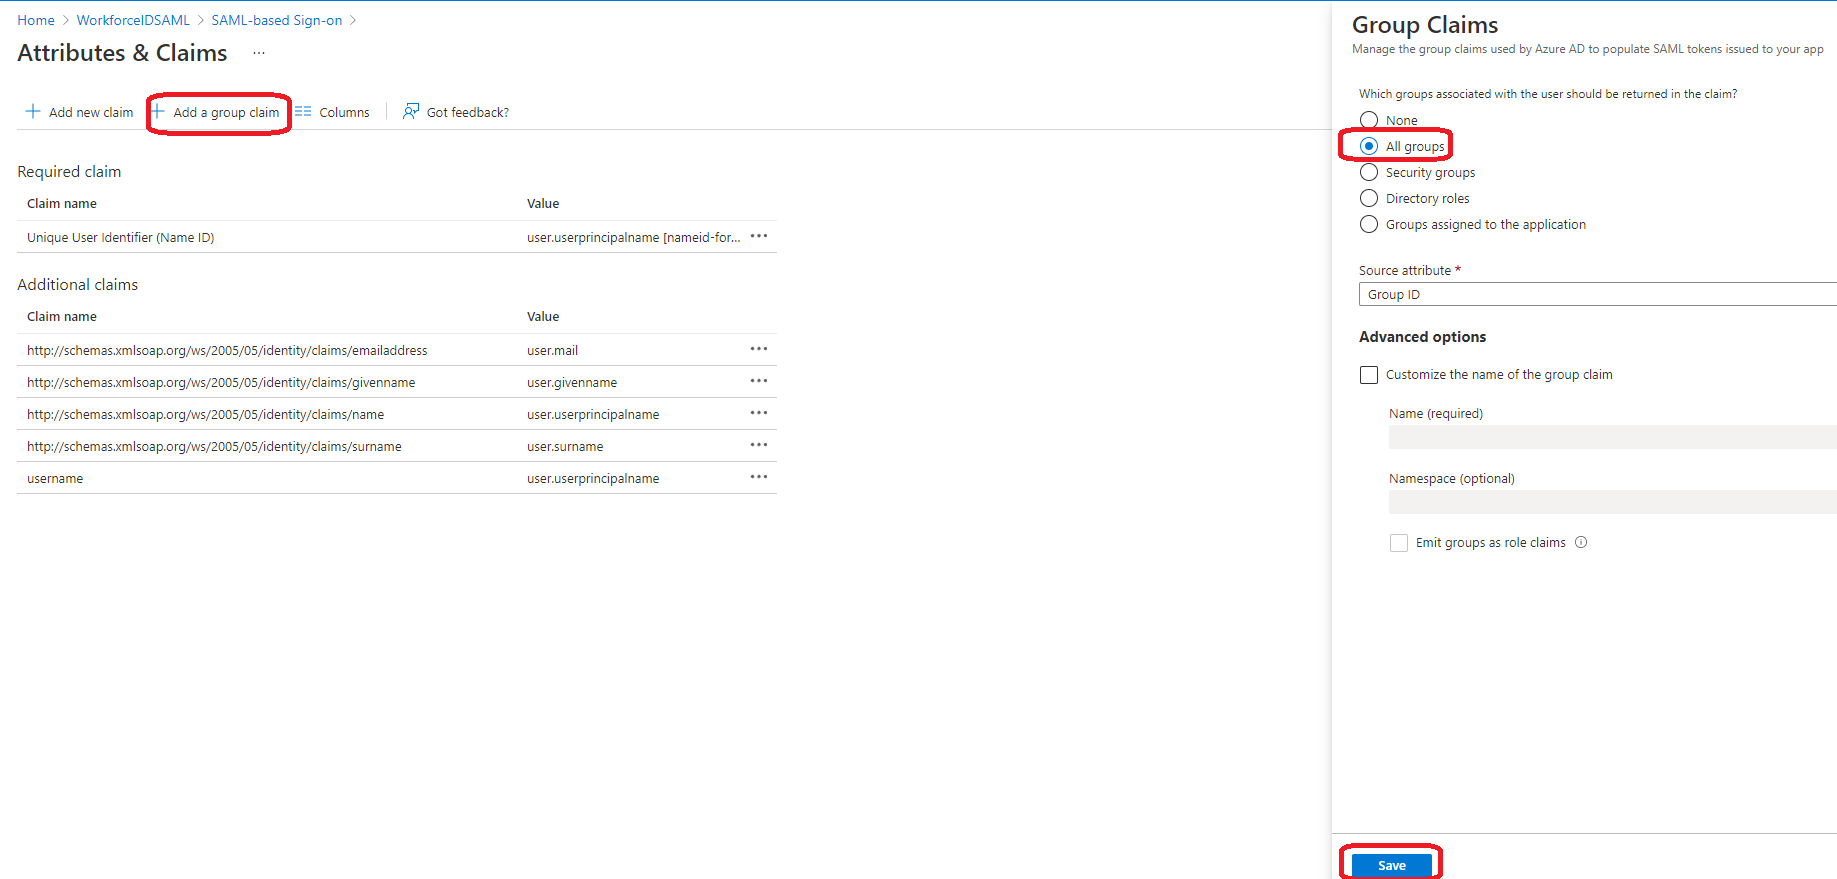
For user group mapping, click on Add a group claim and select the option 'All groups'. Click Save.
-
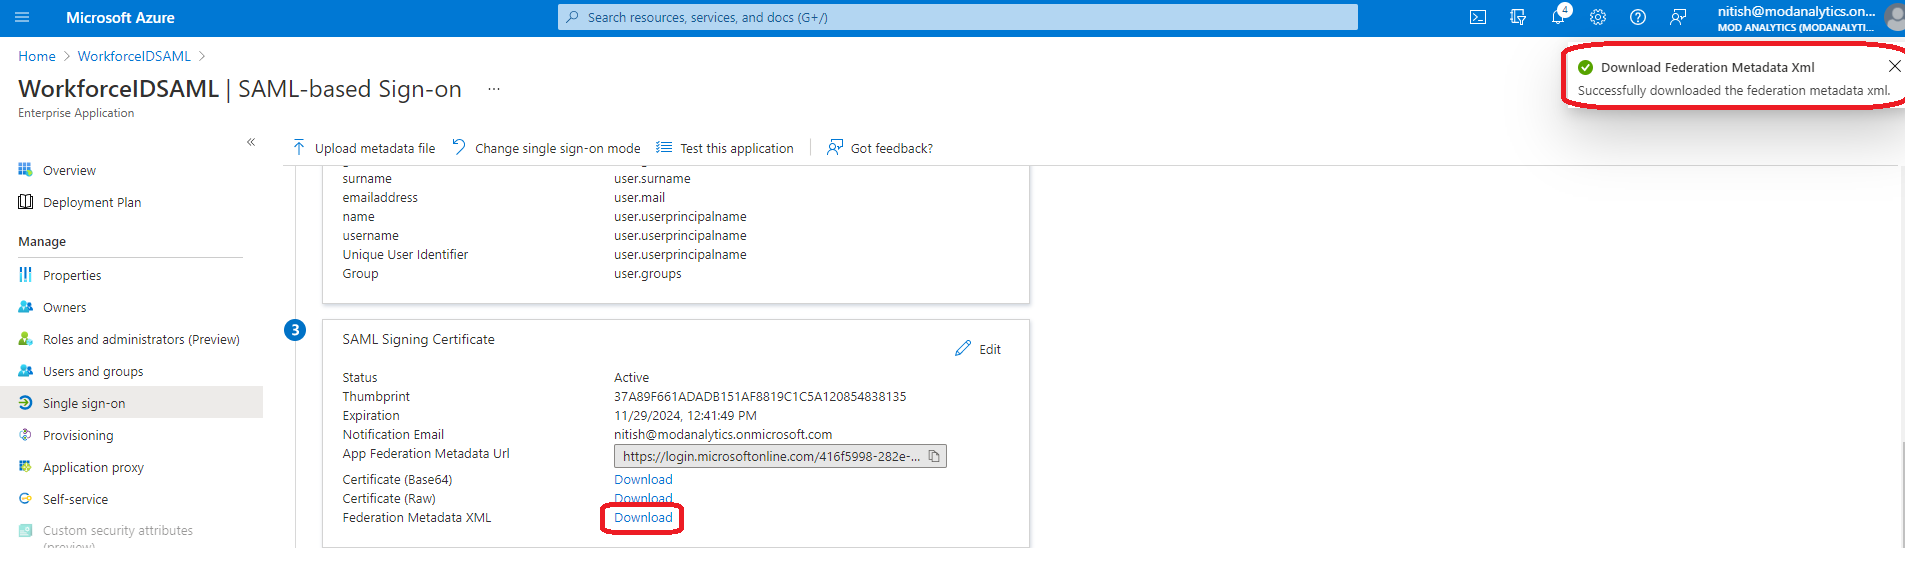
In the third section (SAML Signing Certificate) of the Set up Single Sign-On with SAML page,, click on Download button that is located next to the field 'Federation Metadata XML'. Once you click, a file in xml format will be downloaded on your workstation. Please save the file, as it will be used to complete the remaining configuration in Section 3 of this guide.
You can skip creating a new application and go to Step 5 if you already have an enterprise application that synchronizes Identities with HID Visitor Manager. We suggest that the same application is used for SSO configuration for consistency purposes and ease of configuration
Section 2 (b): Enable SAML Authentication in Okta
-
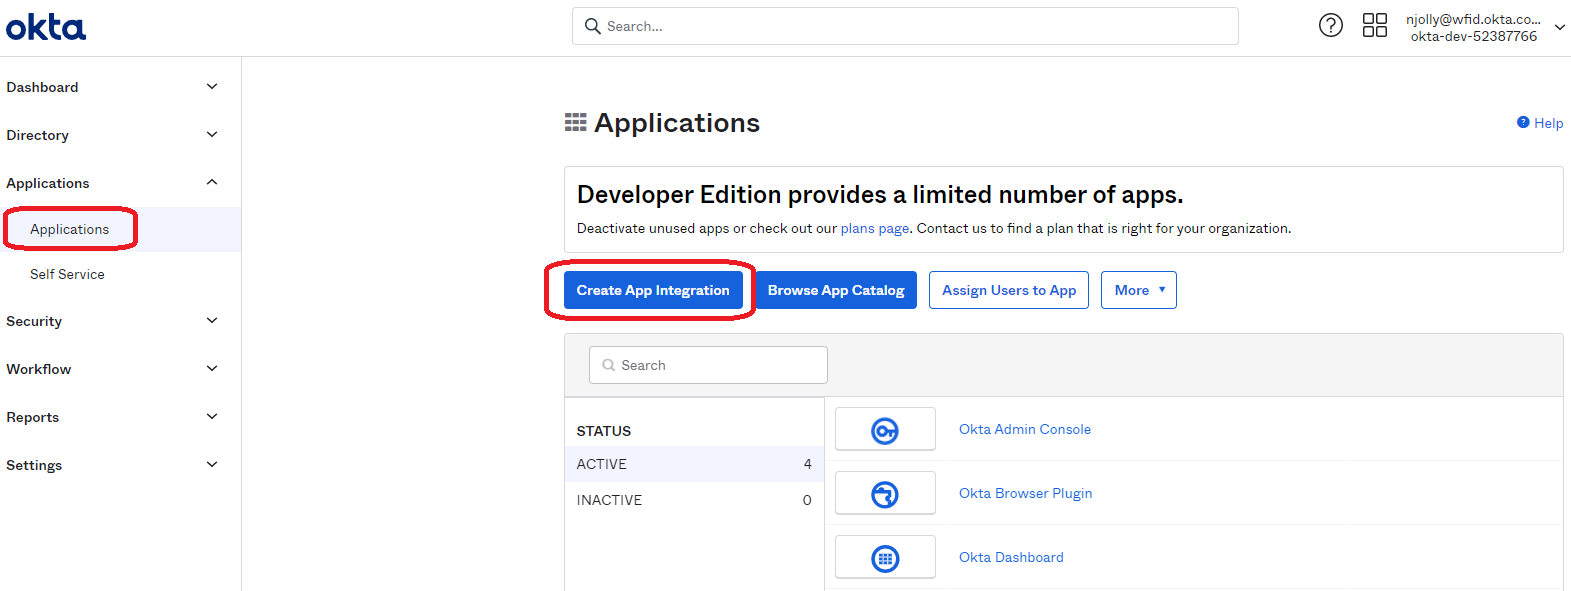
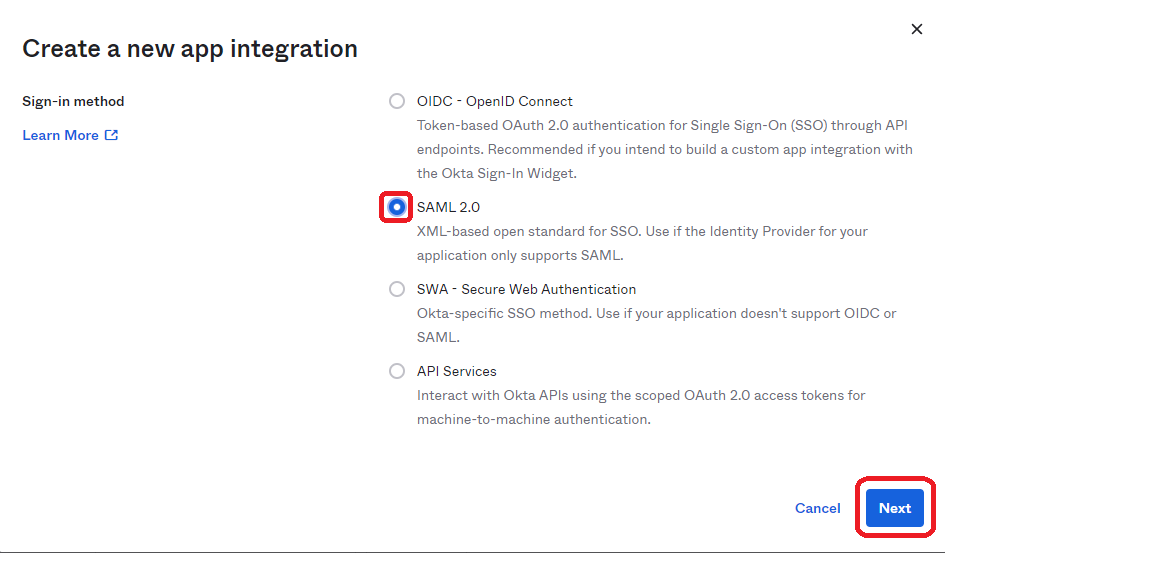
Log in to the Okta portal as an administrator. Navigate to Applications from the menu on the left. Click on Create App Integration.
-
Select SAML 2.0 and click Next.
-
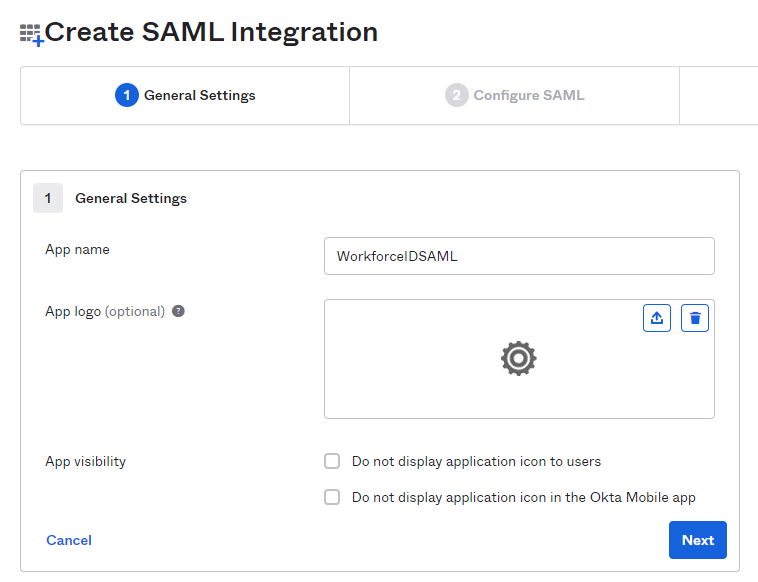
Enter a name of your choice in the field App Name. Click Next.
-
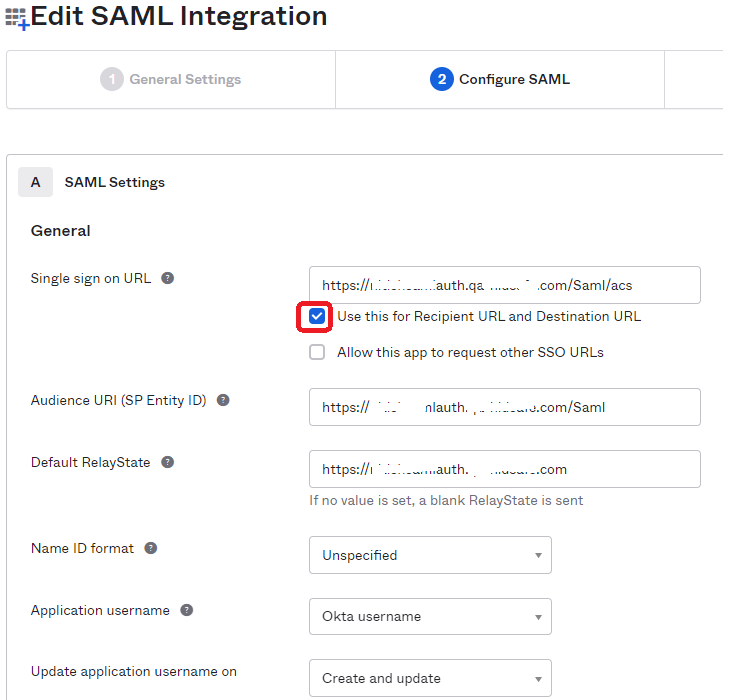
Use the values stored in Section 1 : SAML Authentication Settings from HID Visitor Manager: Step 3 of this guide and enter them here. Use the below table as a guide. Remember to select the checkbox Use this for Recipient URL and Destination URL.
Field Value Single sign on URL https://<yoursite.com>/Saml/acs Audience URI (SP Entity ID) https://<yoursite.com>/Saml Default RelayState https://<yoursite.com> -
Under Attribute Statements, do the following configurations.
-
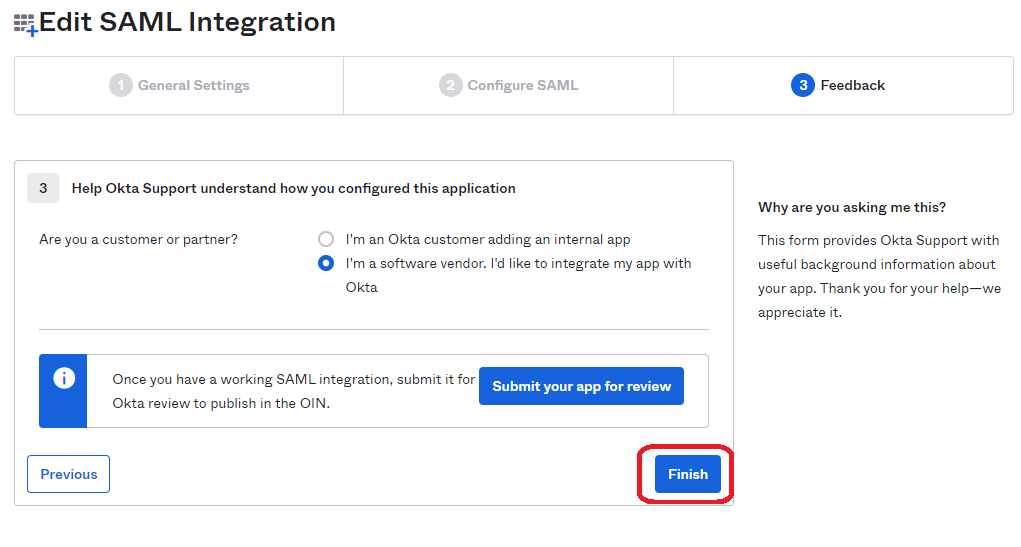
Click Next and then on the final screen, click Finish.
-
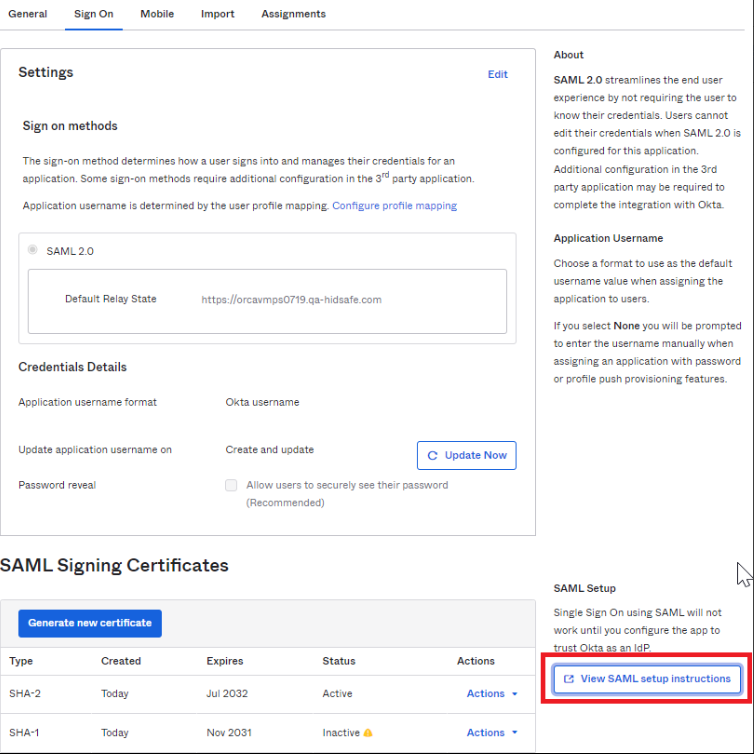
From the Sign Ontab, scroll down to the SAML Setup section on the right-hand part of the screen. Click View SAML setup instructions link.
-
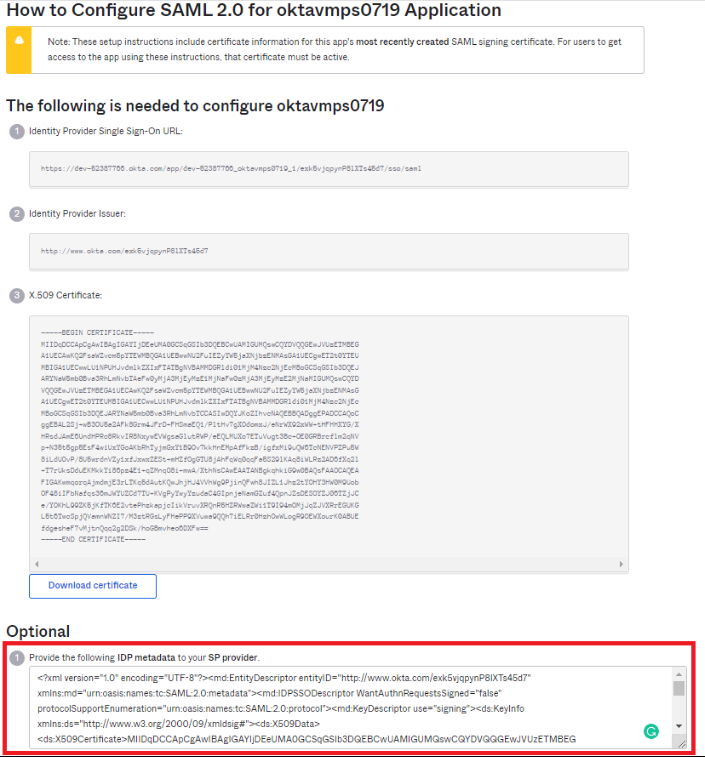
Copy the complete metadata string from the "Provide the following IDP metadata to your SP provider" text box of the Optional section and paste it into the notepad.
-
Save the above file with a filename of your choice in .xml format. For example, enter OktaMetadata.xml and click Save.

Section 2. c) Enable SAML Signout in Okta
-
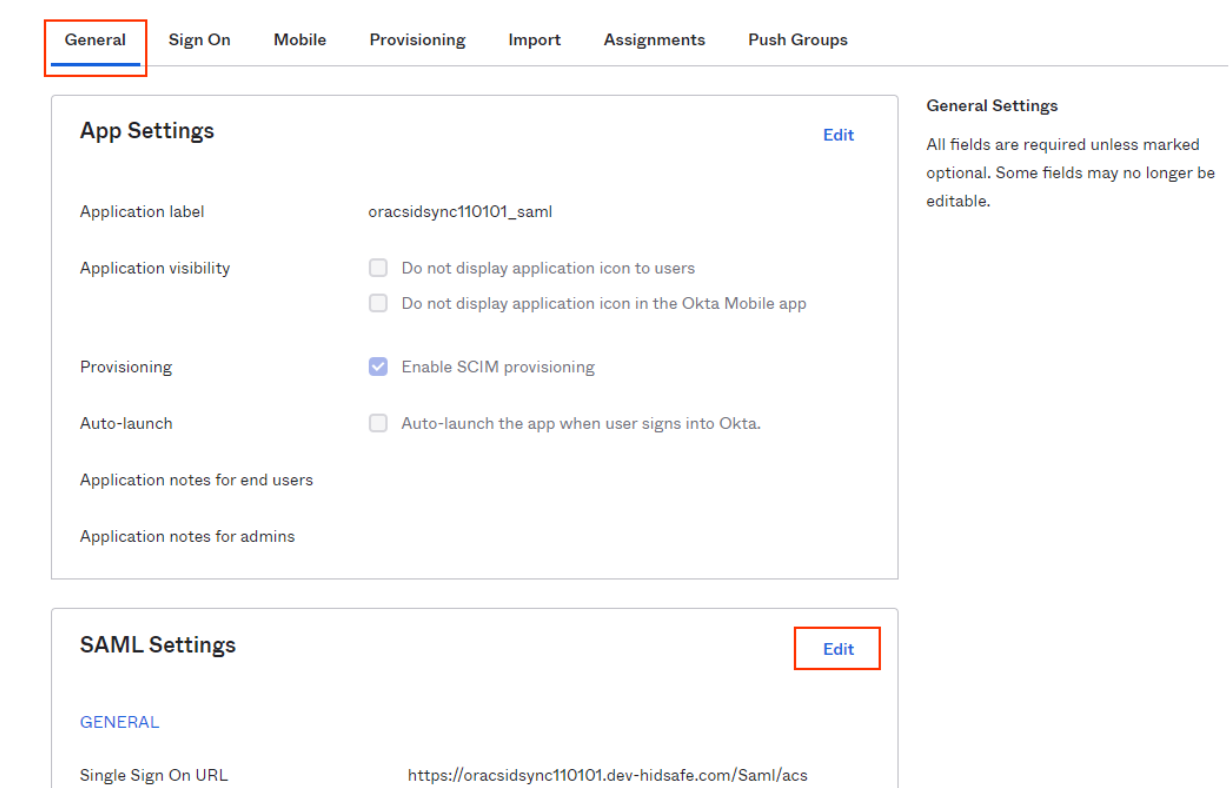
Application General section > SAML Settings > click Edit.
-
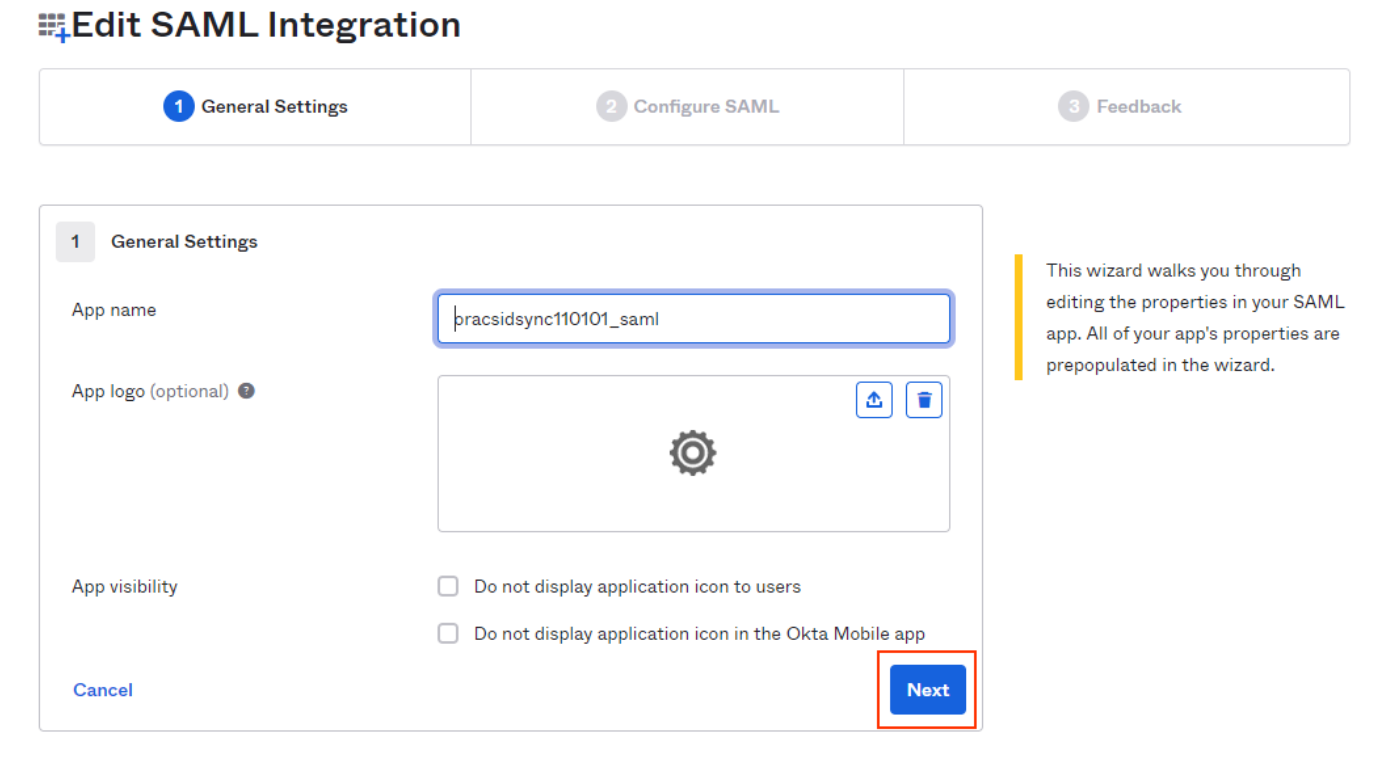
In the Edit SAML Integration screen, click Next.
-
Click on Show Advanced Settings.
-
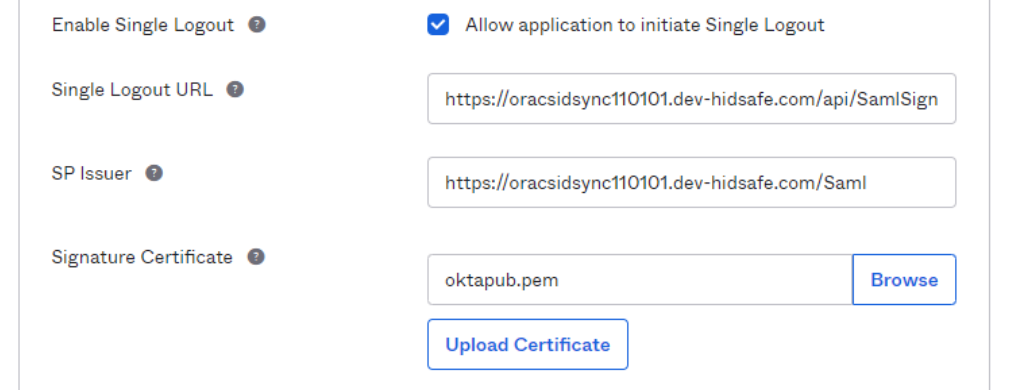
Click on Enable Single Logout. Use the values stored in Section 1: Step 3, and enter them here.
-
Logout URL into Single Logout URL.
-
Identifier (Entity ID) into SP Issuer.
-
Download the Certificate Public Key from WFID(Download Certificate Public Key) and upload the file to Signature Certificate in Okta and click on Upload Certificate.
-
-
Click on Next button and on the next screen click on Finish to save the changes.
Please note it is required to download metadata from Okta and upload to WFID again, if SAML Signout is being enabled after configuring Okta SAML Signon. For more details of downloading Okta SAML metadata please check step 8 in Section 2 (b): Enable SAML Authentication in Okta
Section 3 : Complete SAML Configuration in HID Visitor Manager
-
Log in to HID Visitor Manager using your administrator account.
-
Open the Settings app launcher, navigate to the General tab > Authentication sub-tab.
-
Follow these steps on this page:
-
Enable the Enable SAML Authentication checkbox.
-
Provide a name of your choice in the Identity Provider Name field.
-
Enter or review the matching attribute name in the field Matching Attribute: Username. This is the username that was set up in the previous section (Step 10 in Section 2 (a)) to be used as a claim. For Azure AD, we used username in the example above and for Okta this was oktausername.
Note:Only one matching attribute is allowed.
-
Enter or review the matching attribute name in the field Matching Attribute: Group Namein similar manner too (Step 13 in Section 2(a)).
-
Click Browse and upload the Metadata xml file that was saved in the last step of the previous section.
-
Click Save.
-
-
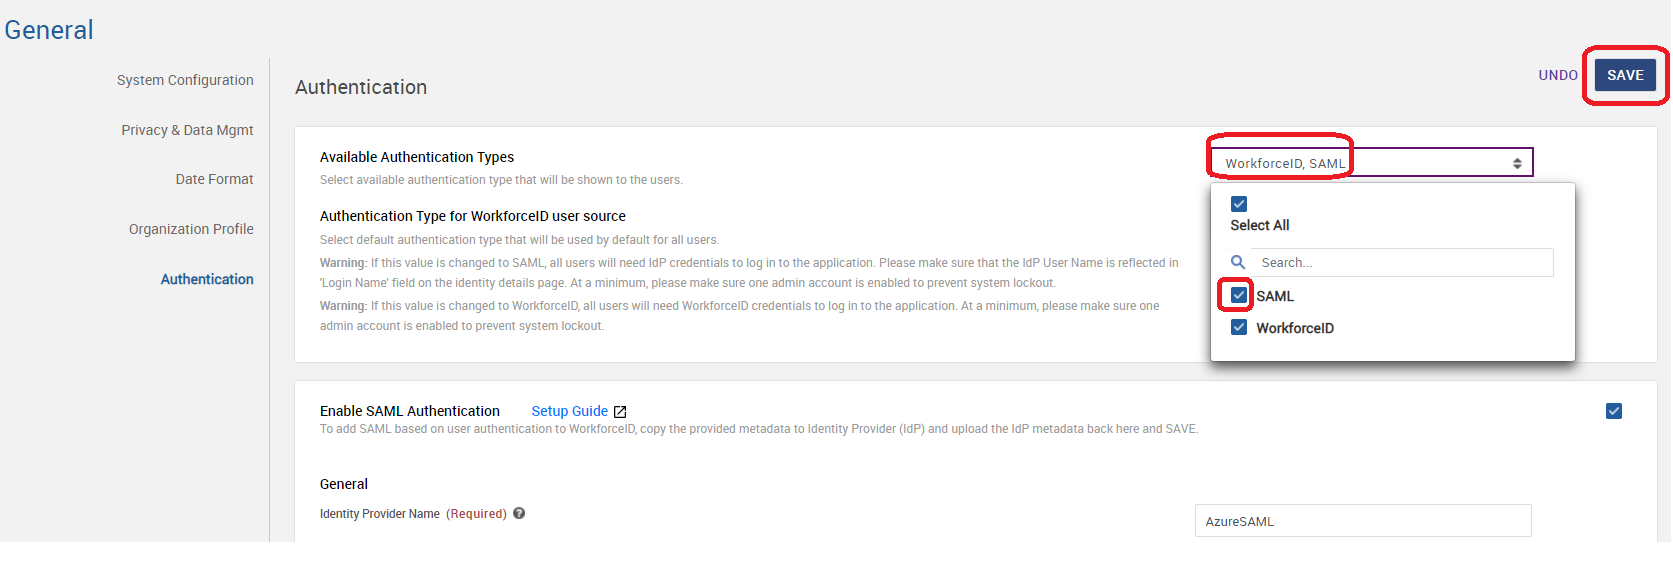
Select the SAML option in the field Available Authentication Types and Save.
-
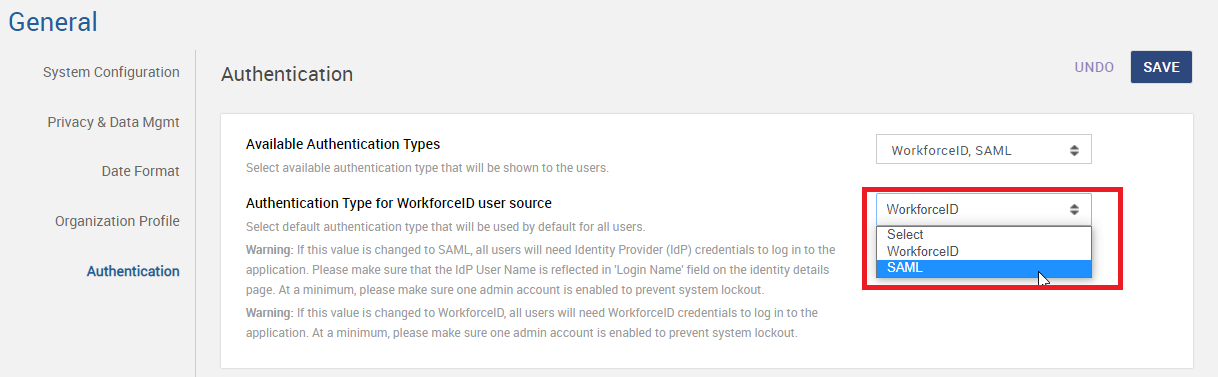
Now that SAML Authentication is available as an option in the HID Visitor Manager, you can select it as the default authentication type for the HID Visitor Manager or individual user sources. We recommend adding SAML Authentication to a user source if available.
-
Once default authentication is selected for HID Visitor Manager or another user source, verify the integration by opening a different browser or an incognito browser window.
-
Test the integration by providing SSO credentials for the user source administrator.
-
Launch your HID Visitor Manager tenant URL (for example, https://acme.workforce.id) in a browser, enter your AD username. Click Next.
-
You will now see the login page that your organization has set up. Enter your SSO credentials and click Login
-
If successful, you will be logged into HID Visitor Manager.
-
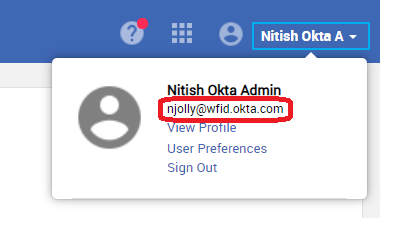
You can verify the username of the logged-in user by clicking on the top banner in HID Visitor Manager.
-

Please ensure that there is at least one other active visitor admin account in HID Visitor Manager with Visitor Administrator privileges for which the IdP username and HID Visitor Manager login name match. We recommend that each user source has at least one administrator account with visitor admin privileges which has matching IdP user name with HID Visitor Manager login name.
Make sure you log out only after successful verification. If verification is not successful, do not logout and review the configuration steps in above sections.
If verification is not successful, please change the default authentication back to HID Visitor Manager before logging out.
Section 4 : Configure User Group Mapping
Once the SAML authentication setup is complete & successful, configure user group mapping between Azure user groups and HID Visitor Manager user groups by following the steps in the below link.
Mapping User Sources and HID Visitor Manager User Groups
Section 5. Additional SAML Configurations
The following steps are the additional SAML configuration at HID Visitor Manager.
-
Log in to HID Visitor Manager using your administrator account.
-
Open the Settings application. Navigate to the General tab and click on the Authenticationsub-tab.
-
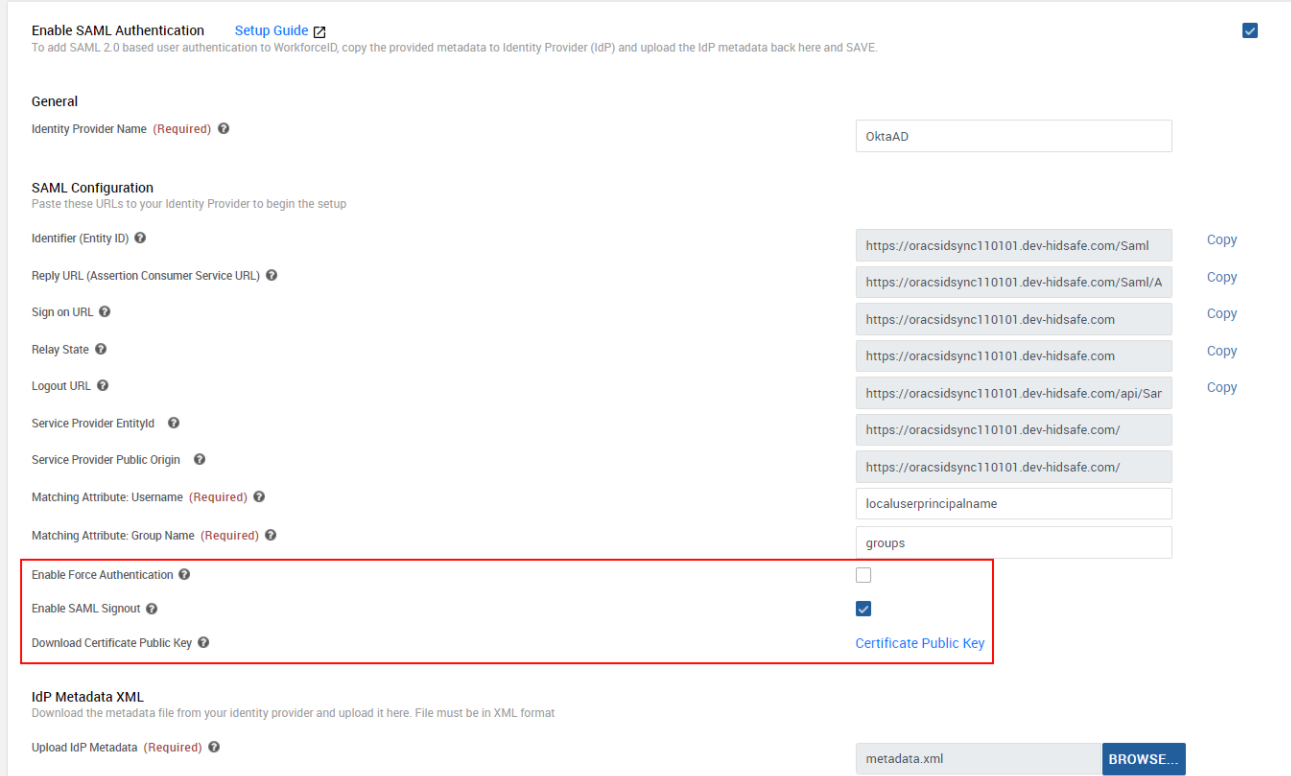
Enable Force Authentication: Checkbox is to enable or disable the Force Authentication flag for SAML authentication requests. This flag will force the IdP to authenticate again, rather than rely on a previous security context.
Note: Even if this is unchecked, each time a user closes the browser window, SSO username will need to be entered on the HID Visitor Manager tenant welcome page again.
-
Enable SAML Signout: Checkbox is to enable or disable SAML Signout if it is supported by IDP. Default it is enabled.
-
Download Certificate Public Key: Link for downloading WFID SAML public key. For some IDPs public key is required for configuring SAML Signout (eg. Okta).
-
Frequently Asked Questions
Q. What if I am not able to see the login page of my organization?
A: Review the mappings done in sections 2 and 3. Most of the time, small errors while entering the configuration values cause the issue. If you are still unable to proceed, please contact the customer support team.
Q: I am the only administrator in HID Visitor Manager, how can I prevent myself from being locked out?
A: It is highly encouraged to have more than one account in HID Visitor Manager with administrator privileges. See section 3 step 5-7.
Q: Does HID Visitor Manager support Multi-Factor Authentication (MFA)?
A: Yes. Please make sure it is enabled on the Identity Provider side before testing.
Q: I do not have either Azure AD or Okta. Can I still proceed further?
A: At this moment, HID Visitor Manager SAML based single sign-on integration has been tested and supported with Azure AD and Okta only. It may work with other IdPs that support SAML v2.
Q: I am locked out of my HID Visitor Manager tenant. What should I do?
A: If are a HID Visitor Manager administrator, please contact the customer support team.
Q: Does HID Visitor Manager supports IdP initiated SSO?
A: No, currently supports only Service Providers (SP) initiated SSO


