Replace Damaged Hardware
The following parts can be replaced on-site by a technician without any software manipulation, other than shutting down the appliance (except for hard drive disk).
- Motherboard
- Ethernet card
- Power supply
- RAID card
- Fan
- Memory card
- Hard drive disk
The steps to replace damaged hardware (except for hard drive disk) are as follow:
- Shut down the appliance using the UNIX terminal.
- Replace the damaged part.
- Restart the appliance.
Once the appliance is restarted, it will be fully functional. You do not have to make any manual changes to the network configuration.
Replacing a Damaged Hard Drive Disk
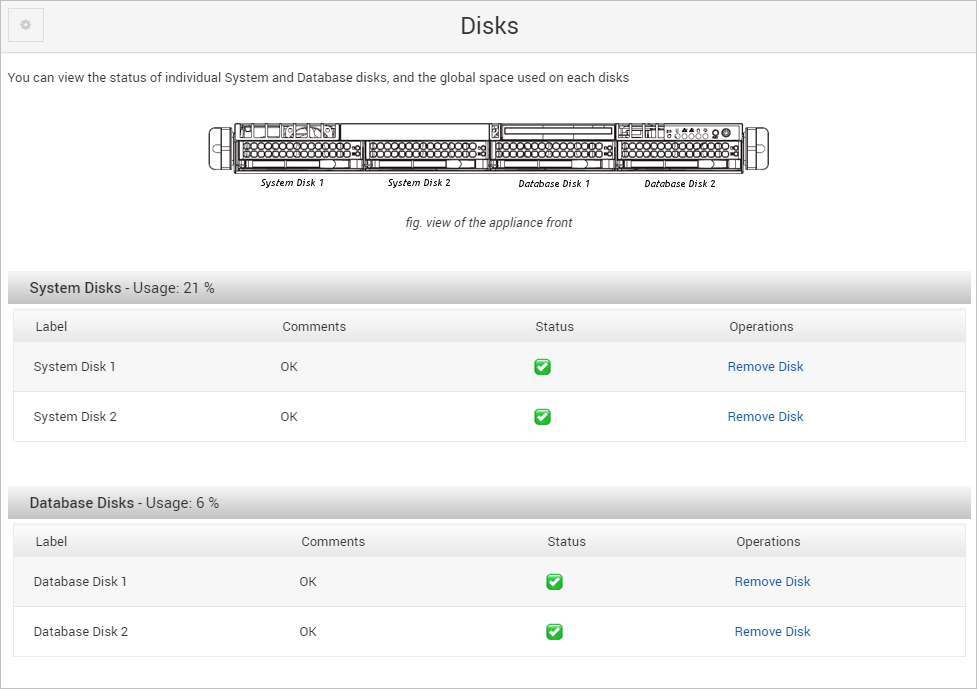
From the ActivID Console, you can select the Disks page, view the status of the disks, and start the recovery process without any interruption to services. You can view the status of individual RAID and ASM disks, and the global space used on system disk (RAID) and Oracle ASM on ASM disks.
For further details of the possible disk error messages and suggested solutions, see Hard Drive Disk Status and Operations.
Once you have physically replaced the hard disk, you can start or schedule the start of the recovery process.
When a hard disk is damaged on a hardware appliance, the monitoring system notifies the operator via an external network management (NMS) (for example, Nagios). However, it is not mandatory to install or use a NMS to monitor the status of the hard drive disk.
Safety Precautions
The appliance is static-sensitive. When replacing any of the hardware components, take the following safety precautions.
Electrostatic Discharge (ESD) can damage electronic components. To prevent damage to any printed circuit boards (PCBs), it is important to handle them very carefully. The following measures are generally sufficient to protect your equipment from ESD damage.
- Use a grounded wrist strap designed to prevent static discharge.
- Touch a grounded metal object before removing any board from its antistatic bag.
- Handle a board by its edges only. Do not touch its components, peripheral chips, memory modules or gold contacts.
- When handling chips or modules, avoid touching their pins.
- Put the server board, add-on cards and peripherals back into their antistatic bags when not in use.
- For grounding purposes, make sure your computer chassis provides excellent conductivity between the power supply, the case, the mounting fasteners and the server board.
The hard drive disks are mounted in drive disk carriers to simplify installation and removal from the chassis. These carriers also help promote proper airflow for the hard disk drive bays. You must keep the carriers in the chassis, even if the carriers are empty without installed hard drive disks.
To install or replace a hard drive disk, you do not have to access to the interior of the chassis, and you do not have to power down the appliance.
LED Status
| Button/LED Button | Name | Description |
|---|---|---|

|
Universal Information LED |
Note: As long as the condition exists, this LED remains flashing or on. If this LED is activated via IPMI, then you can turn if off via IPMI.
|

|
Green Hard Drive Disk LED |
When illuminated, this LED indicates drive activity. It blinks on and off when this specific disk is being accessed. |

|
Red Hard Drive Disk LED |
When blinking, it indicates the disk is rebuilding. When solid, it indicates a disk failure. |
If one of the hard drive disks is able to complete the boot process, but you suspect there is an issue with the second hard drive disk, then you must check the current state of the RAID.
If the RAID is degraded, then swapping the hard drive disks will resolve the issue. If one is damaged, then you must replace the other before starting the recovery process.
- Use caution when working around the hard drive backplane. Do not touch the backplane with any metal objects and make sure no ribbon cables touch the backplane or obstruct the holes, which aid in proper airflow.
- Before replacing a hard disk, verify its status first.
Procedure 1: Remove the Disk
The Remove Disk option enables you to safely remove the disk from the appliance. This option is available when:
- The disk is not recovering or not scheduled to have a recovery.
- Only when the paired disk is responsive with the status OK (that is, the other disk is with the same configuration – ASM or RAID, is configured and working properly with the status OK).
- Log on to the ActivID Console and, under System, select Disks.
- Click the Remove Disk option for an ASM Disk or a RAID Disk.
- Click Ok to initiate the process to stop the disk.
- To remove the carrier holding the hard drive disk, push the release button located beside the drive disk LEDs.
- Swing the handle fully out, and then use it to pull the damaged unit straight out.
- Insert your new disk.


The disk is stopped and can be replaced.
The Green Hard Drive Disk LED is now ON to help you identify the disk.
Procedure 2: Insert the New Hard Drive Disk
- With the Maintenance Kit, you received a spare hard drive disk already installed in its carrier. Align the new carrier to its slot, and push it into position with the handle.
- After you insert the carrier, you must use the handle to lock it into position. Gently complete the process by using the handle to lock the carrier into place.
- After you replace the hard drive disk, verify that it is working properly. Both the red hard drive disk LED and the green hard drive disk LED will be ON.
Procedure 3: Recover the Disk
- Go back to the ActivID Console and, under System, click Disks.
- Click Recover.

You are prompted to select an immediate recovery or a scheduled recovery. To avoid any impact on system performance, it is recommended to schedule the recovery process. The scheduled disk recovery date is displayed in UTC.

You can choose to Recover Disk Now or to save a schedule to recover the disk on a specific date and time.
Once the recovery starts, the status of the drive disk changes to Recovery in progress. Once the recovery is completed, the status of the hard drive disk changes to OK.

If the recovery fails, then the status of the hard drive disk changes to Recovery failed. Logs are generated.
Replacing a Power Supply
The ActivID Appliance has a 650-watt redundant power supply configuration consisting of two hot-swap power modules. If either of the two power supply modules fails, the other module will take the full load and allow the system to continue operation without interruption.
If the appliance stays ON, the Universal Information LED on the control panel will blink slowly and you can hear a beeping sound. These warnings remain so until the failed module has been replaced. For information on the LEDs on the control panel, seeAppliance Panel Overview
- You must replace the failed module with the same model.
- Before replacing any electrical parts, observe the safety precautions.
- Unplug the power cord from the failed power supply modules.
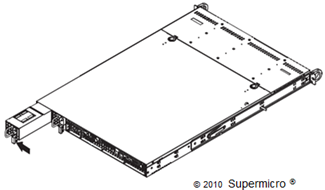
- To remove the failed power supply module, push the release tab (located on the back of the power supply) to the side.
- Pull the module straight out.
- Replace the failed module with another power supply module.
- Push the new module into the power bay until you hear a “click” sound.
- Plug the AC power cord back to the module.
- After replacing the module, verify that the new module is working:
- The power supply LED is green.
- The fault LED is not illuminated.


