Configure Roles
Roles are used to assign Permission sets and permissions to users.
You can create, edit, and delete roles. You can also associate permissions with, and remove permissions from, specific roles.
Using the ActivID Management Console, you create a role to represent a relationship and associate the role with the relevant Permission set permission.
Then, you assign the role either to an individual user (local database users) or to an LDAP group or organizational unit (OU) (all external users belonging to the LDAP entity are granted the role).
Assigning the role gives the individual user the permission to perform the actions in the associated set.
One user can have many roles; one role can be assigned to many users.
The following diagrams illustrate the permissions/roles assignment for local database users and LDAP users.
Roles can be assigned directly to:
- A local database user:

- An LDAP group or LDAP OU:
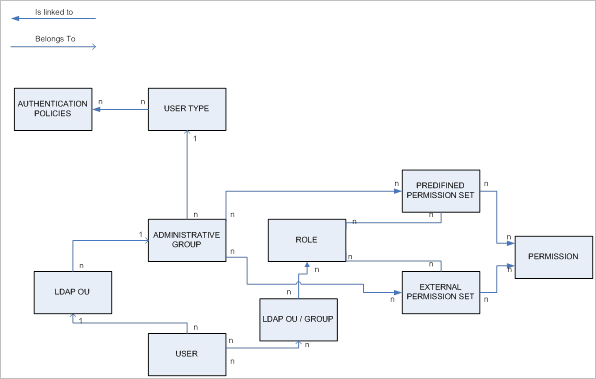
External users belonging to the LDAP entity are granted the role.
The difference in this diagram (compared to the diagram above) is that you can only assign roles to individual LDAP users by assigning the role directly to the entity (LDAP group/OU) to which the user belongs.
| Role | Description |
|---|---|
| Audit Viewer | Grants permissions to search and view audit records. |
| Configuration | Allows configuring User Repositories, OOB Delivery Gateways, Channels, and Authorization Profiles. |
| Configuration Manager | Allows access to management console configuration functions |
| Device Administration | Grants permissions to search, import, manage devices and credentials. |
| Help Desk | Grants permissions to manage user assets. |
| Power User Administration | Grants permissions to administer power users (i.e. ActivID Administrators, Operators and Systems). |
| RADIUS Front End | Allows RADIUS Front End systems to manage users authentication and authorization operations. |
| REST Gateway Administration | Grants permissions to administer soft tokens |
| Role Assignment | Grants permissions to assign roles to all users except Prime User. |
| Self Service Portal Administration | Grants permissions to administer soft tokens |
| Soft Token Portal Administration | Grants permissions to administer soft tokens |
| Standard User Administration | Grants permissions to administer standard users (i.e. Employees and Customers). |
| Standard User Administration for External Systems | Grants permissions for external systems to manage standard users. |
| Default Assigned Role | Online Banking | Online Banking for Temenos | Enterprise Secure Access | eGovernment |
|---|---|---|---|---|
- Only the dataset users with a Management Console Static Login authenticator can log on to the ActivID Management Console by default.
- By default, the predefined users do not have credentials. In order to log on as one of the users, you must create an authenticator (for example, a static password).
Create a New Role
To configure the role’s Predefined Permission sets, the operator must have the following permissions:
- Modify role asset type Permission set privilege – allows adding a Predefined Permission on the resource Asset type.
- Modify role Permission set privileges – allows adding a Predefined Permission on the resource Admin Group and adding a Predefined Permission on the resource type NONE.
To configure the role’s External Permission sets, the role must have the following permissions:
- Modify role asset set External Permission set privileges – allows adding an External Permission on resource Asset set.
- Modify role External Permission set privileges – allows adding an External Permission set on resource NONE.
- Log on to the ActivID Management Console as an operator with the required permissions.
- Select the Access Administration tab and, under Access Control, select Roles.
- Name – the name of the role
- Description – a description of the role
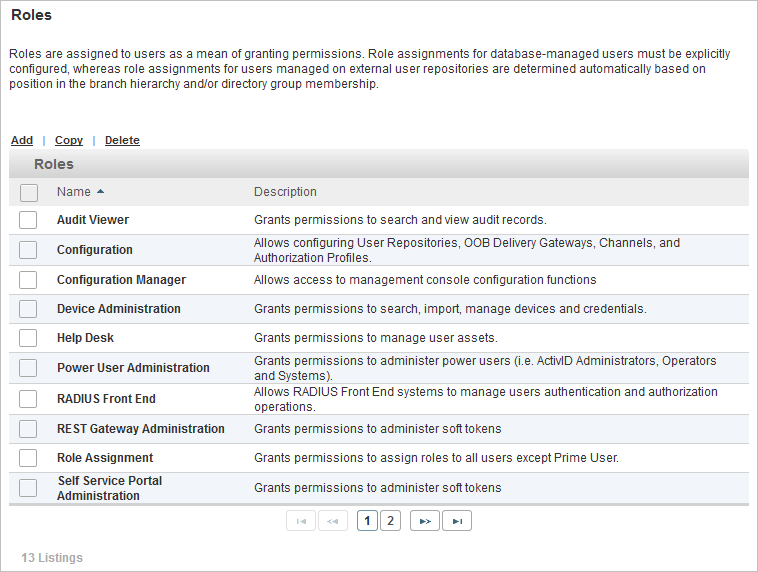
All existing roles are listed in a paged table. The total number of roles is given in the lower left corner.
Each row corresponds to a role. It provides the following information in the different columns:
Launch the Role Creation Wizard
- Click Add.
- Enter a descriptive Name.
- Edit the Code to identify the role.
- Click Next and proceed to Assign Permissions to the Role.

The Code is pre-assigned and case-sensitive. You can modify it but it must be unique and a maximum length of 20 characters.
Alternatively, click Save and assign the permission to the role later.

At this point, you can save the role but it will not contain any permissions. You can then assign specific permissions to this role and also assign this role to LDAP users.
In order to enable an operator to assign this role to a user, you must add the new role’s Code to the operator’s Roles Assignment permission.
Assign Permissions to the Role
- Log on to the ActivID Management Console as an operator with the required permissions.
- Select the Access Administration tab and, under Access Control, select Roles.
- Click on the Name of the role that you want to edit.
-
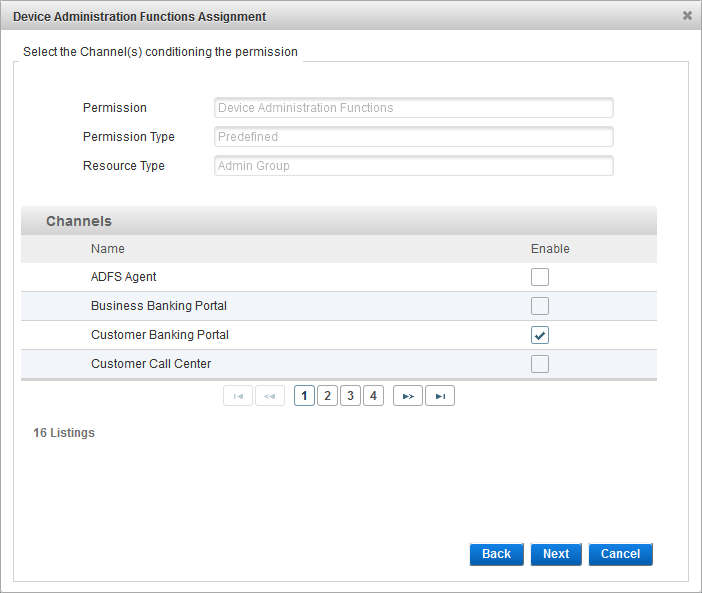
In the Permissions tab, click Assign for the permission(s) to be granted to this role (in this example, Device Administration functions).
-
Depending on the permission you selected, configure the permission by selecting the Authentication Policy(ies), Channel(s), and Resource(s) options.
-
Select one or more check box(es) for the Authentication Policy.
-
Click Next.
-
Select one or more check box(es) for the Channel and click Next.
-
Select one or more check box(es) for the Resources and click Next.
-
Click OK and proceed to Configure the Role Assignment Rule for LDAP User Repository if required.
If not, proceed to Add a Role to the Roles Assignment Functions Permission Set.


Configure the Role Assignment Rule for LDAP User Repository
- Select the Assignment Rules tab.
-
Under User Repositories, select the check box for the user repository to which to assign the role.
-
Select the basis on which the users in the user repository will gain role membership, and click Next:
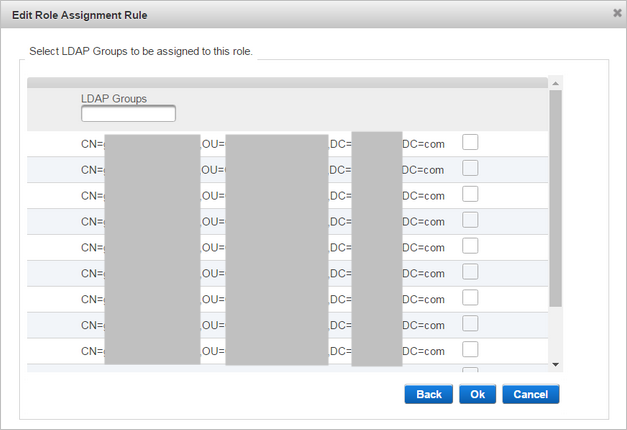
- Enter the group identifier in the LDAP Filter field and click Next.
- Select the checkbox(es) for the required group(s) or refine the search results using the LDAP Groups field, and then click OK.
-
Click Save and proceed to Add a Role to the Roles Assignment Functions Permission Set.


Users belonging to an identified group(s) will be assigned to role regardless of their OU.

The search filter is the User ID attribute defined for the User Repository. By default, the attribute is mapped to the sAMAccountName directory attribute for Active Directory.
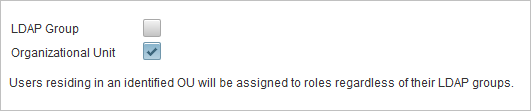
Users residing in an identified OU will be assigned to roles regardless of their LDAP groups.
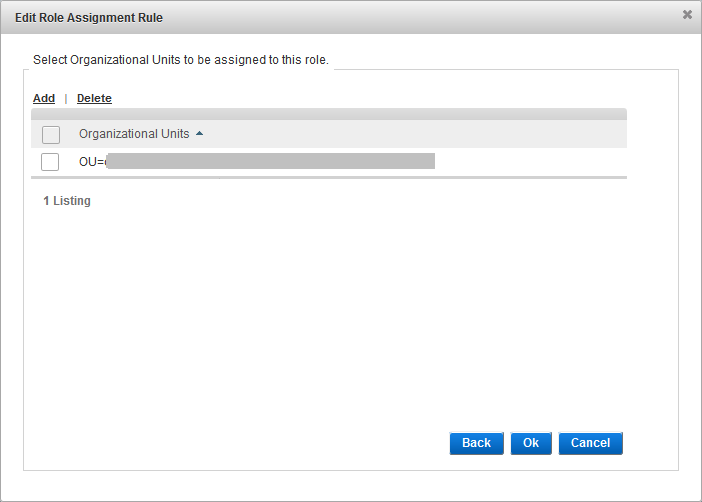
Select the required Organizational Units and click Ok.
Users must belong to an identified group or reside in an identified OU in order to be assigned to role.

Enter the LDAP filter and then select the LDAP Group/Organizational Unit as described above and click Ok.
Add a Role to the Roles Assignment Functions Permission Set
- Log on to the ActivID Management Console as an operator with the required permissions.
- Select the Access Administration tab and, under Access Control, select Permission Sets.
-
Select the Roles Assignment Functions Permission set.
-
Under Individual Permissions, click the edit icon (pencil) to add the role code in both the Modify user roles and Read role parameters.
-
Click Save.
-
You can then Assign Roles to a User.


All the different roles that can be assigned are listed with a separator “|”. You must use this separator when adding the new role code.
Copy a Role
- Log on to the ActivID Management Console as an operator with the required permissions.
- Select the Access Administration tab and, under Access Control, select Roles.
-
Select one or more check boxes of Roles that you want to copy, and click Copy.
- Edit the role settings as required.


Edit a Role
- Log on to the ActivID Management Console as an operator with the required permissions.
- Select the Access Administration tab and, under Access Control, select Roles.
- Click on the Name of the role that you want to edit.
- Edit the role settings as required.
- Click Save to apply your changes.

All the tabs are accessible and all settings can be modified except the Code.
If you want to cancel the operation, click Back to List.
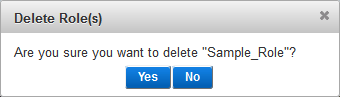
Delete a Role
- Log on to the ActivID Management Console as an operator with the required permissions.
- Select the Access Administration tab and, under Access Control, select Roles.
-
Select one or more check boxes of Roles that you want to delete, and click Delete.
-
When prompted, click Yes to delete the role.