Configure Authentication Policies
An authentication policy is a template containing predefined parameters enforced during authentication, such as password lengths or constraints, OTP synchronization protocols, Push Notification Signature details...
Authentication policies can be one of three different types:
- Username/Password (LOGIN or UP) policies define password rules (for example, password history) and password complexity rules (for example, password must contain numbers or special characters, etc.)
- Security Questions/Memorable Data (SQ) policies are assigned a set of security questions to create a pool of applicable questions that can be displayed, selected, and used by the user population that are assigned that specific authentication policy
- Device-based (DEVICE) policies are assigned a set of applicable credential types that are associated to user’s devices. For instance, an OTP device authentication policy could have a combination of OOB, OATH or ActivID SKI credentials.
Authentication policy parameters include attributes, validity, channel and gateway assignments and constraint settings.
You configure authentication policies using the ActivID Management Console.
Create an Authentication Policy
The predefined authentication policies comply with the following recommendations in the NIST SP 800-63B-3 guidelines concerning digital identity:
- Minimum Length – 8 characters
- Maximum Length – 100 characters
- Restrictions:
- No constraints in the range of characters allowed.
- No requirement to mix different character types.
The default restrictions are designed to prevent the use of previous passwords, commonly chosen passwords that appeared in password leaks, a sequence of letters, and rejects passwords that contain the user name or the value of one UserAttribute.
- Maximum Age – 1825 days
- Lock Policy – Disabled for 900 seconds after five (5) consecutive authentication failures.
- Log on to the ActivID Management Console as a Configuration Manager.
-
Select the Configuration tab and, under Policies, select Authentication and then Authentication Policies.
- Code – the unique code identifying the authentication policy
- Name – the name of the authentication policy
- Description – a description of the authentication policy
- Adapter – the authentication policy adapter associated with the authentication policy
- Class – the authentication policy class (type)

All existing authentication policies are listed in a paged table. The total number of authentication policies is given in the lower left corner.
Each row corresponds to an authentication policy. It provides the following information in the different columns:
Launch the Authentication Policy Creation Wizard
-
Click Add.
-
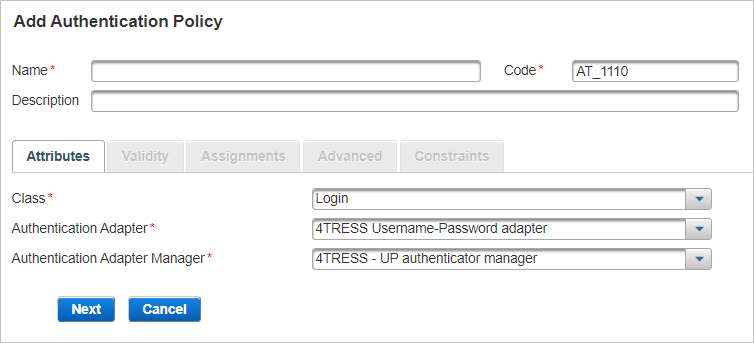
Enter the main information for the Authentication policy and click Next:
- Name – should be unique for ease of administration.
- Code – a value is automatically generated but it can be changed. The code must be unique, a minimum of three characters, and a maximum of 10 characters. It cannot be changed once the authentication policy is created.
- Description – (optional) content is free-format.
- Proceed to Define the Attributes Settings.
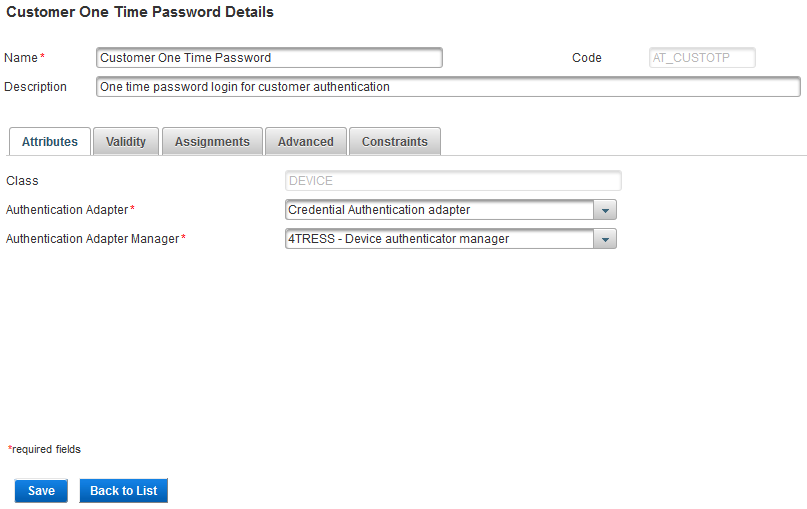
Define the Attributes Settings
The Attributes are the general parameters of the policy.

-
From the Class drop-down list, select the required policy type – Login, Security Questions or Device.
-
From the Authentication Adapter drop-down list, select the required adapter A functional module that supports a specific authentication scheme. Authentication adapters are specific to Authentication classes. You select an authentication adapter during authentication policy configuration..
- 4TRESS LDAP Username-Password adapter
- Credential Authentication adapter
-
PKI Certificate Matching Credential Authentication adapter
- Transaction Signing Credential Authentication adapter
This is the software that provides the authentication service for the authentication policy. The adapter handles requests for authentication made through the authentication policy.
| Class | Adapter |
|---|---|
|
LOGIN |
4TRESS Username-Password adapter |
|
Security Questions |
4TRESS Memorable Data adapter |
|
DEVICE |
|
-
From the Authentication Adapter Manager drop-down list, select the required manager.
- LDAP authenticator manager for the LDAP authentication with the Device authentication class
- Device authenticator manager for the Device authentication class
- UP authenticator manager for the Login authentication class
- MD authenticator manager for the Memorable Data/Security Questions authentication class
This is the software that manages data storage and retrieval for an authentication record during its life cycle.
-
Click Next and Define the Validity Settings.
Define the Validity Settings
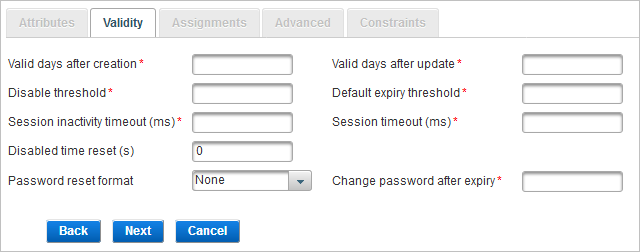
The Validity parameters are related to the validity of the authentication records created from this authentication policy.
-
Enter the required parameter values:
Parameter Description Valid days after creation
The default expiration period of an authentication record, as a number of days, starting from the date of creation of the authentication record.
To apply the new expiration period to the new authentication records, edit this field for an existing authentication policy. The pre-edited expiration period continues to apply to existing authentication records set up under the authentication policy.
Valid days after update
The default expiration period of an authentication record when the password is changed, starting from the date the password is changed.
For a Security Questions authentication policy, this value will be high, since Security Questions responses will not be expected to change over time.
Disable threshold
The maximum number of successive failed attempts by a user to log on using an incorrect password before the password is locked.
Default expiry threshold
The number of times a user can authenticate using a password before the password expires. It corresponds to the Maximum number of successful authentications allowed.
If you do not want to use the expiration threshold functionality, then enter a value of -1.
Session inactivity time-out (ms)
Time (in milliseconds) after which an idle session is automatically terminated. The value should be lower than that set for the global Session Timeout parameter.
Session timeout (ms)
The maximum period, in milliseconds, that a user authenticated via this authentication policy can sustain their session before being prompted to re-authenticate by logging on again.
Disabled time reset(s)
Enter this value in seconds. This value enables the auto-unlock feature. If an authenticator is locked for any reason (for example, it reached the max authentication count), it’s possible to unlock the authenticator (if you have set this to a value other than zero).
For example, if you configure the value to be 120 seconds (two minutes), then by setting Disabled Time Reset, it will automatically unlock the authenticator when the user tries to authenticate after two minutes.
Password reset format
Defines the format for the password reset file. For standard formatting, select None.
When specifying ANSI X9.8 PIN encryption, the password must be numeric and be between 4 and 12 digits long.
Note: This feature is not currently supported.Change password after expiry
Enables an operator to log on with a password beyond the password’s expiration date. However, the user is requested to change the password immediately.
The number entered in the field specifies the number of times the user can enter the existing expired password in an attempt to change it before being denied further access.
-
Click Next and Define the Assignments Settings.
Define the Assignments Settings
In the Assignments tab, define the policy’s channels The means through which users interact with an organization, system, or workspace where they perform operations. A channel defines the method of access for which a User Authentication method (or privilege) is valid. and delivery gateways.

- Select one or more channels to which to link the new authentication policy by moving them to the Selected Channels list.
- To move a single channel, select the required channel and click the forward arrow
 .
. - To move several channels simultaneously, use the Ctrl or Shift keys to select the required channels and click the forward arrow .
- To move all the channels, click the forward-all arrow
 .
.
The Available Channels list specifies all the channels that currently exist in your system.
You can move the channels by dragging and dropping, or using the arrow buttons:
You can use the backward arrows to restore the selected channel(s) to the Available list.

- Select one or more gateways to manage the delivery of Out-of-Band (OOB) messages and passwords by moving them to the Selected Delivery Gateways list.
- There are no default gateways. You can configure gateways using the ActivID Management Console.
- Delivery Gateways are only used for OOB authentication (such as SMS and Push-based validation).
- To move a single gateway, select the required gateway and click the forward arrow .
- To move several gateways simultaneously, use the Ctrl or Shift keys to select the required gateways and click the forward arrow .
- To move all the gateways, click the forward-all arrow .
- The order for the selected delivery gateways is important!
- You must configure the delivery gateways if the authentication policy is an OOB type.
The Available Delivery Gateway list specifies all the gateways that currently exist in your system.
You can move the gateways by dragging and dropping, or using the arrow buttons:
You can use the backward arrows to restore the selected gateways(s) to the Available list.
-
Click Next and Define the Advanced Settings (Tiered Authentication).
Define the Advanced Settings (Tiered Authentication)
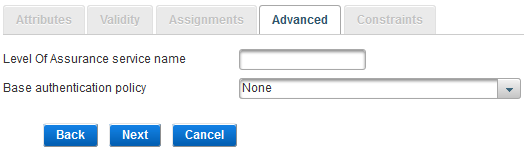
In the Advanced tab, set the Level of Assurance (LOA) service name and base authentication policy for tiered-authentication Authentication can be tiered into two types - primary and secondary authentication - and involves the use of more than one level of authentication to enable a user to access data and carry out particular actions. As the first authentication in a session is considered the Primary authentication, all subsequent authentications in the session are considered to be Secondary authentications..
The Level of Assurance (LoA) Level of Assurance (LoA) is the level of confidence in the claimed identity of a user during authentication See also ACR value (also known as the ACR Authentication context class reference (ACR) specifies the rules required by a provider or relying party that define how a user authenticates to mitigate specific authentication risks See also LoA value) defines the level of assurance provided by the authentication process to the user's claim to the 'identity' they use to authenticate.
ActivID AS selects the optimal authentication methods available to the user in order to meet the level required by the application/service based on the values defined for the associated authentication policy.
-
Enter the Level Of Assurance service name (that is, one of the integer values in the table below).
Identity authentication level service values can be configured with integer values 1, 2, 3 or 4.
The value can also be a chain of characters that correspond to the OpenID Connect acr claim, such as urn:openbanking:psd2:sca or urn:openbanking:psd2:ca that respectively represent the strong or normal PSD2 authentication method.
LoA can typically be defined for SAML transactions. Each assurance level describes the recipient’s degree of certainty that the user has presented an identifier that refers to their identity.
LoA values can be configured at Authentication Adapter level or Credential adapter level. However, if both are configured, then the authentication adapter LoA takes precedence.
In this context, an LoA Service value can be associated to an authentication policy.
LoA (Int) Definition LoA (String) 1 Little or no confidence in the asserted identity’s validity.
urn:oasis:names:tc:SAML:2.0:post:ac:classes:nist-800-63:v1-0-2:1
2 Some confidence in the asserted identity’s validity.
urn:oasis:names:tc:SAML:2.0:post:ac:classes:nist-800-63:v1-0-2:2
3 High confidence in the asserted identity’s validity.
urn:oasis:names:tc:SAML:2.0:post:ac:classes:nist-800-63:v1-0-2:3
4 Very high confidence in the asserted identity’s validity.
urn:oasis:names:tc:SAML:2.0:post:ac:classes:nist-800-63:v1-0-2:4
With this configuration, the service provider (SP) authentication process adapter will return (in the SAML assertion) the LoA string as a value for one of the SP attributes defined in the SP metadata. For further details on how to return values in SAML assertions, see Configure SAML Assertion Settings.
-
To set this authentication policy as the ‘child’ policy in a tiered-authentication deployment, from the drop-down list, select the Base authentication policy as the ‘parent’ policy.
This means the user will need to make a successful authentication with the authentication policy chosen as the base type (that is, a static password), before being prompted to authenticate using the ‘child’ authentication policy (that is, a One-Time Password). Both authentications need to succeed for the tiered-authentication to succeed.
If you are not configuring for tiered authentication, leave the setting as None.
-
Click Next and Define the Constraints.
Define the Constraints
In the Constraints tab, define the specific constraints parameters depending on the authentication policy class chosen in Attributes tab and click Save.
If you are creating a Login class authentication policy, define the following constraints (divided into three sections below)
-
Password Creation – the constraints enforced when a password is created.

| Constraint | Options | Description |
|---|---|---|
|
Characters range
|
No constraint |
All characters allowed, including special characters. |
|
Only numeric |
Only numbers allowed, no punctuation, no characters, and no spaces. |
|
|
Only alphabetic |
Only letters allowed, no punctuation, no numbers, and no spaces. |
|
|
Numeric OR alphabetic |
Combination of letters and numbers allowed, no punctuation, and no spaces. |
|
|
Numeric AND alphabetic |
Must have a combination of letters and numbers, no punctuation, and no spaces. |
|
|
With at least
|
One numeric character |
Contain at least one numeric character. |
|
One lowercase character |
Contain at least one lowercase character. |
|
|
One uppercase character |
Contain at least one uppercase character. |
|
|
One special character |
Contain at least one special character. The supported characters are - + _ ! @ # $ % & * . , ? However, ( ) are not recognized as special characters but are allowed in passwords. |
|
|
Minimum length |
Numeric value |
Minimum number of characters for the user name or password. |
|
Maximum length |
Numeric value |
Maximum number of characters for the user name or password (For a user name, the default is 100 characters and can be up to 250 characters and 100 characters for a password.) |
|
Minimum number of different characters |
Numeric value |
User name or password must contain at least the same number of different characters as the number specified in this field. For example, if 3 is specified as the number in this field, aa11 is not valid, while Aa11 could be valid. Make sure you understand the relationship between the Case-sensitive and Different characters constraints. In a string of lowercase characters, uppercase characters are “different”. |
|
Forbidden values
|
Any previous password |
Previous passwords are saved and compared against new password submissions. |
|
Contain username or is a user attribute |
New password submissions are compared against user attribute values specified for that user. Note: User attribute values, such as surname and date of birth, are specified in relation to attribute types assigned to the user type to which a user belongs
|
|
|
Black-listed word |
Must not contain black-listed words. The passwords are compared against a black list containing commonly-used, expected, or compromised words. This list includes:
|
|
|
Sequence of letters or numbers |
Password must not consist of a series of numbers or letters (for example, 5678, abc). |
-
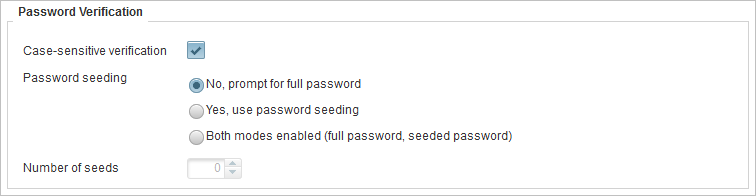
Password Verification – the constraints enforced at when the password is verified.
| Constraint | Description |
|---|---|
|
Case-sensitive verification |
Select if the password should be case-sensitive. Make sure you understand the relationship between the Case-sensitive and Different characters constraints. In a string of lowercase characters, uppercase characters are “different”. |
|
Password seeding |
Defines if partial passwords are allowed:
If you are creating a partial authentication policy, then you must select the set the Minimum Length constraint in the Password Creation section. |
|
Number of seeds |
Specifies the number of characters that can be requested for a partial password. |
-
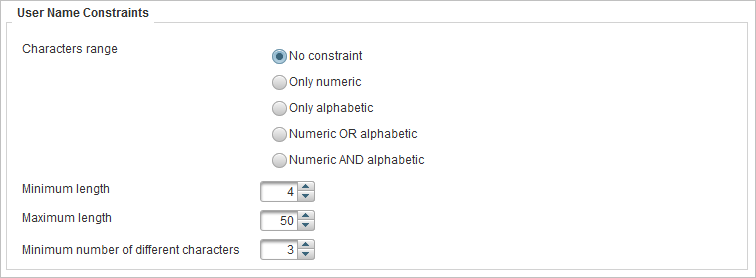
User Name Constraints – the constraints enforced when a user name is created.
| Constraint | Options | Description |
|---|---|---|
|
Characters range
|
No constraint |
All characters allowed. |
|
Only numeric |
Only numbers allowed, no punctuation, no characters, and no spaces. |
|
|
Only alphabetic |
Only letters allowed, no punctuation, no numbers, and no spaces. |
|
|
Numeric OR alphabetic |
Combination of letters and numbers allowed, no punctuation, and no spaces. |
|
|
Numeric AND alphabetic |
Must have a combination of letters and numbers, no punctuation, and no spaces. |
|
|
Minimum length |
Numeric value |
Minimum number of characters for the user name or password. |
|
Maximum length |
Numeric value |
Maximum number of characters for the user name or password. (For a user name, the default is 100 characters and can be up to 250 characters and 100 characters for a password). |
|
Minimum number of different characters |
Numeric value |
User name or password must contain at least the same number of different characters as the number specified in this field. For example, if 3 is specified as the number in this field, aa11 is not valid, while Aa11 could be valid. Make sure you understand the relationship between the Case-sensitive and Different characters constraints. In a string of lowercase characters, uppercase characters are “different”. |
If you are creating a Security Questions class authentication policy, define the following constraints:

You can define the prompts displayed to users during Security Question authentication by dragging and dropping, or using the arrow buttons:
- To move a single prompt, select the required prompt and click the forward arrow .
- To move several prompts simultaneously, use the Ctrl or Shift keys to select the required prompts and click the forward arrow .
- To move all the prompts, click the forward-all arrow .
You can use the backward arrows to restore the selected prompt(s) to the Available list.
| Constraint | Description |
|---|---|
|
Prompts required for creation |
The number of prompts that user must provide responses to in order to create the authentication record. |
|
Prompts required for display |
The number of prompts that the user has supplied responses for which will be randomly displayed in order for the user to authenticate. Note: This number must not exceed the number of Prompts required for creation.
|
|
Prompts required for authentication |
The number of prompts that the user must give the correct responses to in order to authenticate. Note: This number must not exceed the number of Prompts required for creation.
|
|
Indicate failed prompts |
Specifies if the response prompts that were answered incorrectly are identified. |
|
Answer seeding |
Defines if partial answers are allowed:
|
|
Number of seeds |
Specifies the number of characters that can be requested for a partial Security Questions prompt. The number of seeds should not exceed the minimum length for any response in the group, as defined in the configuration of Security Questions prompts. |
If you are creating a Device class authentication policy, define the following constraints:
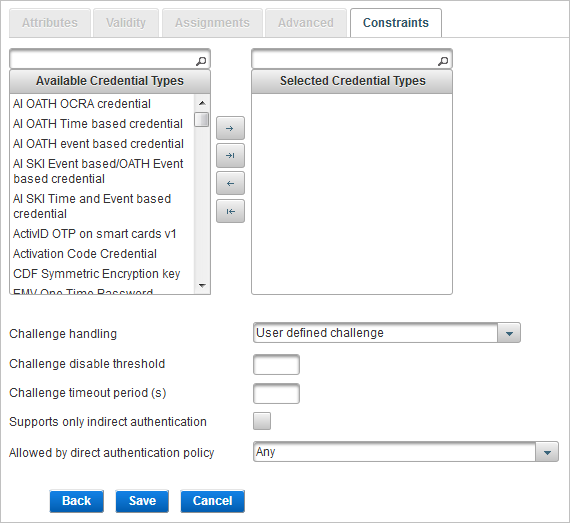
You can define the credential types allowed for the Device authentication policy by dragging and dropping, or using the arrow buttons:
- To move a single type, select the required type and click the forward arrow .
- To move several types simultaneously, use the Ctrl or Shift keys to select the required types and click the forward arrow .
- To move all the types , click the forward-all arrow .
You can use the backward arrows to restore the selected type(s) to the Available list.
| Constraint | Description |
|---|---|
|
Challenge handling |
Defines how the challenge is used during an asynchronous authentication.
The device generates a response to the challenge, and the user submits both the challenge and response. Use this mode when employing challenge/response to sign a parameter of a transaction. The user-defined challenge should be used for transaction signature verification. It should not be used for authentication, because it’s prone to replay.
The device generates a response to the challenge. The user submits the response to ActivID AS, which confirms that the challenge and response match. It should be used for authentication purposes. Both the challenge and response are generated upon challenge request. It does not require the user to resend the challenge again for authentication purposes because it has been stored in the database.
The device generates a response to the challenge. The response submitted by the user is sent to ActivID AS, by the application, along with the challenge initially issued by ActivID AS. ActivID AS checks first that the challenge sent matches the one initially issued, and if it matches, verifies the response. |
|
Challenge disable threshold |
The maximum number of challenges that can be issued for an authentication record of this policy without submission of a valid response. Once this threshold is crossed, the count must be reset before a challenge will be issued. |
|
Challenge timeout period (s) |
A timeout period (in seconds) for a challenge. If a response takes longer than this period, ActivID AS fails the authentication request. |
|
Support only indirect authentication |
Specifies whether only indirect authentication is supported or both direct and indirect authentication is supported. |
|
Allowed by direct authentication policy |
If a direct user uses this authentication policy to perform direct authentication, then only this user can authenticate indirect users. For example, if Customer one time password is selected, then only direct users who authenticate with customer OTP can authenticate the indirect users. |
Edit an Authentication Policy
- Log on to the ActivID Management Console as a Configuration Manager.
-
Select the Configuration tab and, under Policies, select Authentication and then Authentication Policies.
-
Click the Code of the authentication policy that you want to edit.
- Edit the settings as required in each tab.
- Code
- Class
All the tabs are accessible and all settings can be modified except the:
- Click Save to apply your changes.
If you want to cancel the operation, click Back to List.
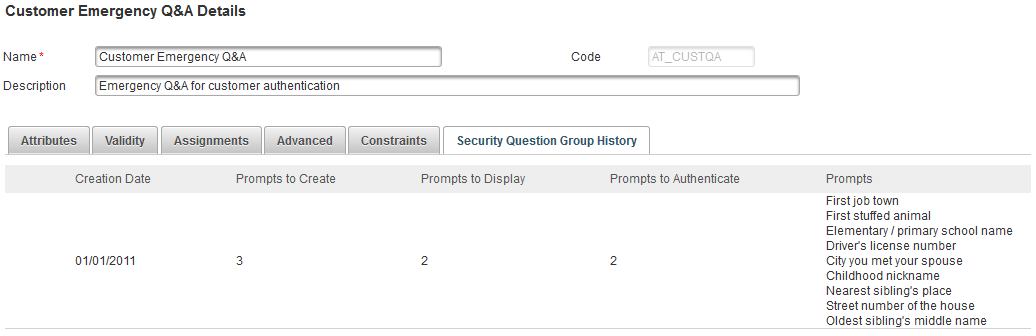
This tab provides read-only information on the groups of security questions previously defined for the authentication policy.
Delete an Authentication Policy
You cannot delete the “Prime User Login” authentication policy or the “Management Console Static Login” authentication policy. A warning message will be displayed.
If there are authentication records of the selected policy defined in the system, then you cannot delete the authentication policy.
- Log on to the ActivID Management Console as a Configuration Manager.
-
Select the Configuration tab and, under Policies, select Authentication and then Authentication Policies.
-
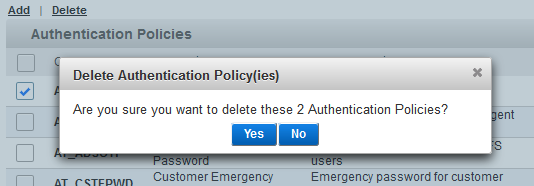
To delete one or more authentication policies, select the check boxes to the left of the policy names and click Delete.
-
Click Yes to delete the policies, or No to cancel the operation.

See also:


