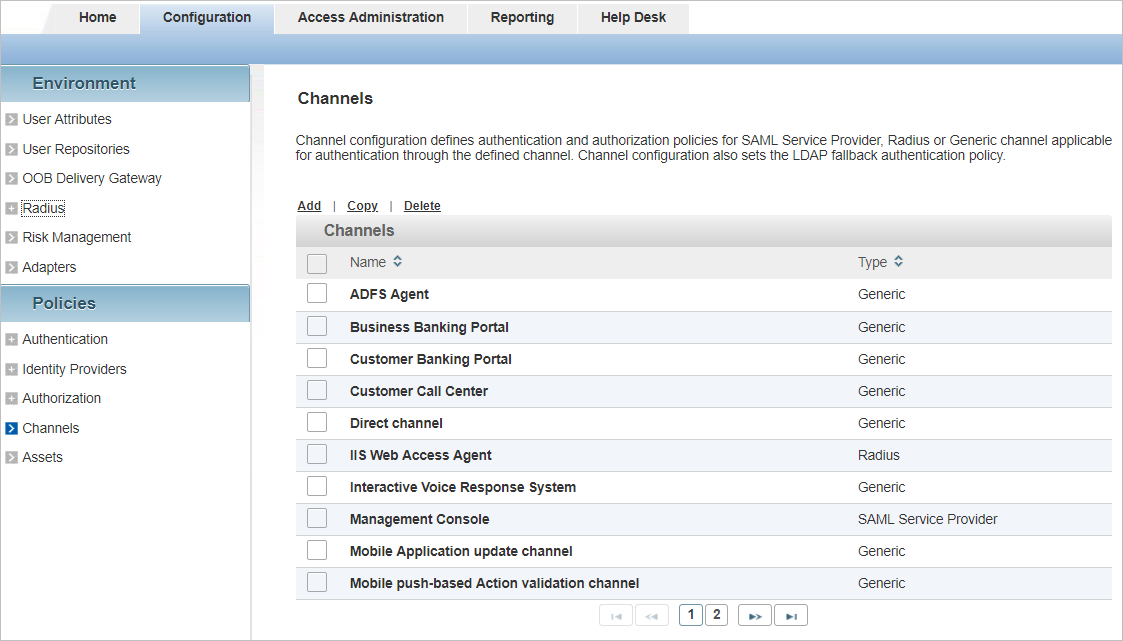
Configure SAML Channels/Service Providers
This section describes how to create and configure a SAML channel/service provider.
Create a SAML Channel/Service Provider
You have either the metadata file or the URL from the SP Server that you want to add to ActivID AS.
For information on the definition and content of metadata, refer to the Oasis technical documentation available at http://www.oasis-open.org
Add a Service Provider Channel
-
Log on to the ActivID Management Console as an ActivID Administrator.
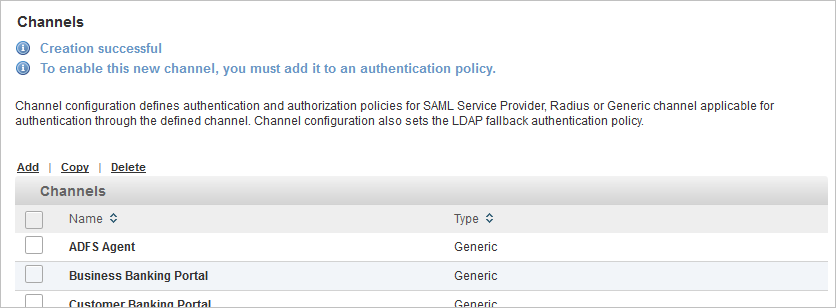
- Select the Configuration tab and, under Policies, select Channels.
-
Click Add.
-
Enter the Name and, optionally, a Description, for the channel.
-
You can either accept the pre-assigned Code to identify the channel, or edit it.
-
From the Type drop-down list, select SAML Service Provider.
-
Click Next.

The Metadata field and configuration tabs appear.
Import SAML Service Provider Metadata

You can use one of the following methods to import metadata:
- Using a file previously exported from the SP:
Click File Import to import the metadata file previously exported from the SP.
Click Browse to locate the file.
Click Upload when the button becomes available.
- Click Done.
- Using a HTTP/HTTPS URL:
Click Http Import.
Enter the URL in the Enter metadata URL field, for example, http://<OpenSSOSP Server Name>:8080/opensso/saml2/jsp/exportmetadata.jsp
- Click Upload.
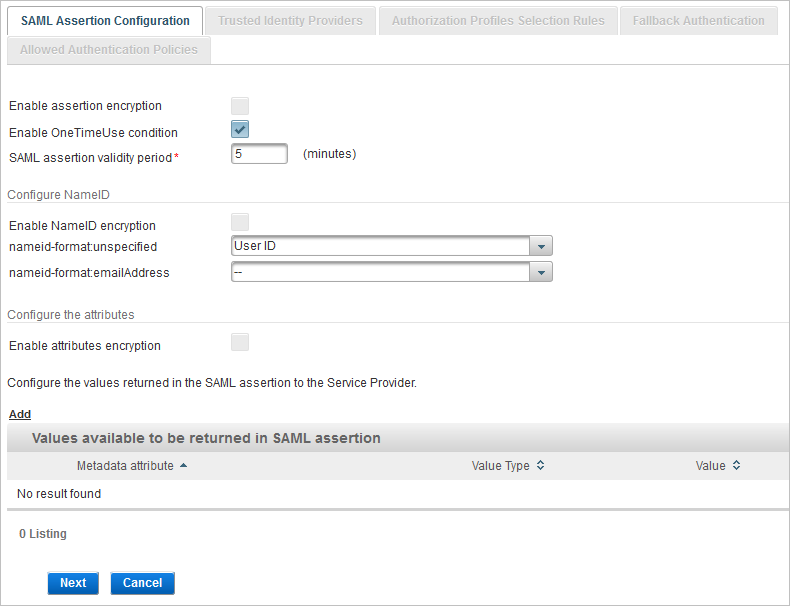
Configure SAML Assertion Settings
-
Select the Enable assertion encryption option to encrypt the assertions returned to the SP with the SP encryption public key.
-
Select the Enable OneTimeUse condition option to add the OneTimeUse condition element to the assertion.
This option indicates that the information in the assertion should be used immediately and must not be retained for future use. For example, user attributes contained in the assertion are subject to change from one authentication to the other and should not be cached SP side.
-
Define the SAML assertion validity period (in minutes) required for the data package to pass in the network between the IdP and the SP. This validity period can be relatively short and configured for each channel.
Configure NameID Format Mapping
Within a SAML assertion, the NameID Policy defines the constraints on the name identifier format to be used to represent the requested subject.
This format can be included as a part of the SAML request or, if it is omitted, it can be any type of format supported by the IdP (as defined in the metadata).
The ActivID IdP supports the following formats:
-
urn:oasis:names:tc:SAML:2.0:nameid-format:persistent
This format is used to federate an identity through the use of a persistent identifier generated by the ActivID IdP. The persistent identifier (or alias) is constructed using pseudo-random values (having no link with the user’s actual attributes). It is stored as a Federated ID attribute for the user. This format provides permanent privacy since identifiers remain associated with local identities until they are removed. The SP will only know of the persistent identifier that the IdP created for the user visiting the SP. The SP will not know those created for the same user for other SPs.
-
urn:oasis:names:tc:SAML:2.0:nameid-format:transient
This format is similar to the persistent format, except that it corresponds to a one-time-user identifier created at the IdP. It supports anonymity at an SP as it is not associated with a specific local user identity at the SP and is destroyed once the user session terminates.
-
urn:oasis:names:tc:SAML:1.1:nameid-format:emailAddress
This format indicates that the identifier is in the form of an email address.
-
urn:oasis:names:tc:SAML:1.1:nameid-format:unspecified
The identifier to be used is left to individual implementations.
For each SP channel, it is possible to configure the Email Address and the Unspecified NameID formats so that they are mapped to user attributes.

-
In the Configure NameID section; select the Enable NameID encryption option.
-
From the nameid-format:unspecified drop-down list, map the User Attribute to be used as an identifier for the subject. The default value is User ID.
-
From the nameid-format:emailAddress drop-down list, map the Email User Attribute to be used as an identifier for the subject. There is no default value.

Implementation Example:
If the nameid-format:emailAddress is mapped to the user’s E-Mail Address attribute with the user’s email address as user@email.com, then the single-sign-on workflow of a user logging on to the service provider is as follows:
-
User is prompted to enter IdP credentials (for example, username, password).
-
The ActivID IdP generate an assertion with a subject identifier set to user@email.com
-
The SP checks that the email address returned in the assertion corresponds to the identifier of a local account and grant access to the requested resource.
Configure Assertion Encryption Attributes
-
The metadata attribute table is available only when the SP metadata contains an attribute section.
-
The “Add” option to configure such attributes will be available only if the SP metadata file contains extensions with AttributeConsumingService indexes. For more information, see Add Values to be Returned in Assertion.

SAML assertion is always signed by the ActivID IdP. However, when the SP expects encrypted assertions and has been configured as such, you must configure the assertion for encryption.
-
Import SP metadata in ActivID IdP channel SP.
-
Under Encryption, select the Assertion option.
This option is available only when the SP Metadata contains the encryption certificate.
-
Save your settings and then click Next in the channel creation wizard to Select a Trusted Identity Provider (Optional).
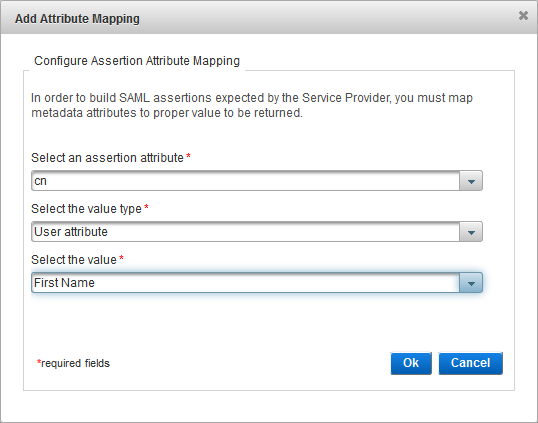
Add Values to be Returned in Assertion
An SP might require receiving attribute values within the Response to the authentication Request. The ActivID AS allows the configuration of these attributes.
AttributeConsumingService index="1">
ServiceName xml:lang="en">OpenSSO service 1</ServiceName>
RequestedAttribute NameFormat="urn:oasis:names:tc:SAML:2.0:attrname-format:uri" Name="cn" />
RequestedAttribute NameFormat="urn:oasis:names:tc:SAML:2.0:attrname-format:uri" Name="sn" />
RequestedAttribute NameFormat="urn:oasis:names:tc:SAML:2.0:attrname-format:uri" Name="street" />
RequestedAttribute NameFormat="urn:oasis:names:tc:SAML:2.0:attrname-format:uri" Name="LOA" />
-
Click Add to add values available to be returned in SAML assertion.
-
From the drop down list, select an assertion attribute
-
From the drop down list, map the attribute to the value type – Static value, User Attribute, or Predefined Attribute.
-
From the drop down list, map the attribute to the value (the options vary according to the value type) and click OK.
-
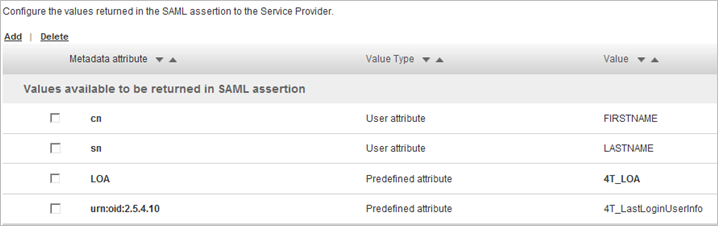
View the list of values to be returned in SAML assertion:
-
You can Add or Delete Metadata attributes to be returned as needed.
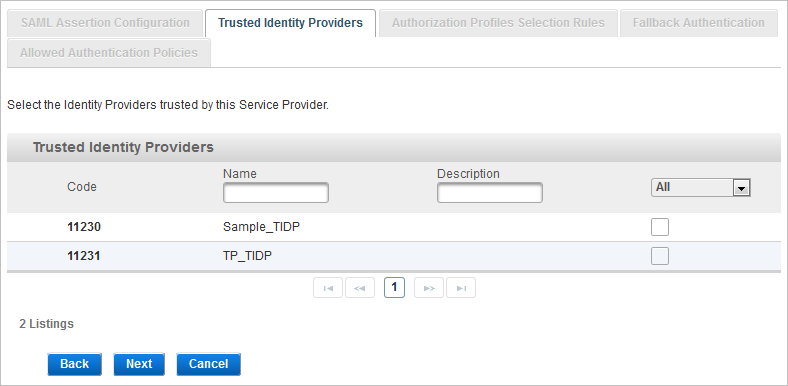
Select a Trusted Identity Provider (Optional)
When the channel trusts an External Identity Provider that has been configured in the ActivID AS, the trusted Identity Provider can be enabled for the channel as described below.
-
From the drop-down list, select Available or All to view the possible trusted IdPs.
-
Select the check box(es) for the required trusted IdP and click Next to Assign Authorization Profiles Selection Rules (Optional).
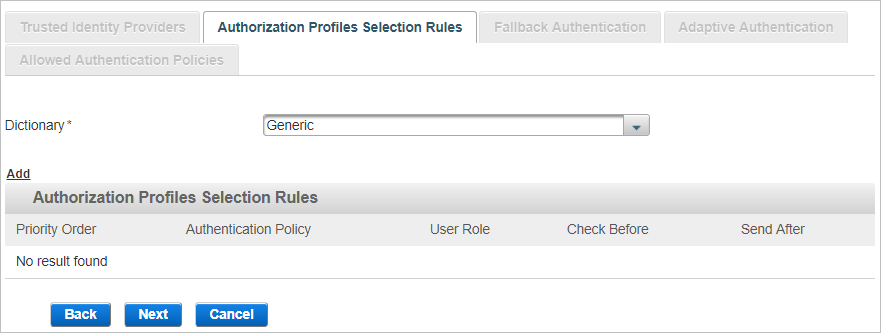
Assign Authorization Profiles Selection Rules (Optional)
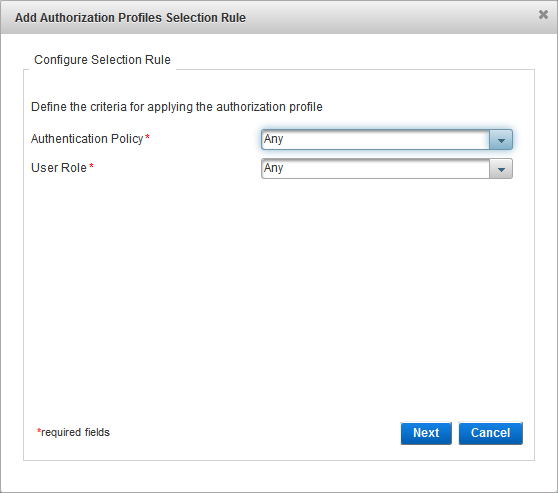
An Authorization Profile Selection Rule is selected based on the role and Authentication Policy to be used for the user (dynamic authentication) and the roles granted to the user.
Each rule specifies the following conditions to control access:
Each condition is independent, so the console does not check if the selected Authentication Policy is eligible for the selected User Role:
- Authentication Policy only – the user must belong to an LDAP group enabled with the specified policy.
- User Role only – the user must be assigned the specified role. Users of each role should use different RADIUS IP addresses.
- Authentication Policy AND User Role − both conditions are applied in conjunction.
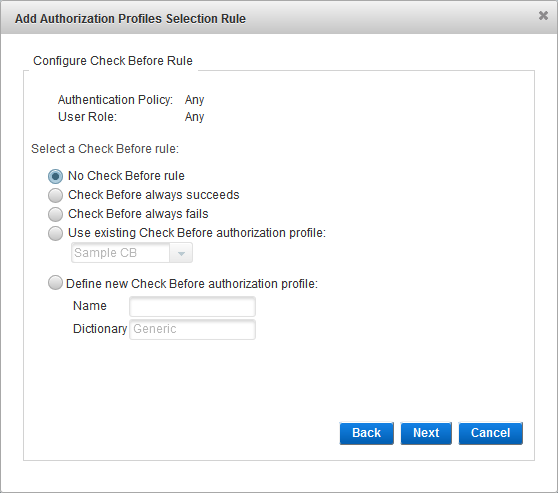
Adds additional constraints on user access (restricts role depending on defined static RADIUS values and or an LDAP user attributes). The success conditions are:
- The authentication request does not contain the Check Before attribute.
- If a static value is required, the value matches that of the Check Before attribute.
- If an LDAP value is required, the user LDAP value exists and the value matches that of the Check Before attribute.
There are also two automatic conditions:
- Check Before always succeeds (automatic success condition)
- Check Before always fails (automatic fail condition)
Check Before profiles can be generic or RADIUS-specific (to filter users based on LDAP attributes) by selecting the corresponding dictionary. Only the profiles configured with the same dictionary as selected in the Authorization Profile Selection Rule tab can be applied to the rule.
Specifies attributes name/value pairs to return to the service provider.
Send After profiles can be generic or RADIUS-specific by selecting the corresponding dictionary. Only the profiles configured with the same dictionary as selected in the Authorization Profile Selection Rule tab can be applied to the rule.
-
Select the Dictionary from the available list (filtered by the type of channel you are creating).
- The attributes in this dictionary correspond to ActivID AS user attributes.
- Dictionaries are text files of attributes to which you can add entries.
-
Click Add to add authorization profiles selection rules.
-
From the Authentication Policy drop-down list, select the authentication policy that must be enabled for the user’s group.
-
From the User Role drop-down list, select the role that must be assigned to the user, click Next and proceed to Configure SAML Assertion Settings.
Configure the Check Before Rule
-
Select the Check Before rule option and click Next:
- No Check Before rule - no checks are performed before the authentication request is processed.
- Check Before always succeeds - if the user role and authentication policy match those defined in the selection rule, and the provided credentials are valid, the authentication always succeeds.
- Check Before always fails - if the user role and authentication policy match those defined in the selection rule, the authentication always fails (even if the provided credentials are valid).
- Use existing Check Before authorization profile - from the drop-down list, select the existing profile.
- Define new Check Before authorization profile - enter a Name for the new profile. You cannot modify the Dictionary selection.
- The subsequent steps depend on the selected option:
- If you selected no rule or an existing profile, proceed to Configure the Send After Rule.
- If you selected to define a new profile, Create a Check Before Profile.
Configure the Send After Rule
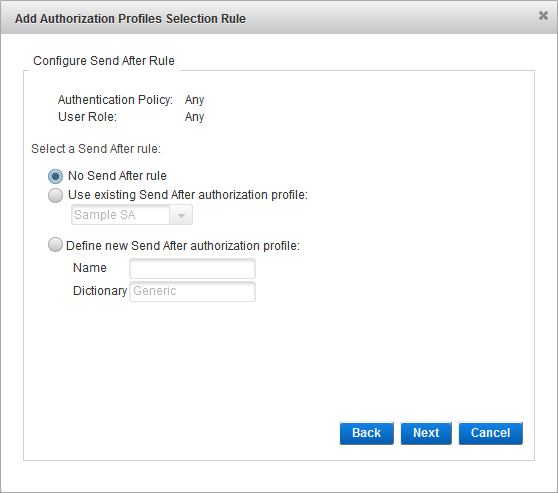
- Select the Send After rule:
- No Send After rule
- Use existing Send After Authorization profile - from the drop-down list, select the existing profile.
- Define new Send After Authorization profile - enter a Name for the new profile. You cannot modify the Dictionary selection.
- If you did not configure a Check Before profile, then you must create/select a Send After profile (that is, the No Send After Authorization profile option is not available).
- If there are no existing profiles, the Select Send After Authorization profile option is not displayed.
- The subsequent steps depend on the selected option:
- If you selected no rule or an existing profile, proceed to the next step.
- If you selected to define a new profile, Create a Send After Profile.
-
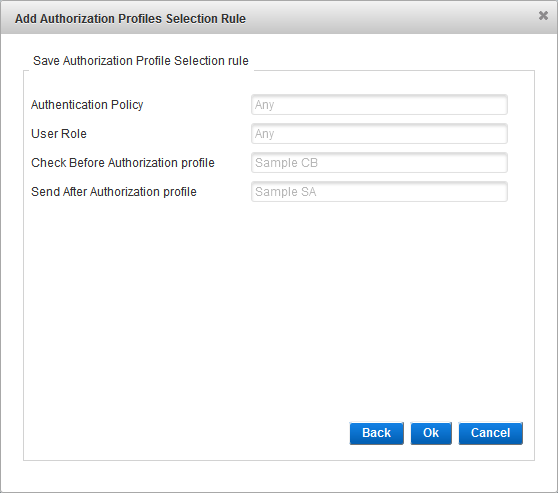
- Click OK to save the selection rule, and then click Close when the success message appears. You return to the Add channel page.
- Click Back to edit the rule.
- When you have completed the authorization profiles selection rules configuration, click Next to Enable Fallback Authentication (Optional).
Enable Fallback Authentication (Optional)
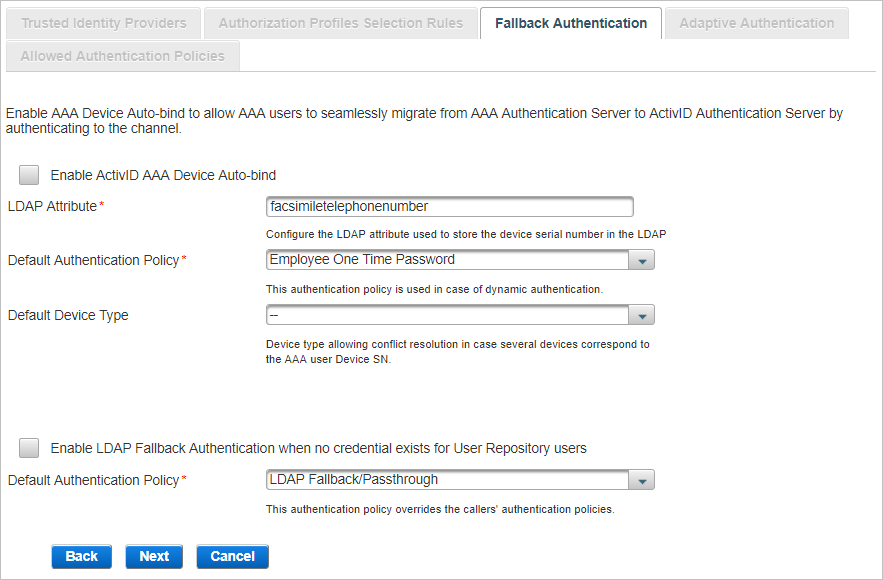
Select one or both of the Fallback authentications available and click Next:
AAA Device Auto-bind enables AAA users to be automatically authenticated using OTP generated by their device in the context of AAA user migration to ActivID AS.
Following the user’s authentication on the channel, a Device authenticator will be created for the user, and the device will be bound to the user.
When the user enters an incorrect OTP, the authentication process will fail. However, a Device authenticator is created for the user, and the device will be bound to the user. The failed authentication attempt will be recorded.
The .sds files corresponding to the AAA users’ devices have been exported from AAA and imported into ActivID AS.
To make sure that the devices will be synchronized when imported into ActivID AS, you must update the AAA administration database with the credentials of all devices used for synchronous authentication prior to the export. This is done through the AAA console “/Tools/Retrieve Device Credentials” option.
The LDAP attribute used to store the devices’ serial numbers has been mapped to one of the user attributes in the User Repositories.
AAA user device serial numbers are stored in each user’s appropriate LDAP attribute (for example, facsimileTelephoneNumber) as defined in the AAA Server configuration. For more information, refer to ActivID AAA documentation.
The User Repository has been enabled for a User Type and an Admin Group.
-
In the Fallback Authentication tab, select Enable AAA Device Auto-bind.
-
If the LDAP attribute used to store the Device SN is different from facsimileTelephoneNumber, enter the correct value in the LDAP Attribute field.
-
Select the Default Authentication Policy that will be created for the AAA user upon authentication with a device on this channel. The default value is Employee One Time Password.
-
Optionally, select the Device Type to be bound to the user.
You must ensure that the following attributes are set for the specific device types:
- Soft PIN position – set to Either.
- Default PIN applied on import – leave it blank. Otherwise, the soft PIN of the devices will be changed to the new default values.
- Soft PIN Minimum length – set according to the AAA device.
- Soft PIN Maximum length – set according to the AAA device.
You must set these attributes for the following device types:
- Mini Token (OT) + PIN
- Mini Token (OE) + PIN
- Mini Token (AT) + PIN
- Mini Token (AE) + PIN
LDAP Fallback enables users to be automatically authenticated using their static LDAP password until another method of authentication is specifically assigned to them.
- This setting is channel-specific.
- By default, an LDAP Fallback/Passthrough authenticator will be created for the LDAP users upon authentication to ActivID AS. Once the user’s authenticator has been created using one of ActivID AS authentication policies, the LDAP Fallback/Passthrough authenticator will no longer be used.
- By default, the LDAP Fallback/Passthrough authentication policy is not assigned with any user permissions in the ActivID Management Console. To enable privileges for the LDAP user when they log on using their LDAP static password, the LDAP Fallback/Passthrough authentication policy must be assigned with the relevant permissions.
-
Select Enable LDAP Fallback Authentication when no credential exists for User Repository users.
-
Select the Default Authentication Policy that will be created for the LDAP user upon authentication on this channel. The default value is LDAP Fallback/Passthrough.
When both the Device Auto-bind and LDAP Fallback Authentication options are enabled, both AAA users awaiting their devices to be bound and LDAP users awaiting their authenticators can authenticate with their LDAP password.
- Select both Enable AAA Device Auto-bind and Enable LDAP Fallback Authentication ....
-
Customize settings as described in the previous sections.
-
Click Next and proceed to View the Allowed Authentication Policies.
View the Allowed Authentication Policies
The Allowed Authentication Policies tab lists the policies assigned to the channel. As this is a new channel, there are no policies currently assigned when the channel is created.
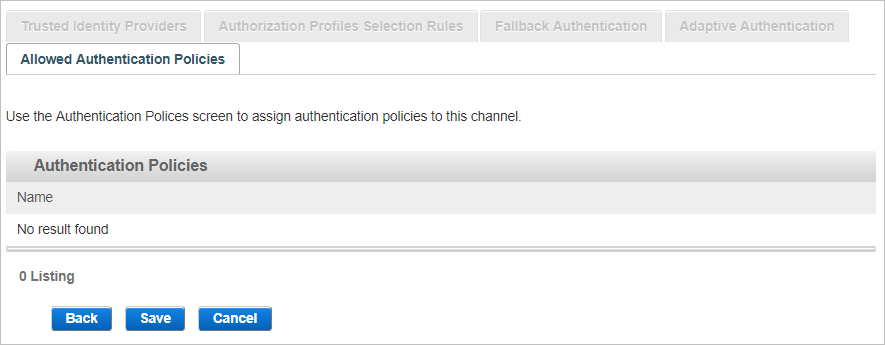
-
Click Save to apply the channel settings.
- Add this channel to the required authentication policy(ies).
Set the Default Authentication Policy for the SAML Channel
For each security domain, you can define the default authentication policy displayed in the login page for the SAML-based channels (that is, the SAML Service Provider type channels). This includes the ActivID Management Console and ActivID Self-Service Portal.
-
Log on to the ActivID Management Console (for the required domain) and select the Configuration tab.
-
Under Policies, select Channels.
-
Click on the Name of the SAML channel for which you want to define the default authentication policy (in this example, the Management Console).

-
From the Authentication Portal Default Authentication Policy drop-down list, select the required policy.
The list is based on the:
- Allowed Authentication policies defined for the channel.
- Authentication Policies Mapping defined for the ActivID Identity Provider.
For example, if you select the AT_LDAP - LDAP Fallback/Passthrough policy, the default authentication method displayed by the ActivID Management Console will be LDAP Username Password.

-
Click Save.
Configure SAML Channel/Service Provider ActivID Users
The ActivID AS users authenticating through a SAML channel (using Single-Sign-On) must have an authenticator record for at least one of the authentication policies allowed for the channel.
For details, see register users and create authenticators.
The following steps explain how to create a customer PKI authenticator and a customer static password authenticator for a registered user.
-
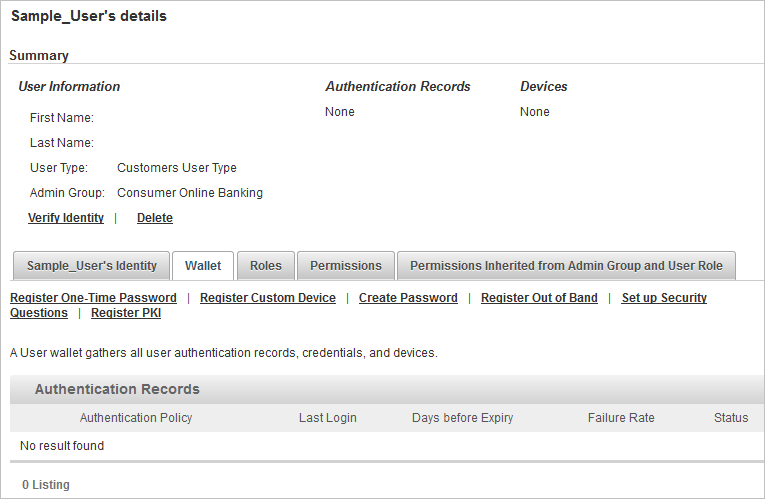
Search for the required user and select the Wallet tab.
-
Create the static password by clicking the Create Password link, selecting the Customer Static Password policy and then setting the password.
-
Create the Customer PKI authentication record by clicking the Register PKI link and then importing the logon PKI certificate from the user’s smart card.
-
Import the PKI issuer root certificates in the SSL truststore of the application server where the ActivID Authentication Portal is deployed. For further information about importing certificates, see Manage the Certificates.
-
Restart ActivID AS.
-
After you have created the Customer PKI authentication and Customer Static Password authenticator records, you must configure the appropriate Authentication Policies Mappings for this SP channel.


