Configuring Customer Central for Passkey Management

Customer Central integrates with the following directories:

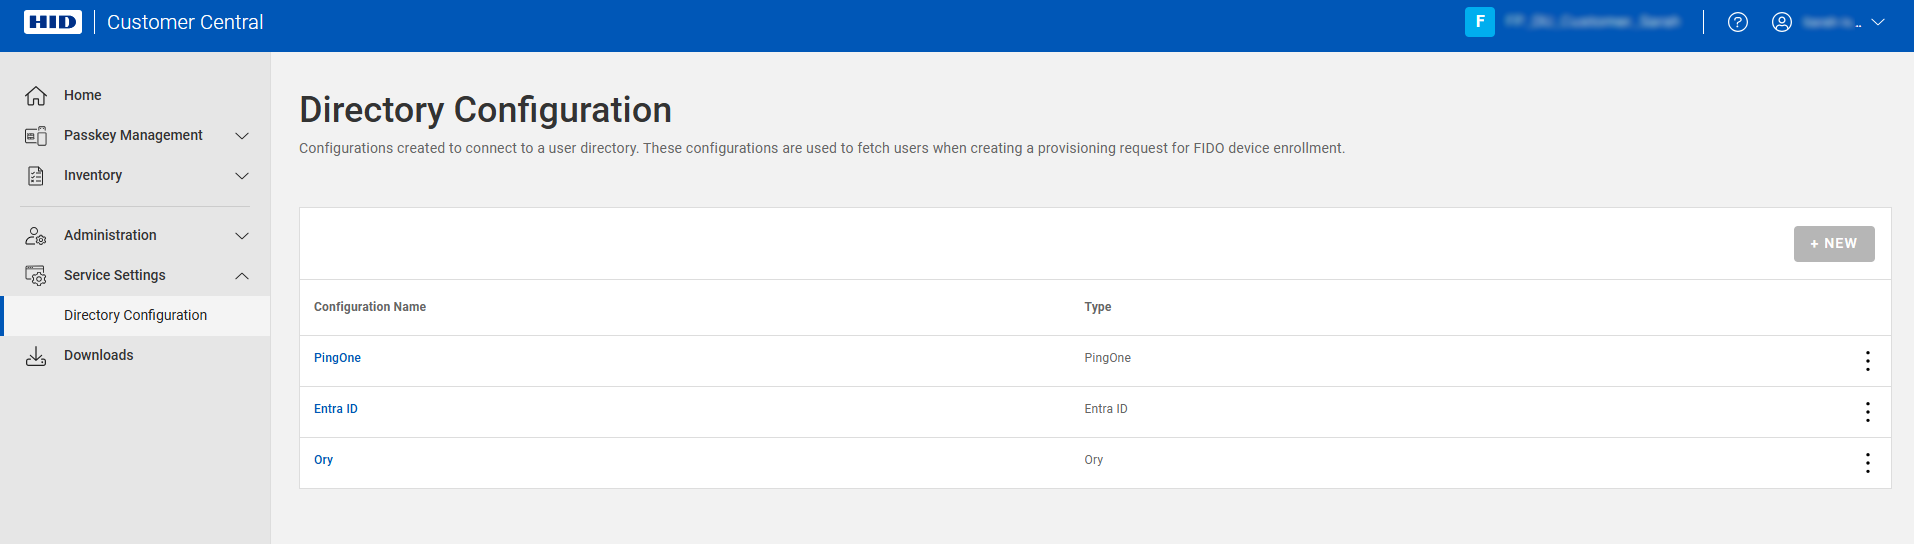
Important: The service only supports one configuration of each directory type. The NEW button is not available when this limit is reached.

directory configuration full

Integrating with Microsoft Entra ID

Register Customer Central as an Application in Microsoft Entra ID

Prerequisites: Before configuring the service, you must have:
  • A Microsoft Azure directory with a valid license for Microsoft Entra ID

  • A Microsoft Entra ID administrator account with the required role to create an application (for example, Cloud Application Administrator)

  • The Administrator or Device Service Administrator role, or at least the Create Configuration privilege for Entra ID

Customer Central must be registered as an application with Microsoft Entra ID to be able to connect to Entra ID services.

For details on this procedure, refer to Register an application with the Microsoft identity platform | Microsoft Learn.

When registering your application with Microsoft Entra ID, make sure you set up the following configuration:

  1. Log on to the Microsoft Entra admin center (https://entra.microsoft.com/#home) and, if necessary, switch to the required directory.

  2. Under Entra ID in the left menu, navigate to App registrations and click New registration.

    Entra ID App registrations

  3. Create the application as follows:

    Entra ID Register app

    1. Enter a Name for the application.

    2. Under Supported account types, select Accounts in this organizational directory only (<your directory> only - Single tenant).

    3. Click Register.

  4. After the initial registration is complete, make a note of the Application (client) ID and the Directory (tenant) ID.

    Entra ID app overview

  5. In the overview page for your application, click the link under Client credentials.

    Alternatively, under Manage, select Certificates & secrets.

  6. Click New client secret.

    Entra ID app client secret

    1. Add a client secret credential for your application with an identifiable Description and Expires after 180 days as recommended.

    2. Click Add.

  7. Under Manage, click Certificates & secrets.

    Entra ID app secret value

    1. Select the Client secrets tab.

    2. Make a note of the Value for the application's secret.

    Important: The Value displayed for the client secret credential corresponds to the Secret required when configuring the connection to Entra ID in Customer Central.

    This Value is only displayed when the secret is generated, so you must make sure to keep a copy of it.

  8. Under Manage, select API Permissions.

    Entra ID app API permissions

    Note: Leave the delegated User.Read permission as is.
    1. Click Add a permission.

      Entra ID add API permission

    2. Select Microsoft Graph.

    3. Select Application Permissions.

    4. Add the following permissions:

      • Group.Read.All

      • User.Read.All

      • UserAuthenticationMethod.ReadWrite.All

    When complete, the Configured permissions should be as follows:

    Entra ID app configured API permissions

  9. Once these permissions are set, click Grant admin consent for <your directory> and then Yes.

    Entra ID app API grant admin consent

  10. Make sure the status for the permissions is "Granted for <your directory>" with a green checkmark next to each.

    Entra ID app API permissions summary

Enable FIDO Provisioning

Before users in your organization can register and sign in to their Microsoft Entra account using (FIDO2) passkeys, you must enable the provisioning of the passkeys.

For details on this procedure, refer to Enable passkeys (FIDO2) for your organization | Microsoft Learn.

  1. Return to the Microsoft Entra admin center home page and select Authentication Methods in the left menu.

  2. Under Manage, select Policies.

    Entra ID authentication methods

  3. In the Authentication method policies section, select the Passkey (FIDO2) built-in authentication method.

    Entra ID Passkey settings

  4. In the Enable and Target tab, toggle the policy to Enable.

  5. In the Include tab, select All users or Select groups to define the users allowed to authenticate with this method.

  6. Select the Configure tab and set the following parameters:

    Section Setting Description
    GENERAL Allow self-service set up Set to Yes
    Enforce attestation Set to Yes if your organization wants to ensure that a FIDO2 security key model or passkey provider is genuine
    KEY RESTRICTION POLICY Enforce key restrictions Set to Yes only if your organization wants to only allow or disallow certain security key models or passkey providers (identified by their AAGUID)
    Restrict specific key Set to Allow only if your organization wants to only allow or disallow certain security key models or passkey providers (identified by their AAGUID)

    Entra ID Passkey settings configured

    Important: If you change key restrictions and remove a previously allowed AAGUID, users who have registered an allowed device will no longer be able use it to sign in.

  7. Click Add AAGUID and add the AAGUID of your devices (for example, 2a55aee6-27cb-42c0-bc6e-04efe999e88a for the HID Crescendo 4000 device).

    Entra ID Passkey AAGUID

    For the complete list of identifiers for the HID Crescendo FIDO devices, see AAGUID for Crescendo Devices.

  8. Click Save.

Assign Users or Groups

Once you have completed the application and passkey configuration, you can now define the user population accessible for Passkey Management in Customer Central.

Note: This population must include, but is not limited to, the users you specified for the (FIDO2) passkeys authentication method.

For details on this procedure, refer to Manage users and groups assignment to an application | Microsoft Learn.

  1. Return to the Microsoft Entra admin center home page, expand Entra ID in the left menu and select Enterprise apps and then your application.

    Entra ID app overview

  2. In the overview page, under Getting Started, click Assign users and groups.

    Alternatively, under Manage, select Users and groups.

    Entra ID Users and groups

  3. Click Add user/group.

    Entra ID add users groups

  4. Click None Selected.

  5. Select the required users or groups you want to assign to the Passkey Management application and click Select.

    Entra ID select users groups

  6. When complete, click Assign.

    Entra ID assign users and groups

Configure the Connection to Microsoft Entra ID

Before you can provision and enroll FIDO devices for your users, you must configure the connection between your Microsoft Entra ID application and Customer Central.

Prerequisites: To configure the directory, you must have:
  • A valid license for the FIDO Provisioning service

    To purchase new licenses or renew existing ones, contact your HID Account Manager.

  • The Administrator or Device Service Administrator role, or at least the Create Configuration privilege for Entra ID

  • Created the application in Microsoft Entra ID and enabled passkey authentication for the service

  • Assigned the users or groups to the service

  • The following information that was obtained when you created the application in Microsoft Entra ID:

    • The Directory (tenant) ID - the unique identifier that represents your organization's Microsoft Entra ID instance

      This ID is used to identify which directory your Passkey Management application should communicate with and authenticate against.

    • The Application (client) ID - the unique identifier that Microsoft Entra ID assigned to your Passkey Management application when you registered it

      This ID is used to identify your application when it authenticates with Microsoft Entra ID.

    • Secret - the Value of the client secret credential used by your Passkey Management application to identify itself when requesting a token

      Note: This Value is only displayed when the secret is generated and cannot be displayed again.

      If you do not know the secret's value, you must generate a new secret.

  1. Sign in to Customer Central.

  2. Expand Service Settings service settings icon in the left menu and select Directory Configuration.

    directory configuration empty

  3. Click NEW.

    directory configuration type entra

  4. Select the directory type and click CONTINUE.

    directory configuration entra

  5. Enter a Configuration name for the configuration.

  6. Enter the following information obtained in Register Customer Central as an Application in Microsoft Entra ID:

    • Directory (tenant) ID - the unique identifier that represents your organization's Microsoft Entra ID instance

    • Application (client) ID - the unique identifier that Microsoft Entra ID assigned to your Passkey Management application when you registered it

    • Secret - the Value of the client secret credential used by your Passkey Management application to identify itself when requesting a token

  7. Click ADD.

    directory configuration test

    Customer Central verifies that the configuration is correct and displays a success message when complete.

    Customer Central is now connected to your Microsoft Entra ID application and your users are available for provisioning.

    directory configuration entra complete

Integrating with PingOne

Prerequisites: Before configuring the service, you must have:
  • A PingOne directory with a valid license for Ping Identity

  • A PingOne administrator account for your PingOne environment with the required roles to manage applications

  • The Administrator or Device Service Administrator role, or at least the Create Configuration privilege for PingOne

Create an Application

  1. Log on to the PingOne admin console as an administrator for your PingOne environment.

  2. Expand and select Applications in the left menu and then click + to add an application.

    create pingone application

  3. Define the application's parameters:

    • Application Name - enter a name for your application

    • Description - enter a brief description for your application (optional)

    • Application Type - select Worker

    For further information, go to Applications | PingOne Documentation.

  4. Click Save.

    PingOne application roles

  5. Select Roles in the application's top menu.

  6. Click Grant Roles.

    PingOne application grant roles

  7. Add the following roles for your environment:

    • Environment Admin

    • Identify Data Admin

    For further information, go to Configuring roles for a worker application | PingOne Documentation.

  8. Click Save.

    PingOne application roles assigned

  9. Select Overview in the application's top menu.

    PingOne application overview

  10. Click Protocol - OpenID Connect.

    PingOne application OIDC settings

  11. Scroll down to the Token Endpoint Authentication Method section and select Client Secret Post as the method.

    For further information, go to Token endpoint authentication methods | PingOne Documentation

    PingOne application token endpoint authentication method

  12. Click Save.

    PingOne application details

  13. Make a note of the:

    • Environment ID

    • Client ID

    • Client Secret

    Note: This information is required when configuring the connection to PingOne in Customer Central.
  14. Enable the application by toggling the button in the application's menu bar.

Define the Authentication Policies

  1. Log on to the PingOne admin console as an administrator for your PingOne environment.

  2. Expand Authentication in the left menu to display the Policies menu.

  3. Select FIDO and either select an existing policy or create a new one with the following configuration:

    Parameter Value
    Relying Party ID PingOne
    Discoverable Credentials Required
    Authenticator Attachment Both

    User Verification

    • Preferred

    • Enforce during authentication

    Backup Eligibility

    • Disallow

    • Enforce during authentication

    User Display Name

    • Attributes:

      • Email Address

      • Name (Given, Family)

      • Username

    • Additional Display Information:

      • Include Environment Name

      • Include Organization Name

    Attestation Request

    • Attestation Type - Direct

    • Attestation Requirements - Allow Specific Authenticators

    PingOne FIDO policy

    For further information, go to FIDO policies | PingOne Documentation.

  4. Select MFA and either select an existing policy or create a new one with the following configuration:

    Parameter Value
    Allowed Authentication Methods FIDO2
    FIDO Policy The FIDO policy created above
    Allow Pairing Enabled

    PingOne FIDO policy

    For further information, go to MFA policies | PingOne Documentation.

  5. Select Authentication and either select an existing policy or create a new one with the following configuration:

    Parameter Value
    STEP TYPE Multi-factor Authentication
    MFA Policy The MFA policy created above

    PingOne authentication policy

    For further information, go to Adding a multi-factor authentication or PingID step | PingOne Documentation.

  6. Enable the authentication policy for the application:

    1. Expand and select Applications in the left menu and then select the application you created above.

      PingOne application policies

    2. Select Policies in the application's menu bar and click Add Policies.

      PingOne application add policies

    3. In the PingOne Policies tab, select the Authentication with MFA policy you created above and click Save.

Configure the Connection to PingOne

Before you can provision and enroll FIDO devices for your users, you must configure the connection between your PingOne application and Customer Central.

Prerequisites: To configure the directory, you must have:
  • A valid license for the FIDO Provisioning service

    To purchase new licenses or renew existing ones, contact your HID Account Manager.

  • The Administrator or Device Service Administrator role, or at least the Create Configuration privilege for PingOne

  • Created the application in PingOne and enabled passkey authentication for the service

  • Assigned the users or groups to the service

  • The following information that was obtained when you created the application in PingOne:

    • The Environment ID - the unique identifier that represents your organization's PingOne instance

      This ID is used to identify which directory your Passkey Management application should communicate with and authenticate against.

    • The Client ID - the unique identifier that PingOne assigned to your Passkey Management application when you registered it

      This ID is used to identify your application when it authenticates with PingOne.

    • Secret - the client secret credential used by your Passkey Management application to identify itself when requesting a token

  1. Sign in to Customer Central.

  2. Expand Service Settings Service Settings icon in the left menu and select Directory Configuration.

    directory configuration empty

  3. Click NEW.

    directory configuration type PingOne

  4. Select the directory type and click CONTINUE.

    directory configuration PingOne

  5. Enter a Configuration name for the configuration.

  6. Enter the following information obtained in Create an Application:

    • Environment ID - the unique identifier that represents your organization's PingOne instance

    • Application (client) ID - the unique identifier that PingOne assigned to your Passkey Management application when you registered it

    • Secret - the client secret credential used by your Passkey Management application to identify itself when requesting a token

  7. Click ADD.

    directory configuration test

    Customer Central verifies that the configuration is correct and displays a success message when complete.

    Customer Central is now connected to your PingOne application and your users are available for provisioning.

    directory configuration PingOne complete

Test a Connection

Prerequisites: You must have the Administrator, Device Service Administrator or View Only role, or at least the Test Configuration privilege for the directory type.
  1. Sign in to Customer Central.

  2. Expand Service Settings Service Settings icon in the left menu and select Directory Configuration.

    directory configuration menu

  3. Click the menu icon Device Management menu icon for the configuration and select Test Connection.

Edit a Configuration

Prerequisites: You must have the Administrator or Device Service Administrator role, or at least the Edit Configuration privilege for the directory type.
  1. Sign in to Customer Central.

  2. Expand Service Settings Service Settings icon in the left menu and select Directory Configuration.

    directory configuration menu

  3. Click the menu icon Device Management menu icon for the configuration and select Edit.

    directory configuration edit

    Note: The UPDATE button is unavailable until you have entered the required information.

    You can update the:

    • Configuration Name

    • Application (client) ID - the unique identifier that assigned to your Passkey Management application when you registered it

    • Secret - the client secret credential used by your Passkey Management application to identify itself when requesting a token

      Note: For Microsoft Entra ID applications, the secret’s Value is only displayed when the secret is generated and cannot be displayed again.

      If you do not know the secret's value, you must generate a new secret.

  4. Edit the configuration as required and click UPDATE.

Delete a Configuration

Prerequisites:
  • You must have the Administrator or Device Service Administrator role, or at least the Delete Configuration privilege for the directory type.
  • You can only delete a configuration if there are no associated pending provisioning requests

    directory configuration delete error

    Complete or delete the requests before deleting the configuration.

  1. Sign in to Customer Central.

  2. Expand Service Settings Service Settings icon in the left menu and select Directory Configuration.

    directory configuration menu

  3. Click the menu icon Device Management menu icon for the configuration and select Delete.

    directory configuration delete

  4. Enter permanently delete in the field and click CONFIRM.