Integrating with Ory
A valid license for Ory services
The Administrator or Device Service Administrator role
Alternatively, you can use a custom role with the Create Configuration privilege for Ory.
Create a Client Application
-
Log on to the Ory Console (https://console.ory.sh/) as an administrator for your Ory workspace and select the required project.
-
Select OAuth 2 in the top menu and then select Clients and applications in the left menu.
-
Select Create a new client or edit an existing custom application.
-
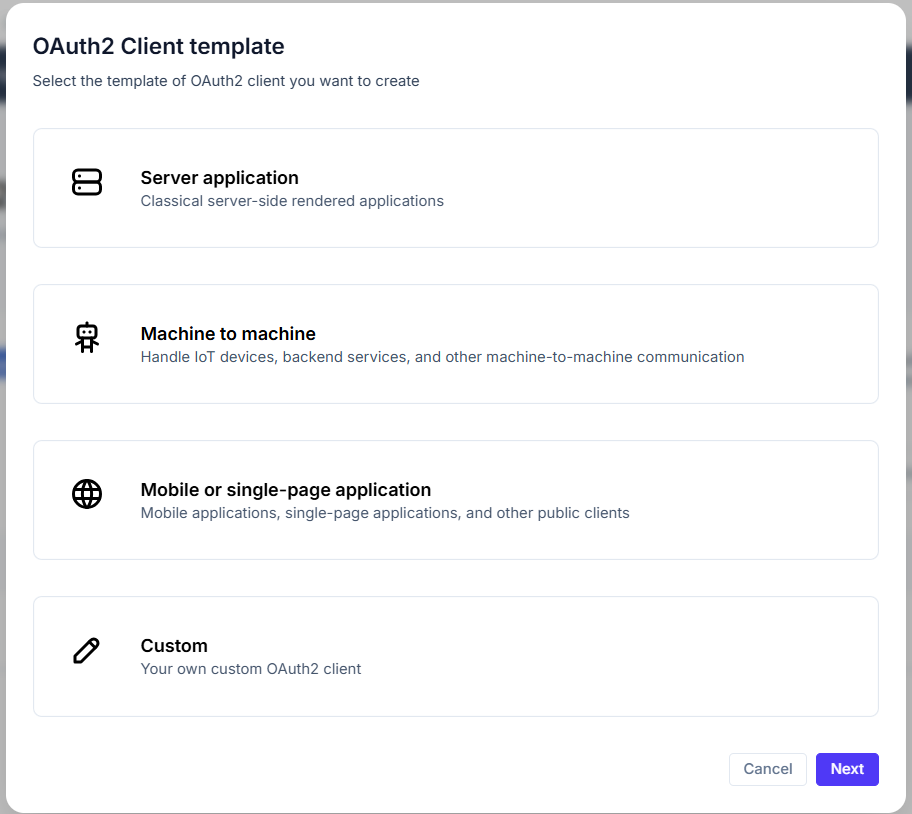
Select the Custom template and click Next.
-
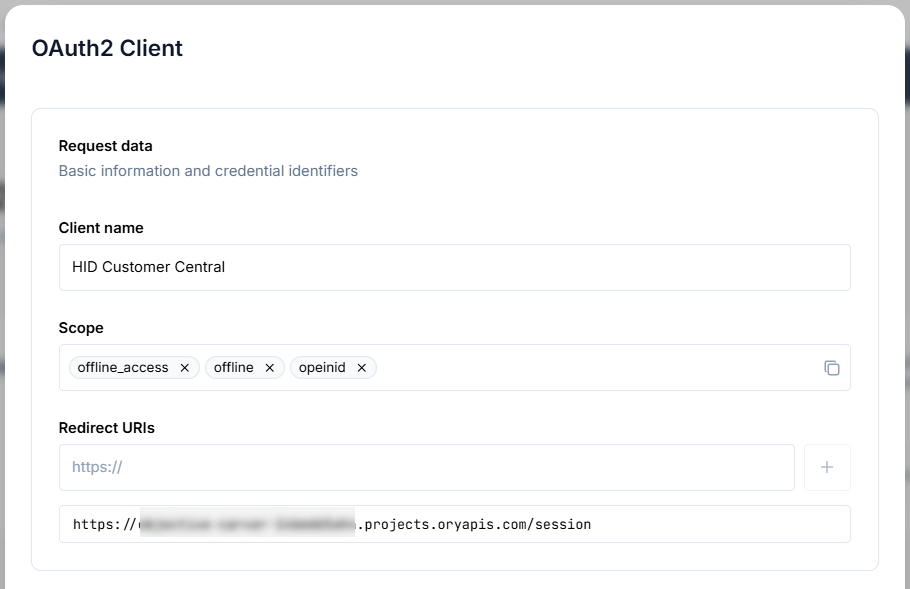
Define the application's Request data parameters:
-
Client name - enter a name for your application
-
Scope - enter the following scopes:
-
offline_access
-
offline
-
openid
-
-
-
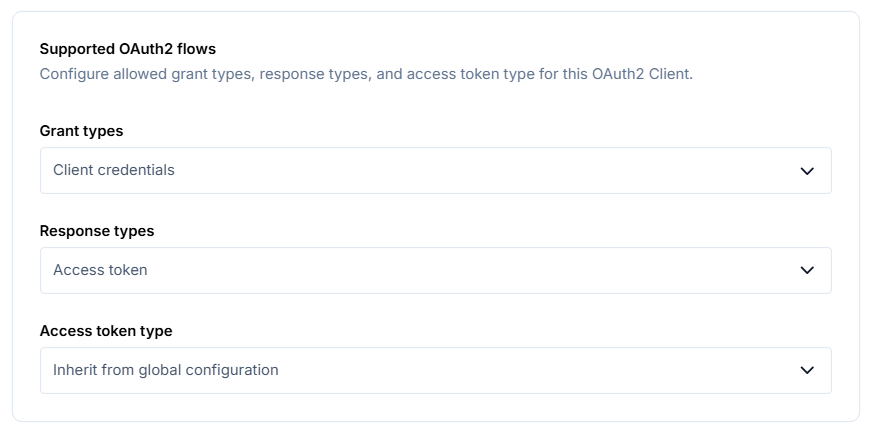
Define the application's Supported OAuth2 flows:
-
Grant types - select Client credentials
-
Response types - select Access token
-
Access token type - select Inherit from global configuration
-
-
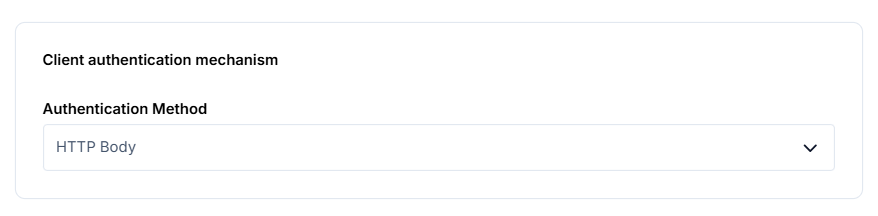
In the application's Client authentication mechanism parameters, select HTTP Body as the Authentication Method:
-
-
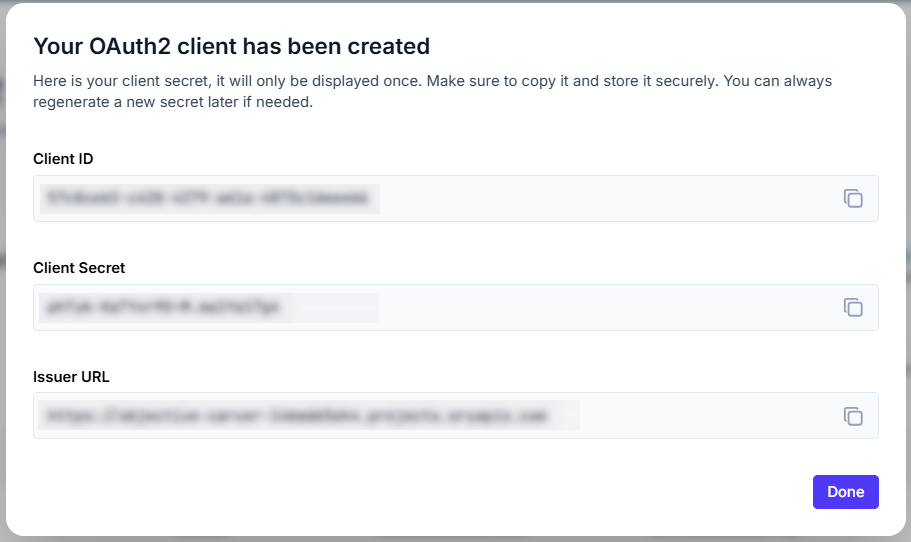
Make a note of the Issuer URL (later referred to as the API Endpoint) which Customer Central will use as the base URL to communicate with the Ory Network APIs for user identity management.
For further information, see SDK configuration | Ory documentation.
Note: This information is required when configuring the connection to Ory in Customer Central.
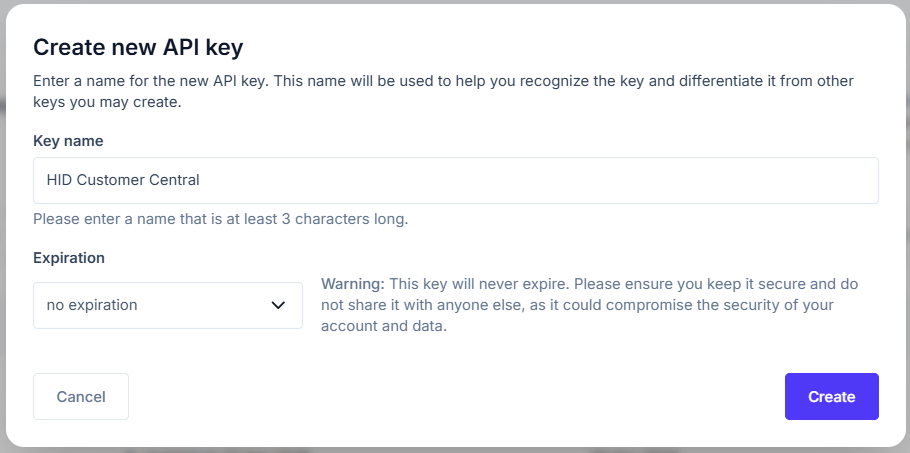
Generate an API Key
The API Key (Personal Access Token) allows Customer Central to interact with the administrative Ory APIs on behalf of your project.
-
In the Ory Console, select Project settings in the top menu and then select API Keys in the left menu.
-
Select Create new API key.
-
Enter a descriptive name for the key and click Create.
-
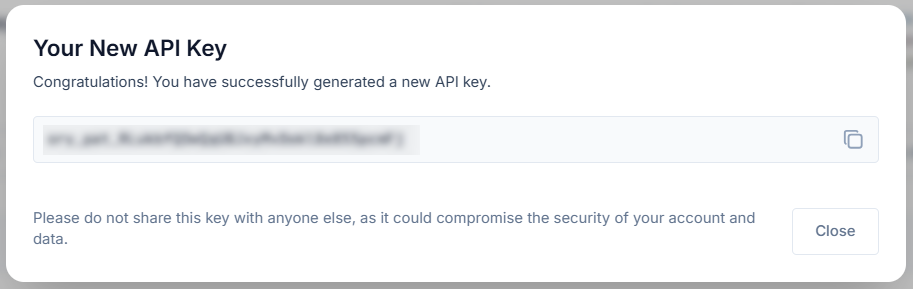
Make a note of the key as it is required when configuring the connection to Ory in Customer Central.
If you do not know the key's value, delete the original key and then generate a new key.
For further information, see Ory Network API Keys | Ory Documentation.
Create the Identity Schema
The Identity Schema allows you to define the mapping between the user data (such as names and email addresses) in your Ory project and the attributes to define a user's identity when provisioning passkeys in Customer Central.
-
In the Ory Console, select User management in the top menu and then select Identity schema in the left menu.
-
Create a schema with a descriptive name and the required traits (attributes) to map in the Passkey Management user fields:
For example:
-
Username - either traits.username or traits.email
-
Display Name - either traits.name or a custom traits.display_name
-
-
Click Save.
-
Make a note of the schema ID as it is required when configuring the connection to Ory in Customer Central.
For further information, see Identity schema | Ory Documentation.
Configure the Connection to Ory
Before you can provision and enroll FIDO devices for your users, you must configure the connection between your Ory application and Customer Central.
A valid license for the FIDO Provisioning service
To purchase new licenses or renew existing ones, contact your HID Account Manager.
The Administrator or Device Service Administrator role
Alternatively, you can use a custom role with the Create Configuration privilege for Ory.
Created the application in Ory, created the API key and defined the identity schema for the service
The following information that was obtained when you prepared your Ory project above:
API endpoint - the URL to communicate with the Ory Network APIs for user identity management
This is the same as the Issuer URL generated when you created the application and can be retrieved from the Project settings in the Ory Console.
API Key - the key allowing Passkey Management to interact with the administrative Ory APIs on behalf of your project
Note: This key is only displayed when generated and cannot be displayed again.If you do not know the key's value, delete the original key and then generate a new key.
For further information, see Ory Network API Keys | Ory Documentation.
Identity schema ID - the identifier for the identity schema you created to map the user attributes
-
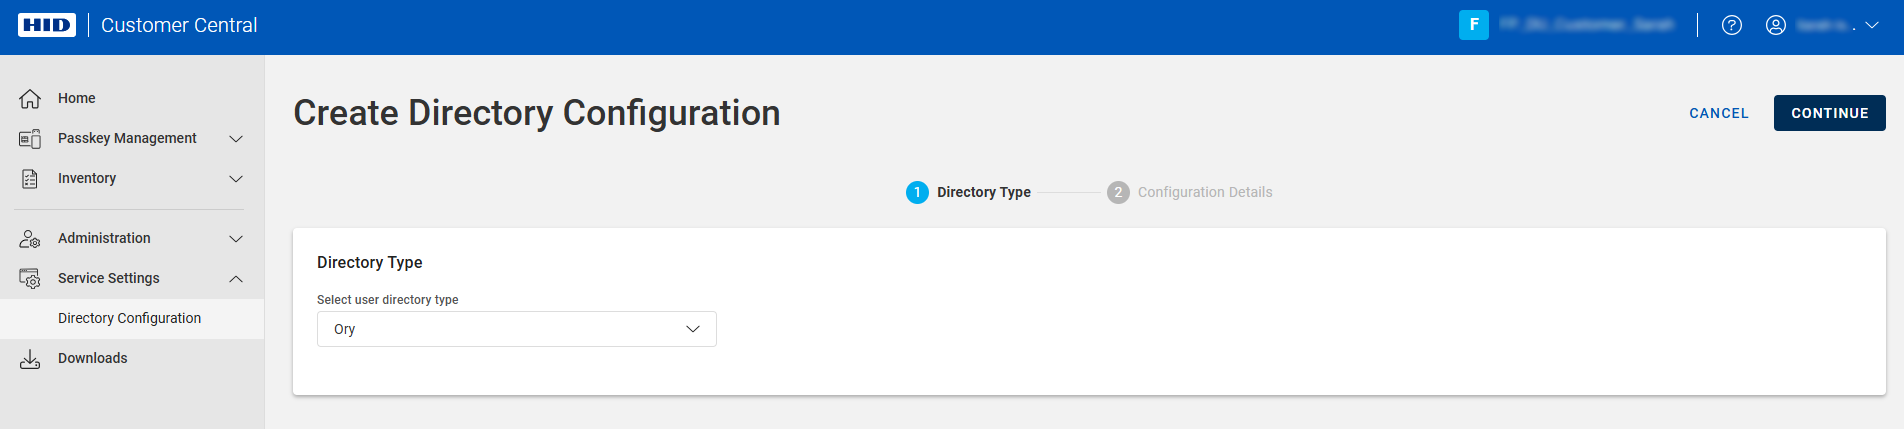
Expand Service Settings
 in the left menu and select Directory Configuration.
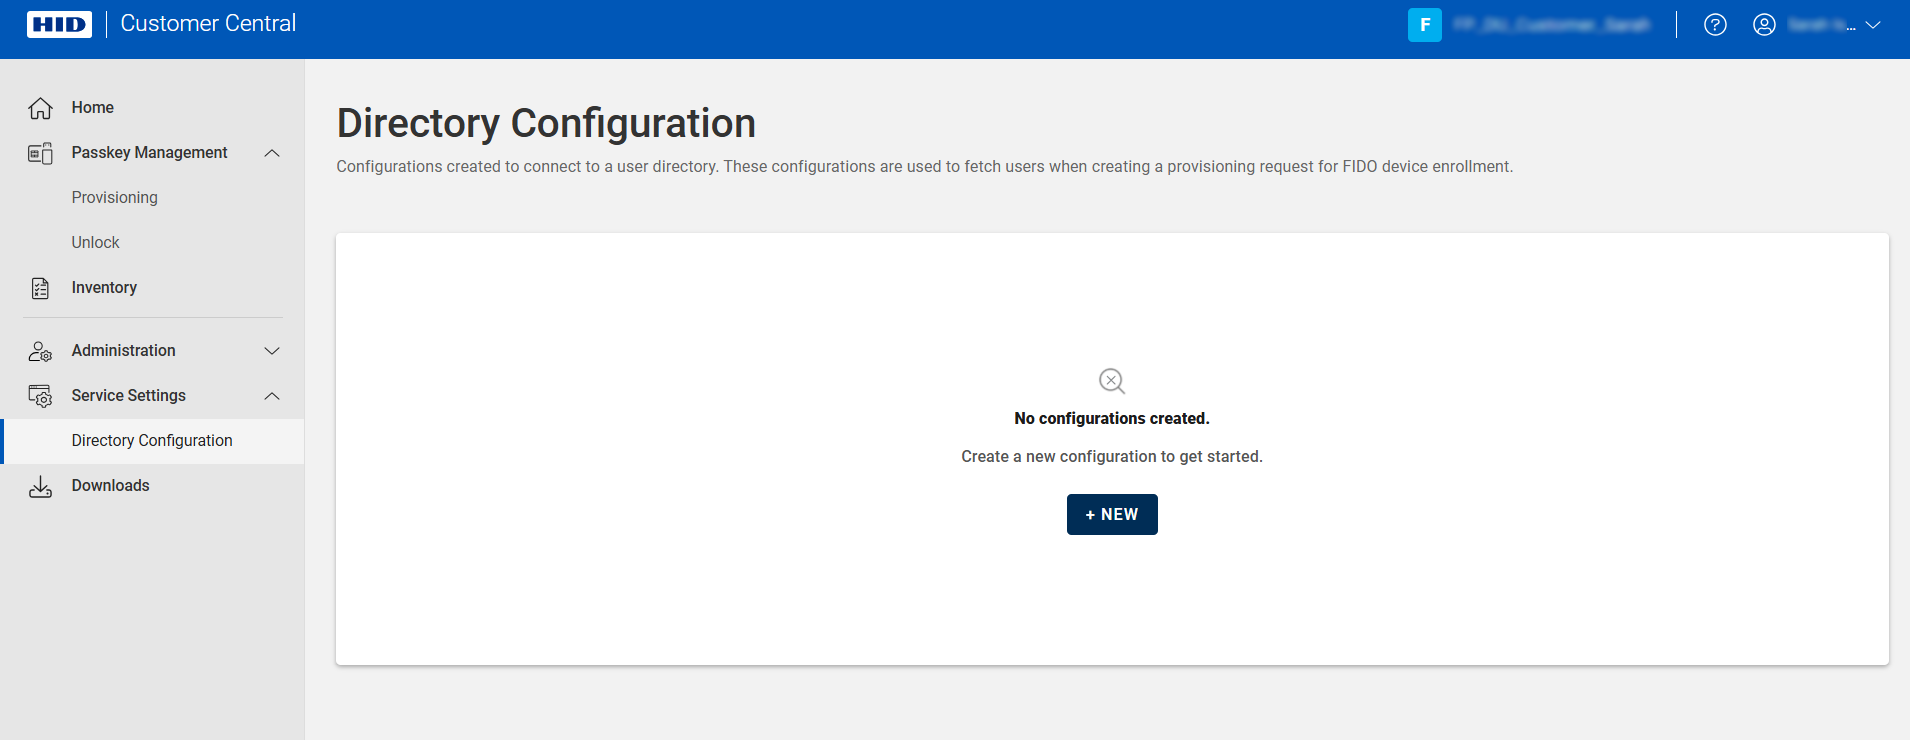
-
Click NEW.
-
Select Ory as the directory type and click CONTINUE.
-
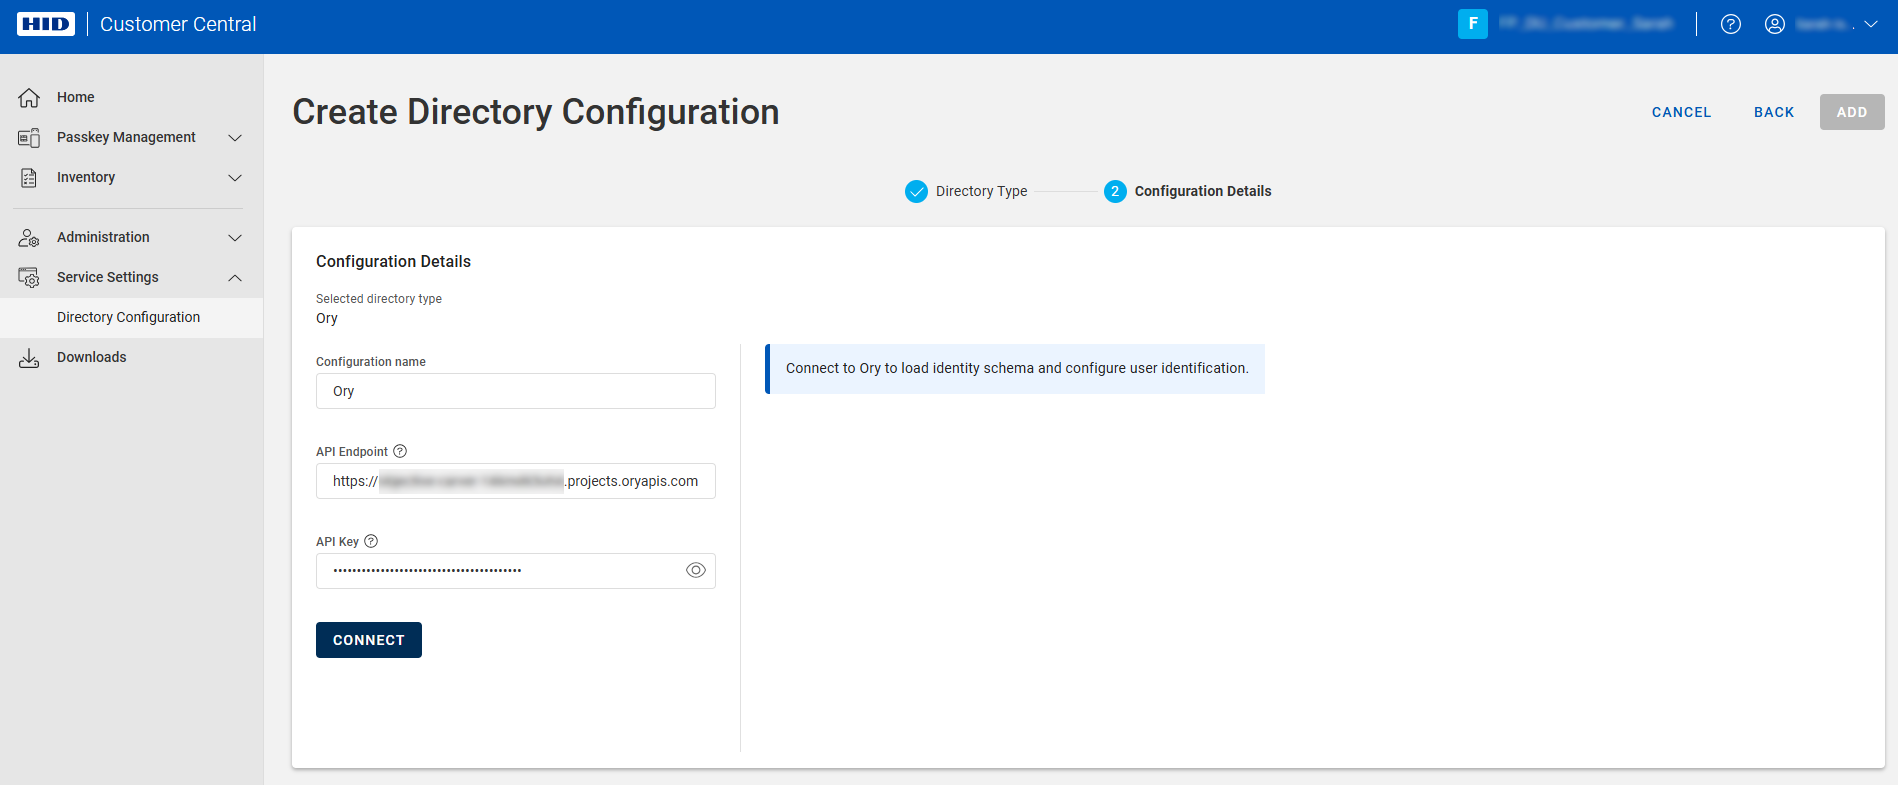
Enter a Configuration name for the configuration.
-
Enter the following information:
-
API Endpoint- the URL to communicate with the Ory Network APIs for user identity management
This is the same as the Issuer URL generated when you created the application and can be retrieved from the Project settings in the Ory Console.
-
API Key - the key allowing Passkey Management to interact with the administrative Ory APIs on behalf of your project
Note: This key is only displayed when generated and cannot be displayed again.If you do not know the key's value, delete the original key and then generate a new key.
For further information, see Ory Network API Keys | Ory Documentation.
-
-
Click CONNECT.
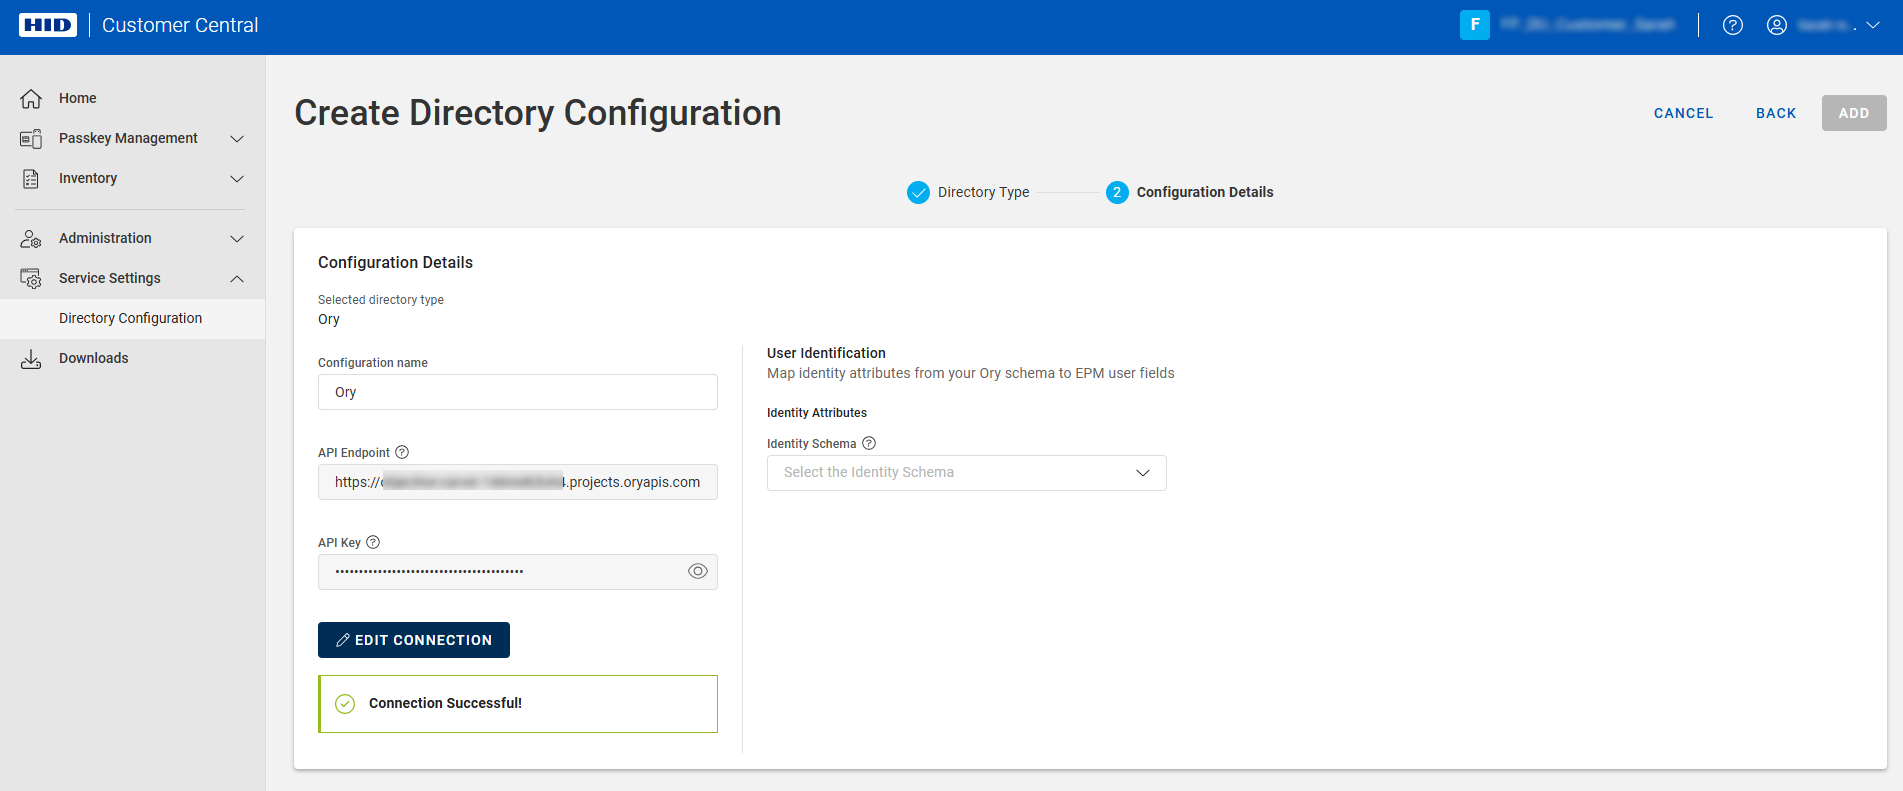
Customer Central verifies that the configuration is correct and fetches the identity schemas configured in your Ory project.
-
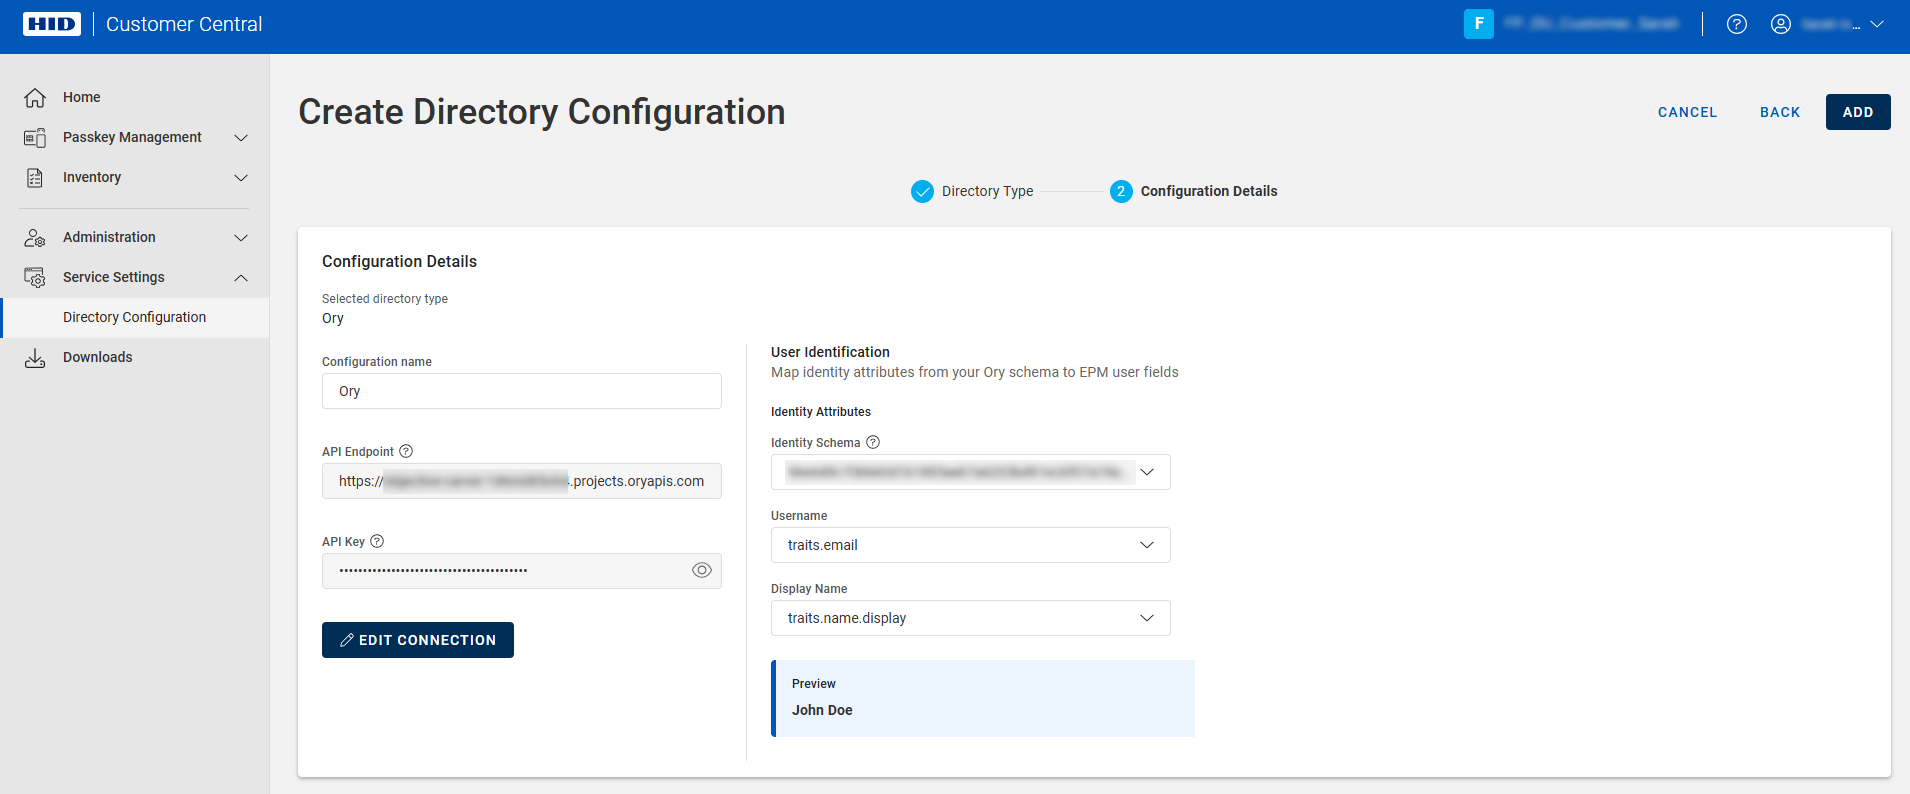
Select the Identity Schema that you created in the Ory Console.
-
Map the schema's trait attributes to the corresponding user fields.
For example:
-
Username - either traits.username or traits.email
-
Display Name - either traits.name or a custom traits.display_name
Note: If you do not select a Display Name attribute, you can define the format of the display name using the First, Middle, or Last Name attributes.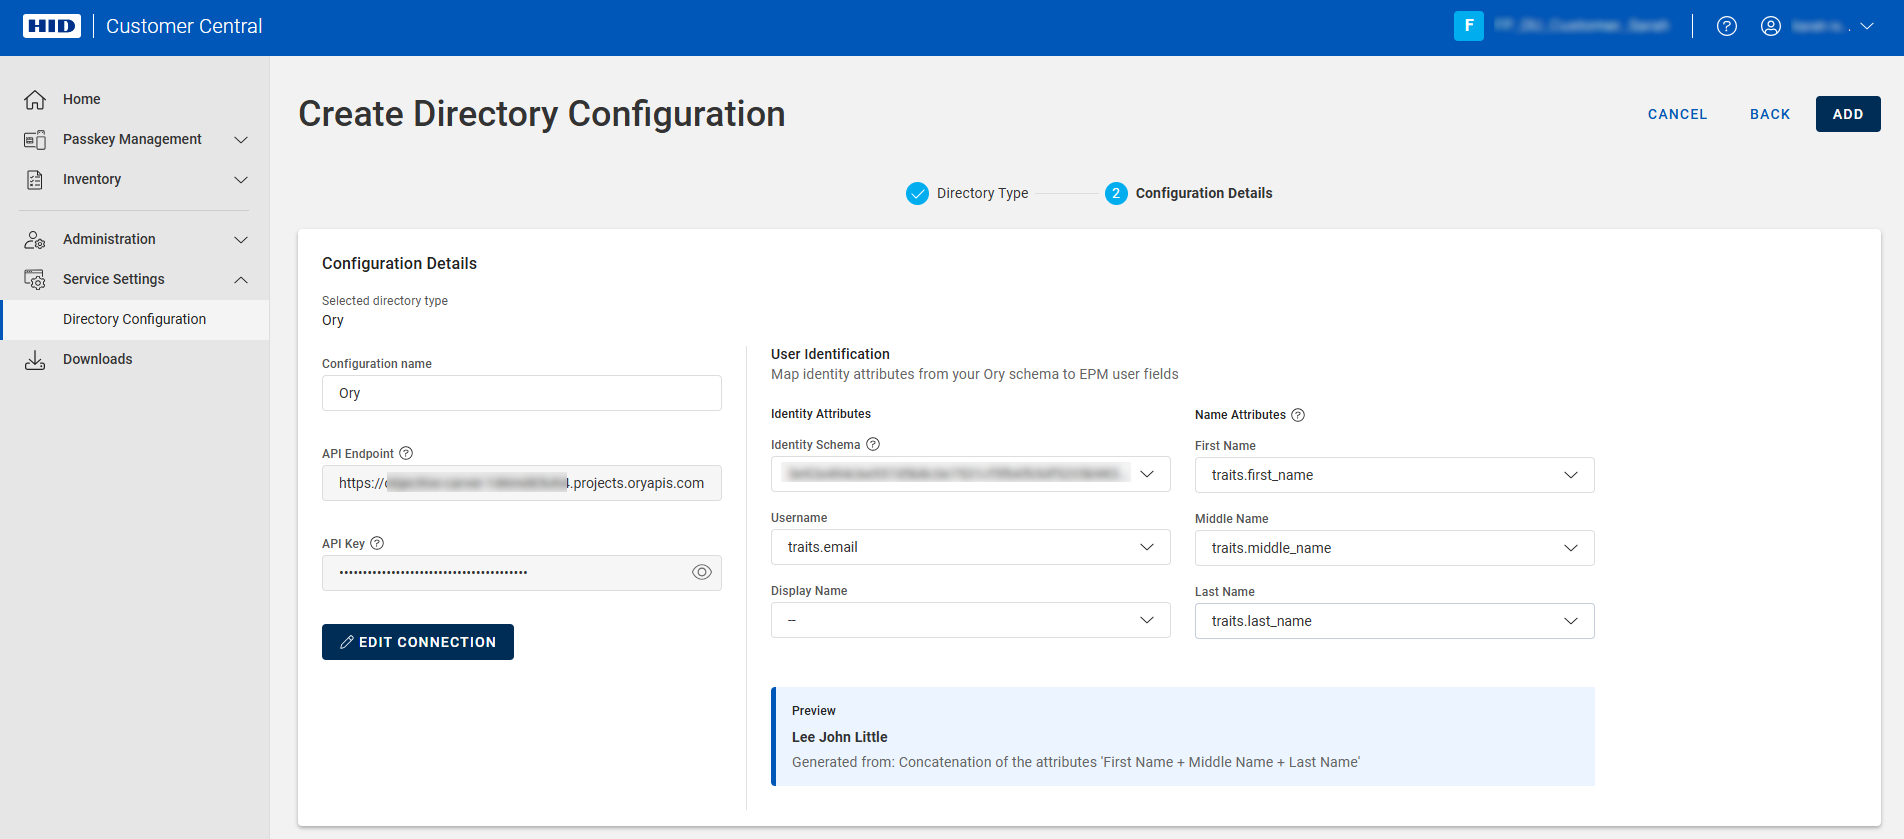
A preview of the display name is automatically generated.
-
-
Click Add.
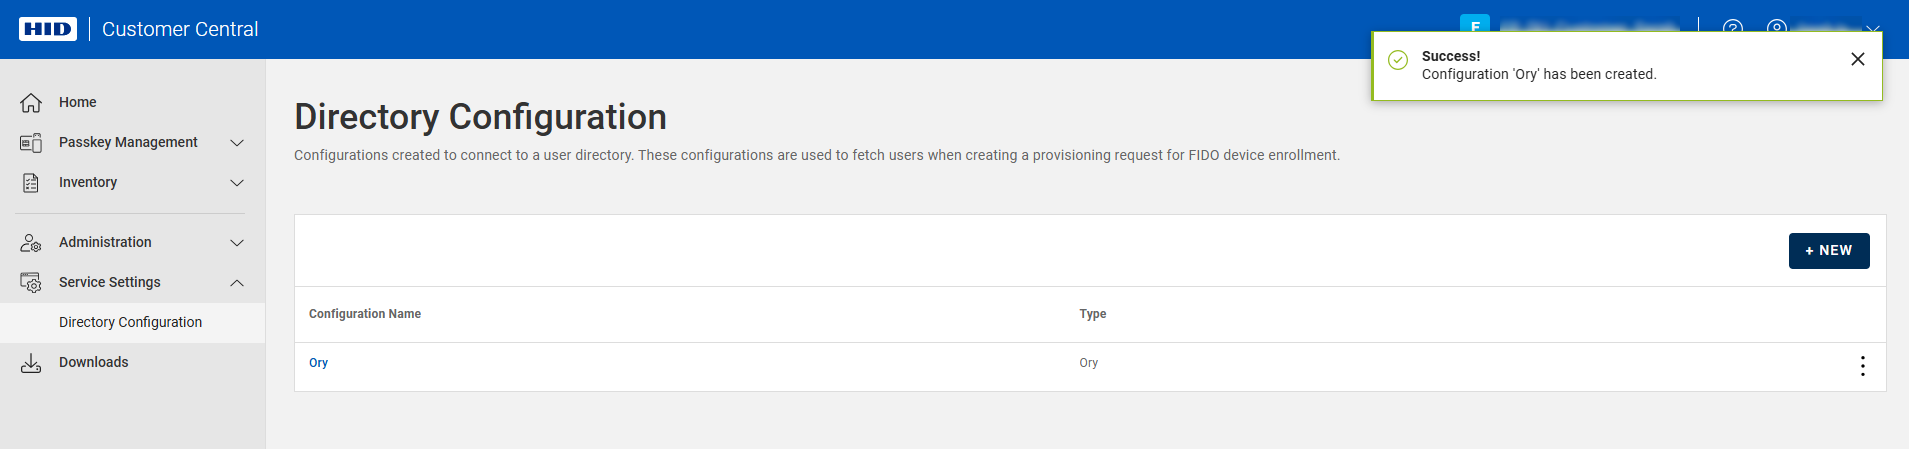
Customer Central is now connected to your Ory application and your users are available for provisioning.
Test a Connection
Alternatively, you can use a custom role with the Test Configuration privilege for the directory type.
-
Expand Service Settings
in the left menu and select Directory Configuration.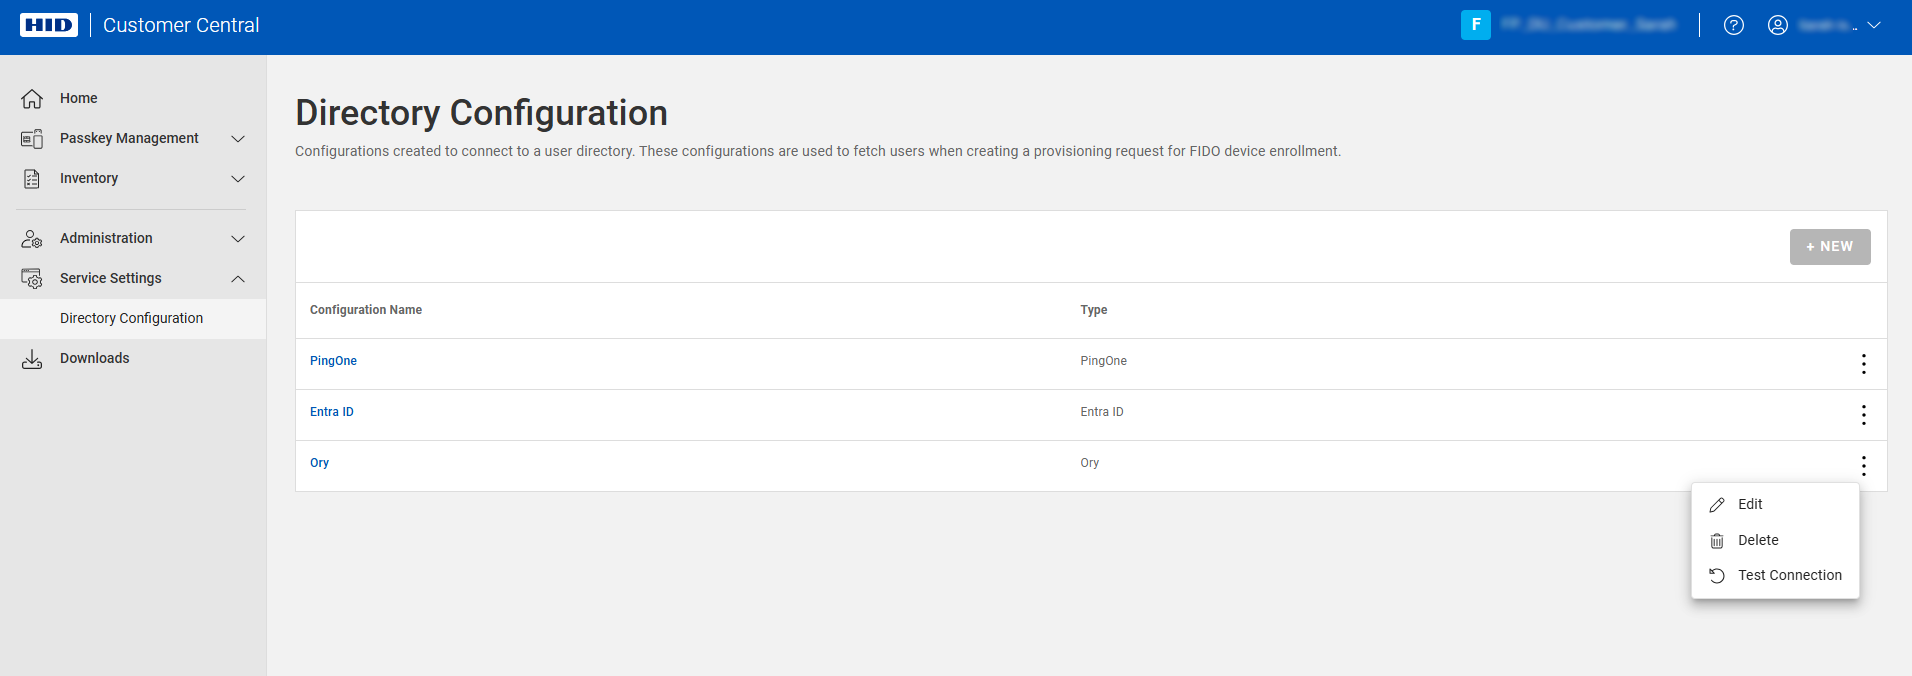
-
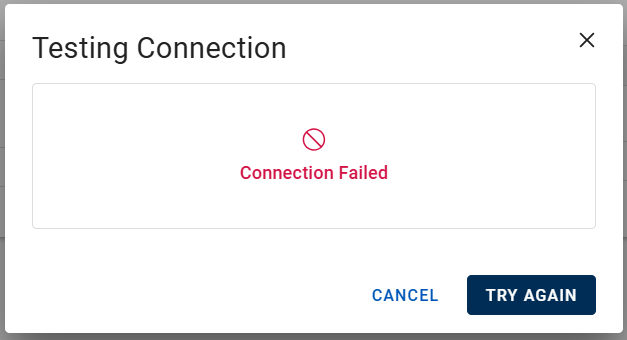
Click the menu icon
 for the configuration and select Test Connection.
-
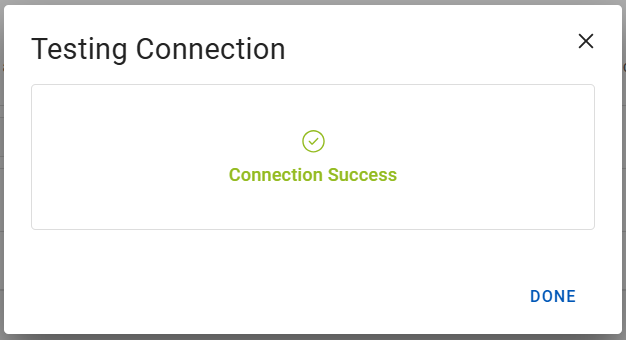
Success:
-
Failure - verify your configuration and try again
-
Edit a Configuration
Alternatively, you can use a custom role with the Edit Configuration privilege for the directory type.
-
Expand Service Settings
in the left menu and select Directory Configuration.
-
Click the menu icon
for the configuration and select Edit.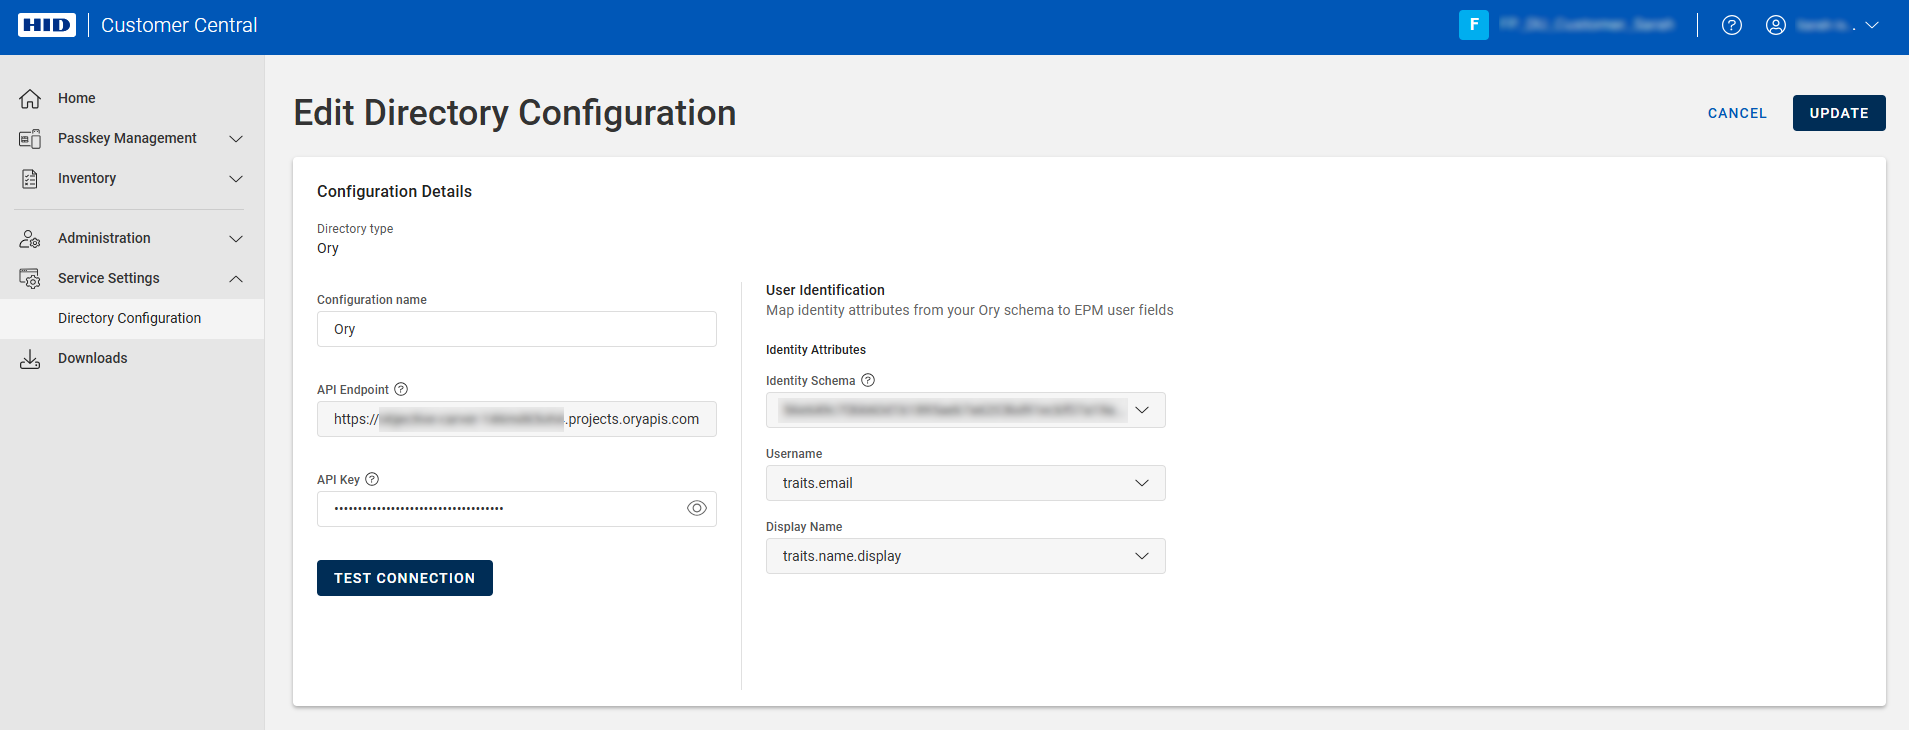 Note: The UPDATE button is unavailable until you have entered the required information.
You can update the:
-
Configuration Name
-
API Key - the key allowing Passkey Management to interact with the administrative Ory APIs on behalf of your project
Note: This key is only displayed when generated and cannot be displayed again.If you do not know the key's value, delete the original key and then generate a new key.
For further information, see Ory Network API Keys | Ory Documentation.
-
-
Edit the configuration as required and click UPDATE.
Delete a Configuration
- You must have the Administrator or Device Service Administrator role
Alternatively, you can use a custom role with the Delete Configuration privilege for the directory type.
You can only delete a configuration if there are no associated pending provisioning requests
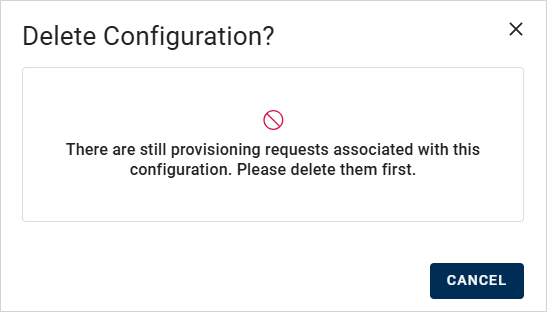
Complete or delete the requests before deleting the configuration.
-
Expand Service Settings
in the left menu and select Directory Configuration.
-
Click the menu icon
for the configuration and select Delete.
-
Enter permanently delete in the field and click CONFIRM.