View this page for  |
|  |
| 
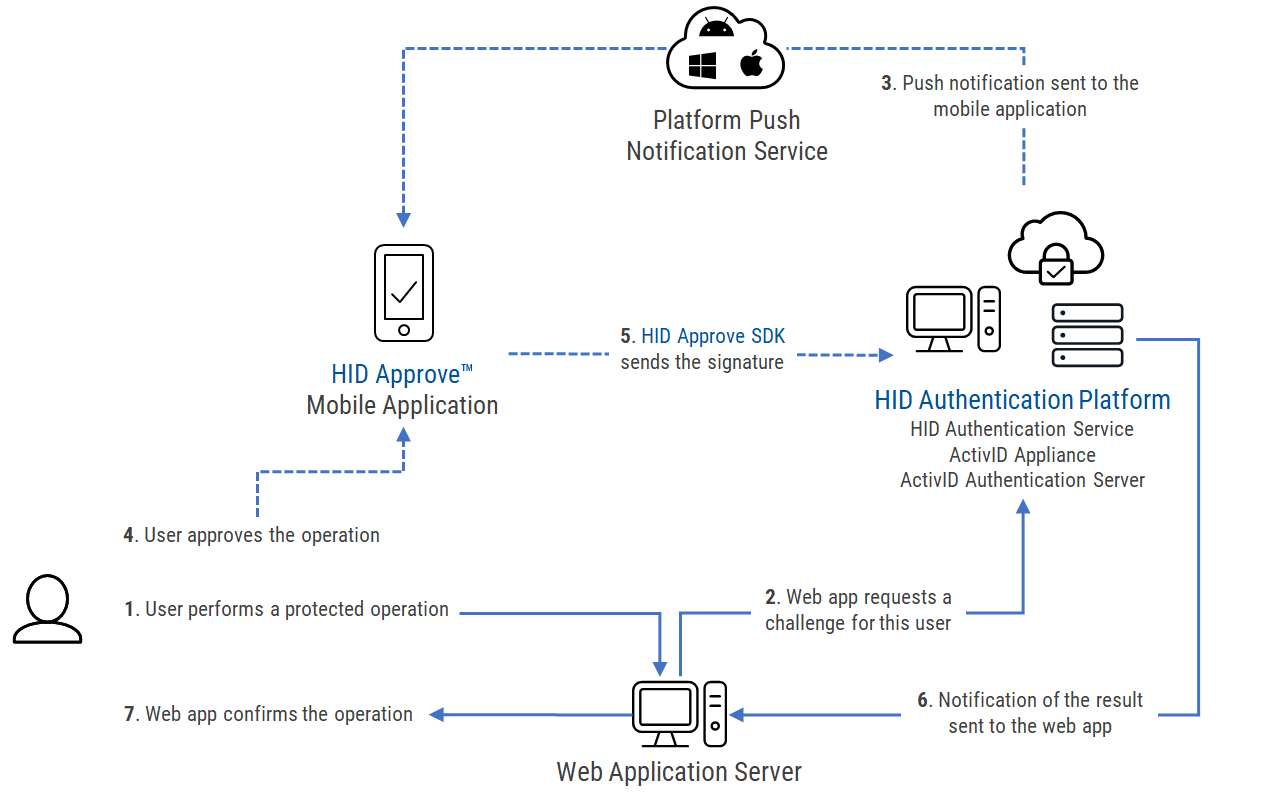
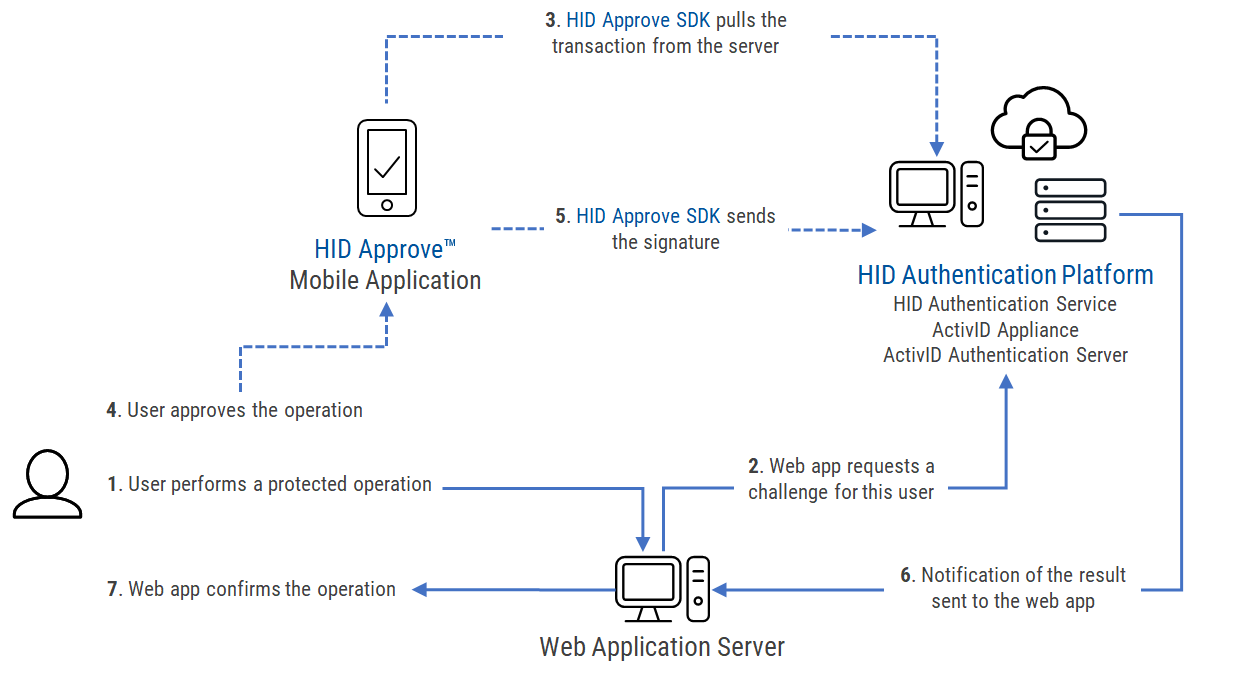
Once the keys are provisioned, the device is ready to perform a Transaction Signing operation (that is, to approve or decline an authentication request operation based on details sent by the HID authentication platform). How the application is notified that a transaction is to be signed depends on its deployment. One option is to get a push notification from the server.
Pending Transactions
For Client Initiated Backchannel Authentication (CIBA) integrations and more information about creating a transaction using a Web App/backend integration, refer to the bcauthorize endpoint in the HID authentication platform documentation.
The integrating application signs a transaction as follows:
- Create an instance of the IDevice (DeviceFactory.GetDevice).
-
Retrieve the transaction identifier (transactionId) for the transaction that will be processed. This identifier can be retrieved from the:
-
Push notification payload received by the application. This is the tds member of the payload
-
List of pending transactions for a specific container retrieved from the server (IContainer.RetrieveTransactionsIds)
-
- Get public information (IServerActionInfo) from the transaction identifier (transactionId) (IDevice.RetrieveTransactionInfo). There is no communication with the server at this point.
The returned IServerActionInfo instance provides the:
IServerActionInfo.Container - the container associated with this transaction
IServerActionInfo.UniqueIdentifier - the transaction Unique Identifier
This unique identifier corresponds to the server challenge identifier (cid) and can be used to correlate transactions between the client and server.
IServerActionInfo.ProtectionKey - the session transport key, which can be used to determine the corresponding key protection policy (such as if the password is required)
- Check if the Session Transport Key is protected by a password and prompt the user as required.
- Get transaction details from the server (IServerActionInfo.GetServerAction).
- Get the transaction details (IServerAction.ToString) and the list of allowed statuses (ITransaction.getAllowedStatuses) that will be displayed to the end user so that they can decide which action to take (“approve” or “decline” the transaction).
- Display the transaction to the end user and retrieve the end user’s selection among the available statuses.
- Then request the end user to provide their Transaction Signing password and send the final status to the HID authentication platform (ITransaction.SetStatus).
Sample Pending Transaction Signing on Windows (C#)
// Retrieve pending transaction for this container. The ID can also be recieved through a push message.
var txIds = await container.RetrieveTransactionsIds(null, null);

// Get the public information of the transaction
var info = await device.RetrieveActionInfo(txIds[0]);

// Retrieve the transaction details
var transaction = (ITransaction)await info.GetServerAction(null, null);

// Here we can check whether the transaction protection key is protected by a password
var signKey = await transaction.GetSigningKey();
var policy =  await signKey.GetProtectionPolicy();
if (ProtectionPolicyType.Password.Equals(policy.Type))
{
    // Prompt the end-user for the transaction protection key password
    Debug.WriteLine("This is a password policy");
}

// We can now sign the transaction with a selected status
var status = transaction.AllowedStatuses.First();
var succeeded = await transaction.SetStatus(status, mypassword, null, null);
Direct Client Signature (DCS)
In combination with the HID Authentication Service, HID Approve SDK 5.14 introduces the Direct Client Signing (DCS) feature allowing to generate authentication requests for signature directly within the HID Approve SDK.
The symmetric workflow provides seamless integration for authentication for business applications and is a suitable and a more secure alternative for symmetric key-based OTPs. Depending on the use case, it could also eliminate the need for complex asynchronous integrations that use traditional pending transactions for authentication.
After the generation of a direct transaction, it can be signed the same way as standard pending transactions.
For Client Initiated Backchannel Authentication (CIBA) integrations that might require additional verification of the authentication request signature, the newly created authentication request identifier will be returned after performing the cryptographic signature. For further information about CIBA feedback event polling, see Configuring the CIBA Feedback Mode.
For example:
- Create an instance of the IDevice (DeviceFactory.GetDevice).
-
Locate a specific container instance (IDevice.FindContainers).
-
Locate the asymmetric signing key to be used with the new transaction. This can be done by using the filter KEY_PROPERTY_USAGE with either KEY_PROPERTY_USAGE_AUTH or KEY_PROPERTY_USAGE_SIGN (IContainer.FindKeys).
-
Generate a new transaction for a specific container (IContainer.GenerateAuthenticationRequest).
-
Check if the Session Transport Key is protected by a password and prompt the user as required.
-
Prompt the end user to provide their Transaction Signing password if protected by a password, and send the final status to the HID Authentication Service with the selected status (ITransaction.SetStatus).
-
For CIBA integrations, forward the created request ID to the back end for verification as required (ITransaction.GetRequestId).
Sample Direct Transaction Signing on Windows (C#)
// Locate container’s signing key for transaction
var keyFilterAuth = new List<Parameter>() {
  new Parameter(Constants.KEY_PROPERTY_USAGE, Constants.KEY_PROPERTY_USAGE_AUTH )
};
List<IKey> authkeys = (List<IKey>)await currentContainer.FindKeys(keyFilterAuth);

// Arbitrarily using first key as example. With multiple keys, check label or id
IKey key = authkeys[0];

// Generate a new direct transaction.
var txMessage = "User Login";
var transaction = await container.GenerateAuthenticationRequest(txMessage, key.Id);

// Here we can check whether the transaction protection key is protected by a password
var signKey = await transaction.GetSigningKey();
var policy =  await signKey.GetProtectionPolicy();
if (ProtectionPolicyType.Password.Equals(policy.Type)) {
    // Prompt the end-user for the transaction protection key password
    Debug.WriteLine("This is a password policy");
}

// We can now sign the transaction with any selected status
var status = "approve";
var succeeded = await transaction.SetStatus(status, mypassword, null, null);

// If farther verification needed by backend, forward the resulting CIBA authentication request id
var authRequestId = transaction.GetRequestId();Canceling Pending Transactions
The HID Authentication Service now supports discarding or canceling pending transactions from the server without needing to sign the rejected transactions. For integrating applications, this can provide an improved user experience as the end-user’s signing key is not required to perform the cancel operation.
In addition, users can indicate an unwanted fraudulent or suspicious transaction via the application to the back end. Depending on the server authentication policy configuration, appropriate administrator-controlled counter measures can be invoked to reduce the risk of unauthorized access or potential push notification fatigue attacks on the end user.
For example, the authentication policy's disabledTimeReset parameter could be configured to prevent the creation of new transactions indefinitely or to block for a fixed 'cool-down' period. Any remaining pending transactions for the user would also be automatically revoked by the server.
Sample Transaction Cancellation on Windows (C#)
// Retrieve pending transaction for this container. The ID can also be received through a push message.
var txIds = await container.RetrieveTransactionsIds(null, null);

// Get the public information of the transaction
var info = await device.RetrieveActionInfo(txIds[0]);

// Retrieve the transaction details
var transaction = (ITransaction)await info.GetServerAction(null, null);

// We can cancel the transaction or cancel with flag suspicious
// Optional message describing cancelation reason to be audited
var message = "Duplicate"
// Reason can be either USER_CANCEL or NOTIFY_SUSPICIOUS
var reason = CancelationReason.USER_CANCEL;
await transaction.Cancel(message, reason, null);


