User Authentication with HID Approve
Understanding the HID Approve Flows
The HID Approve authentication flow has a number of steps and secure data exchanges between your application, the user's device and the HID Authentication Service.
The following authentication mechanisms are available with HID Approve:
-
Push Notification - a strong authentication mechanism involving a push notification sent to the user's device through a secured tunnel
-
OTP (One-Time Password) - convenient for offline authentication (when the user's device does not have an internet connection)
-
Challenge/Response - similar to OTP, it is convenient for offline authentication, but uses a back-end generated challenge in an asynchronous flow
-
Transaction signing and validation - validate and secure an operation containing transaction data
The HID Approve solution, used over OpenID with the HID Authentication Service, is built following a back-channel architecture called back-channel architecture called CIBA (Client Initiated Back-channel Authentication). This means that the authentication flow is initiated by your application. A further exchange of information takes place in the background between the end user (through the HID Approve app) and the HID Authentication Service. A mechanism of callbacks or polls allows your application to be notified with the status of the flow.
To be able to receive the callback from our service if you have a firewall configured in front of the callback server, make sure you allow (whitelist) the public IP addresses used by our service.
For further information about CIBA, see the OpenID CIBA specifications.
A registered and active Client ID
This client must have the Push based Validation Direct User Permissions (FS_TSDUP) permission set (for example, by assigning the privileged M2M (RL_CLIENTIDM2M) role to the client).
A created user
A device (smartphone, tablet or computer) on which the HID Approve App is installed.


Register a User for HID Approve
Regardless of the authentication mechanism you plan to use, the user and their device need to be set up with the HID Approve app. For that, a device needs to be created on the HID Authentication Service and bound to the user. This device is the virtual representation of the user's smartphone or laptop on which the HID Approve app is running.
To register a user's device with HID Approve, a device provision request needs to be created. A device provision request is an invitation for the user to onboard their device with HID Approve to the HID Authentication Service.
To register for HID Approve authentication:
-
With your application, create a device in the HID Authentication Service and assign it to the user.
-
With your application, create a device provision and invite the user to register themselves (QR code) with the HID Approve App.
-
The HID Approve App proceeds with a back-end exchange of data with the HID Authentication Service to perform the setup. During the process the appropriate authenticators are created and initialized.
-
Finally, the HID Authentication Service calls the callback URL of your application (defined on your Client ID), passing the status of the registration as a parameter.
Alternatively, your application can call the token endpoint with the CIBA poll grant (urn:openid:params:grant-type:ciba).
Do you remember ?
In Basic Concepts for Integration, we saw that one application = one Client ID. The callback URLs of your applications are defined within each client ID. Therefore, one application = one client ID = one callback URL. This provides the flexibility to create multiple applications using HID Approve.
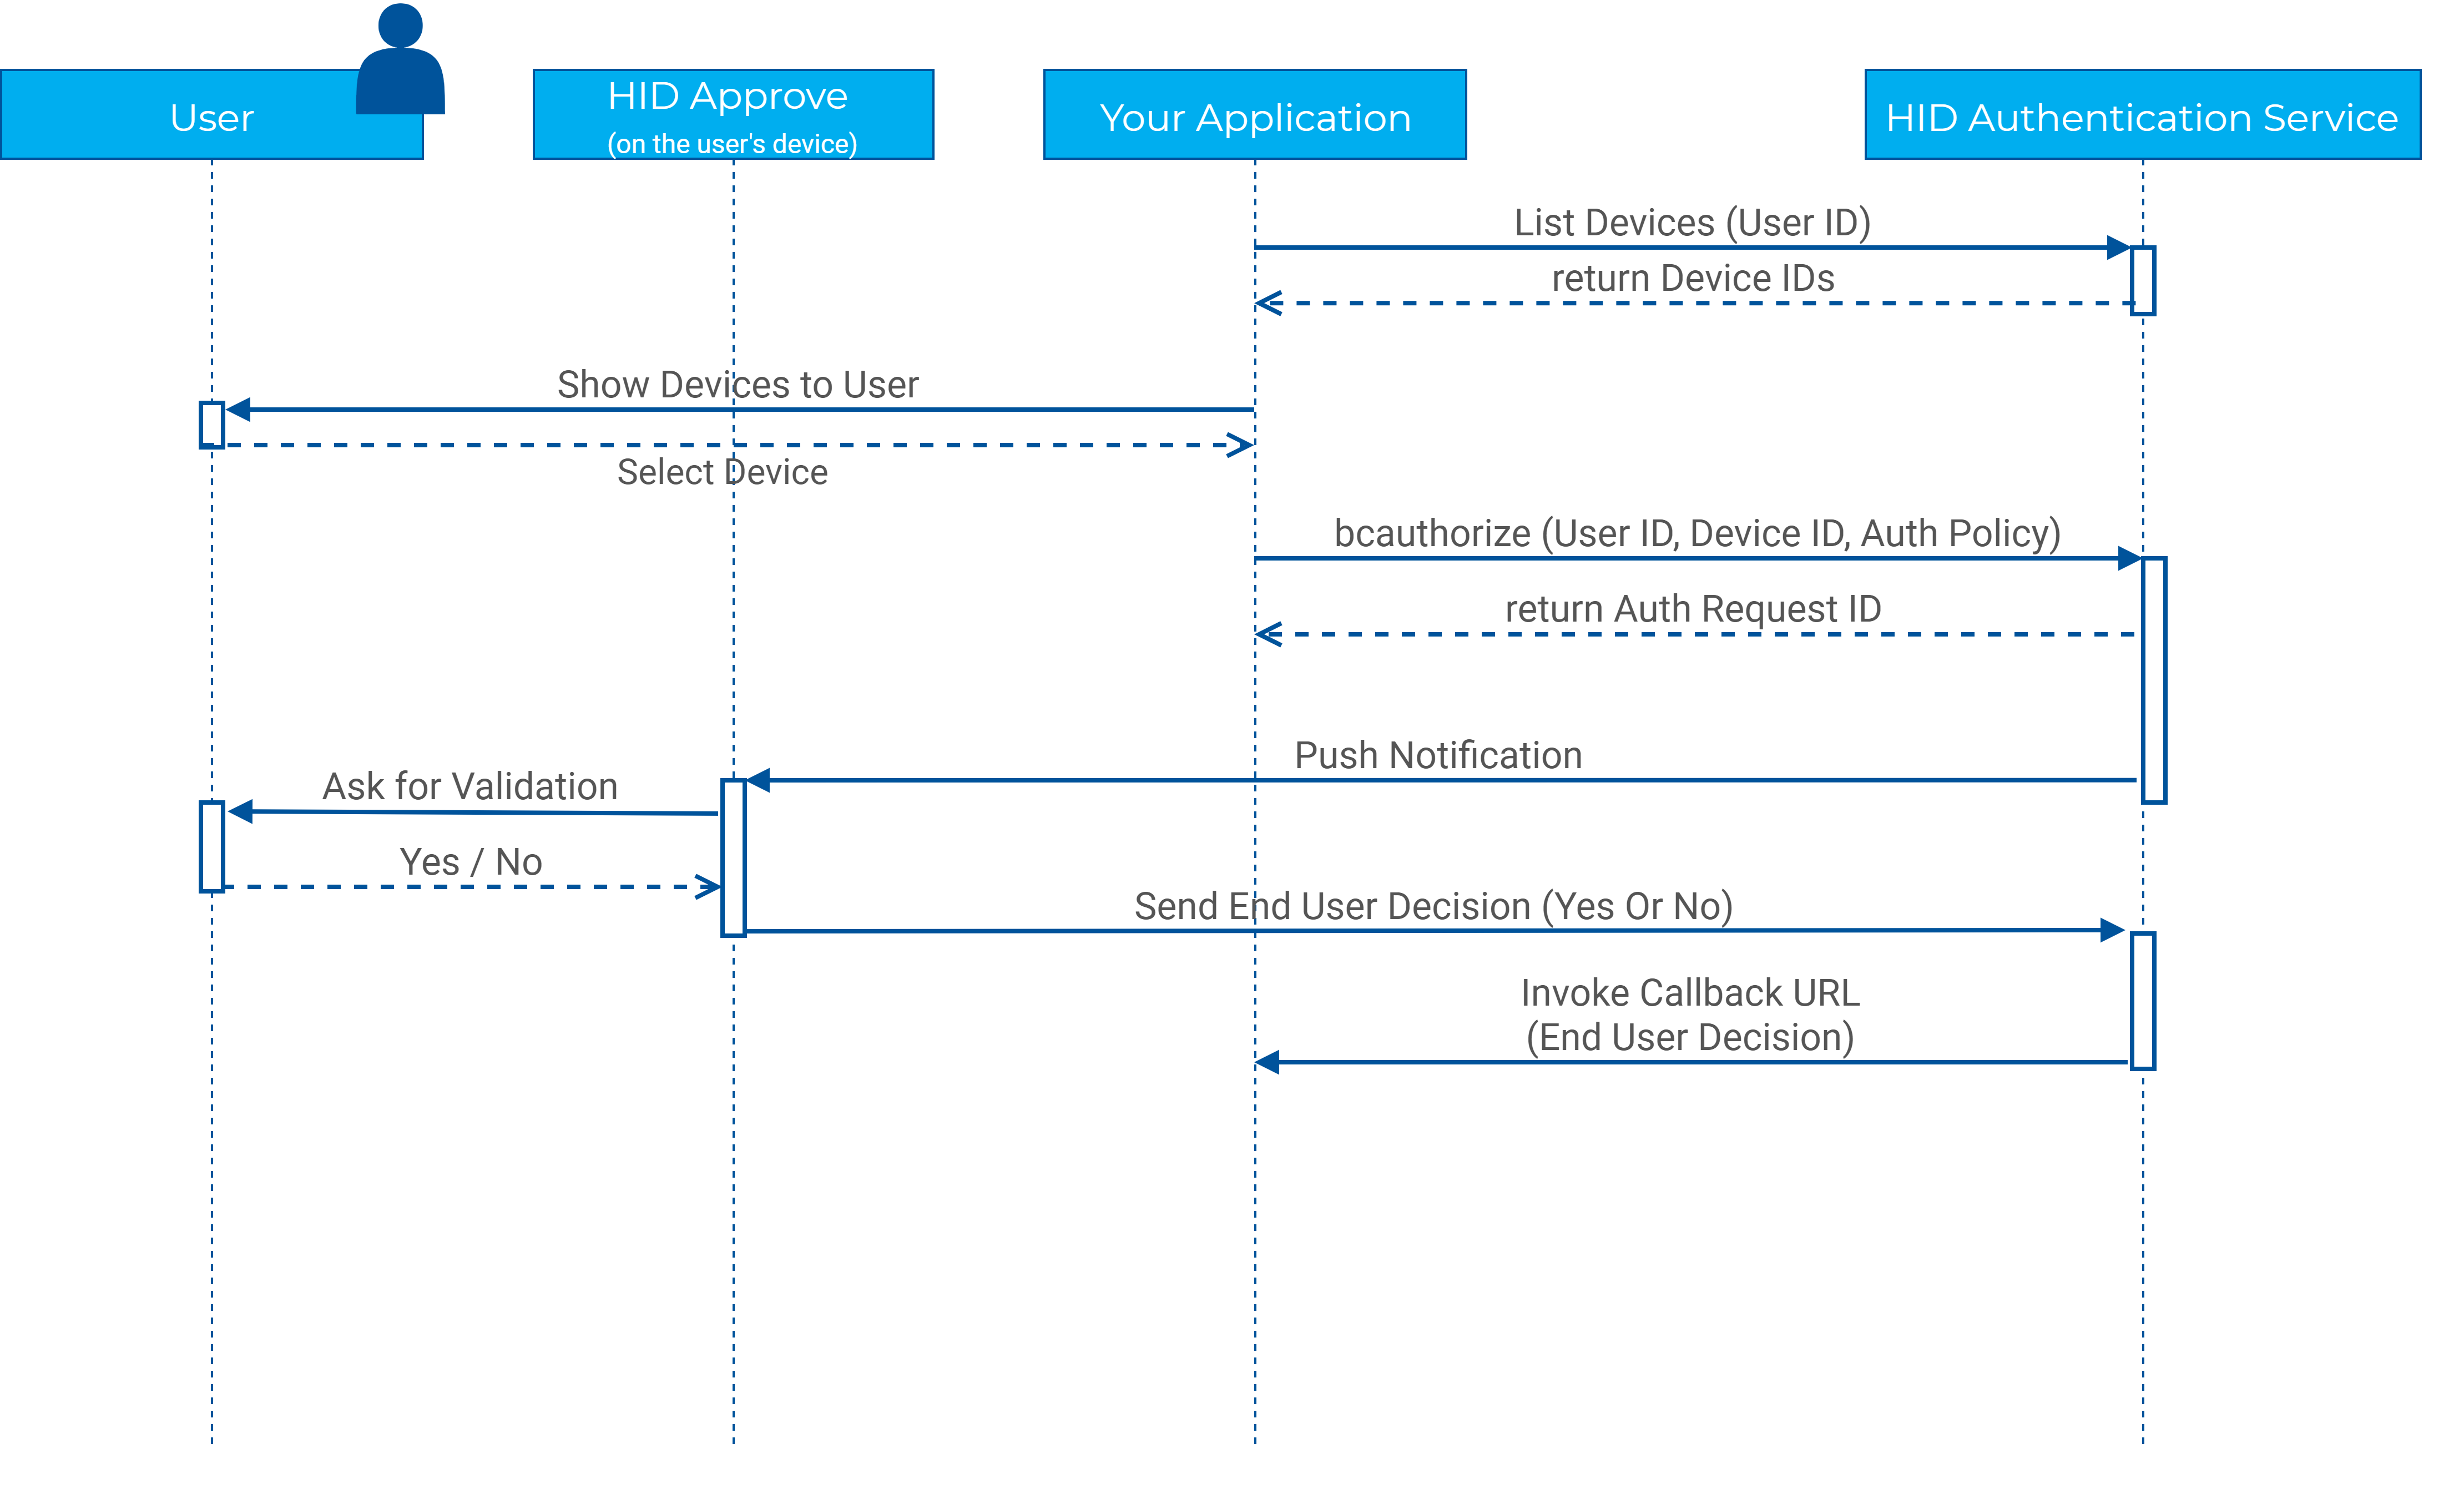
Push Notification Flow
The push notification authentication workflow is:
-
Request the HID Authentication Service to fetch the HID Approve device ID registered for the end user. If the end user has several devices registered with HID Approve, your application must fetch the list of devices, and display it to the end user for them to choose the one that is the most convenient for them to use.
-
Your application must then generate an ID Token containing the information about the end user and the device, as well as the authentication policy to be used.
-
Your application sends the ID Token to the bcauthorize endpoint to initiate the authentication.
-
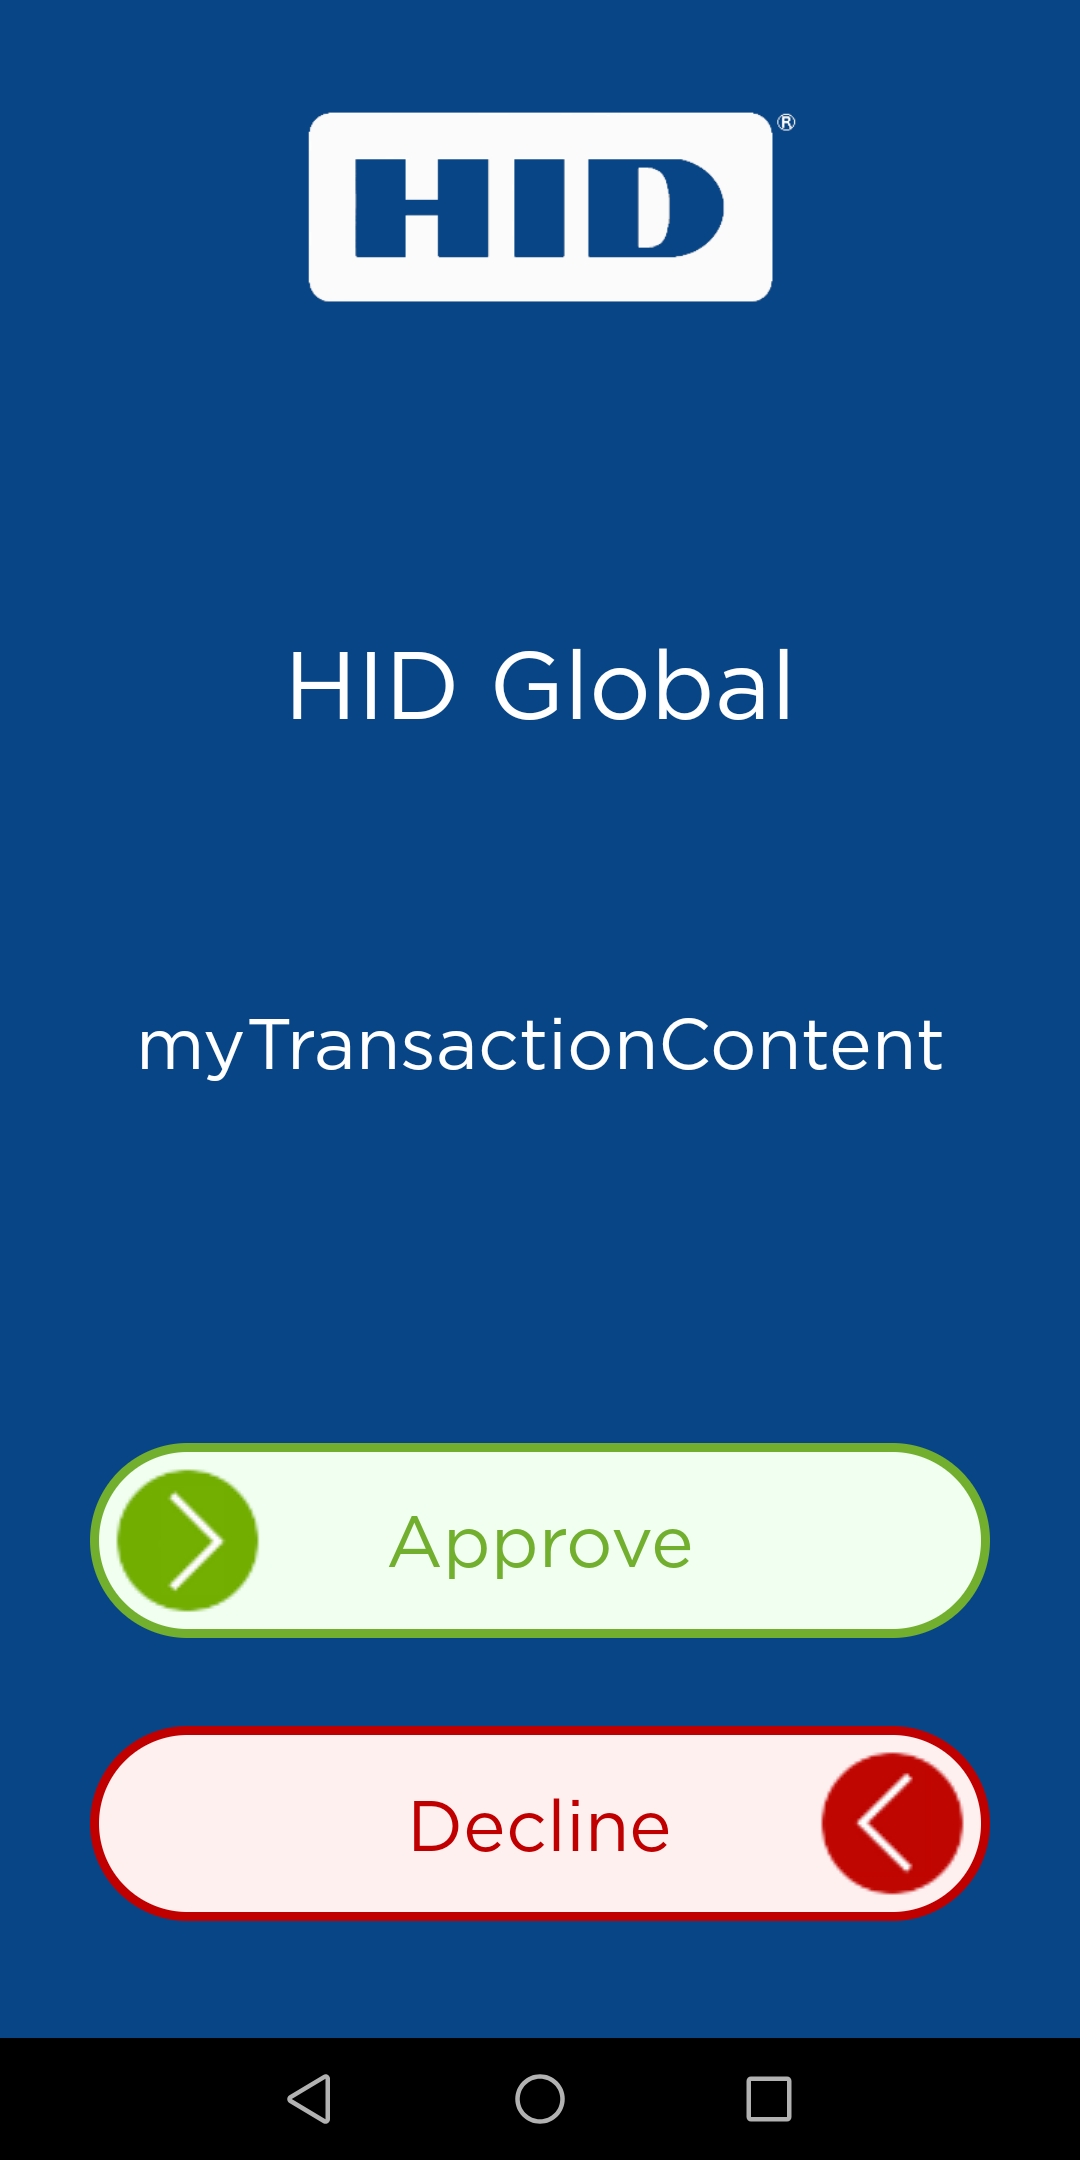
The HID Authentication Service sends a push notification to the designated device.
-
The end user accepts or refuses the notification on the HID Approve app.
-
The HID Authentication Service calls the callback URL registered on your Client ID, passing the status of the authentication.
OTP (One-Time Password)
The OTP authentication workflow is:
-
The user opens the HID Approve app and generates a secure code.
-
The application then submits the user's external ID and the secure code to the HID Authentication Service.
-
The HID Authentication Service validates the secure code for the given user and returns the result to the application.
Challenge/Response
The challenge/response workflow is:
-
The user opens the HID Approve app and enters a challenge value. The challenge value is generated by the HID Authentication Service.
-
The HID Approve app generates a secure code based on the challenge value.
-
The application then submits the user's external ID, challenge (if needed) and the secure code to the HID Authentication Service.
-
The HID Authentication Service validates the secure code for the given challenge and returns the result to the application.
Transaction Signing
The transaction signing workflow is:
-
The application generates three values. For example, in the case of a banking transaction, these fields could be Account Number, Amount and Reference ID.
-
The user opens the HID Approve app and enters the three values.
-
HID Approve generates and displays a secure code based on the entered values.
-
The user enters the secure code in the application.
-
The application send to the HID Authentication Service the user external ID, along with the device ID, the values of the three fields and the secure code of the user.
-
The HID Authentication Service returns a bearer token to confirm the authentication.
Authenticating with HID Approve
Onboard an End User with HID Approve
Obtain a Token for your Client ID
The first step to register a user with HID Approve is to obtain a token for your client ID
Sample request to authenticate a Client ID with a password
POST https://[base-server-url]/idp/{tenant}/authn/token
Authorization: Basic YOUR_CLIENT_ID_CREDENTIALS_BASE64
Content-Type: application/x-www-form-urlencoded
grant_type=client_credentialsWe obtain an access token:
{"access_token":"7+hHjQAAAW+gY9BLqVZ40JmQapwRe+vLyudtN7RQ","token_type":"Bearer","expires_in":3600}Now that we have a token for our Client ID, we can:
-
Obtain the internal ID of the user
-
Create a device for the user
-
Create a Device provisioning request (an invitation to be onboarded for the HID Approve app)
Obtain the User's Internal ID
Sample request to search for the user
POST https://[base-server-url]/scim/{tenant}/v2/Users/.search HTTP/1.1
Authorization: Bearer YOUR_CLIENTID_BEARER_TOKEN
Content-Type: application/scim+json

{
    "schemas": [
        "urn:ietf:params:scim:api:messages:2.0:SearchRequest"
    ],
    "filter": "externalId eq \"YOUR_USER_EXTERNAL_ID\"",
    "sortBy": "id",
    "sortOrder": "descending",
    "startIndex": 0,
    "count": 100
}Sample response containing the internal ID of the user in the id attribute (in this example, 11072)
{
    "schemas": [
        "urn:ietf:params:scim:api:messages:2.0:ListResponse"
        ],
    "totalResults": 1,
    "resources": [
    {
        "schemas": [
            "urn:ietf:params:scim:schemas:core:2.0:User",
            "urn:hid:scim:api:idp:2.0:UserDevice",
            "urn:hid:scim:api:idp:2.0:UserAttribute",
            "urn:hid:scim:api:idp:2.0:UserAuthenticator"
            ],
        "id": "11072",
        (...)
    }]
}
Create the User's Device
The second step is to create a device of type DT_TDSV4 or DT_TDSV4F (FIPS 140-2 compliant).
For further information, see:
Sample request to create the device
POST https://[base-server-url]/scim/{tenant}/v2/Device HTTP/1.1
Authorization: Bearer YOUR_CLIENTID_BEARER_TOKEN
Content-Type: application/scim+json

{
    "schemas": ["urn:hid:scim:api:idp:2.0:Device"],
    "externalId": "test@mail.com-331",
    "type": "DT_TDSV4",
    "status": {
        "status": "PENDING",
        "active": false,
        "expiryDate": "2020-11-30T11:54:31+0100",
        "startDate": "2017-11-30T11:54:31+0100"
        }
}
Where the external ID of the device is generated with the external ID of the user and a random number.
Sample response containing the internal ID of the device
{
    "schemas": ["urn:hid:scim:api:idp:2.0:Device"],
    "id": "11845",
    "externalId": "test@mail.fr-331",
    (...)
}Sample request to bind the device to the user, using the internal ID of the device
PUT https://[base-server-url]/scim/{tenant}/v2/Device/YOUR_DEVICE_INTERNAL_ID HTTP/1.1
Authorization: Bearer YOUR_CLIENTID_BEARER_TOKEN
Content-Type: application/scim+json
{
    "schemas": [
        "urn:hid:scim:api:idp:2.0:Device"
    ],
    "id": "11845",
    "externalId": "test@mail.com-331",
    "owner": {
        "display": "test@mail.com"
        },
    "status": {
        "status": "PENDING",
        "active": false,
        "expiryDate": "2025-11-30T11:54:31+0100",
        "startDate": "2017-11-30T11:54:31+0100"
    }
}
Now that the device is created and bound to the user, we can create the device provision which is the invite to onboard the end user on HID Approve:
Sample request
POST https://[base-server-url]/scim/{tenant}/v2/Device/Provision HTTP/1.1
Authorization: Bearer YOUR_CLIENTID_BEARER_TOKEN
Content-Type: application/scim+json

{
    "schemas": [
        "urn:hid:scim:api:idp:2.0:Provision"
    ],
    "deviceType": "DT_TDSV4",
    "description": "did=11845,url=AAAS_PLATFORM:443/YOUR_TENANT,pch=CH_TDSPROV,pth=AT_TDSOOB,pct=CT_TDSOOB,pdt=DT_TDSOOB,cb_url=https://your-application/callback,cb_notif_token=8d67dc78-7faa-4d41-aabd-67707b374255,mod=GEN,sec=",
    "owner": {
        "value": "11072"
    },
    "attributes": [
    {
        "name": "AUTH_TYPE",
        "value": "AT_SMK",
        "readOnly": false
    }
    ]
}
Where the description contains all the configuration of the HID Approve authentications. In particular, your CIBA callback URL with cb_url, the device internal ID and cb_notif_token that is a value you should randomize, with a UUID.
Sample response with a provisioning message that is used to create the manual or QR code invitation
{
    "schemas": [
        "urn:hid:scim:api:idp:2.0:Provision"
    ],
    "id": "11052",
    "meta": {
        "resourceType": "Provision",
        "created": "2020-01-22T17:21:17Z",
        "location": "https://[base-server-url]/scim/{tenant}/v2/Device/Provision/11052",
        "version": "1"
    },
    "deviceType": "DT_TDSV4",
    "status": {
        "status": "UNPROCESSED",
        "active": false
    },
    "owner": {
        "type": "User",
        "display": "test@mail.com",
        "value": "11072",
        "$ref": "https://[base-server-url]/scim/{tenant}/v2/Users/11072"
    },
    "attributes": [
    {
        "name": "PROV_MSG",
        "type": "string",
        "value": "{\"ver\":\"v8\",\"url\":\"[base-server-url]:443/{tenant},\"uid\":\"test@mail.com\",\"did\":\"11845\",\"dty\":\"DT_TDSV4\",\"dir\":\"11052\",\"pch\":\"CH_TDSPROV\",\"pth\":\"AT_TDSOOB\",\"sec\":\"\",\"pss\":\"RDNJSTVJSUJXWA==\"}",
        "readOnly": false
    }
    ]
}
Where the invitation consists of the following attributes:
-
User ID - test@mail.com
-
Invite code - a base64-decoded string of the pss attribute (base64Decode(RDNJSTVJSUJXWA==) = D3II5IIBWX).
-
Service URL - [base-server-url]:443/{tenant} (without https://)
Once the user registers with the HID Approve app, your callback URL is called.
When the device registration is successful, a set of authenticators are created for the user. These authenticators support the authentication mechanisms in HID Approve:
| Policy | Description |
|---|---|
|
AT_SMK |
Policy used internally by the service to synchronize HID Approve |
|
AT_PASAIDP |
Policy used for the push authentication flow on the IDP portal HID Approve is then used as second factor authenticator |
|
AT_PASA |
Policy used for the push authentication flow This policy is used for login validation |
|
AT_TDS |
Policy used for push authentication flow This policy is used for action validation |
|
AT_EMPOTPI |
Policy used for the OTP authentication flow on the IDP portal HID Approve is then used as second factor authenticator |
|
AT_EMPOTP |
Policy used for the OTP authentication flow, as well as the Challenge/Response authentication flow |
Get the User ID and Device ID
Obtain a Token for your Client ID
The first step to authenticate a user with a Push Notification is to obtain a token for your Client ID.
This token will allow you to fetch the list of devices for the user.
Sample request to authenticate a Client ID with a password
POST hhttps://[base-server-url]/idp/{tenant}/authn/token
Authorization: Basic YOUR_CLIENT_ID_CREDENTIALS_BASE64
Content-Type: application/x-www-form-urlencoded
grant_type=client_credentialsWe obtain an access token:
{"access_token":"7+hHjQAAAW+gY9BLqVZ40JmQapwRe+vLyudtN7RQ","token_type":"Bearer","expires_in":3600}Now that we have a token for our Client ID, we can:
-
Obtain the internal ID of the user
-
Obtain the list of devices registered with the user
Obtain the User's Internal ID
Sample request to search for user
POST https://[base-server-url]/scim/{tenant}/v2/Users/.search HTTP/1.1
Authorization: Bearer YOUR_CLIENTID_BEARER_TOKEN
Content-Type: application/scim+json

{
    "schemas": [
        "urn:ietf:params:scim:api:messages:2.0:SearchRequest"
    ],
    "filter": "externalId eq \"YOUR_USER_EXTERNAL_ID\"",
    "sortBy": "id",
    "sortOrder": "descending",
    "startIndex": 0,
    "count": 100
}Sample response containing the internal ID of the user in the id attribute (in this example, 11072)
{
    "schemas": [
        "urn:ietf:params:scim:api:messages:2.0:ListResponse"
    ],
    "totalResults": 1,
    "resources": [
    {
        "schemas": [
            "urn:ietf:params:scim:schemas:core:2.0:User",
            "urn:hid:scim:api:idp:2.0:UserDevice",
            "urn:hid:scim:api:idp:2.0:UserAttribute",
            "urn:hid:scim:api:idp:2.0:UserAuthenticator"
            ],
        "id": "11072",
        (...)
    }
    ]
}
Fetch the List of User's Devices
Now that we have the internal ID of our user, we can fetch the list of devices:
Sample request
POST https://[base-server-url]/scim/{tenant}/v2/Device/.search HTTP/1.1
Authorization: Bearer YOUR_CLIENTID_BEARER_TOKEN
Content-Type: application/scim+json

{
    "schemas": [
        "urn:ietf:params:scim:api:messages:2.0:SearchRequest"
    ],
    "filter": "owner.value eq 11072",
    "sortBy": "id",
    "sortOrder": "descending",
    "startIndex": 0,
    "count": 100
}Sample response with the list of devices registered for the user, including the internal ID of the device that we want to extract
{
    "schemas": [
        "urn:ietf:params:scim:api:messages:2.0:ListResponse"
    ],
    "totalResults": 1,
    "resources": [
    {
        "schemas": [
            "urn:hid:scim:api:idp:2.0:Device"
        ],
        "id": "11093",
        "externalId": "f85e7c0e-ec0a-473e-b3de-9adba859b36e",
        (...)
        "friendlyName": "Honor 7X",
        "type": "DT_TDSV4",
        (...)
    ]
}
Where:
- The response contains a friendlyName attribute, allowing to display a more human-readable list of devices to your end user. This friendly name was captured during the end user registration with HID Approve.
-
A filter is used to extract the devices of the type DT_TDSV4* to identify which devices are push-based. If you use only one type of device for your push authentication users (such as DT_TDSV4), you can use the search filter:
type eq DT_TDSV4 and owner.value eq 11072
Push Notification
A bearer token of a Client ID, obtained by authenticating the Client ID against the OpenID API
A user created with an HID approve device ready to be used (see Onboard an end user with HID Approve)
The internal ID of the user and the device ID (see Get user ID and client ID)
Send the Push Notification
Now that we identified the device on which we want to send the Push notification, we can call the bcauthorize endpoint to actually send the message.
To do so, we need to generate an unsigned ID Token containing our Push message, as well as information about the user and the device:
{
    "usercode": "YOUR_USER_EXTERNAL_ID",
    "deviceid": "THE_DEVICE_INTERNAL_ID",
    "authpol": "AT_PASA",
    "tds": "myTransactionContent",
    "createSession": "0"
}
Where the authpol attribute is the authentication policy used for the push notification and tds is the message that will be displayed to the end user on the HID Approve App.
Now we add a header to our ID Token indicating that it is not signed:
{
    "alg" : "none",
    "typ" : "JWT"
}Then we encode the token with base64URL and append the header and body:
base64URLEncode( header ) + "." + base64URLEncode( body ) + "."For example:
eyJhbGciOiJub25lIiwidHlwIjoiSldUIn0%3D.eyJ1c2VyY29kZSI6InRlc3RAbWFpbC5mciIsImRldmljZWlkIjoiMTEwOTMiLCJhdXRocG9sIjoiQVRfUEFTQSIsInRkcyI6Im15VHJhbnNhY3Rpb25Db250ZW50IiwiY3JlYXRlU2Vzc2lvbiI6IjAifQ%3D%3D.We are now ready to call the bcauthorize endpoint:
POST https://[base-server-url]/idp/{tenant}/authn/bcauthorize HTTP/1.1
Authorization: Bearer YOUR_CLIENTID_BEARER_TOKEN
Content-Type: application/json

{
    "scope": "openid hid-tx-sign",
    "client_notification_token": "8d67dc78-7faa-4d41-aabd-67707b374255",
    "acr_values": "mod-mf",
    "login_hint_token": "eyJhbGciOiJub25lIiwidHlwIjoiSldUIn0%3D.eyJ1c2VyY29kZSI6InRlc3RAbWFpbC5mciIsImRldmljZWlkIjoiMTEwOTMiLCJhdXRocG9sIjoiQVRfUEFTQSIsInRkcyI6Im15VHJhbnNhY3Rpb25Db250ZW50IiwiY3JlYXRlU2Vzc2lvbiI6IjAifQ%3D%3D."
}
Where the:
-
login_hint_token attribute contains the ID Token we generated.
-
client_notification_token will be transmitted back to your application when your callback URL is called.
It adds a layer of verification on the back-channel communication between the HID Authentication Service and your servers. It is recommended generating a 128-bits minimum string, such as a UUID.
The bcauthorize endpoint responds with a request identifier that will be sent back when your callback URL is called, allowing your application to distinguish between push notifications:
{"auth_req_id":"e965c755","interval":0,"expires_in":3600}Once the bcauthorize endpoint is called, the end user receives a Push Notification on their device.
Receive Callback
When the end user responds, the HID Authentication Service calls your callback URL with the following HTTP request:
POST callback_URL HTTP/1.1
Authorization: Bearer 8d67dc78-7faa-4d41-aabd-67707b374255
Content-Type: application/json

{
    "access_token": "",
    "auth_req_id": "e965c755",
    "token_type": "Bearer",
    "id_token": "eyJhbGciOiJub25lIn0.eyJyZXN1bHQiOjEsInJlYXNvbiI6IlJlYXNvbiBub3QgZGVmaW5lZCIsImRvbWFpbiI6InQ1OWU2YjhjNTUyNTc5MjQzOTAxMDYiLCJKV1MiOiJleUowZVhBaU9pSktWMVFpTENKaGJHY2lPaUpTVXpVeE1pSjkuZXlKamJHbGxiblJoY0hCeWIzWmhiSE4wWVhSMWN5STZJbUZqWTJWd2RDSXNJblJrY3lJNkltMTVWSEpoYm5OaFkzUnBiMjVEYjI1MFpXNTBJaXdpZEhoamIzVnVkR1Z5SWpvaU1URWlmUT09Lm1TdDhsbi1oaDlyTmJkY2ktNWJkVVRMaE42OUR5RHpxclBPaks4R0tvVnZqZnNLN25NY3Z1WXhSVW5xaXNsTHh5MDVtbF9MblVlb1JPenhZdzJUWC04MEw3MV9LaXIybUluQTd3SUhIbVRYZEdGbVFhemZfWmJSUFVQdGFOSnkwaEZFcF91c0FUc21KdFZ2ZkVha1l3aXpicEY0bHZJUXd3N20zOHRyc1U5VDZvbXlCZU84SW56eHpLRTI5WWJMMS1oU1FGYnlTU0VfeWRmdVplZ045UFJPLVFLQnItWjlDS1A3eFI3OGpyYnVmVjV1bjVfN29wd1FoSDBxQk00TjQxQ2w5SlFEWExZbnVsNXgtUlUzMVRZdzYzUzA5RkY1ZEtqcjVtMmtuODZ0aGVBYUF2N2R5d0JoSnFERl8tQ2Uzam1pRmt4OGRVLVMzLUYxZWtYYlhfdz09IiwiUFVLIjoiTUlJQklqQU5CZ2txaGtpRzl3MEJBUUVGQUFPQ0FROEFNSUlCQ2dLQ0FRRUFweFNTZ2FvdjNxK0txeXRVM2FXTlRWRjNhVWRXNkJRSDQyOHdNK2cwb0dZVUJQbG1NcXY5RWZlQkRtR3prXC81MkpBZ3FlQjIrSkpXaUY1Vk9ONm5Va3M0clg2eWpxbDJ4azYwVjFJMCtPNmw0ZnBhS0hHR2FLVDg5dVdrWkRDcmZYRzRLMWxkbGRBMHRORXZMZ0xYa25uTGlPa1ZKN0tSZER4alhuR3ZCVGdFaFA4MFlPdXFLTjM4cUFidHphVUhoS1BUSllVWXhFalIwZE5LaGVQYTJRd1ZPVWVZK1FtS1RtT2dGTnFcL0Nra0FmUzByR2tHR3NWXC9EZGVqdFlmSmI0VmM3TDZWOWNZaWp5RVdMaG1TUm1BT3d0Tmt6ME51bmtWd05YNkwzdFd3TlplaFJ3RlErdnFNTWpsb0YwSHlLNEhsZlBEMG5iVThSSUxhXC9aNkc4VmFRSURBUUFCIiwiY2xpZW50YXBwcm92YWxzdGF0dXMiOiJhY2NlcHQiLCJ1c2VyY29kZSI6ImFkbWludXNlckBoaWRnbG9iYWwiLCJkZXZpY2VpZCI6MTExMDl9."
}
Where the:
-
Authorization header is the value of the client_notification_token parameter that was used when triggering the authentication
This token is mostly used to verify that the response received corresponds to the request. -
auth_req_id is the value of the auth_req_id parameter received from the HID Authentication Service after triggering the authentication
This value is as well used to verify that the response received corresponds to the request. -
id_token contains information about the user and the status of the authentication
It is a JWT token and can be either plain or signed based on a value (True / False) configured in the hid_ciba_callback_format_plain parameter.
It can also be signed and encrypted by defining the algorithm (RSA-OAEP-256) in the id_token_encrypted_response_alg parameter along with the jwks certificate
If we decrypt the plain id_token, we obtain the following information:
Header:
{"alg": "none"}
Payload:
{
    "result":1,
    "reason":"Reason not defined",
    "domain":"t59e6b8c55257924390106",
    "JWS":"eyJ0eXAiOiJKV1QiLCJhbGciOiJSUzUxMiJ9.eyJjbGllbnRhcHByb3ZhbHN0YXR1cyI6ImFjY2VwdCIsInRkcyI6Im15VHJhbnNhY3Rpb25Db250ZW50IiwidHhjb3VudGVyIjoiMTEifQ==.mSt8ln-hh9rNbdci-5bdUTLhN69DyDzqrPOjK8GKoVvjfsK7nMcvuYxRUnqislLxy05ml_LnUeoROzxYw2TX-80L71_Kir2mInA7wIHHmTXdGFmQazf_ZbRPUPtaNJy0hFEp_usATsmJtVvfEakYwizbpF4lvIQww7m38trsU9T6omyBeO8InzxzKE29YbL1-hSQFbySSE_ydfuZegN9PRO-QKBr-Z9CKP7xR78jrbufV5un5_7opwQhH0qBM4N41Cl9JQDXLYnul5x-RU31TYw63S09FF5dKjr5m2kn86theAaAv7dywBhJqDF_-Ce3jmiFkx8dU-S3-F1ekXbX_w==",
    "PUK":"MIIBIjANBgkqhkiG9w0BAQEFAAOCAQ8AMIIBCgKCAQEApxSSgaov3q+KqytU3aWNTVF3aUdW6BQH428wM+g0oGYUBPlmMqv9EfeBDmGzk/52JAgqeB2+JJWiF5VON6nUks4rX6yjql2xk60V1I0+O6l4fpaKHGGaKT89uWkZDCrfXG4K1ldldA0tNEvLgLXknnLiOkVJ7KRdDxjXnGvBTgEhP80YOuqKN38qAbtzaUHhKPTJYUYxEjR0dNKhePa2QwVOUeY+QmKTmOgFNq/CkkAfS0rGkGGsV/DdejtYfJb4Vc7L6V9cYijyEWLhmSRmAOwtNkz0NunkVwNX6L3tWwNZehRwFQ+vqMMjloF0HyK4HlfPD0nbU8RILa/Z6G8VaQIDAQAB",
    "clientapprovalstatus":"accept",
    "usercode":"adminuser@hidglobal",
    "deviceid":11109
}
The following information is available in the payload:
-
domain - the tenant ID in which the user is registered
-
usercode - the user's external ID
-
clientapprovalstatus - the user's response (it can be "accept", "deny" or "report", see the default approval status in Advanced Configuration for HID Approve)
-
deviceid - the device ID of the device on which the action was performed
-
PUK - the public key used to verify the JWS value
-
JWS - a signed JWT containing details about the transaction
It can be verified using the PUK.
If we decrypt the JWS in the example, we obtain the following details:
Copy{
"clientapprovalstatus": "accept",
"tds": "myTransactionContent",
"txcounter": "11"
}-
tds - message displayed on the device during the action
-
txcounter - counter of the number of operations made on the device
-
If we decrypt the signed and encrypted id_token, we obtain the following information:
Header :
{"alg": "R256"}
Payload :
{
    "at_hash": "pW95YDc_pqN7_9vtqlXePw",
    "sub": "adminuser@company",
    "result": 1,
    "reason": "Reason not defined",
    "JWS":"eyJ0eXAiOiJKV1QiLCJhbGciOiJSUzUxMiJ9.eyJjbGllbnRhcHByb3ZhbHN0YXR1cyI6ImFjY2VwdCIsInRkcyI6Im15VHJhbnNhY3Rpb25Db250Z W50IiwidHhjb3VudGVyIjoiMTEifQ==.mSt8ln-hh9rNbdci-5bdUTLhN69DyDzqrPOjK8GKoVvjfsK7nMcvuYxRUnqislLxy05ml_LnUeoROzxYw2TX-80L71_Kir2m A7wIHHmTXdGFmQazf_ZbRPUPtaNJy0hFEp_usATsmJtVvfEakYwizbpF4lvIQww7m38trsU9T6omyBeO8InzxzKE29YbL1-hSQFbySSE_ydfuZegN9PRO-QKBr-Z9C P7xR78jrbufV5un5_7opwQhH0qBM4N41Cl9JQDXLYnul5x-RU31TYw63S09FF5dKjr5m2kn86theAaAv7dywBhJqDF_-Ce3jmiFkx8dU-S3-F1ekXbX_w==",
    "PUK":"MIIBIjANBgkqhkiG9w0BAQEFAAOCAQ8AMIIBCgKCAQEApxSSgaov3q+KqytU3aWNTVF3aUdW6BQH428wM+g0oGYUBPlmMqv9EfeBDmGzk/52JAgqeB 2+JJWiF5VON6nUks4rX6yjql2xk60V1I0+O6l4fpaKHGGaKT89uWkZDCrfXG4K1ldldA0tNEvLgLXknnLiOkVJ7KRdDxjXnGvBTgEhP80YOuqKN38qAbtzaUHhKPTJYU EjR0dNKhePa2QwVOUeY+QmKTmOgFNq/CkkAfS0rGkGGsV/DdejtYfJb4Vc7L6V9cYijyEWLhmSRmAOwtNkz0NunkVwNX6L3tWwNZehRwFQ+vqMMjloF0HyK4HlfPD0 8RILa/Z6G8VaQIDAQAB",
    "iss": "",
    "aud": "4973518669523453427542728266963461944561358816",
    "urn:openid:params:jwt:claim:auth_req_id": "ebcre4e1",
    "auth_time": 1590023743,
    "exp": 1590027343,
    "iat": 1590023743,
    "clientapprovalstatus": "accept",
    "deviceid": 11109
}In addition to the details listed above, the following information is available in the payload:
-
at_hash - hash value of an access token in the CIBA response payroll
-
sub - the subject identifier which is intended to be used by Client ID
-
iss - contains scheme, host, and optionally, port number and path components and no query or fragment components
-
aud - audience for which the id_token is intended
-
urn:openid:params:jwt:claim:auth_req_id - the request identifier
-
auth_time - the time of the end-user authentication
-
exp - the expiration time on or after which the ID Token must not be accepted for processing
-
iat - the time at which the JWT was issued
For further information, see Configuring CIBA Feedback.
One-Time Password
A bearer token of a Client ID, obtained by authenticating the Client ID against the OpenID API
A user created with an HID approve device ready to be used (see Onboard an end user with HID Approve)
The internal ID of the user and the device ID (see Get user ID and client ID)
This flow is similar to the challenge/response flow described in User authentication with Device OTP.
The main difference is the authentication policy to use where HID Approve requires the AT_EMPOTP policy.
-
The user opens the HID Approve app and clicks Generate to obtain an OTP.
-
Depending on the policy of the device type used, the app might prompt the user for their password protecting the service (defined at activation).
Sample request to authenticate the user with the generated OTP
POST https://[base-server-url]/idp/{tenant}/authn/token HTTP/1.1
Authorization: Bearer YOUR_BEARER_TOKEN
Content-Type: application/x-www-form-urlencoded
mode=SYNCHRONOUS&grant_type=password&username=jsmith@company.com&password=661107&authType=AT_EMPOTP
Where:
-
The value of the password parameter is the OTP.
-
The returned response is an access token, allowing you to use the HID Authentication Service APIs and identifies your user's unique session:
Copy{
"access_token":"lGBtAgAAAW\/HiyXZD564ASD0+rjBFEKypV8553Q",
"token_type":"Bearer",
"expires_in":86400
}
Challenge/Response
A bearer token of a Client ID, obtained by authenticating the Client ID against the OpenID API
A user created with an HID approve device ready to be used (see Onboard an end user with HID Approve)
The internal ID of the user and the device ID (see Get user ID and client ID)
This flow is similar to the challenge/response flow described in User authentication with Device OTP.
The main difference is the authentication policy to use where HID Approve requires the AT_EMPOTP policy.
In the following example, the internal user ID is 11072 and the device ID is 11093.
The first step is to send a request to the HID Authentication Service to generate a secret code (the challenge):
Sample request
POST https://[base-server-url]/scim/{tenant}/v2/Authenticator/11072.AT_EMPOTP HTTP/1.1
Authorization: Bearer YOUR_BEARER_TOKEN
Content-Type: "application/scim+json"
{
    "schemas":[
        "urn:hid:scim:api:idp:2.0:Action" ],
    "urn:hid:scim:api:idp:2.0:Action":{
        "action":"DEVICE-CHALLENGE",
        "attributes":[
        {
            "name":"DEVICE.ID",
            "value":"11093" },
        {
            "name":"CHANNEL",
            "value":"CH_EXTRAPP" }
        ]
    }
}
The response contains the challenge (in this example, 125986):
Sample response
{
    "schemas":[
        "urn:hid:scim:api:idp:2.0:Action" ],
    "attributes":[
    {
        "name":"CHALLENGE",
        "type":"string",
        "value":"125986",
        "readOnly":false
    },
    {
        "name":"CHALLENGE.ID",
        "type":"string",
        "value":"14040",
        "readOnly":false
    },
    {
        "name":"REQUEST.STATUS",
        "type":"string",
        "value":"1",
        "readOnly":false
    },
    {
        "name":"REQUEST.REASON",
        "type":"string",
        "value":"-1",
        "readOnly":false
    },
    {
        "name":"REQUEST.ERROR_MESSAGE",
        "type":"string",
        "readOnly":false
    }
    ]
}
The second step is to ask the user to enter this challenge on their device:
-
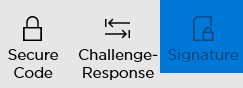
The user switches the authentication flow by selecting the icon displaying two arrows.
 Note: On the HID Approve for Windows 10 app these icons are located in the top-right corner of the application. On mobile devices, the app icons are located at the bottom of the screen.
 -
After entering the challenge received from the HID Authentication Service, the user clicks Generate.
-
Depending on the policy of the device type used, the app might prompt the user for their password protecting the service (defined at activation).
-
A secure code (in this example, 50966367) is generated in response to the challenge.
The last step is to send this new code to the HID Authentication Service:
Sample request
POST https://[base-server-url]/idp/{tenant}/authn/token HTTP/1.1
Authorization: Bearer YOUR_BEARER_TOKEN
Content-Type: application/x-www-form-urlencoded
mode=ASYNCHRONOUS&grant_type=password&device_id=11093&username=jsmith@company.com&password=50966367&channel=CH_EXTRAPP&authType=AT_EMPOTP
The returned response is an access token, allowing you to use the HID Authentication Service APIs and identifies your user's unique session:
{
    "access_token":"lGBtAgAAAW\/HnaSRqAXCsnXE29cXEy1CE5JRgF0D",
    "token_type":"Bearer",
    "expires_in":86400
}
Transaction Signing
A bearer token of a Client ID, obtained by authenticating the Client ID against the OpenID API
A user created with an HID approve device ready to be used (see Onboard an end user with HID Approve)
The internal ID of the user and the device ID (see Get user ID and client ID)
This flow is similar to the challenge/response flow described in User authentication with Device OTP.
The main difference is the authentication policy to use where HID Approve requires the AT_EMPOTP policy.
A possible use case for this operation is the validation of a bank transaction:
-
The bank website displays data fields such as AccountID, Amount and TransactionId, and their values.
-
The user enters these values into the HID Approve app which generates a secure code.
-
This secure code is then used to authenticate the user/transaction.
The first step is to display the fields with the values and to wait for the user to generate the secure code.
In the following example, the device ID is 11093 and the bank website displays the following information:
AccountID: 1122
Amount: 3344
TransactionId: 5566
The second step is to ask the user to enter the values on their device:
-
The user switches the authentication flow by selecting the icon displaying a document with a lock.
 Note: On the HID Approve for Windows 10 app these icons are located in the top-right corner of the application. On mobile devices, the app icons are located at the bottom of the screen.
 -
After entering the values in the corresponding fields, the user clicks Generate.
-
Depending on the policy of the device type used, the app might prompt the user for their password protecting the service (defined at activation).
-
A secure code (in this example, 02236855) is generated for the signature.
The last step is to authenticate the user/transaction:
Sample request
POST https://[base-server-url]/idp/{tenant}/authn/token HTTP/1.1
Authorization: Bearer YOUR_BEARER_TOKEN
Content-Type: application/x-www-form-urlencoded
mode=SIGNING&grant_type=password&device_id=11093&username=jsmith@company.com&password=02236855&channel=CH_EXTRAPP&authType=AT_EMPOTP&context=sign1%3A1122%3Afalse%20sign2%3A3344%3Afalse%20sign3%3A5566%3Afalse&noToken=1
Where:
-
The password is the secure code generated by the device after entering the values
-
The context has the format:
context=PARAM1:VALUE1:isForAUDIT PARAM2:VALUE2:isForAudit PARAM3:VALUE3:isForAudit
Where:
-
PARAM1, PARAM2 and PARAM3 should be respectively sign1, sign2 and sign3
-
VALUE1, VALUE2 and VALUE3 are the values of the fields entered on the device (in this example, 1122, 3344 and 5566)
-
isForAudit can be true or false to define if the authentication will appear in the audit
-
-
noToken is a common parameter for the OpenID token endpoint to define if a token is created for the user (0 = token is created, 1 = token is not created)
It is useful if your application just needs to validate the password without generating a session each time.
-
Do not forget to individually URL-encode each context parameter VALUE and then URL-encode the full context
For example, if the context=sign1:1122:false sign2:33:44:false sign3:55+66:false&noToken=1, the encoded format is:
sign1%3A1122%3Afalse%20sign2%3A33%253A44%3Afalse%20sign3%3A55%252B66%3Afalse&noToken=1
-
All special characters are supported as long as they are URL-encoded in the context
When noToken=0 (token created for the user), the returned response is an access token, allowing you to use the HID Authentication Service APIs and identifies your user's unique session:
Sample response when noToken=0 (session created for the user):
{
    "access_token":"lGBtAgAAAW\/HpnNwqw3oNwNrqNasdJ2vYezNPPDLG",
    "token_type":"Bearer",
    "expires_in":86400
}When noToken=1 (no token created), the response is:
{"access_token":"IA==","token_type":"Bearer"}UserID-Less Authentication
A bearer token of a Client ID, obtained by authenticating the Client ID against the OpenID API
A user created with an HID approve device ready to be used (see Onboard an end user with HID Approve)
QR code scanning must be enabled in the HID Approve application
Users can also authenticate to browser-based apps by scanning a QR code directly from within HID Approve.
In this use case, the initial authentication request is userID-less (that is, it does not contain a user ID or device ID).
The logon or action parameters are passed to the application through a notification, allowing the user to sign this data with their private key.
The request is then associated to the user when they respond to the push notification (approve/deny).
-
The user requests to log on to your bank’s web portal using an userID-less option (for example, a 'sign in' link).
-
The bank's web application client calls HID Authentication Service to submit the request with an ID token that does not contain user or device information.
-
HID Authentication Service generates a signed userID-less JWT containing the:
- Challenge (Logon request) Identifier
- Security domain, channel and authentication details
- Possible approval status
-
The web app displays the JWT as a userID-less QR code.
-
The user scans the QR code either with HID Approve or via an external camera.
Now that we identified the device on which we want to send the Push notification, we can call the bcauthorize endpoint to actually send the message. The flow is described in Push Notification.
When the user approves (or declines) the request, the logon validation data and status is signed with the user’s private key. It is this step that associates the authentication request with the user.
Direct Client Signature (DCS) Authentication
A user created with an HID approve device ready to be used (see Onboard an end user with HID Approve)
The internal ID of the user and the device ID (see Get user ID and client ID)
Direct Client Signature (also known as client-initiated public key authentication) allows client mobile applications to directly initiate a synchronous authentication request using the user’s associated public key to sign the request.
This flow improves the security and user experience of the authentication process. It reduces reliance on less secure methods, such as OTP and symmetric keys, and minimizes synchronization issues.
The fully synchronous workflow, allowing the client-side (mobile) to initiate the operation when needed without any dependency on the back end, streamlines the initial authentication flow for business applications.
The flow is similar to that of the transaction signature, with the important difference that the creation of a transaction is not required by the back end at the start of the workflow. This provides a less complex integration without need for the middleware layer to maintain session and state information related to the authentication operation.
For auditing and verification purposes (including CIBA polling), a transaction is generated at the signing.
-
As there is no pre-existing transaction, generate a new authentication request on the client using generateAuthenticationRequest via the HID Approve SDK.
-
After validating the device's signature, the server creates a new Authentication Request challenge corresponding to the operation.
-
As with a regular transaction, the signing operation is audited and a CIBA feedback event is generated (using the positive status, corresponding to first status value in the credential’s client approval list) for the signed authentication request.
See also:


