Quick Start Guide
Check the Shipment Contents
Your package should include the following:
-
ActivID Appliance, rack mount kit and two power cables.
-
License Agreement and the Quick Start Guide (printed version)
Meet the Prerequisites
-
ActivID Appliance hostname and domain name, registered in DNS
-
ActivID Appliance IP address (this is a statically assigned IP address)
-
Netmask and Default gateway
-
1U rack space
-
Power and network connectivity
-
Terminal Display
-
Keyboard and mouse with USB connectors
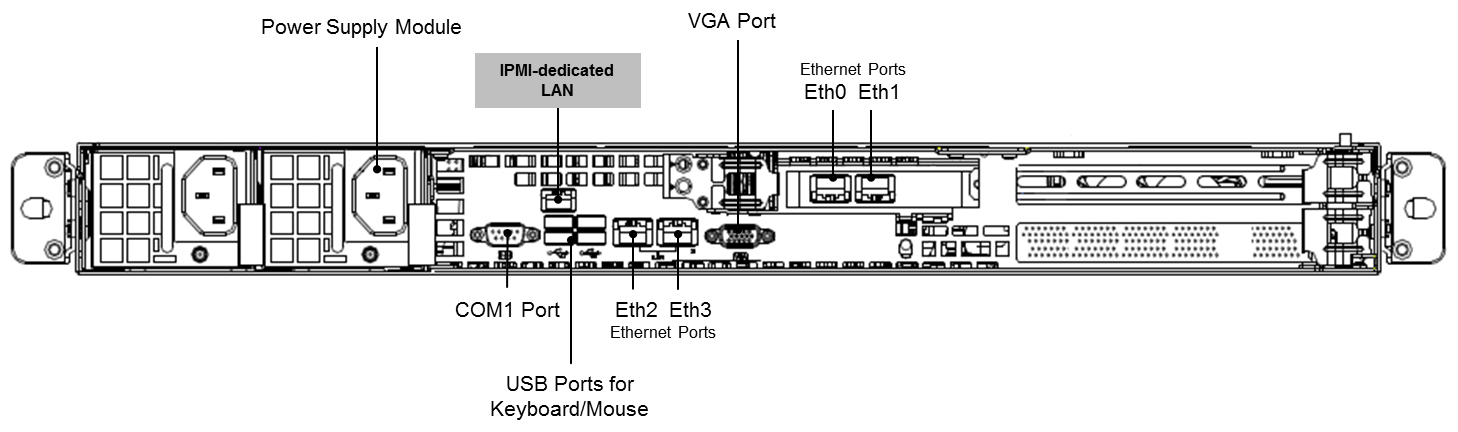
Mount the Appliance and Connect the Cables
-
Only trained and qualified personnel should install, replace, or service this equipment.
-
Do not power on the appliance until all appliance connections are completed.
-
Observe standard precautions for handling electrostatic sensitive devices.
-
Mount the appliance.
-
Connect the monitor connector to the VGA Port.
-
Connect a keyboard to a USB port.
-
Connect a mouse to a USB port.
-
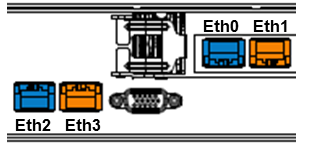
Connect the network cables to the Eth0 and Eth2 ports as minimum for failover on the two network adapter cards.
For full redundancy, connect all four ports.
 Important: HIGHLY RECOMMENDED FOR SECURITY Connect a separate cable to the IPMI-dedicated LAN, as illustrated above.
 -
Connect both power cords to the appliance and plug in the other ends to the power source.
-
Power on the appliance using the main power button
 on the front panel.
Set the Keyboard Layout
This is not a remote operation. It requires a direct connection to the ActivID Appliance.
After the appliance boots up, the UNIX Terminal is displayed.
-
In the terminal, press Enter.
-
At the prompt, enter your keyboard layout and press Enter.
By default, the appliance is configured with English (us) keyboard layout.
Set the Initial Network Configuration
You must configure initial network settings before you can initialize the appliance.
For details and illustrations, see Configuring the Initial Appliance Settings.
-
In the terminal, log on as the ActivID Appliance administrator (appadmin).
You are prompted to change the default password.
-
Enter the current (default) password (password01).
-
Enter and confirm a new password.
Important:Make sure you keep a record of the password
The password must contain a minimum of 6 characters
-
Enter the fully qualified hostname of the machine hosting the ActivID Appliance, and then press Enter.
Important:Make sure that this name does not contain the _ character as it is not supported by DNS
The maximum length of the hostname is 46 characters
-
Enter the IP address of the machine, and then press Enter.
-
Enter the netmask of the machine, and then press Enter.
-
Enter the address of the default gateway, and then press Enter.
-
Enter the IP address of the DNS server, and then press Enter.
If you want to enter other DNS servers, enter y when prompted to configure more servers.
Otherwise, enter n.
-
Review the configuration.
-
When prompted, enter y to confirm the configuration is correct, and then press Enter.
Install ActivID Appliance 8.6
If you are installing ActivID Appliance 8.6 on a virtual machine, make sure that at least 16 GB RAM is allocated to the VM
The update packages specified below are available for upload
They can be obtained from HID Global Technical Support or on the ActivID Appliance Service Pack delivery disks (in the ActivID-Service-Pack folder)
-
From any browser, access the ActivID Console using the following URL:
https://<appliance-hostname>:1005
The first time you access the ActivID Console, you are prompted to trust the connection to the site.
-
Click Proceed to <appliance site>.
-
Enter the credentials for the Appliance Administrator account (appadmin and the password you set during the initial configuration using the UNIX terminal).
-
Go to the ActivID Console’s Software Update page and install the:
-
ActivID Public Key (ActivID_Public_Key_DIDS1802002.rpm)
-
ActivID Appliance 8.0.1 (8.0 SP1) (ActivID_Appliance_8.0_SP1.rpm)
-
-
Reboot the appliance.
-
Install the ActivID Appliance 8.2 (8.0 SP2) (ActivID_Appliance_8.0_SP2.rpm) as a Software Update and reboot the appliance.
-
Install the ActivID Appliance 8.3 (8.0 SP3) (ActivID_Appliance_8.0_SP3.rpm) as a Software Update and reboot the appliance.
-
Install the ActivID Appliance 8.4 (8.0 SP4) (ActivID_Appliance_8.0_SP4.rpm) as a Software Update and reboot the appliance.
-
Install the ActivID Appliance 8.5 (8.0 SP5) (ActivID_Appliance_8.0_SP5.rpm) as a Software Update and reboot the appliance.
-
Install the ActivID Appliance 8.6 (8.0 SP6) (ActivID_Appliance_8.0_SP6.rpm) as a Software Update and reboot the appliance.
Initialize the ActivID Appliance (Full)
-
Log on to the ActivID Console and under Appliance in the left-side menu, select Dashboard.
The ActivID Appliance License Agreement is displayed.
-
Accept the agreement and click Next.
-
In the Initialization section of the Dashboard, select Full installation to install all the ActivID applications.
The deployment of the Authentication Services and the database are enforced.
To install only the ActivID Front Ends (ActivID Management Console, Self-Service Portal and RADIUS Front End), follow the instructions in Initialize the ActivID Appliance (Front End).
Important: After successfully setting the appliance installation type (Full or Front End), you cannot change it unless you reset the appliance to the factory settings (for hardware versions) or revert to the Initial backup (for virtual machines). -
Click Initialize.
The configuration process might take several minutes.
When the installation is complete, the appliance Dashboard is displayed.
-
Under Configuration in the left-side menu, select Security Domains (or click Go to Security Domains in the Dashboard).
-
To add a security domain, click Add.
Note: Adding a domain causes an interruption of service and the process might take several minutes.When you create a new security domain, it adds a new set of data to your deployment.
This data is specific to your domain and is defined by the dataset you chose when creating the domain (for example, the default users and permissions included in the dataset).
-
Enter the Domain Name, select the Dataset from the drop-down list and, optionally, enter a Description.
Important: To add a new security domain, you must observe the following rules when creating the domain name:Must contain alphanumeric characters
Must not contain any of these special characters !#%&()+"'<>?*
Must not start with a numeric character
Must be a maximum of 20 characters
Must not be a variation of an existing security domain name using a different case for one or more characters (for example, do not use Onlinebank when ONLINEBANK already exists)
Oracle reserved keywords are not allowed (that is "SELECT", "ONLINE", etc.)
-
Enter and confirm the password for the ActivID Initialization User (ftinit).
Important: This user is the pre-defined administrator account for the security domain. Make sure you keep a record of the password.The password must:
-
Contain at least one alphabetic and one numeric character
-
Contain at least 3 different characters
-
Be a maximum of 20 characters
-
Be a minimum of 10 characters
-
Be different from any previous password
-
Not contain blacklisted or user-related words
-
Not be a sequence of letters or numbers
-
Not be password01
-
-
Then click Add.
-
Repeat the previous step to create additional domains.
-
Then click Save.
-
Click Ok when the creation process is complete.
-
Under Appliance in the left menu, select Dashboard and then review the appliance status.
When you have completed all the previous steps, go to Your First Steps.
Optional Steps
Configure an External HSM
If you want to integrate a network Entrust® nShield® Connect HSM (all versions) as an external HSM with the ActivID Appliance, you can install and configure the HSM as described in Integrating an External Hardware Security Module (HSM).
Enable Security Domains for RADIUS Front End
If you want to use the ActivID RADIUS Front End, you can activate the service on all or a subset of the security domains as described in Enable Security Domains for RADIUS Front End (Optional).
You can also configure the ActivID RADIUS Front End for the push-based solution.
Configure the ActivID Application Ports
If you want to customize the URLs for the ActivID applications and services by defining the access ports, you can use the ActivID Console.
Initialize the ActivID Appliance (Front End)
The ActivID Authentication Services have already been initialized on the back-end appliance(s) using the Full installation option.
You know passwords for the ftinit accounts associated to the security domains(s) that the front-end installation will join.
Download the Appliance Root CA certificate for the back-end appliance (or the CA certificate if you customized the back-end TLS server certificate) and make sure that it is accessible from the system where you will install the front-end appliance..
You have configured the appliance network using the ActivID UNIX Terminal.
-
Log on to the ActivID Console and go to the Dashboard.
The ActivID Appliance License Agreement is displayed.
-
Accept the agreement and click Next.
-
In the Initialization section of the dashboard, select Front-End installation.
Important: After successfully setting the appliance installation type (Full or Front End), you cannot change it unless you reset the appliance to the factory settings (for hardware versions) or revert to the Initial backup (for virtual machines). -
For the back-end appliance where you installed the ActivID Authentication Services:
-
Enter the hostname
-
Enter the https port
-
Upload the SSL Server Root CA Certificate (the Appliance Root CA Certificate or the customized CA certificate that you downloaded before starting the installation).
-
-
Click Initialize.
-
Under Configuration in the left-side menu, select Key Stores.
-
Download the Appliance Root CA Certificate for the front-end appliance that you will need to upload to the back-end appliance.
-
Log on to the ActivID Console for the back-end appliance and, under Configuration in the left-side menu, select Key Stores.
-
Browse to the Appliance Root CA Certificate for the front-end appliance and click Import.
-
Under Configuration in the left-side menu, click Applications, and then click Restart all Applications to establish the trusted connection to the front-end appliance.
-
Return to the ActivID Console for the front-end appliance and, under Configuration in the left-side menu, click Security Domains.
-
Click Join.
-
Enter the name(s) of the Security Domains and the Password(s) for the corresponding ftinit users that the front-end installation should join.
You can join all or only a subset of the security domains.
Important: The names of the security domains must be exactly as defined in the back-end appliance (including upper or lower case). -
If you want to deploy the ActivID RADIUS Front End on one or more security domains, under Configuration in the left-side menu, select RADIUS Front End.
-
Select the checkbox(es) of the domain(s) that you want to activate for RADIUS Front End and click Activate on domain(s), and then click OK.
-
Under Appliance in the left-side menu, select Dashboard and then review the appliance status.
When you have completed all the previous steps, go to Your First Steps.


