Configuring the Operator Workstation
This section describes how to configure the operator workstation for issuing devices. For detailed instructions about using the ActivID CMS Operator Portal to issue devices, refer to Issuing Devices.
The following table lists the actions required to configure the workstation. Refer to ActivID CMS System Environment for the list of supported environments.
|
Action |
See |
|---|---|
|
Run one of the following supported Windows operating systems.
|
N/A |
|
Install ActivClient 7.1 (or higher version) middleware and a smart card reader. If using ActivID CMS to issue cards via PKCS #11, then install the associated PKCS #11 middleware instead of ActivID ActivClient. Important: Starting with ActivID CMS 5.8, the ActivID ActivClient middleware is no longer required.
|
|
|
Install a biometric service provider (optional, for government use only). |
N/A |
|
Install credentials for the first operator. |
Section Install Credentials for the First Operator on the Workstation |
|
Connect a printer and its drivers. |
Section Card Printers |
|
Configure the card printer settings. |
|
|
Install printing software on the printer to print user information (for example, name, picture) on a smart card during device issuance. ActivID CMS supports Asure ID® (to print with FARGO® printers). |
The appropriate manufacturer’s documentation for installation instructions. |
Users must be able to:
-
Log on to, and have administrator privileges on, the workstation.
-
Download signed .cab files or .jar files from the ActivID CMS server.
-
Download and set up client components (.dll and .jar files) and connect to the CA and the CA directory to set up Entrust Profiles.
Install Credentials for the First Operator on the Workstation
Credentials are the PKI keys and digital certificate that are used by the first operator to connect to ActivID CMS. Transport Layer Security (TLS) 1.2 with mutual authentication (client and server) is the authentication method used. If you chose to have the system automatically generate certificates for your SSL connection, then follow the steps below to install the client credentials for the first operator on the workstation.
-
The path for the default folder location containing the credentials is %PROGRAMDATA%\HID Global\Credential Management System\Local Files\Certificates.
-
The client.pfx and server.pfx files are protected by the password hidglobal.
-
Copy the certificates to your workstation (see Required Certificates).
-
Import the CA The Certificate Authority (CA) issues and manages security credentials and public keys for message encryption in a networks environment. root certificate and the client.pfx file into your browser. For more information, refer to Managing Operators.
Important: The URLs for the Operator Portal and User Portal must both be added as Trusted Sites in the user’s browser. -
Connect ActivID CMS on a workstation and do the following:
Install credentials for the first operator on the workstation.
Have a device available for issuance.
Issue a device to the first operator that contains the operator’s PKI credentials (keys and certificate) used for SSL connection to the ActivID CMS Operator Portal. The operator uses the credentials stored on the device instead of the credentials stored on the workstation, which increases the level of security.
For detailed procedures about issuing a device, refer to Issuing Devices.
-
Connect to ActivID CMS as the first operator using credentials stored on the workstation.
-
Add a directory.
-
Declare a CA.
-
Create a user group containing the first operator.
-
Create a device policy containing at least one PKI application. The credentials that are stored in this application must be usable for authentication to ActivID CMS (that is, should be usable as a client certificate for SSL).
-
Assign the device policy to the user group created in step 4.
-
Issue the device to the first operator using the local issuance process. (Write down the device PIN. It is required for authenticating to the ActivID CMS Operator Portal.)
-
Enroll the first operator. Assign the Administrator role (full access rights) to the operator.
Once you have issued a device to the first operator, it is recommended to remove the first operator’s credentials (client.pfx file) from the ActivID CMS workstation.
If the operator has not been enrolled correctly, you are automatically redirected to the User Portal. In this case, register the first operator’s credentials on the workstation, connect to the ActivID CMS Operator Portal, and then enroll the first operator.
Follow the instructions provided in the browser documentation for removing installed certificates.
Check to be sure that the device you issued to the first operator (see Issue a Device to the First Operator ) is working correctly.
-
Insert the operator’s device into the smart card reader (where applicable) on the client workstation.
-
Connect to ActivID CMS using the URL and designated operator port.
-
Ask the operator to enter their device PIN.
The system then authenticates the user with the certificate stored on the operator’s device. If the operator has been enrolled correctly, he/she is able to access ActivID CMS as an administrator (full rights).
For information about advanced configurations, see Advanced Configuration.
Card Printers
The only supported firmware for FARGO printers is HID Asure ID. Make sure that the latest printer driver and firmware is installed on the workstation to which the printer is attached. For more information, visit the vendor's website.
For more information about supported printer models and software version, refer to ActivID CMS System Environment. For information about using these products, refer to Configuring ActivID CMS for Printing.
Install and Configure a FARGO Printer
-
Turn on the card printer.
-
Turn on the workstation connected to the card printer.
-
Download the latest version of the printer driver.
-
From the Start menu, select Control Panel, and then select Printers. Make sure you can see the printer.
-
Check that your printer reader is recognized by the workstation. Perform the following steps:
-
From the Start menu, click Control Panel, and then click System.
-
In the Hardware tab, click Device Manager, then click Smart Card readers.
-
Look for your printer’s smart card reader, which should be enabled. If not, install the latest driver version for the printer reader.
-
-
Set the printing preferences (see below).
The following examples use the HDP600, but the process is the same for all supported FARGO printers.
-
On the Windows Start menu, click Printers and Faxes.
-
Right-click the icon for the printer you are using, and then click Printing Preferences.
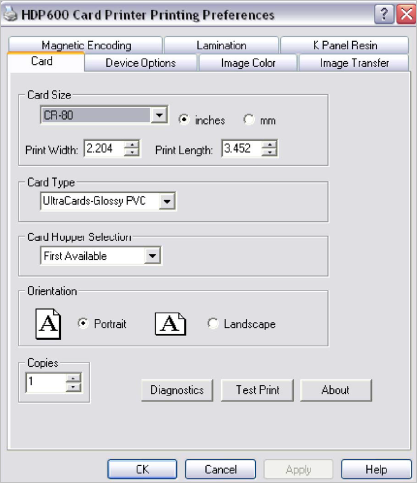
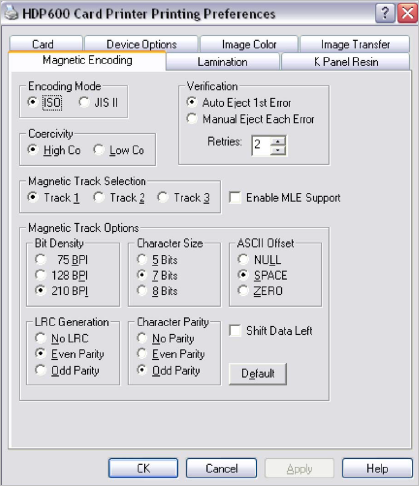
The HDP 600 Card Printer Printing Preferences dialog box appears:
-
On the Card tab, enter the values in the appropriate fields.
-
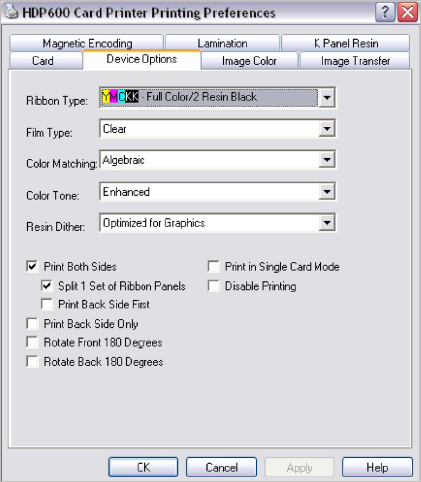
Select the Device Options tab.
-
Enter the values in the appropriate fields.
-
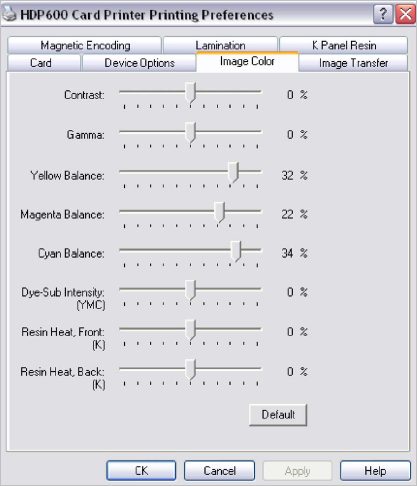
Select the Image Color tab.
-
Enter the values shown in the appropriate fields.
-
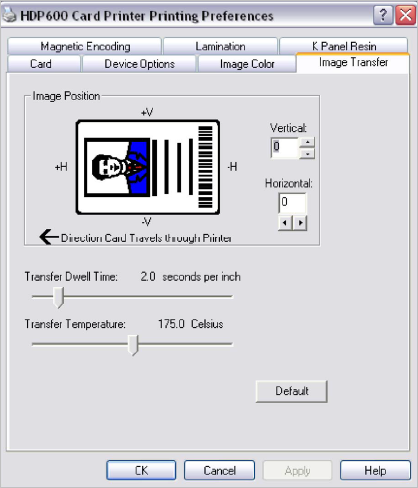
Select the Image Transfer tab.
-
Enter the values shown in the appropriate fields.
-
Select the Magnetic Encoding tab.
-
Enter the values shown in the appropriate fields.
-
Click OK, and then click OK again for every subsequent tab until you return to the Printers and Faxes dialog field.
-
In the File menu, click Close.
The following section uses a FARGO HDP5000 as an example, but the process is the same for all supported FARGO printers.
-
Install the FARGO HDP 5000 printer driver from the software installation package. For detailed instructions about installation, refer to the FARGO HDP5000 High Definition Card Printer/Encoder User Guide available at www.hidglobal.com/documents.
-
Download the Asure ID software from the HID Global website (http://www.hidglobal.com/drivers). You will need a Developers Edition license in order to use Asure ID with ActivID CMS. For instructions about installation and activation, refer to the Asure ID User Guide available at www.hidglobal.com/documents.
-
Configure the ActivID CMS Asure ID Service to establish the communication between ActivID CMS and Asure ID.
-
Copy the content of the Printing/Asure ID Service folder of the ActivID CMS distribution to the local workstation where Asure ID is installed and connected to the printer.
-
Optional- The ActivID CMS Asure ID Service uses the port 9443 by default. You can change this port number if it is already used on the workstation. To change the default port, set the environment variable as follows:
 Copy
CopySet ASURE_ID_SERVICE_PORT=<YOUR_NEW_PORT> -
Double-click on CMS_AsureID_Service.vbs to install the service.
A User Account Control (UAC) dialog box will be displayed to ask for elevation of privileges.
-
-
Configure the card layout. For more information, see Create a Card Layout using Asure ID .
Configuring for Printing
You must perform the following steps:
-
Configure the printer type, refer to Setting Miscellaneous Parameters.
-
Configure ActivID CMS for printing, refer to Configuring ActivID CMS for Printing.
-
Configure user attributes for printing, refer to Setting Parameters for User Attributes.
-
Create a card layout, refer to Creating Card Layouts.
Creating Card Layouts
If you want ActivID CMS to print information on smart cards during issuance, you must create a card layout. This defines how information is printed on smart cards. This includes where and how text appears, as well as the position and size of a picture, if any.
Use the printer workstation for creating card layouts. Although you can create a card layout on any machine, using the same workstation makes troubleshooting problems easier.
To create card layouts, ActivID CMS supports HID Asure ID (for printing with FARGO printers). For information about image capture supported by ActivID CMS, refer to ActivID CMS System Environment.
Create a Card Layout using Asure ID
To create a card layout for the FARGO HDP5000 card printer to use with Asure ID, perform the steps described below on the local printer workstation.
-
Open Asure ID, and start a new project to define the card layout. There is one FARGO HDP5000 Card Printer project per card layout. For instructions about card design, refer to the FARGO HDP5000 High Definition Card Printer/Encoder User Guide available at www.hidglobal.com/documents.
-
Create a card design template using the card design functionality of Asure ID.
-
Save the template to use with the ActivID CMS printer configuration.
The following figure is the sample card design template created using Asure ID:
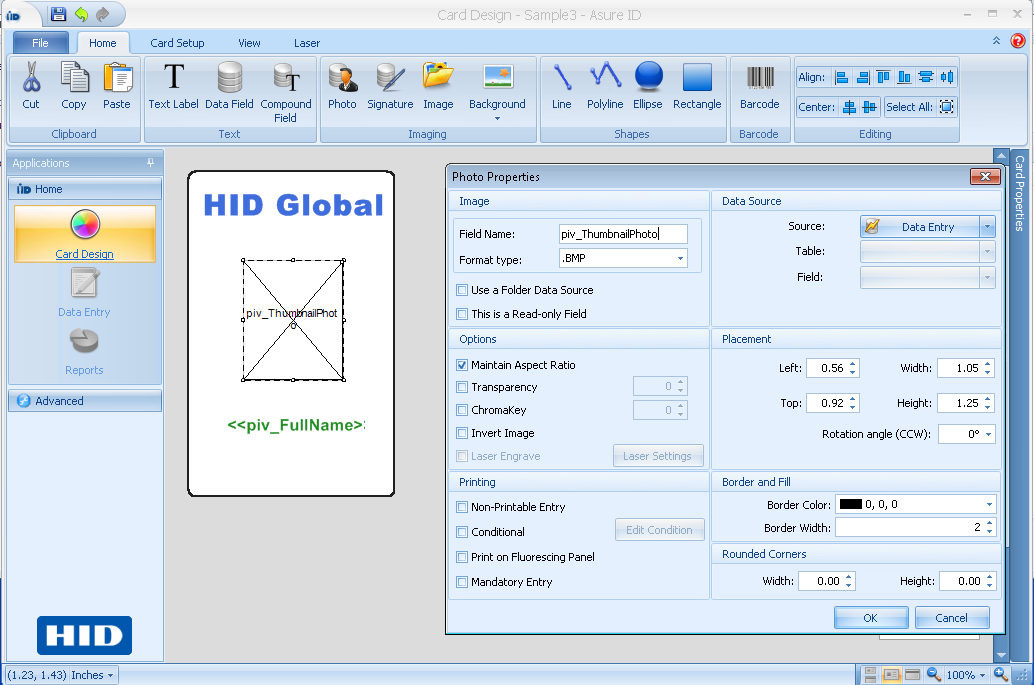
Alternatively, you can use an existing card design template, and import it into Asure ID. Note down the name of the card design layout template to use in the AsureIDService.exe configuration file. The user attributes for printing in the above card layout are obtained from the data generated in ActivID CMS by the Card Production Request (CPR). For example, piv_FullName and piv_ThumbnailPhoto.
You can also enable support for Magnetic Encoding for the card using Asure ID.


