Setting Up Attended Enrollment
The following sections provide instructions for setting up the Attended Enrollment feature of the DigitalPersona LDS Workstation client.
Attended Enrollment is a feature that allows a delegated user, or a member of a delegated user group, to attend and supervise the enrollment of DigitalPersona credentials for other users.
This functionality is an optional feature that can be selected through a Custom installation of the DigitalPersona LDS Workstation client.
Customizing Attended Enrollment
For these later versions, the behavior of Attended Enrollment is governed by the following GPOs which are fully described in Policies and Settings.
The behavior of Attended Enrollment is governed by the following GPOs:
-
Policy Enrollment
-
Authentication of the user being enrolled
-
Security officer authentication
-
Require to complete or omit credential
The workflow and UI behavior of Attended Enrollment can be customized significantly through the related configuration file, DigitalPersona.Altus.Enrollment.exe.config.
For convenience, all options are explained or briefly illustrated within the file itself. However, this section will provide more detailed explanations of the options.
The enrollmentConfiguration section of the file is the only area that should be modified.
Changes to the Custom page definition and other sections may cause the program to malfunction, and should only be done by the HID Global Solutions and Implementation Group.
passwordRandomization
This tag specifies whether the user’s password is randomized during the enrollment process.
<passwordRandomization value="DoNotRandomize" /> <!--DoNotRandomize, RandomizeAlways, MayRandomize-->
Possible values are:
-
DoNotRandomize - (default) Password randomization is not available and the UI offers no option to randomize the user’s password.
-
RandomizeAlways - Password randomization always occurs, and the UI provides the option (on the Advanced Features page) to reset the user’s password.
-
MayRandomize - Password randomization is optional and the UI allows the administrator to choose whether to randomize the user’s password for each user.
See Advanced Features for details on how this affects the Attended Enrollment interface and workflow.
completeAllPages
This tag determines whether or not all displayed credentials must be either enrolled or specifically omitted in order to complete enrollment.
<completeAllPages value="true" /> <!--true, false-->
The default is true. Additional choice is false.
authenticateOfficer... and authenticateUser
There are several tags defining workflow events that can be specified to require authentication by the DigitalPersona Security Officer or the user being enrolled. Default values are shown in the examples below, but if any of these tags are missing, the default for that tag is true.
-
<authenticateOfficerOnStarted value="false" />
Authenticate the Security Officer every time Attended Enrollment is launched.
-
<authenticateOfficerBeforeSave value="true" />
Authenticate the Security Officer each time a credential is saved or credential enrollment page is closed.
-
<authenticateOfficerBeforeSkip value="true" />
Authenticate the Security Officer at omitting user data, once every time a credential page is closed.
-
<authenticateOfficerBeforeDelete value="true" />
Authenticate Security Officer at deleting user data, once every time a credential page is closed or data is deleted.
-
<authenticateOfficerOnCompleted value="true" />
Authenticate Security Officer at completing user enrollment.
-
<authenticateUserOnPageEnter value="true" />
Authenticate the user once at opening each credential page.
-
<authenticateUserOnCompleted value="true" />
Authenticate the user at completing their enrollment.
authenticationPolicyForOfficer
This tag specifies the credentials and credential combinations required for authenticating the DigitalPersona Security Officer.
<authenticationPolicyForOfficer>
<add value="1"/> <!--Password-->
<add value="2"/> <!--Fingerprints-->
<add value="Pin, Otp"/> <!--Contactless Card-->
</authenticationPolicyForOfficer>
Possible values are:
1 - Password
2 - Fingerprint
4 - Smartcard
8 - RecoveryQuestions
32 - Contactless Card
64 - RecoveryPassword
128 - PIN
256 - Proximity
512 - Bluetooth
2048 - OTP-->
userTypes
This tag specifies the types of users to show in the UI, therefore making them available for Attended Enrollment.
<userTypes>
<add value="AD"/> <!--DigitalPersona AD (Windows) users-->
<add value="Altus"/> <!--DigitalPersona Non AD users-->
</userTypes>
The default is to show both types of user. To remove a user type, remove or comment out the associated line.
ExcludedNodes
This tag specifies the GUID for any tiles which should not be shown on the Attended Enrollment Credential Manager page, and therefore those associated credentials which will not be able to be enrolled through Attended Enrollment.
<excludedNodes>
<add userType="AD" value="BCC6142F-CE8B-4B48-B605-342842B3DDDB"/> <!--Photo Capture->
<add userType="AD" value="24FAC572-AE57-45E2-ACCF-4417A44A9F02"/> <!--Custom Page 1-->
</excludedNodes>
The above sample shows the default of not showing the tiles and pages for Photo Capture and for Custom Page 1 when enrolling credentials for DigitalPersona AD users.
If tiles/pages should be excluded for both user types, use the add tag without the UserType parameter, as in the following example.
<excludedNodes>
<add value="BCC6142F-CE8B-4B48-B605-342842B3DDDB"/> <!--Photo Capture->
<add value="24FAC572-AE57-45E2-ACCF-4417A44A9F02"/> <!--Custom Page 1-->
</excludedNodes>
Values for the current set of DigitalPersona pages are as follows.
Password = "DE9F54BE-F6B9-4306-BC67-DDD71B27B35B"
Fingerprints = "CBFFA046-6267-4594-AB5C-11A7B5B97035"
Cards = "4FA5D027-18C9-4766-97B9-CE3C5962476F"
PIN = "B07C25CA-FE67-48F1-AC7D-3B204108F52C"
One-Time Password = "9AC39EB1-FCD3-4207-B98A-5B290B2AB8CA"
Recovery Questions = "A6421E1B-6E67-411B-ABBC-45AE4811E6C6"
Photo Capture = "BCC6142F-CE8B-4B48-B605-342842B3DDDB"
Custom page = "3B797E3F-08E8-44A0-ABF2-C136CC4EEA49"
Custom Pages and DPLdif Utilities
Elements used in the Custom page definition section must already exist in the DigitalPersona LDS database, or be added to the database using the DPLdifUtilities.Builder.exe and DPLdifUtilities.Import.exe server tools. These are located in your DigitalPersona LDS Server product package, in the Server Tools folder.
The DPLdifUtilities.Builder.exe tool can be run on any modern Windows computer. The DPLdifUtilities.Import.exe must be run on the DigitalPersona LDS Server.
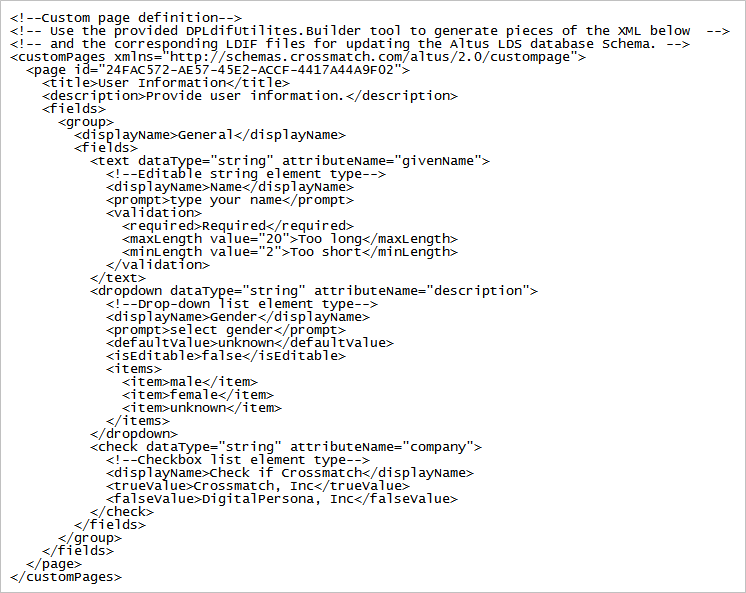
The entire default text of the Custom page section is shown below.
See the next two sections for instructions on using the server tools mentioned above.
DPLdifUtilities.Builder.exe
The DPLdifUtilities.Builder tool provides a GUI-based way to generate the XML for adding new attributes to Attended Enrollment Custom pages, and for creating the LDAP Data Interchange Format (.ldif) file that can be used to add the attributes to the DigitalPersona LDS database.
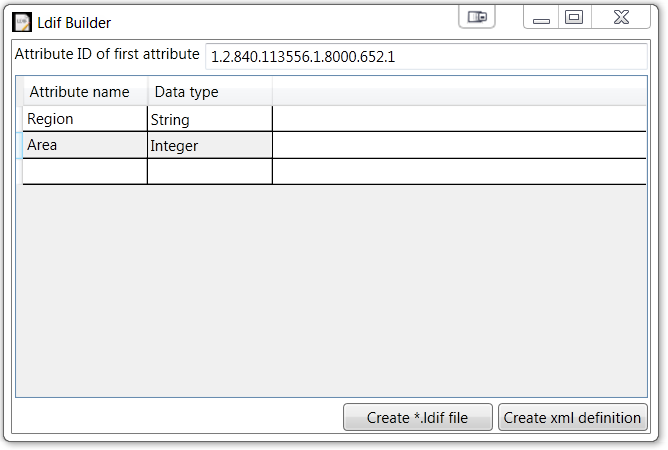
To create new attributes:
-
Enter a name for the new attribute.
-
Select a data type from the Data Type drop-down list.
-
Repeat steps 1 and 2 for each new attribute needed.
-
Click Create xml definition.
-
The necessary xml will be generated and opened in your default text reader (e.g. Notepad). Following the above example, it would look like the image below.

-
These generated attributes can be placed in the DigitalPersona.Altus.Enrollment.exe.config file, in the Custom page definition section, under the <Fields> node. Save the file, or copy the text directly into the configuration file.
-
The next step is to create the LDIF file that will be used to update the DigitalPersona LDS Server’s database. Click the Create the *.ldif file button. Save the file to a location where you can copy it to your DigitalPersona LDS Server. You may want to rename it as well.
Once the associated LDIF file has been created and imported into the DigitalPersona LDS database (see next section), your new attributes and the fields they represent will be operational on the page.
To add validation rules:
-
Add an opening and closing <validation></validation> tag within any <text> tag.
-
Within the validation tag, enter any of the validation rules listed below.
-
Required
-
MinLength
-
MaxLength
-
Number range
-
Regex
DPLdifUtilities.Import.exe
To import your new attributes into the DigitalPersona LDS database:
-
Copy the entire Server Tools folder to the computer where DigitalPersona LDS Server is installed. This will include any .ldif files that you created as well as a required xml file generated by the DPLdifUtilities.Import.exe tool.
-
Ensure that there are no extraneous .ldif files in the folder. The import tool will process any .ldif files found in the directory.
-
Double-click DPLdifUtilities.Import.exe. Or, you can drop any .ldif files on top of the executable.


