Using DigitalPersona Attended Enrollment
DigitalPersona Attended Enrollment allows the DigitalPersona administrator to delegate a user or group to supervise the credential enrollment process.
Supervised (attended) enrollment is the default method of creating DigitalPersona users and enrolling their credentials. However, self-enrollment of user credentials is also an option.
This feature is not installed as part of the typical (default) installation, but must be selected as part of a Custom installation of DigitalPersona LDS Workstation.
Much of the workflow and behavior of the DigitalPersona Attended Enrollment interface is configurable and is defined in the file DigitalPersona.Altus.Enrollment.exe.config file, located in the component’s /Bin folder (by default, C:\Program Files\DigitalPersona\Bin).
It is not a feature of the DigitalPersona Kiosk clients.
Security Officer Identification
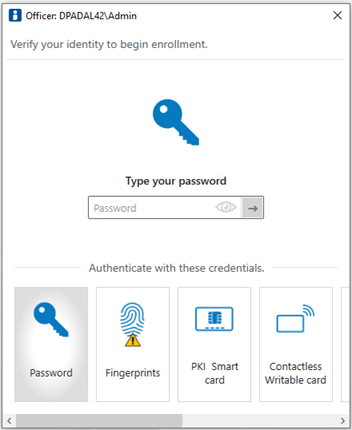
When launching Attended Enrollment, the first screen requires authentication by a DigitalPersona Security Officer.
The Security Officer submits one of their enrolled credentials. When using a Windows password, they can simply click the arrow to the right of the password field. The User Selection page displays.
Additionally, by default, the Security Officer will need to authenticate after enrollment of each credential. This feature can be configured through the governing XML file.
Also, the user being enrolled will need to authenticate at the end of the enrollment process.
The user selection/creation process is slightly different for Non AD users and AD users, as shown in the following pages.
Non AD User Selection/Creation
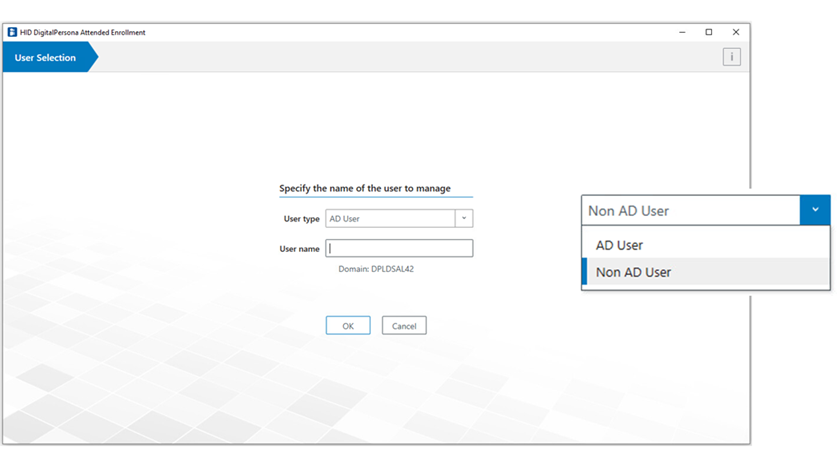
Within a DigitalPersona LDS environment, to select or create a Non AD user:
-
On the User selection page, select Non AD user from the drop-down list.
-
Enter a valid user name and click OK.
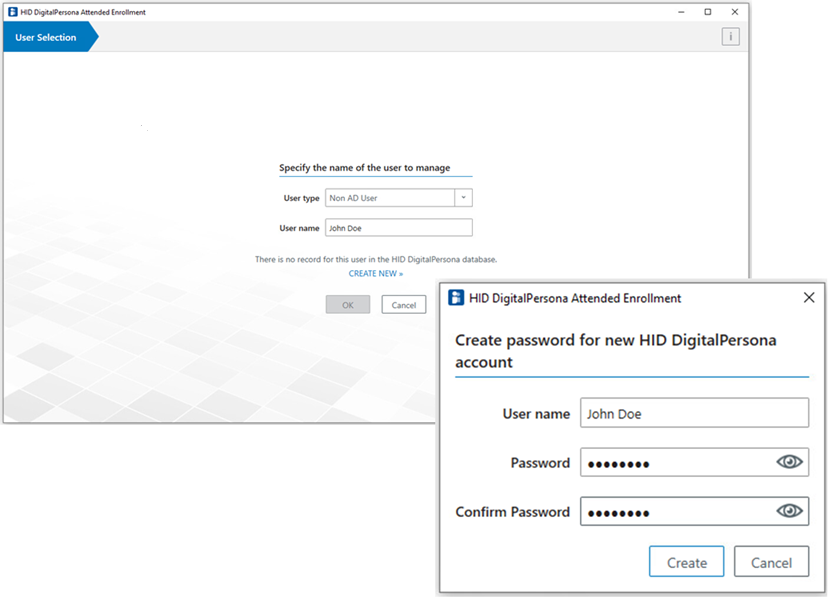
When an entered user name is not found in the DigitalPersona database, you have the option of creating the user at this point (see below).
If you think you have simply misspelled the name, you can edit the name directly on this page. and click OK to search for the user again.
To create a new Non AD user:
-
On the User selection page, select Non AD from the drop-down list.
-
Enter a unique user name and click OK.
If there is no DigitalPersona record for that user name, you can create a new DigitalPersona Non AD user.
-
Click CREATE NEW>>.
-
Have the new user enter and confirm a password.
-
Click Create.
-
On the User creation page, have the new user enter and confirm a DigitalPersona password. Then click OK.
The Credential Enrollment page displays. For further enrollment instructions, see Credential Enrollment.
AD User Selection
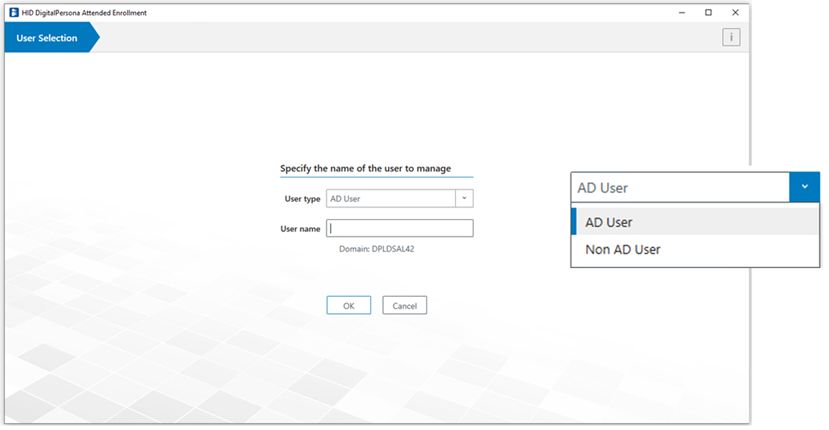
To select an AD user for Attended Enrollment:
On the User selection page, select AD user from the drop-down list.
Credential Enrollment
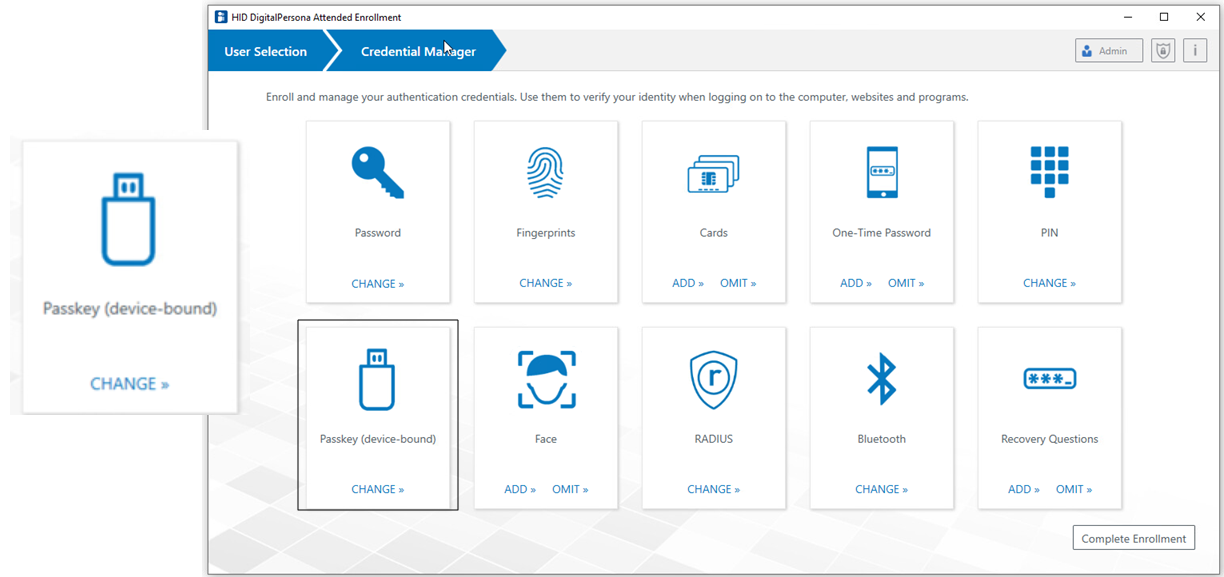
Once a user is selected, the Credential enrollment page displays.
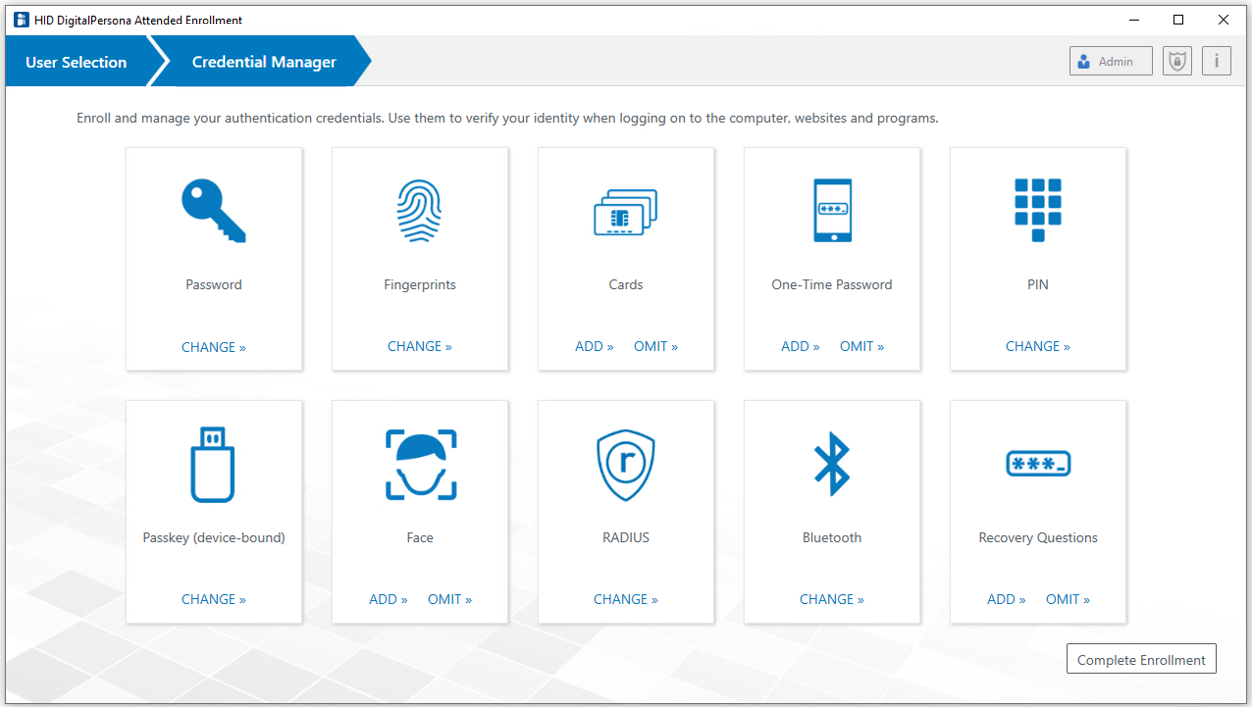
This is the central location within Attended Enrollment where a user’s credentials and other identifying information can be enrolled and managed.
The tiles on the page, representing credentials and other information that may be captured by DigitalPersona in relation to a specific user, give access to pages where this information may be provided.
The DigitalPersona administrator can configure which specific tiles appear on the page, and whether or not they must all be enrolled or omitted before enrollment is complete (see Customizing Attended Enrollment).
By default, in order to complete the initial enrollment for a user, all tiles shown on the page must be visited, and credentials either added (enrolled) or specifically omitted. When information is omitted, the Security Officer must enter a reason for the omission, which is then made part of the user record in the DigitalPersona database. The first portion of the omitted reason will also display on the tile.
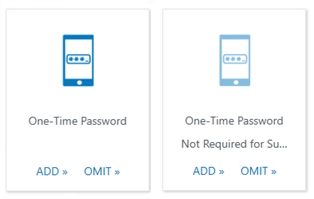
Once a credential has been enrolled, the word ADD will be replaced with CHANGE. When a tile has been marked as omitted, that tile will be dimmed:
When enrolling Bluetooth credentials, the credential will be paired with the machine where attended enrollment is taking place. Supervisors should ensure that the user’s device is then unpaired from the attended enrollment machine, since only seven devices can be paired to a single machine per the Bluetooth standard. In practice, usually no more than three or four are recommended. Users will need to pair their Bluetooth device with any computer where they will be using it as a credential.
The Credential Enrollment workflow is the same for both DigitalPersona AD and Non AD users, but the UI and the user experience is different depending on whether a single print fingerprint reader or a ten print scanner is being used for enrollment.
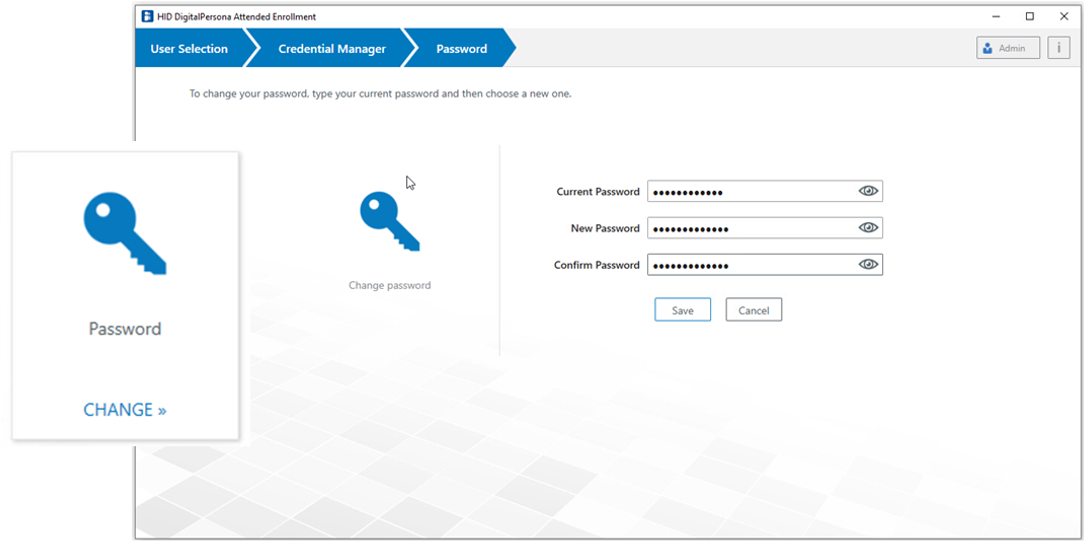
Password Credential
The Password tile provides a means to change the user’s password, by entering their current password, and then entering and confirming a new password.
Fingerprints Credential
If there is a supported fingerprint reader or ten-print scanner built into or connected to your computer, you can enroll and manage a user’s fingerprints.
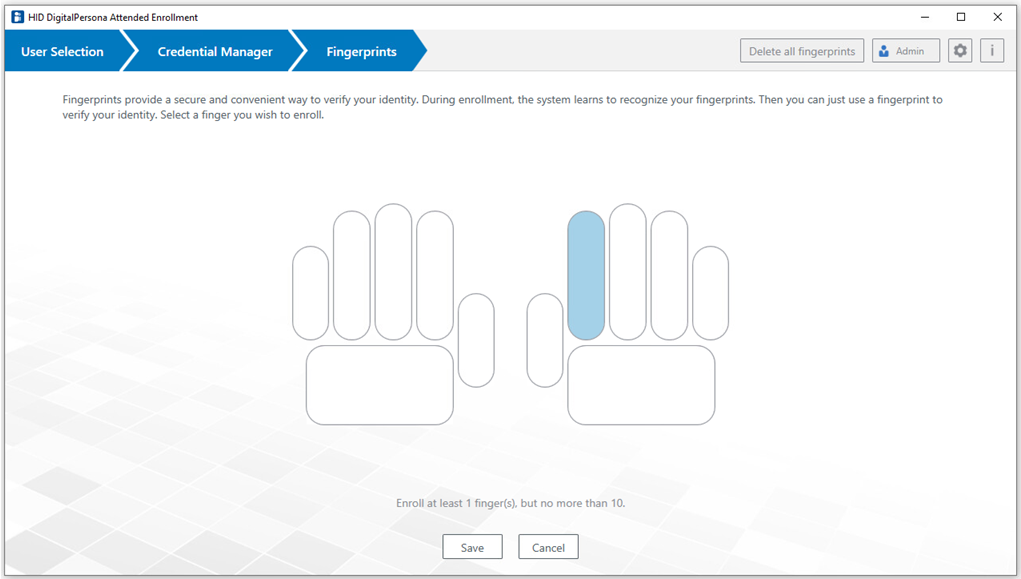
Select the Fingerprints tile to display the Fingerprints page, where you can enroll a user’s fingerprints credential.
The process of enrolling a user’s fingerprints is slightly different depending on whether you are using a single print fingerprint reader, or a ten-print fingerprint scanner such as one of the HID Guardian products.

Enroll Fingerprints with a Single Finger Reader
To enroll a fingerprint:
-
Click the Fingerprints tile to display the Fingerprints pages.
-
Click on a finger in the displayed hand image.
-
Scan the selected finger as many times as requested to enroll the fingerprint.
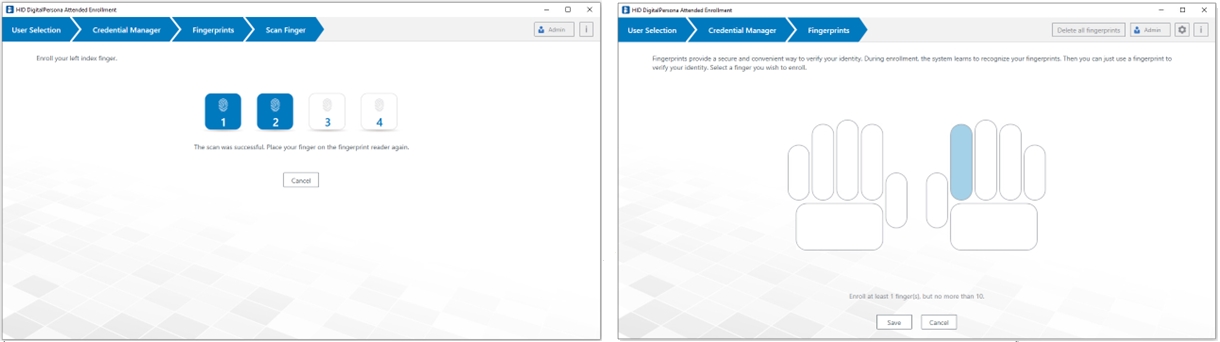
-
When an adequate number of images have been captured, the page will close and the Credential Manager page will redisplay with the newly enrolled finger highlighted.
Note: Verification by both the Security Officer and the user may be required before the fingerprint credential is saved -
Click Save.
Note: Fingerprint enrollment is not complete until you click Save. If you leave the computer inactive for a while without clicking Save, or close the program, any changes will not be saved.
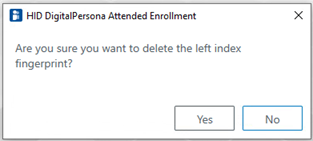
-
To delete a fingerprint, click any highlighted finger and confirm the deletion by clicking Yes.
-
To delete the entire fingerprint credential:
-
In the upper-right portion of the page, click Delete all fingerprints.
-
In the confirmation dialog, click Delete to confirm the deletion.
-
Enrolling Fingerprints with a Ten-print Scanner
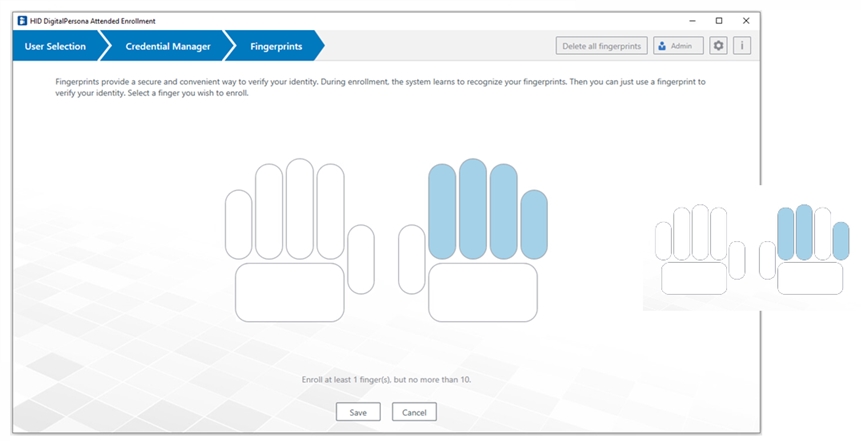
The ten print scanner captures fingerprints in three segments, often described as 4-4-2 (that is, four fingers of the left hand, four fingers of the right hand, and the two thumbs together).
For a list of supported ten print scanners, see the readme.txt file included with this software package. Additional files may need to be installed before use.
-
Click the Fingerprints tile to display the Fingerprints pages.
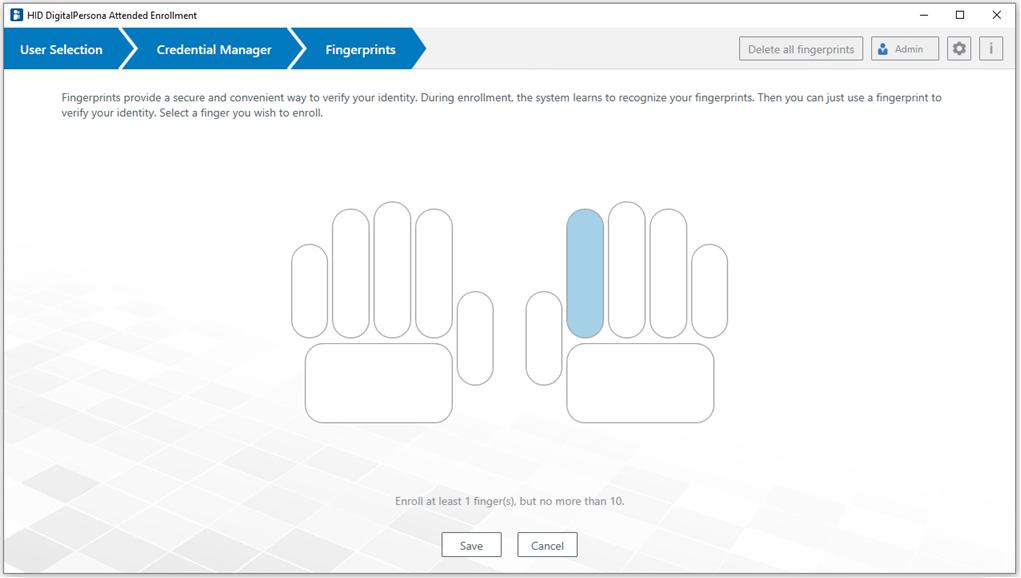
-
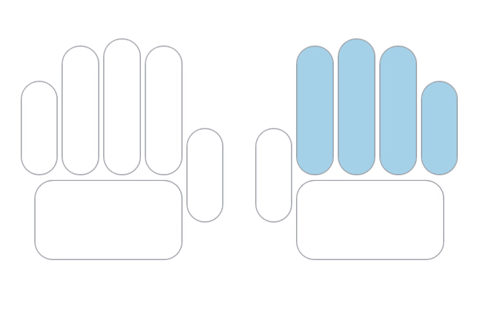
Select which segment to enroll. In the displayed image, choose the left hand, both thumbs or the right hand.

-
On the Scan Fingers page, if the user is missing any fingers, click the associated finger to remove it from the scan. Then scan the specified fingers or thumbs as many times as requested to enroll them.
-
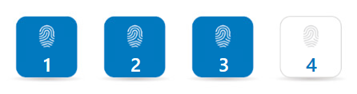
Each successful scan will result in one of the scan numbers at the bottom of the window turning blue.
-
When enrollment of the segment is complete, the screen shows the fingerprint segment in a darker blue.
-
Select another segment until the fingerprints of both hands and thumbs have been captured.
-
Click Save.
Note: Fingerprint enrollment is not complete until you click Save. If you leave the computer inactive for a while without clicking Save, or close the program, any changes will not be saved.
-
To delete a partial fingerprint segment:
-
Select a previously enrolled segment.
-
Then confirm the deletion.
-
-
To delete the entire fingerprint credential:
-
In the upper-right portion of the page, click the Delete all fingerprints button.
-
In the confirmation dialog, click Delete to confirm the deletion.
-
Authentication with a Ten-print Scanner
To authenticate with the ten-print scanner, use only a single finger or thumb. Use only the front half of the scanner screen to scan the fingerprint.
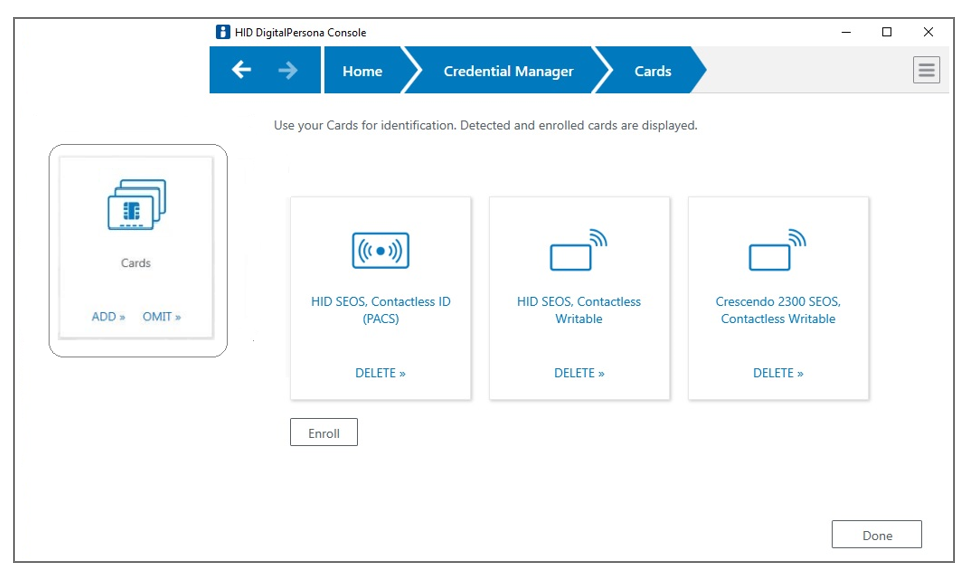
Cards Credential
This tile provides a means for enrolling a user’s Contactless Card credential.
To enroll a card credential:
-
On the DigitalPersona Console Home page, click the Cards tile to display the Cards page.
The CHANGE button displays on the Cards tile after the first card has been enrolled and saved.
-
Click Enroll.
You will be asked to present the card to be enrolled.
-
Place the Contactless card very close to the reader and hold it there until an image of the enrolled card appears or an error message is displayed.
-
If the errors prevent completion of the enrollment, click Cancel.
-
Click Done to return to the Credential Manager page.
To delete a card credential:
-
Click Delete on the card image for the card you want to delete.
-
Click Done to return to the Credential Manager page.
One-Time Password Credential
A One Time Password (OTP) credential uses an automatically generated time-sensitive numeric code for authentication.
The OTP credential can be used for authentication at Windows logon and within a Windows session as defined by the Logon or Session Policy in force, as well as for DigitalPersona Password Manager trained applications, websites or network resources and SAML-compliant portals such as Office 365.
It also can be used for authentication to the DigitalPersona Identity Server, providing access to the DigitalPersona Administration Console, and HID DigitalPersona Enrollment, as well as for verifying your identity within HID DigitalPersona Enrollment when enrolling or managing credentials.
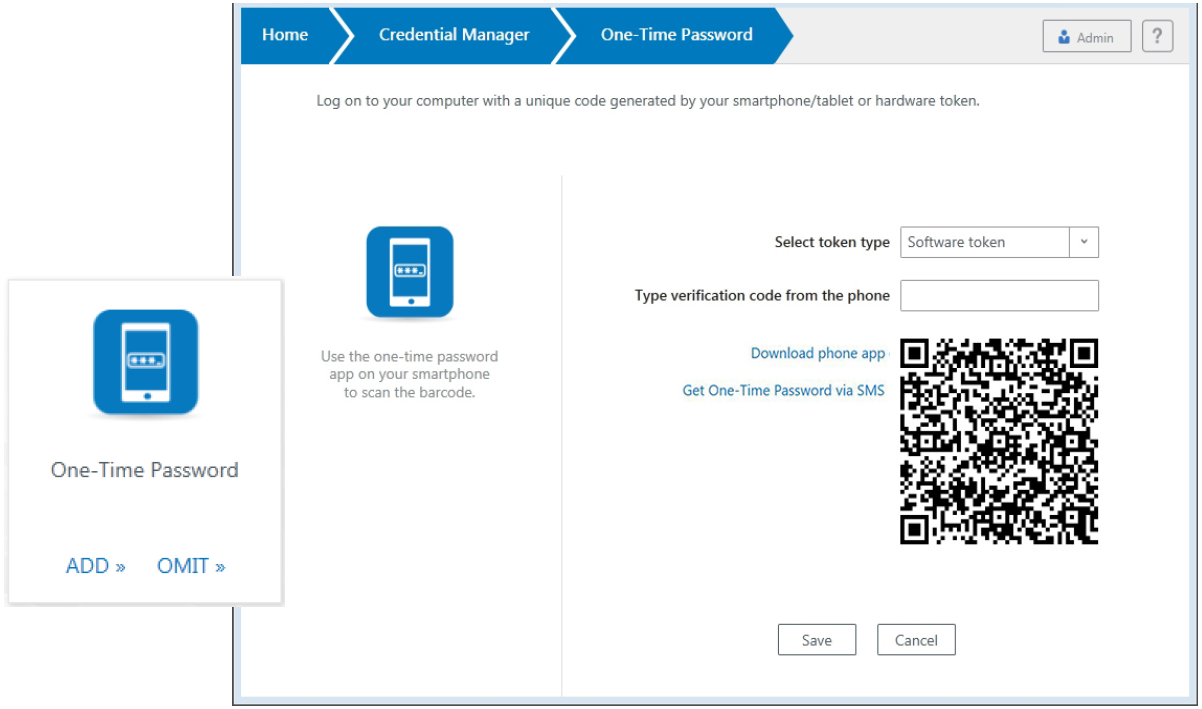
A QR Code scanner app on your device will greatly simplify the enrollment process for the software-based tokens, by automating the entry of required account information, although is not required as manual entry of the information is also possible.
The verification code may be generated in one of the following ways:
-
Authenticator app - a software token is generated by a special authenticator app on a user’s mobile device, and the resulting time-sensitive code is used for authentication.
-
OTP Push Notification - a software token is generated by DigitalPersona and sent to a mobile device where the user can Accept or Deny its use for authentication. This features is only available through the DigitalPersona authentication app. Although generation of the OTP is supported in third party authentication apps, Push Notification is only available through the DigitalPersona app.
-
OTP via SMS - a software token is generated by DigitalPersona, and a time-sensitive code that can be used for authentication is sent to a mobile device through SMS.
-
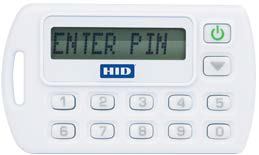
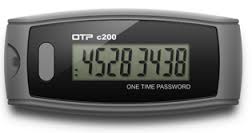
Hardware token - a dedicated hardware device generates a time-sensitive code used for authentication. The hardware token must be an OATH-compliant TOTP (Time-based One-Time Password) device.
-
OTP via email - (For AD Users only) if enabled by the administrator through the associated Send OTP by email GPO setting, the option to have a One-Time Password sent to the user’s email address is automatically available (enrolled) upon completing the enrollment of any of the other types of OTP credentials described above.
Note: To authenticate using OTP via SMS or OTP via email, the user’s workstation must be able to connect to the DigitalPersona LDS Server, either within the network, through a VPN or using the VPN-less (web proxy) feature which is enabled through the Allow VPN-less access GPO setting.
OTP Enrollment
The steps in the enrollment of an OTP credential differ slightly based on the type of OTP credential described above.
Authenticator App and Push Notification
Enrollment of an OTP credential to be used with an authenticator app will also automatically include the ability to make use of OTP Push Notification (when using the DigitalPersona app only), after the following steps have been taken:
-
The implementation team has created a tenant record for you in the CPNS service.
-
The associated OTP GPO settings have been enabled and configured by a DigitalPersona administrator as described in OTP policy settings.
-
Each user must allow notification during the app installation, or enable notifications for the DigitalPersona app in Settings/Notifications/DigitalPersona after installation.
During enrollment, you may choose not to use OTP Push Notification by selecting Decline on the Push Authentication page, in which case, you can still use regular (non-push) OTP.
On the Credential Manager, One-Time Password page, you can download an OTP authentication app, and then enroll the OTP credential for use with the authenticator app and OTP Push Notification (if configured).
 The steps to enrolling a software-based OTP token to be used with an authenticator app or OTP Push Notification are:
Download an Authenticator App
-
From the DigitalPersona Console, click Credential Manager, and then click the One-Time Password tile.
-
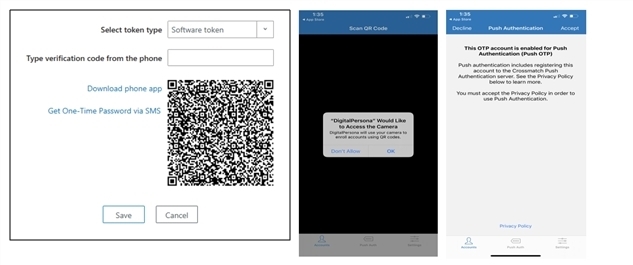
On the One-Time Password page, select Software token as the token type if it is not already selected. (It is the default.)
-
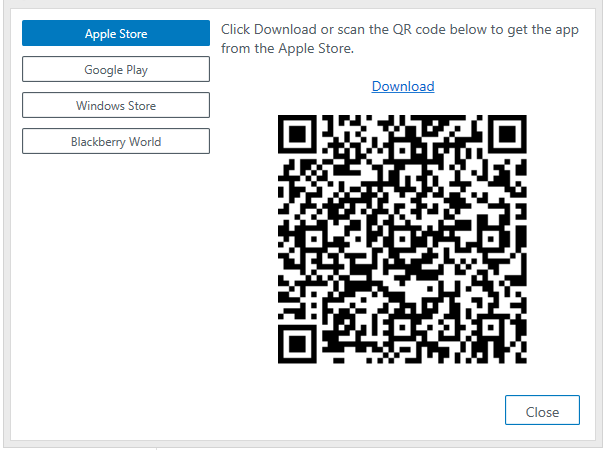
Click the Download phone app link to display a dialog where you can download and install the authenticator app for your device.
-
Select your device’s app store, and then scan the QR code provided or click the corresponding Download link.
The DigitalPersona app is currently available in the Apple Store and on Google Play.
For the Windows and Blackberry mobile platforms, the Microsoft and Google Authenticator apps provide nearly identical functionality, although setup and enrollment steps may vary slightly.
-
Scanning the QR code with a QR Code scanner app on your device is the simplest procedure. It will automatically open your device’s default web browser and display the product page for the selected authentication app so that you can download and install the app.
-
Clicking the Download link will open the selected app store in your computer’s default browser. Some app stores may require signing in and/or downloading the app and copying it to your device.
The instructions that follow are for the DigitalPersona app as installed on an iPhone. Instructions for the use of other authentication apps and devices may differ slightly.
Set Up a DigitalPersona Account on Your Device
-
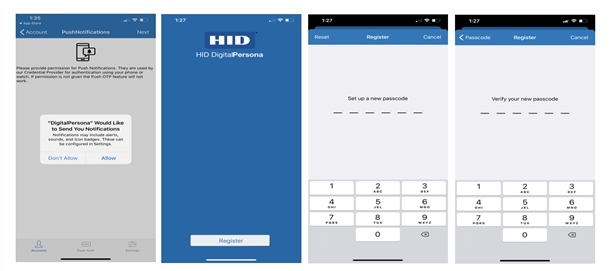
Launch the DigitalPersona mobile app on your device:
-
On iOS - The first time the app is launched, the Register screen displays, with a popup dialog requesting you to allow the app to send you notifications. Click OK to allow DigitalPersona Mobile to send you notifications.
Note: If you do not allow notifications, you will not be able to use the PUSH notification feature for One Touch Passwords. -
On Android systems - The first time the app is launched, the Register screen displays.
Notifications are enabled by default for the app, and therefore PUSH OTP will be operational (if the Privacy Policy is accepted as described below).
-
-
Click Register.
-
Enter and verify a six-digit passcode.
-
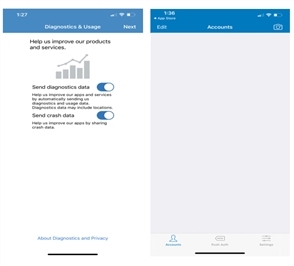
On the Diagnostic and Usage page, accept the defaults or tap an option to deselect it.
-
On the Accounts screen, click the Camera icon. You will be asked for permission to access your device’s camera. Tap OK if you want to use the camera to scan the QR Code for automatically creating your DigitalPersona Mobile account. If you click Don’t Allow, you will not be able to create an account or use the Authenticator app.
-
On the Scan QR Code screen, scan the QR code that displays on the One-Time Password Page. Do not scan the same QR code again from the dialog that has the app stores on it which was used to download the app.
-
If the Push Authentication Server has been previously setup by your DigitalPersona Administrator, Push Authentication will be automatically enabled for your device once you choose to Accept the associated Privacy Policy. If you choose to Decline the Privacy Policy, Push Authentication will not be enabled.
-
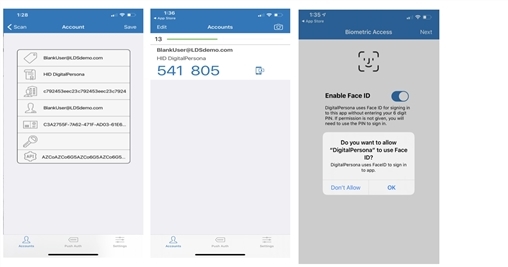
Once the account information is displayed, tap Save. The DigitalPersona Mobile account will be created and the Accounts screen displayed with the new account and your first One-Time Password shown.
-
Manual account creation - this feature is reserved for use by DigitalPersona technicians.
 Sign in to the DigitalPersona Mobile App
Once you have registered as described in the previous pages, you can sign in to the app as follows.
-
Launch the DigitalPersona Mobile app.
-
Sign In.
-
Fingerprint enabled devices - You can enable fingerprint authentication to the DigitalPersona Mobile app by selecting Enable Touch ID on the Sign In screen or later in the DigitalPersona Mobile Settings. Then touch the fingerprint sensor to sign in.
-
Non-fingerprint enabled devices - Tap Sign In and then enter your six-digit DigitalPersona Mobile passcode.
-
Enroll the OTP Credential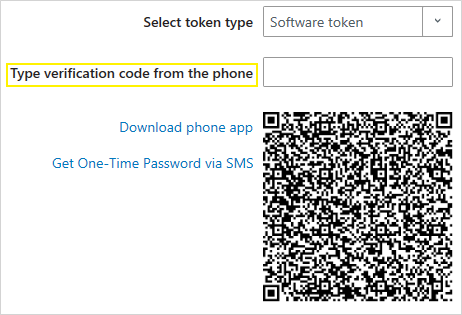
-
On your computer, open the One-Time Password page.
-
On your device, sign in to the DigitalPersona Mobile app.
-
On your computer, enter the six-digit verification code displayed in the app and click Save.
OTP for SMS Delivery
On the Credential Manager, One-Time Password page, you can enroll an OTP credential that will transparently generate a time-sensitive code that is sent to your mobile device and display a notification asking you to Allow or Deny its use for authentication.
Enrollment of the SMS delivery feature requires that a DigitalPersona administrator has previously created a Nexmo (https://www.nexmo.com) account and entered Nexmo account information into the OTP setting on the DigitalPersona Server, as described Security\SMS.
To enroll the OTP via SMS credential:
-
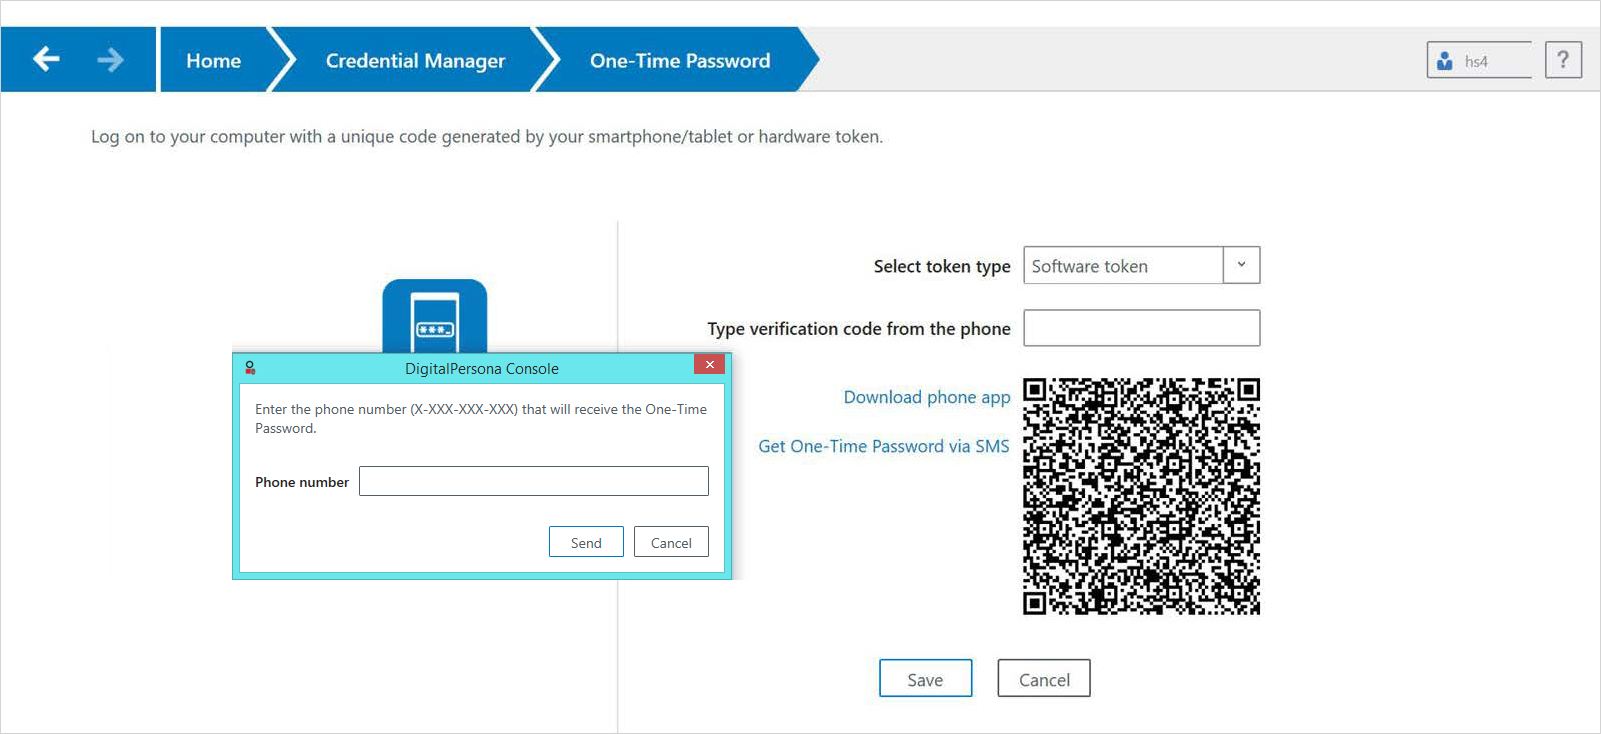
On the One-Time Password page, click the Get One-Time Password via SMS link.
-
Enter the number for the mobile device that you would like to enroll in order to receive a One-Time Password through SMS delivery.
-
Click Send.
-
You will receive an SMS message on your mobile device containing a six-digit verification code.
-
On your computer, enter the verification code into the Type verification code from the phone field.
-
The Credential Manager page will re-display and the One-Time Password tile will now show the Change caption, indicating that a One-Time Password credential has been enrolled.
OTP Hardware Token
On the Credential Manager, One-Time Password page, you can enroll a hardware token as a DigitalPersona credential. The hardware device can then be used to generate a code for authentication. Note that hardware tokens must be OATH compliant TOTP (Time-based One-Time Password) or HOTP (HMAC-based One-Time Password) devices.
Typical TOTP hardware tokens:

Typical HOTP hardware tokens:
To enroll an OTP credential using a hardware token:
-
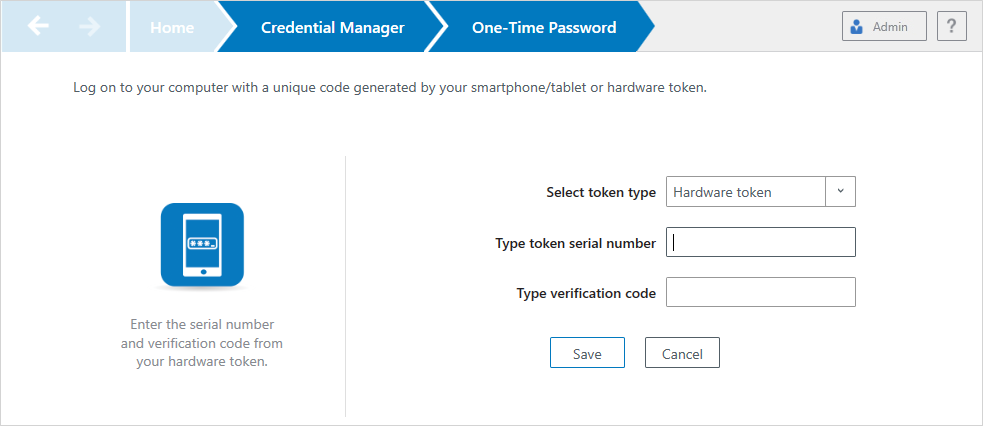
From the DigitalPersona Console, click Credential Manager, click the One-Time Password tile and, from the Select token type drop-down list, select Hardware token.
-
Enter the serial number for your hardware token, which is usually found on the back of the device.
Note: A vendor supplied file associated with a specific set of hardware tokens must have been previously imported to the DigitalPersona Server before the hardware token can be enrolled (see Hardware Tokens Management Utility). -
Activate your hardware device. On some hardware tokens, you will simply need to press a button to do so, on others you will need to enter a preselected PIN to display the valid code on your device.
-
Enter the verification code displayed on your device and click Save.
OTP Sent Through Email
If enabled by the administrator, a software token is generated by DigitalPersona, and a time-sensitive code that can be used for authentication is sent to the user’s Active Directory email address. By default, this option is not configured (and therefore unavailable to users), but can be enabled by the administrator through the Send OTP by email GPO setting.
Also a valid SMTP server must be specified during configuration of the DigitalPersona Web Management Components package or through the SMS Configuration GPO setting.
Once enabled, the option to have a One-Time Password sent to the user’s email address is automatically available (enrolled) upon completing the enrollment of any of the other types of OTP credentials described above.
Authentication with a One-Time Password
To authenticate with your One-Time Password, use one of the following options depending on from where you are authenticating:
-
At Windows logon, select Sign-in options and then select the One-Time Password (or OTP) tile to display One-Time Password options.
-
On any Verify your Identity screen, select the One-Time Password (or OTP) tile.
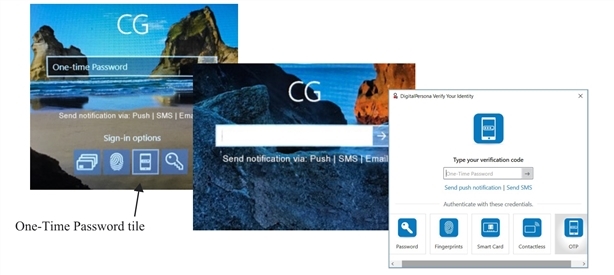
You can use an OTP credential in any of the following ways:
-
Select Send push notification to send a One-Time Password to your enrolled mobile device allowing you to Approve or Deny authentication.
-
Select Send SMS to send an SMS message to your enrolled mobile device with a One-Time Password that you can enter on your computer for authentication.
-
Launch your previously registered authentication app on your mobile device and enter the resulting One-Time Password into the entry field on your computer.
-
Activate the display on an enrolled hardware token, and enter the displayed One-Time Password on your computer.
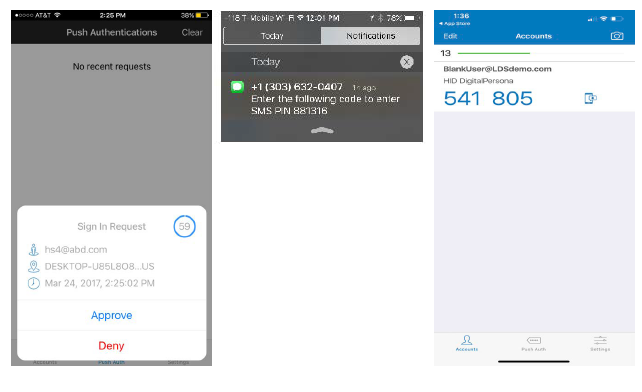
In most cases, enter your One-Time Password into the One-Time Password field on your computer screen and select the arrow button. When using push notification, you do not need to enter the code on your computer, as tapping Approve or Deny on your mobile device automatically authenticates to your computer.
For some types of HOTP tokens, make sure that focus is located on the One-Time Password field, push the button on the HOTP device, and then click on the arrow button.
To change your OTP credential:
Once the credential has been enrolled, the word CHANGE will display beneath the OTP tile.
-
On the Credential Manager page, click CHANGE.
-
Confirm that you want to delete the current OTP credential and enroll a new credential.
-
Enroll the new OTP credential.
To delete your OTP credential:
-
Once the credential has been enrolled, the word DELETE will display beneath the OTP tile.
-
On the Credential Manager page, click DELETE.
-
Confirm the deletion.
Syncing the HOTP Counter During Authentication
If the de-sync value exceeds the look-ahead window, the user won't be able to authenticate with OTP.
This may be resolved by entering two concatenated HOTP codes during authentication, which will accomplish both re-syncing the HOTP counter and authentication.
The user types two OTP codes in the OTP field and presses Enter.
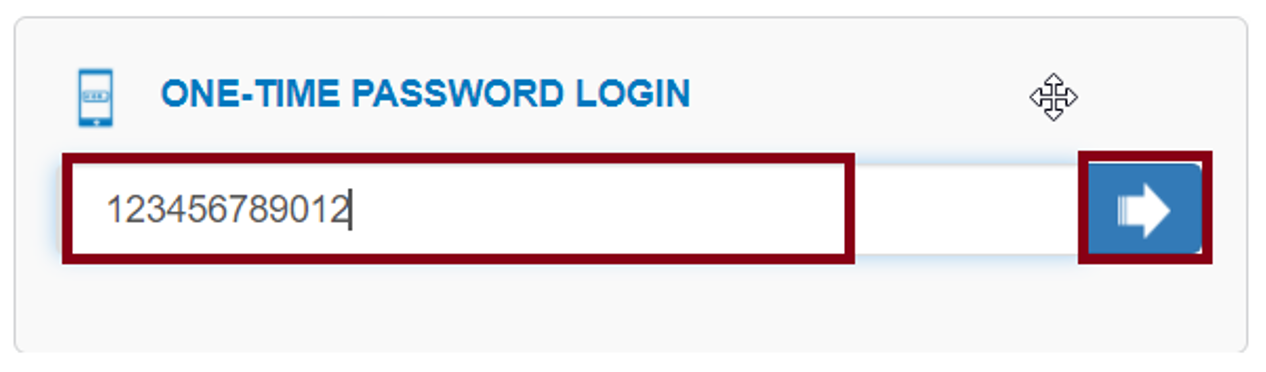
This will double the length of the entered value, i.e. if a 6-digit OTP code is used, the entered value would be 12 digits.
This only works with the Hardware OTP device, and not with other variations of OTP such as TOTP.
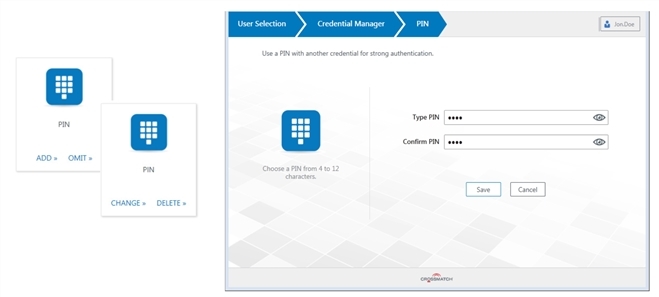
PIN Credential
This tile provides a means for enrolling a user’s PIN credential.
A PIN is a credential composed of user-selected characters. A PIN is often used in combination with another credential to easily enhance its security.
A PIN may be used as a credential for authentication, when combined with an additional supported credential as defined by the Logon or Session Policy in force.
You cannot enroll weak PINs in DigitalPersona, similarly to Windows Hello for Business. According to Microsoft, a weak PIN has a constant delta from one digit to the next, for example, 1111 or 2468. This algorithm does not apply to alphanumeric PINs.
This PIN should not be confused with a PKI Smart Card PIN which is used as part of a PKI Smart Card credential.
To enroll a PIN credential:
-
Click the PIN tile to display the PIN page.
-
Enter and confirm a PIN.
The system default requires a PIN between four and twelve alphanumeric characters.
However, the minimum and maximum PIN length may be specified through a GPO setting by the DigitalPersona administrator.
Note: Weak PINs are not allowed to be enrolled in DigitalPersona, similarly to Windows Hello for Business. According to Microsoft, a weak PIN has a constant delta from one digit to the next, for example, 1111 or 2468. This algorithm doesn't apply to alphanumeric PINs. -
Click Save.
Passkey (Device-Bound) Credential
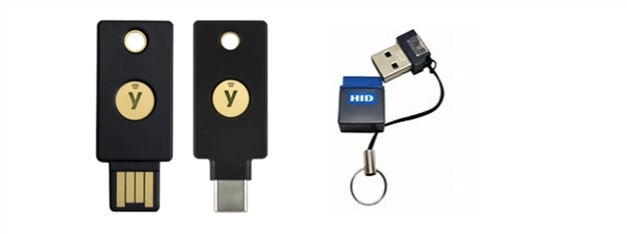
A passkey is a type of passwordless digital credential that is used as an authentication method. From a technical standpoint, passkeys are FIDO-based credentials that are discoverable by browsers or housed within native applications, or security keys for passwordless authentication.
Passkeys that are synced between a user's devices via a cloud service are generally referred to as "synced passkeys", while ones that never leave a single device are referred to as "device-bound passkeys".
The device-bound passkey credential is represented by the Passkey (device-bound) tile ![]() .
.
To enroll a Passkey (synced) credential, use the DigitalPersona web-based enrollment as described in Passkey (Synced) Credential.
Beginning with DigitalPersona version 3.4, passkey devices are supported via the FIDO2 protocol.
FIDO UTF is no longer supported, and any previously enrolled passkeys need to be re-enrolled with DigitalPersona 3.4 or a newer version.
Enroll a Passkey (Device-Bound) Credential
-
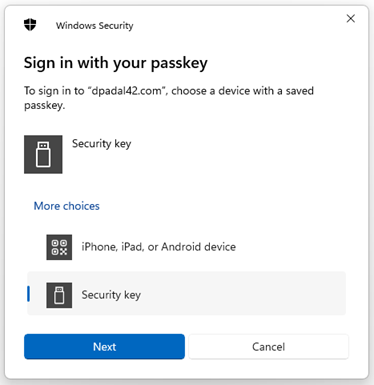
Click the Passkey (device-bound) tile.
-
Insert a passkey into an available USB port and click Enroll.
If you are prompted to select a device, select the option to use a security key. Then follow any onscreen instructions provided in the following Windows dialogs.
-
Depending on the type of passkey being used, activate it through one of the following actions.
-
Tap the sensor on the device.
-
Press a button on the device.
-
Remove and reinsert the device.
-
Tap the Touch or Tap the message window.
-
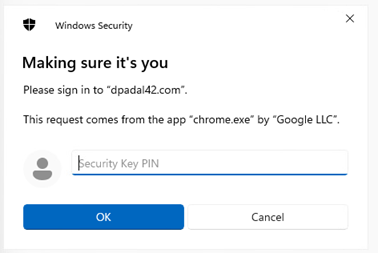
Enter the Passkey PIN.


-
Upon successful enrollment, CHANGE is added to the passkey credential icon.
![]()
To delete a Passkey (device-bound) credential:
-
Click CHANGEon the Passkey (device-bound) tile to display the Passkey (device-bound) page.
-
Click Delete Credential.
-
In the confirmation dialog, click Delete.
To change a Passkey (device-bound) credential:
-
First delete the previously enrolled Passkey (device-bound) credential.
-
Then enroll a new Passkey (device-bound) as described above.
To authenticate with a Passkey (device-bound) credential:
-
In the DigitalPersona Identity Server or Verify your Identity window, select the Passkey (device-bound) tile.

-
Follow any onscreen instructions.
Depending on your passkey and any authentication settings, you may be prompted to provide your PIN and to touch your Security Key.

After touching your enrolled passkey, you will be automatically signed in.
Face Credential
The Face page enables you to enroll and manage a user's Face credential.
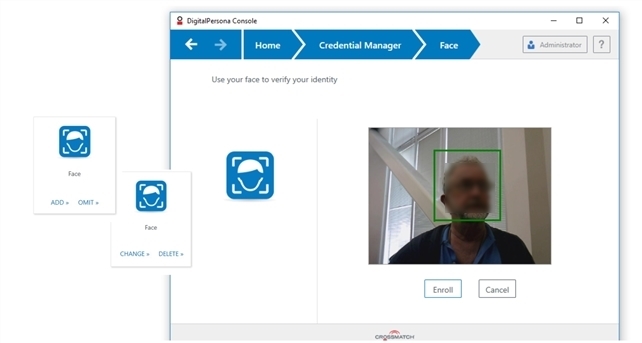
To enroll a Face credential:
-
From the DigitalPersona Console, click Credential Manager, and then click the Face tile to display the Face page.
-
If multiple cameras are available, select a camera from the drop-down list.
-
Center your face within the frame and click Enroll.
A green rectangle will display around your face in the camera image.
-
Once enrollment is complete, the screen will refresh and display the nine separate frames used in enrolling your Face credential.
To change a user's Face credential:
-
Once a Face credential has been enrolled, the word CHANGE appears below the credential's tile.
-
Click CHANGE to display the Face page.
-
Click Re-Enroll.
To delete a user's Face credential:
-
Click CHANGE to display the Face page.
-
In the upper right section of the page, click Delete Credential.
To authenticate using a Face credential:
-
At Windows logon, select Sign-in options and then select the Face tile. If authentication is successful, the user will be logged in to Windows.
-
On any Verify your Identity screen, select the Face tile.
RADIUS Credential
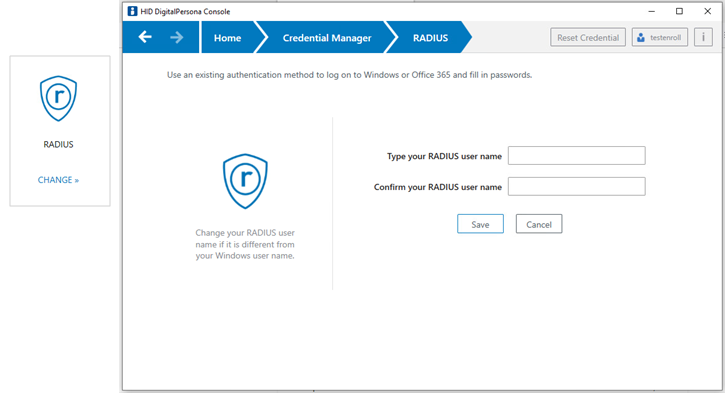
The RADIUS page provides a means for enrolling a RADIUS credential.
To enroll a RADIUS credential:
-
On the DigitalPersona Console Home page, click the RADIUS tile to display the RADIUS enrollment page.
-
On the RADIUS enrollment page, enter and confirm your RADIUS user name.
-
Click Save to complete the enrollment.
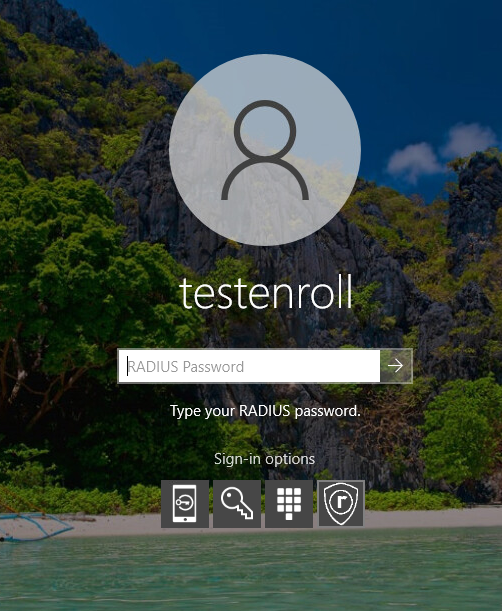
To authenticate with RADIUS at Windows Logon:
To authenticate with your RADIUS credential at Windows Logon, select the RADIUS Sign-in option and enter your RADIUS password.
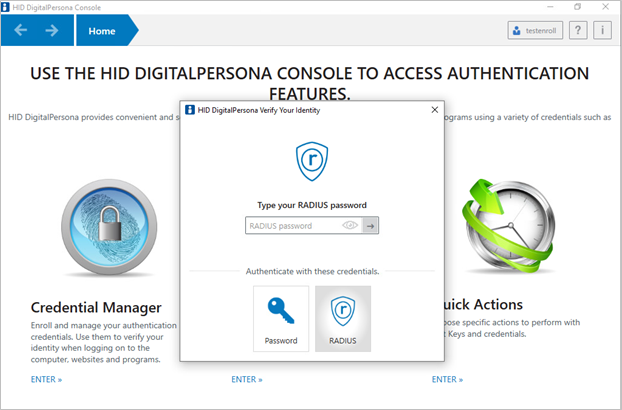
To authenticate with RADIUS in the Verify Your Identity window:
To authenticate with your RADIUS credential at Windows Logon, select the RADIUS credential and enter your RADIUS password.
Bluetooth Credential
Any Bluetooth-enabled device discoverable by this software may be used as a credential for authentication, when combined with an additional supported credential as defined by the Logon or Session Policy in force.
This is because Bluetooth enrollment pairs the associated device with the machine where it is enrolled initially.
Users will need to pair their device with each DigitalPersona Workstation or Kiosk where they expect to use their Bluetooth credential.
Devices previously paired with the computer will simply be enrolled.
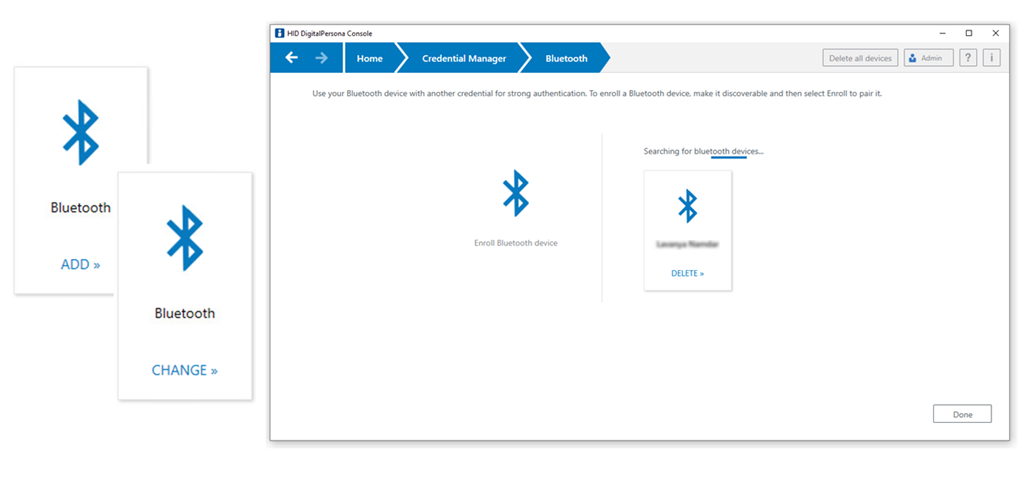
To enroll or pair a Bluetooth device:
-
On the DigitalPersona Console Home page, click the Bluetooth tile to display the Bluetooth enrollment page.
-
Click ADD.
All unenrolled and discoverable Bluetooth devices within range are displayed in the bottom portion of the page.
-
On the Bluetooth Devices page, select the desired device and choose Enroll.
-
If an expected device is not displayed, ensure that the device is set to be discoverable.
-
If the device has not previously been paired with this computer, you will be asked to pair it, and then the device will be enrolled as a credential.
-
To change a Bluetooth device:
-
To enroll an additional Bluetooth device, change your current Bluetooth device, or delete a specific Bluetooth device, choose CHANGE on the Bluetooth tile.
-
Then on the Bluetooth Devices page, select Enroll or Delete.
To delete a Bluetooth device:
-
To delete all enrolled Bluetooth devices, choose Delete on the Bluetooth tile.
-
Then confirm the deletion by verifying your identity.
Recovery Questions Credential
The Recovery Questions credential allows a DigitalPersona
The Recovery Questions page provides a means to set up a user’s Recovery Questions.
Administrators can configure the list of security questions displayed or create custom questions through the Recovery Questions GPO setting.
To use this recovery credential to gain access to a computer, a user must have previously logged on to the same computer at least once with another valid credential.
For DigitalPersona Workstation, this feature is optional and must be explicitly configured by the DigitalPersona Administrator through the Recovery Questions GPO setting.
This feature is not available in the DigitalPersona Kiosk products.
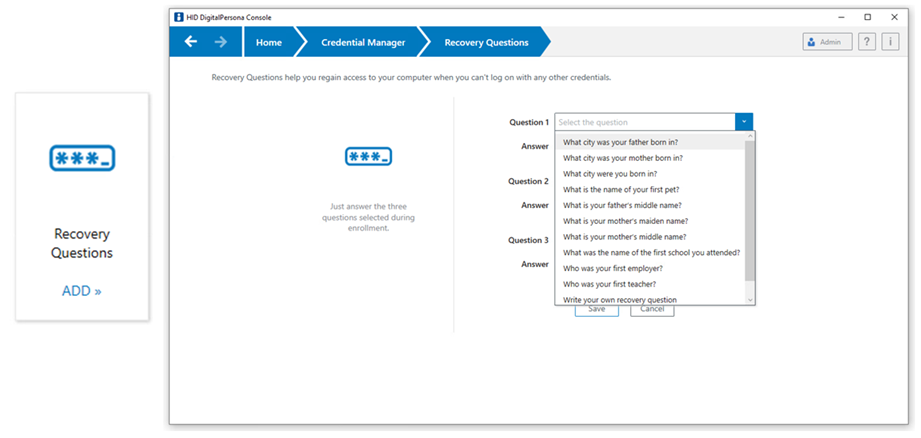
To set up a user’s Recovery Questions:
-
Click the Recovery Questions tile to display the Recovery Questions page.
-
The user selects their questions from those available from the drop-down menus, and enters their unique answers.
They can also write their own security questions by selecting the last option.
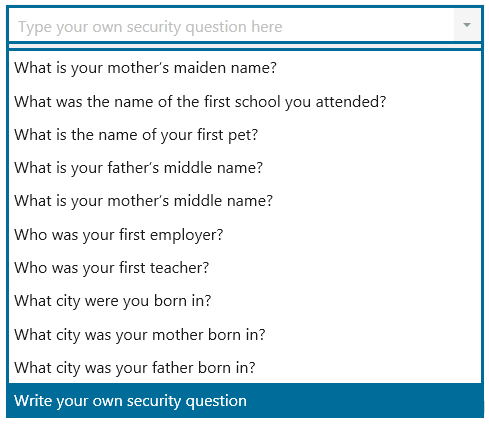 Important:
Each answer must be unique. Providing the same answer for different questions is not supported.
The answers to Recovery Questions are not case-sensitive.
-
Click Save.
Completing Enrollment
By default, all displayed tiles must be either enrolled or omitted, before clicking Complete enrollment.
This behavior can be changed in the DigitalPersona.Altus.Enrollment.exe.config file mentioned above.
Once completed, the program returns to the User selection page.
Advanced Features
The DigitalPersona Advanced Features page can be accessed by clicking the Advanced button on the Credential Enrollment page.
![]()
The DigitalPersona Advanced Features page displays.
The behavior of the page will vary depending on the value of the passwordRandomization tag in the file, DigitalPersona.Altus.Enrollment.exe.config.
The page variations shown below illustrate the changes in the page depending on the value of the tag.
-
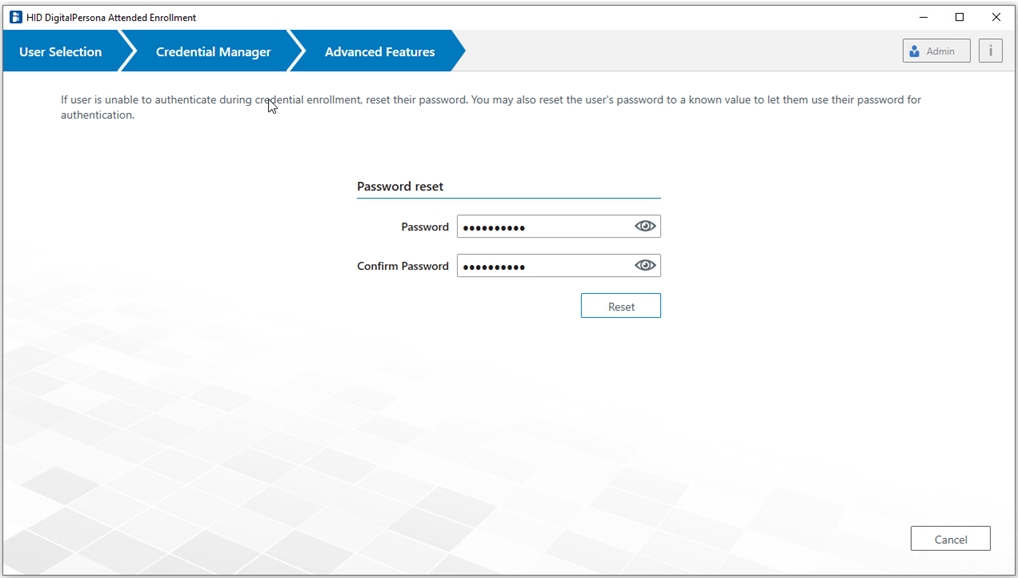
Advanced Features page with DoNotRandomize (default):
-
Advanced Features page with RandomizeAlways:
When the value is set to RandomizeAlways, the two additional messages are added to the workflow as shown below.
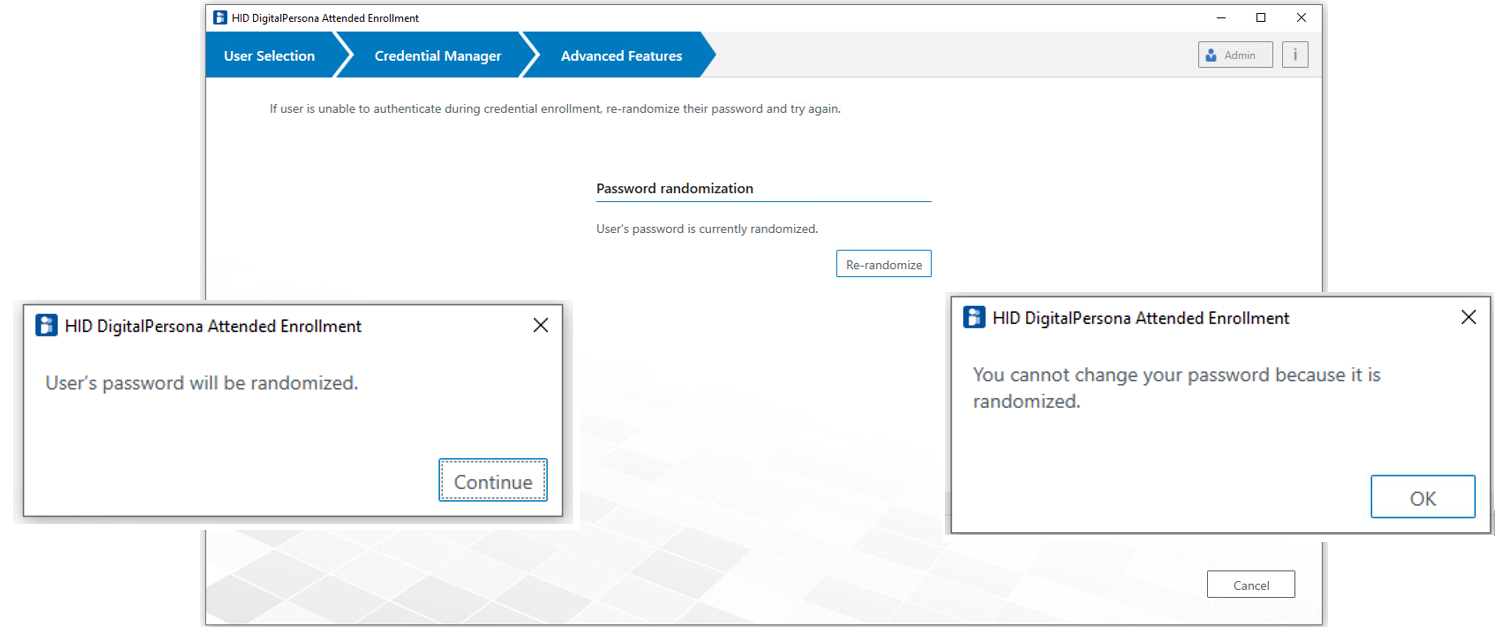
The first message displays when beginning to create or edit a user, and the second message displays when clicking on the Password tile.
-
Advanced Features page and user creation window with the MayRandomize value set in the configuration file:
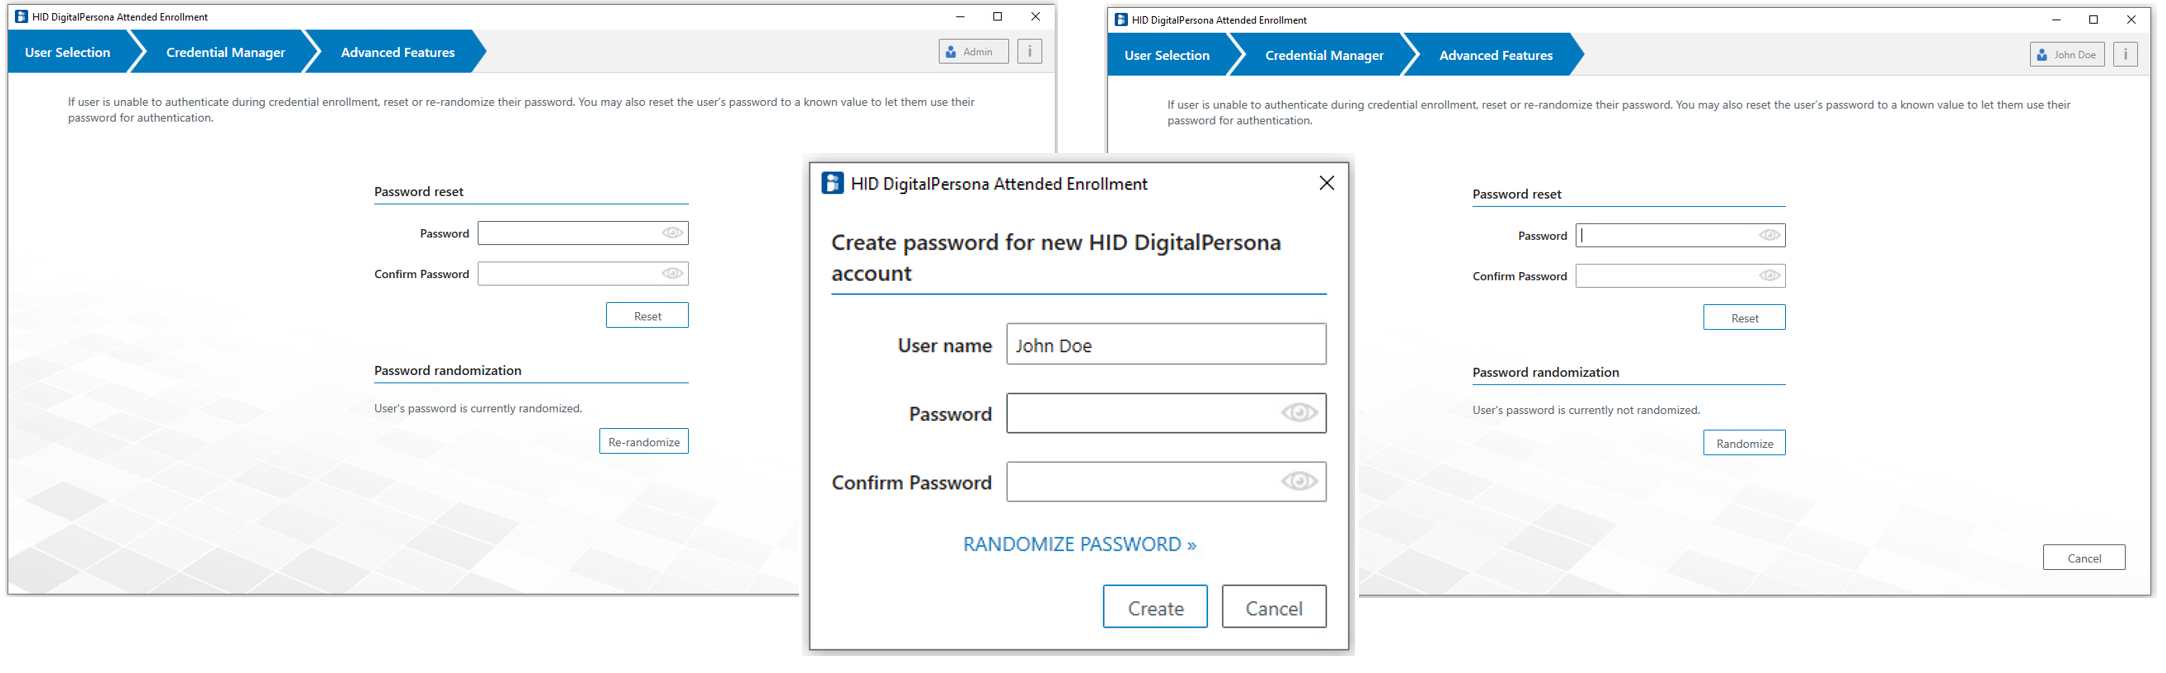
When the value is set to MayRandomize, the choice to randomize a password is shown when creating a new DigitalPersona Non AD user, and the Advanced Features page provides a means to reset the user’s password if not randomized, or re-randomize it if currently randomized.
User Information/Custom Page (Non AD User only)
This tile and its associated page provide a means for capturing additional customized information about users (or anything else) during the Attended Enrollment session. By default, this page is not shown, but may be enabled in the DigitalPersona.Altus.Enrollment.exe.config file.
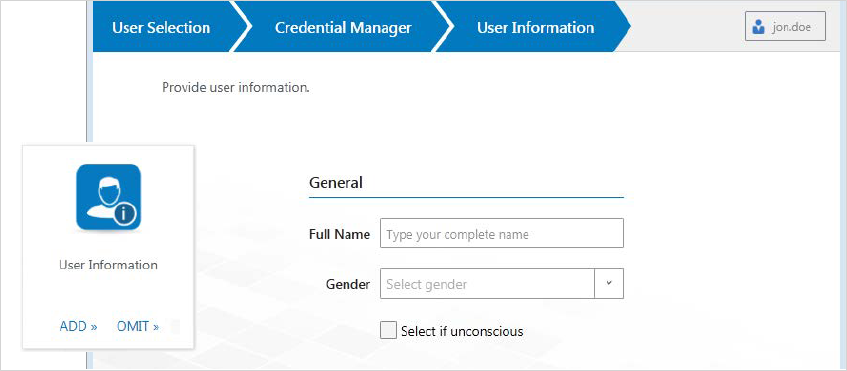
Photo Capture (DigitalPersona LDS, Non AD user only)
This tile provides a means for taking a photograph of the user.
This photograph is for visual identification only and is not a DigitalPersona credential. It cannot be used for verifying your identity when authentication is required for login to Windows, websites or programs.
By default, this page is not available for DigitalPersona AD users and as designed, will not store photos for AD users.
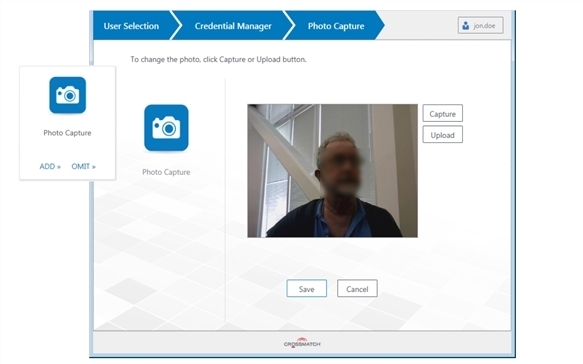
To add a photograph of the user to their account information:
-
Position the user in front of the camera.
-
Click Capture to take a photo with a connected camera, or Upload to select a photo from your computer or other resource. Then click Save.


