Prowatch Agent User Guide
Introduction
About this Document
The HID Visitor Manager Prowatch Agent documentation aims to provide information and instructions for configuring the HID Visitor Manager Prowatch Agent for integration with the on prem Prowatch Security Center Systems. The documents also specify tools and techniques that are generally used to troubleshoot any problems that may arise while integration. It uses a combination of high-level feature descriptions, representative screen images and specific sequences to perform configuration and integration of HID Visitor Manager with Security Center.
Summary of Agent Functionality
The agent, once configured, communicates with Prowatch Security Center to achieve –
-
Master Data Import (e.g. clearances)
-
Propagation of Person, card and clearance details to Security Center (applies to HID Visitor Manager)
-
Propagation of Visitor, card and clearance details to Security Center (applies to HID Visitor Manager Credential Manager)
-
Note that Readbacks (Automatic Change Detection and Synchronization from the PACS) are currently not supported on HID Visitor Manager platform.
Intended Audience
It is expected that this guide will be used by administrative and technical staff during the integration of HID Visitor Manager with the Prowatch Security Center system. In order to get the most from this guide, the readers should have an understanding and familiarity of:
-
The local computer environment at the site where Security Center are installed.
-
HID Visitor Manager system, agents and Prowatch Security Center systems and its components.
Pre-Requisites
-
IMPORTANT: The agent works by communicating with the Prowatch DTU API's (Web Services) and supports v.5.0 of the PACS system.
-
HID Visitor Manager account must be enabled with ProWatch PACS subscription.
-
Port 443 and 8883 must be opened OnPrem in order to support the HTTPS/MQTT traffic between HID Visitor Manager (the cloud) and the HID Visitor Manager Prowatch Agent that will run OnPrem
-
A valid license is required on the Prowatch PACS system to enable and authorize usage of the Prowatch DTU Web Services API
-
The configured port on the Prowatch PACS system that is to be used for Prowatch DTU Web Services support must be open within OnPrem networks, between the system where the HID Visitor Manager Prowatch Agent is installed, and the Prowatch PACS DTU Web Server
-
A PACS Username and Password (operator account) is required for the dedicated use and consumption of Prowatch DTU Web Services APIs
Downloading the Agent Installer
-
Log in to HID Visitor Manager portal using Visitor Administrator credentials
-
Navigate to Settings app > Downloads
-
Click the HID Visitor Manager Agent Installer link and save the file (OnPremAgentSetup.Zip)
-
Install the HID Visitor Manager Agent installer by following the instructions in the next section
On-prem Installer Guide
The On-Prem agents will need to be installed and configured in a somewhat similar way as every other agent but will happen outside of the scope of the standard SAFE Application Server. Standard SAFE installation will not be required for such IOT Enabled On-Prem agents, and instead, the following installer will perform the requisite duties of initially installing the agent On-Premise.
From a high level, the workflow of the installer will need to perform the following actions, and will do-so in the following order spelled out by the installation steps below.
System Requirements
Operating System: Windows 10, Windows Server 2016 Standard, or Windows Server 2019 Standard.
NOTE: The OS must be synchronized with a valid NTP server.
RAM: 4 GB
Processor: Intel Core i3 @ 1.00 GHz
Hard Drive Space: 5 GB
Software: Microsoft .Net Framework 4.8 (https://dotnet.microsoft.com/download/dotnet-framework/net48)
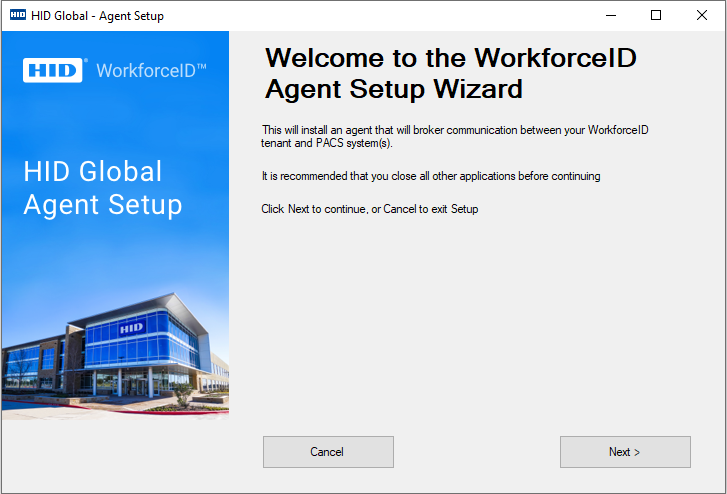
Launch the Installer Application
The downloaded file (OnPremAgentSetup.zip) will need to be copied to the On-Prem server where the agent is intended to be run. From there, once extracted, the Installer Application (OnPremAgentSetup.exe) will need to be launched. The user will be presented with the following screen:
PACS Specific Details will be Captured
Enter the HID Visitor Manager URL, Username and Password which is provided to log in to the tenant. Click Next to continue.
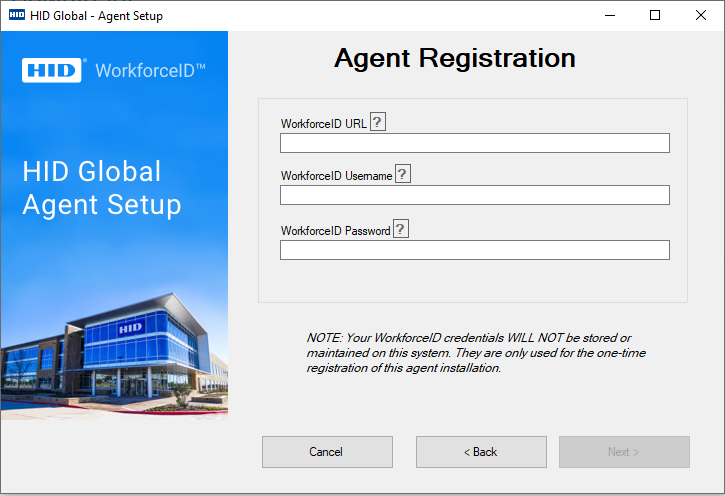
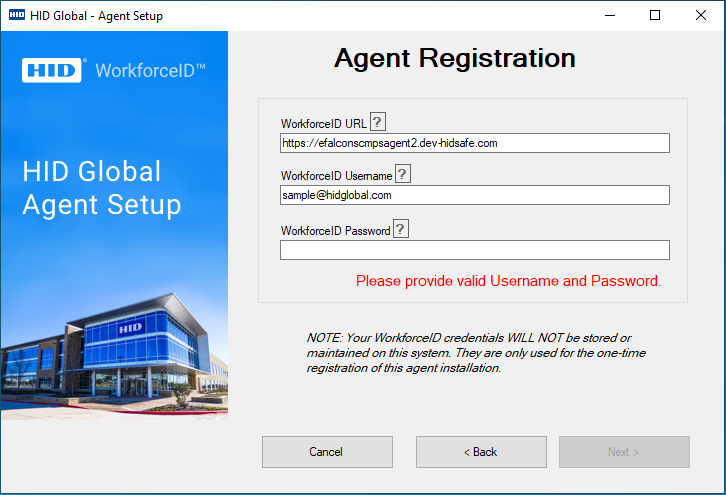
Validate Operator Credential
When the operator enters the wrong credentials,the operator will be notified immediately and need to enter the correct credentials before trying again.
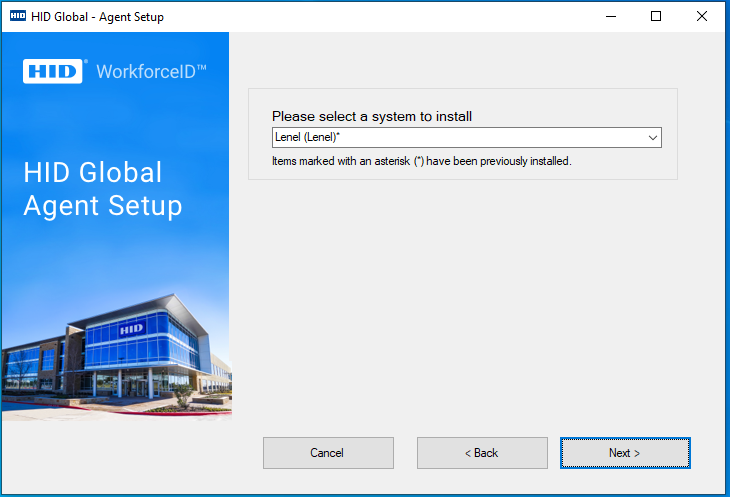
Select a System to Install
On this page, choose a PACS system to install from the dropdown menu as required.
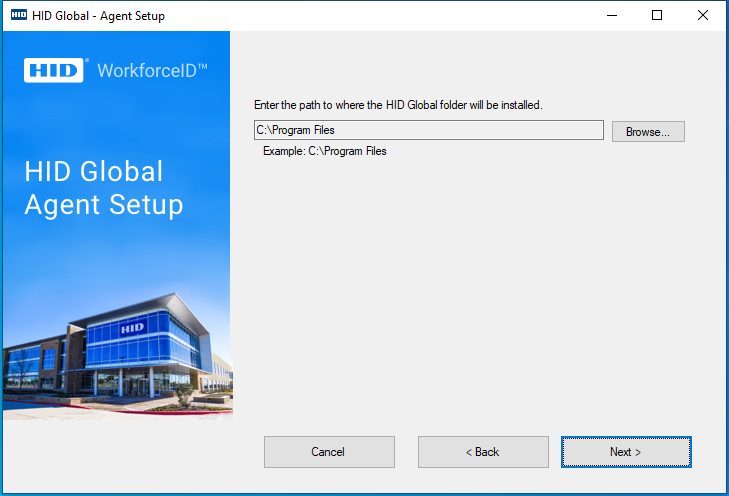
Specify Installation Path for the Agent
An installation path will be selected to install agent files. This allows the user to specify which directory they would like to install the agent. The default path is set to the standard agent installation location, alternatively, the user can click on the Browse button to select the directory to install, and agent files will be installed on that directory.
Based on this path, the Windows Service entry for the agent will point to this location, if a custom directory was chosen. Click on the Nextbutton to begin the Agent Installation.
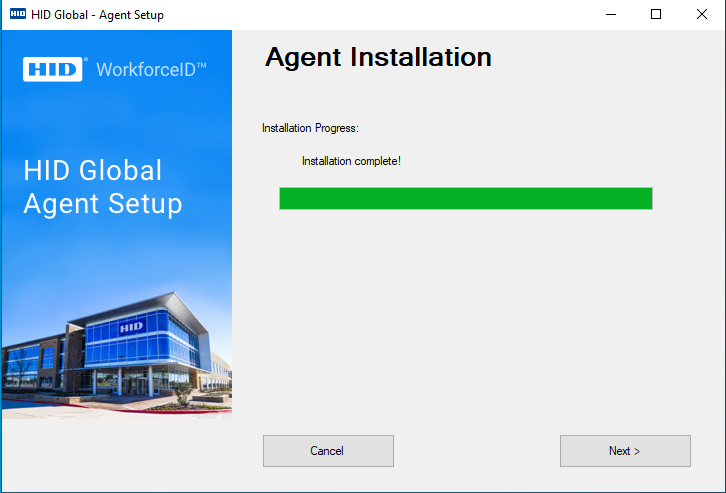
Installation Process is Started
The next screen will show the progress bar, as well as the details of the steps being performed along the way.
The steps that will be performed during this installation are as follows:
-
Prerequisite Checks will be Performed
Based on the agent selected on the previous screen, a customized set of prerequisites will be performed for things such as .NET framework version installation, or other items specific to a given integration. -
Generate Certificates for IOT Device Registration
PK/CSR based on the system where this is running, and the agent being installed, will be generated. -
Call Agent Registration Service
The PK/CSR generated in the previous step will be used as input to this service, in order to generate and/or match up with the appropriate IOT device that will be used to broker communications between SAFE in the cloud, and the On-Prem service. -
Extract Device Certificates and Store them into the Windows Certificate Manager
The certificates relating to the IOT device for this agent will be parsed out of the response to the registration service and installed into the Windows Certificate Store. The AWS Root certificate will be installed in the Local Systems 'Trusted Root', and the actual device certificate will be installed into the Local Systems 'Personal' certificate store. -
Create Agent Folder
The files required for the soon-to-be created service will be installed into the appropriate location on the local file system, based on the system to integrate, chosen on the previous screen of the installer. -
Create the Agent Service
This is where we will create theWindows service (integrated agent) that will act as the communication point to the connected system. Such agents run as Windows services on the operating system and are responsible for processing requests sent from SAFE in order to translate them and provision the specified actions/data into the connected system. -
Update the Registry
Some Windows logging features/paths are stored in and loaded from the Windows Registry. These registry keys will be set up at this time, and are primarily used for logging purposes.
Installation Complete
When all of the above steps are completed, the user will be presented with the following screen indicating that the installation has completed successfully.
In the case of an error, the installer will proceed to the final screen, and details of the error will be presented in order tooutline what occurred.
Configuring Agent
-
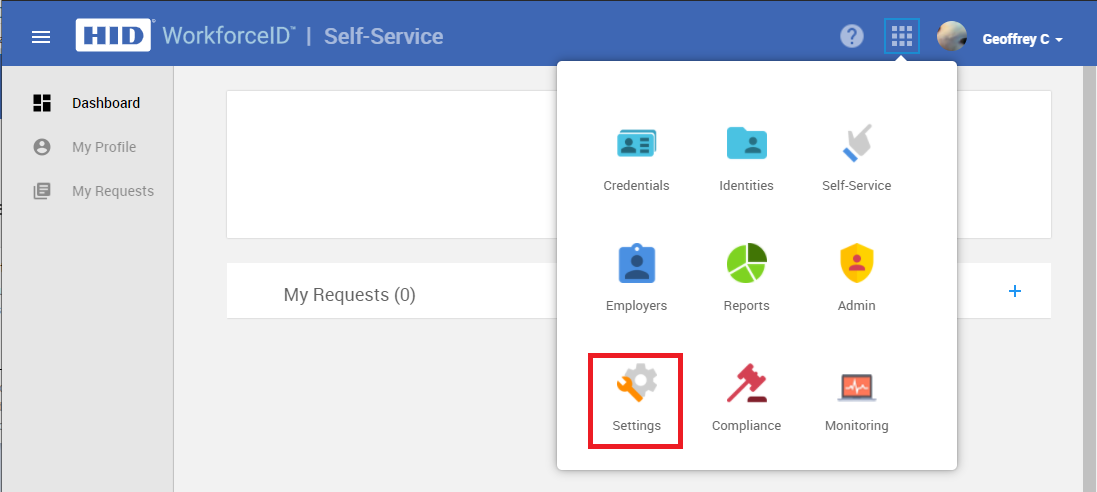
Log in to HID Visitor Manager.
-
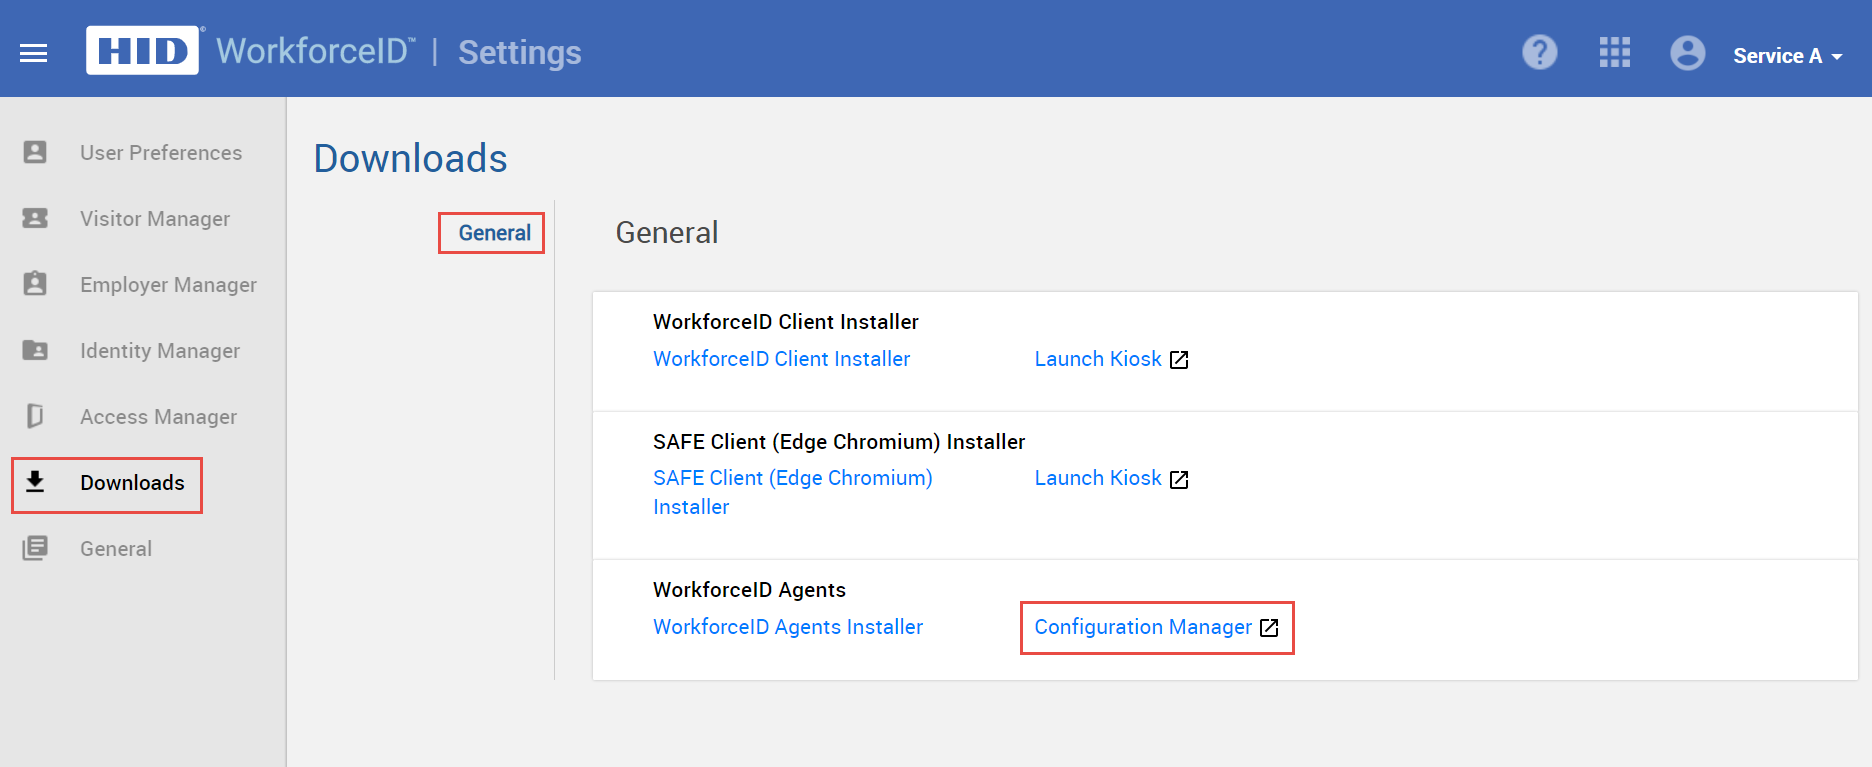
Click App Launcher and select Settings app.
-
Click on the Configuration Manager link, the list of integrated systems appears.
-
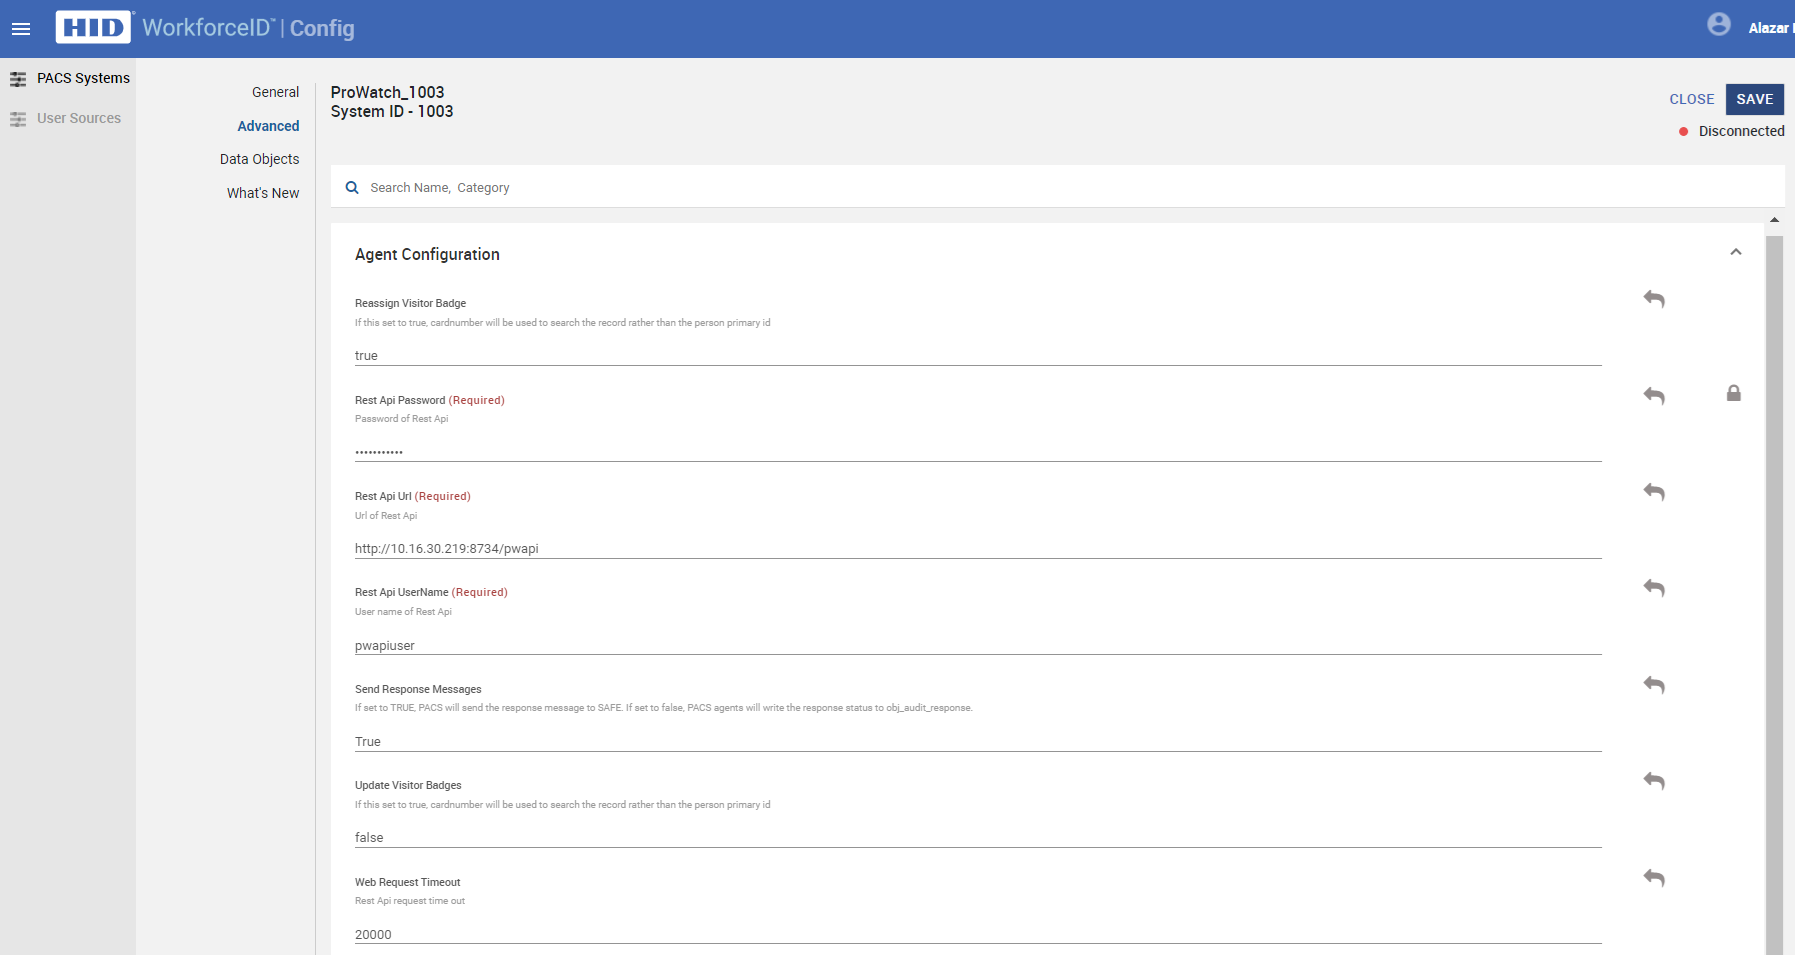
Select the Prowatch agent system and click the Advanced sub-tab.
-
Configure the required settings under the Agent configuration.
-
Once the configuration is complete please start/restart the HID Visitor Manager Prowatch Agent window service. Follow the below steps to navigate to services.
-
Press Windows + R keys.
-
In the run dialogue box enter services.msc and click OK.
Note: Any change to Prowatch Configuration on HID Visitor Manager Configuration App needs restart of Prowatch Agent Service to take affect.
Agent Verification
This section explains how the access areas are synced from Prowatch to HID Visitor Manager and how they get assigned to a Visitor.
Master Data Import for Access Area
Follow the below steps to verify master data (Access Areas) sync from Prowatch to HID Visitor Manager:
-
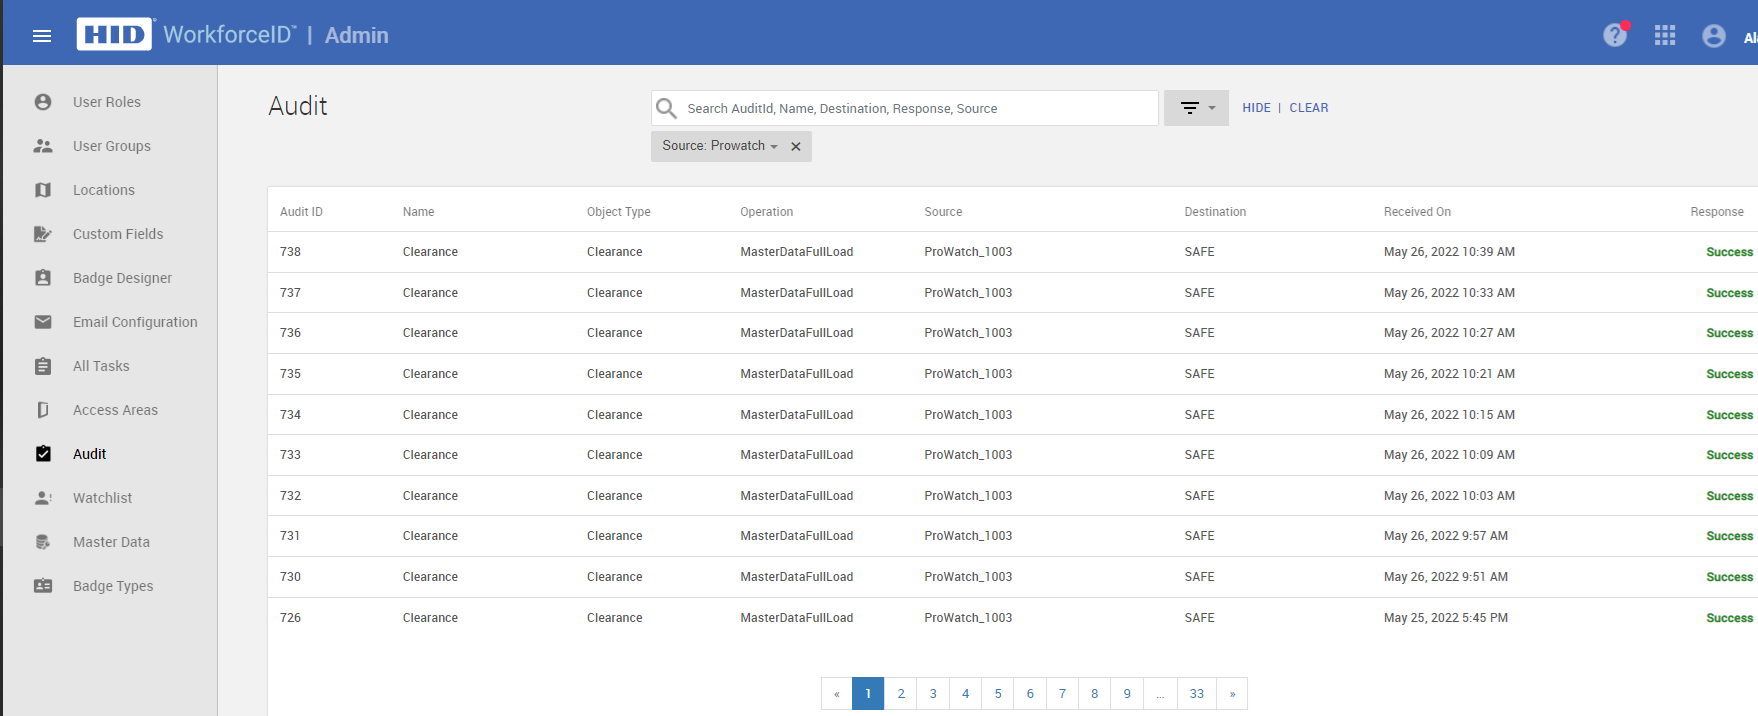
Once the Agent is started, navigate to Admin app > Audit tab.
-
Search for Source as Prowatch, it displays an entry for MasterDataFullLoad from Prowatch to HID Visitor Manager with the Response as Success.
-
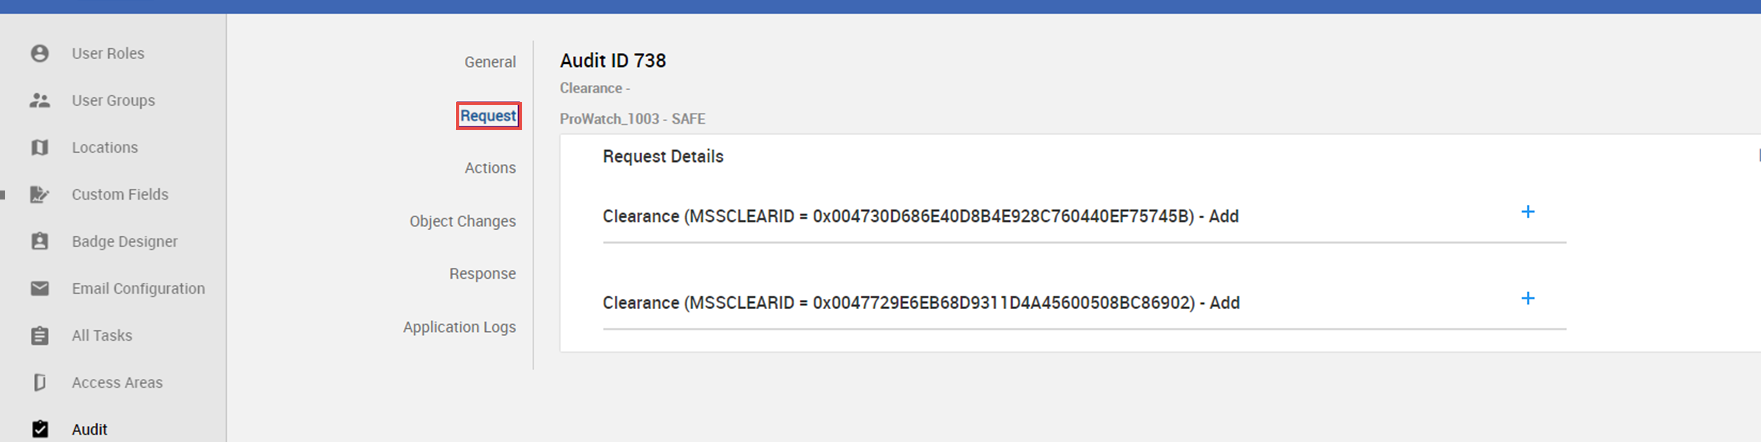
Click on any audit record to open the audit details.
-
Click on the Request sub-tab, it displays the CLEARANCE(Access Area) read as part of the master data load. Copy one of the Area Names.
-
Navigate to Admin app > Access Areas tab.
-
Search for the Access Area copied from Audit, then it is displayed under Access Areas.

Visitor Provisioning
This section explains how the visitor gets checked in and has access areas provisioned from HID Visitor Manager to Prowatch.
Use the following steps to set up a HID Visitor Manager system with access areas imported from Prowatch.
-
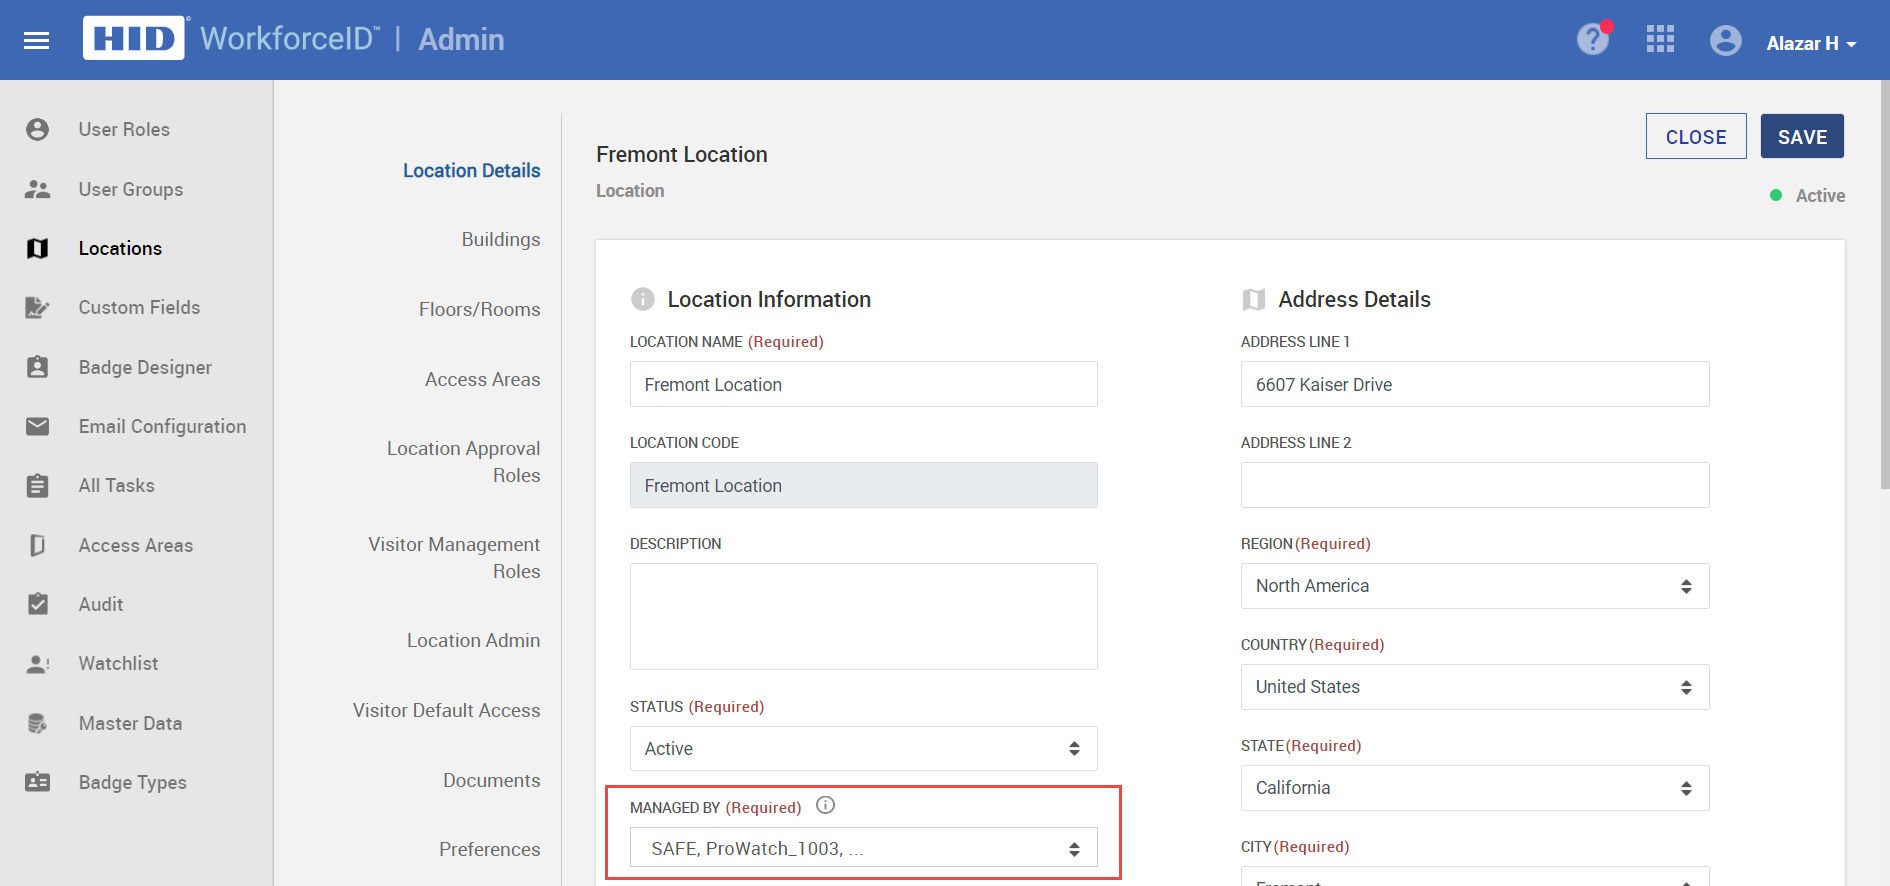
Open Location record, in the Location Details sub-tab, select the Prowatch that manages the location from the Managed By field.
-
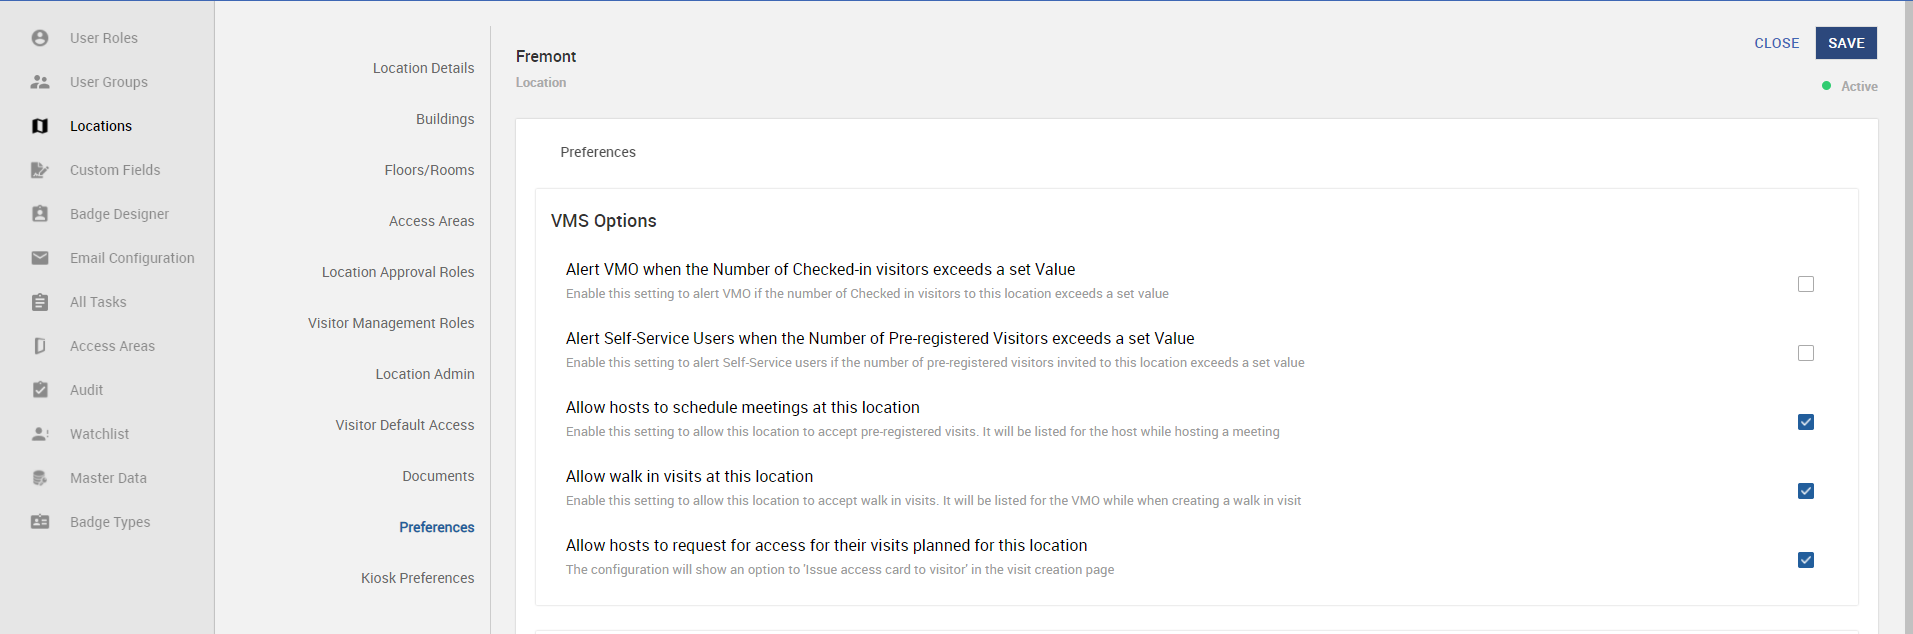
Navigate to Location record > Preferences sub-tab. Make sure the Allow hosts to request for access for their visits planned for this location setting enabled.
-
Click the Access Areas sub-tab. Search access areas by searching the system name as 'Prowatch' and assign access areas for the location.
-
Click on the Visitor Default Access sub-tab and assign default access areas of the location. The Access Area added defined here can be assigned to a Visitor. Set access areas as Auto Request - the access area will be automatically requested for the visit.
-
Create a Visit by going to the Host a Visit quick link from Self Service app. Make sure Issue Access Card to Visitor is selected as Yes. Note that default Visitor Access Areas are visible at the bottom of the page.

-
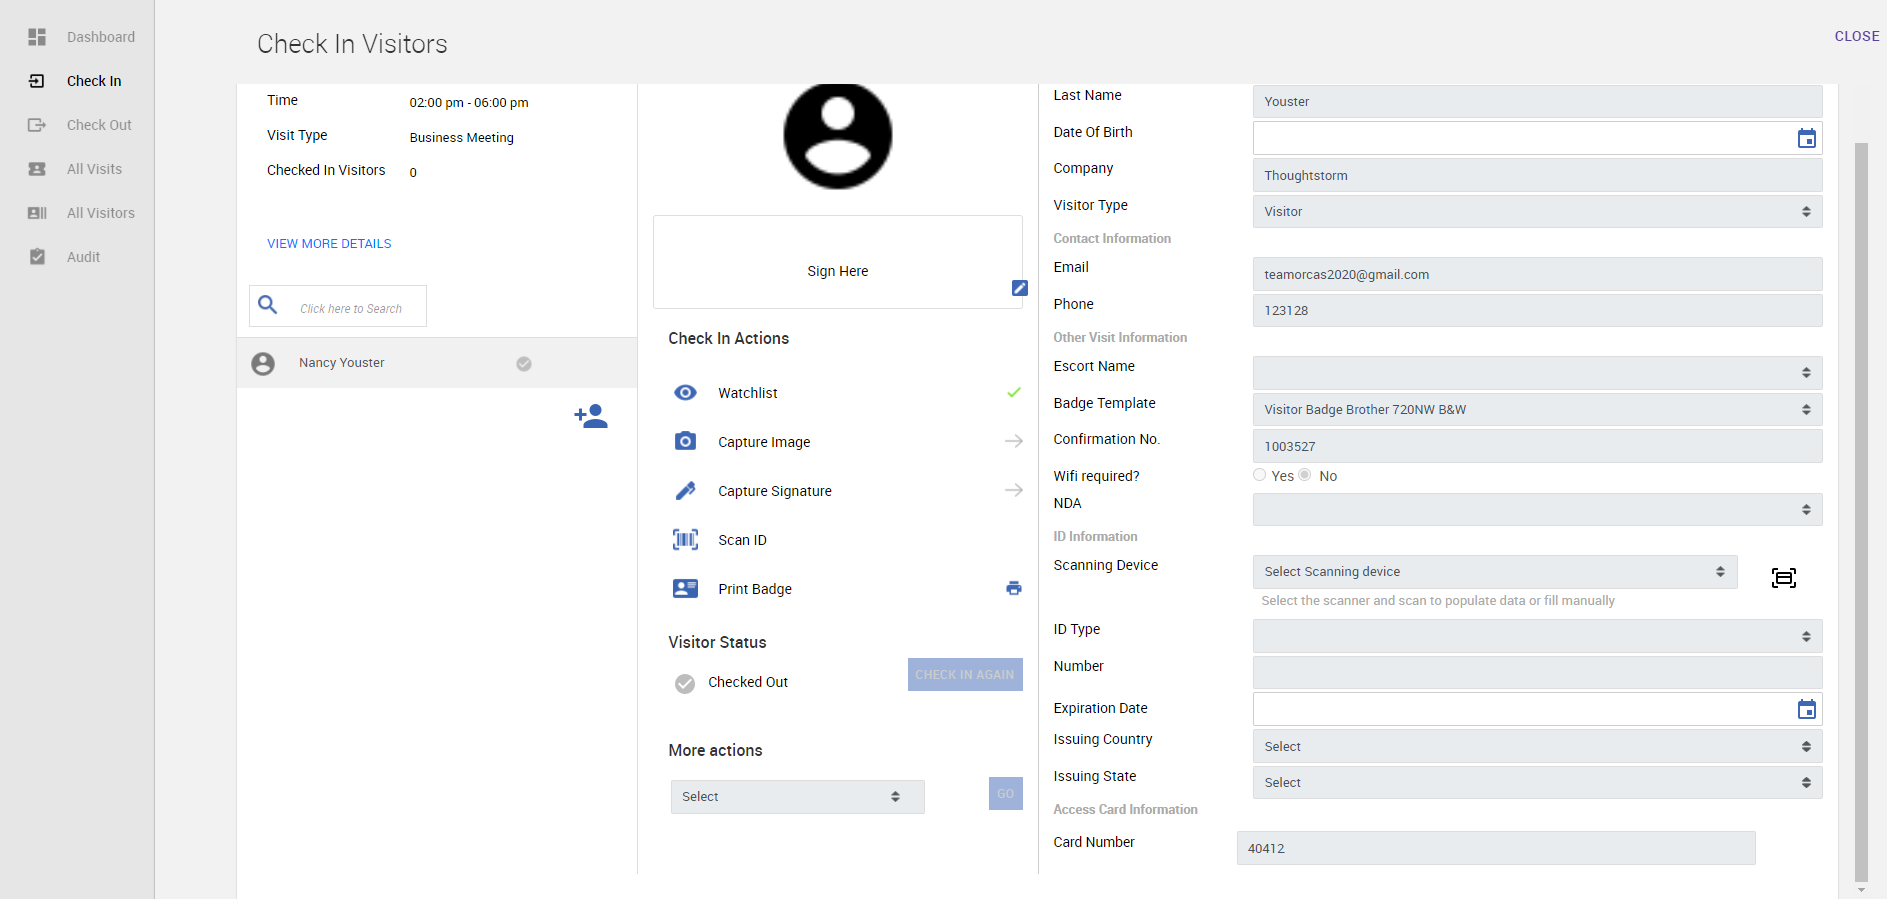
Check-in the visitor from Visitors app > Check-in tab. While checking-in the visitor, make sure to enter the Card Number.
-
Navigate to Visitors app > Audit tab.
-
You should see the Audit entry for the checked-in visitor from HID Visitor Manager to Genetec with the Response as Success. If the response is Pending, wait for few seconds and verify the status by refreshing the page.
-
-
Troubleshooting
Error 1: Generic HID Visitor Manager Agent Troubleshooting
The following error(s) describe general issues/log messages that can help to identify / resolve issue(s) with any HID Visitor Manager Agent, as they could potentially be encountered with any integration that's been installed in a customer's On Premise environment.
Service Start Rejected - Another installed service is already online/connected...
This error can be encountered at the time when a service that's been installed in an On Premise environment is attempted to be started. It arises because these agents require that only a single instance/installation of this agent be online at any given time (Active / Passive setup). This error is intentionally thrown during start-up as a result of the validation that's done at that time to ensure that no other installations of the same agent are currently running. If one is, the agent detects this and throws this validation error. The full error is as follows:
| 9/23/2021|23:54:05.9060|Warning |4540 |QSecureAgentService|QSecureUtilities.dll|QSServiceStarter|Log |Exception happened while starting service System.Exception: Service Start Rejected - Another installed service is already online/connected to this specific agent, and at most, only one should be active at any specific point in time. |
In order to resolve this issue, either the second service should be installed, or otherwise, the first instance installed (the other/running service) must first be stopped.
Error 2: Audit Log
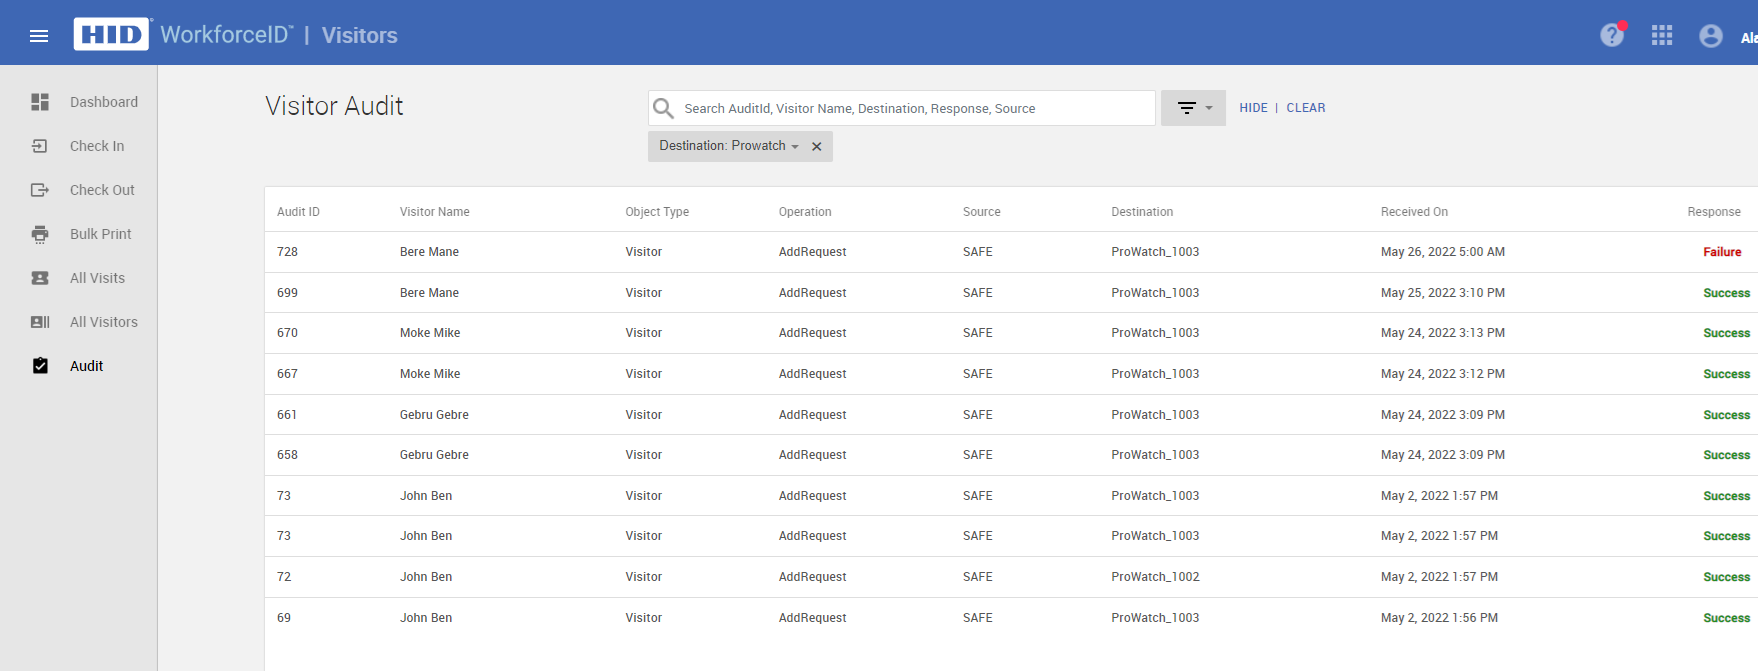
HID Visitor Manager application audit logs can be used to troubleshoot any issues as it logs all transactions that happen between HID Visitor Manager and Prowatch. Refer the below screenshots to understand how audit logs can be used to troubleshoot issues. Navigate to Visitors app > Audit tab. On this you can search and filter for specific audit logs you need to analyze. You can search for messages from HID Visitor Manager to Prowatch as well as from Prowatch to HID Visitor Manager .
The below image shows the list of failed messages from HID Visitor Manager to Prowatch
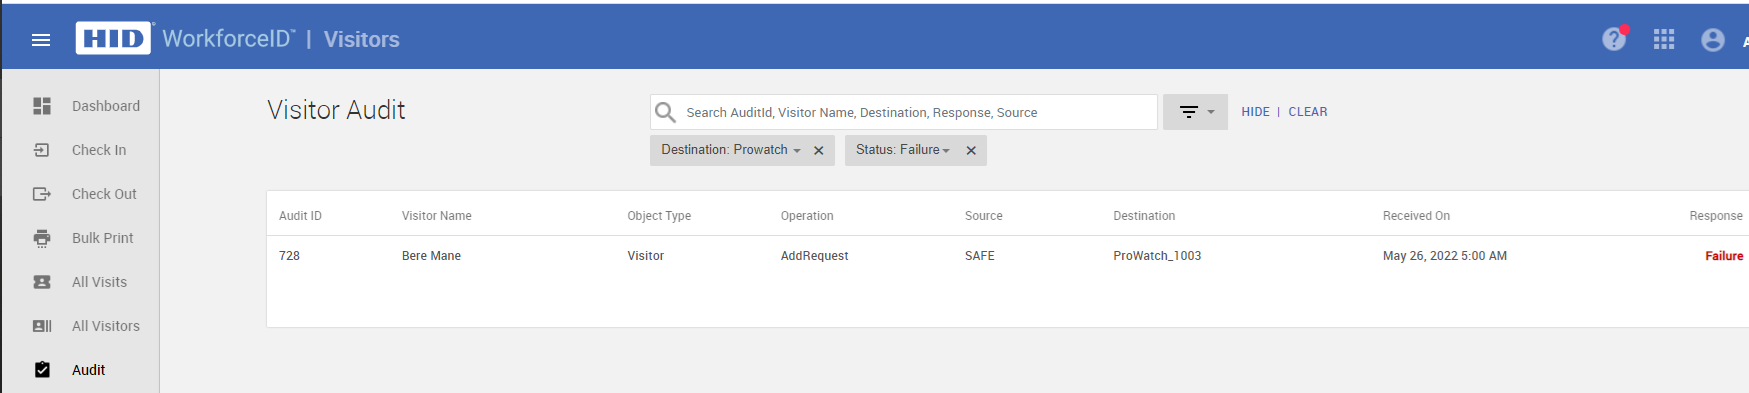
The system lists all the messages which have a status of Failure. You can drill down to the details by clicking on the Audit ID as shown below: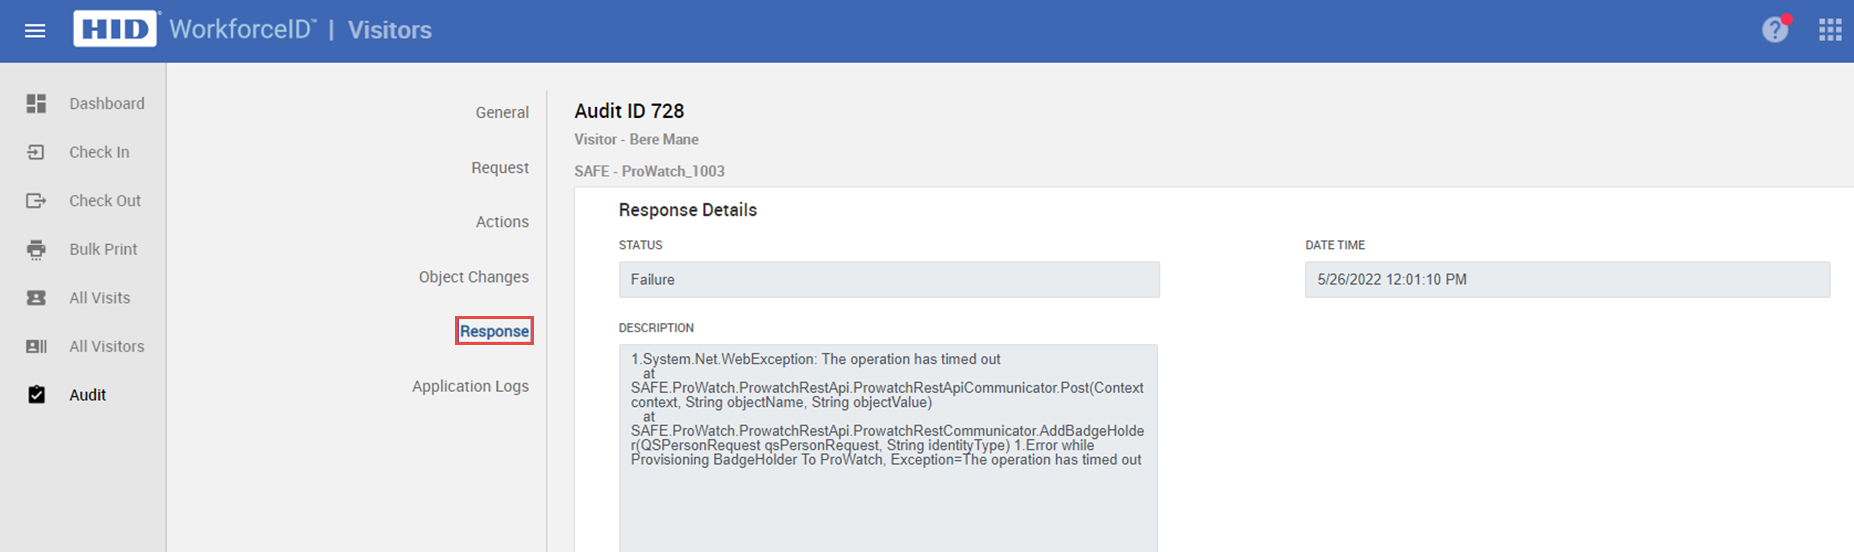
If the Prowatch agent successfully processed the XML message, then the result is returned and the response status is recorded as Success.
Error 3: Errors due to incorrect mappings
Check the agent mappings in the web configurator Data Objects tab to make sure the case is correct for all the field names (e.g. a field name set to 'STATUS' may behave differently than if it were set as mixed case 'Status').
Error 4: On-prem agent Logs
Use log located at C:\Program Files\HID\SAFE\Common\Logs on agent installation machine to troubleshoot issues with Prowatch agent. All Prowatch agent-related log entries are stored in “ProwatchAgentLog.txt”.
Related Topics:


