Configuring the ActivID Appliance for the Thales Luna HSM
Using the ActivID Console:
-
Install the Hot Fix
-
Configure the HSM settings
-
Migrate the cryptography to the external HSM
Install the ActivID Appliance Hot Fix
Install the ActivID Appliance 8.7 hot fix (FIXS2412001) that will enable you to deploy the Thales Luna HSM with the ActivID Appliance.
The ActivID Appliance must be initialized (that is, set the mode as Full installation or Front-End installation)
Upgrades are allowed if you have a maintenance license corresponding to the number of users in your deployment
Only software update files (RPM) provided by HID Global as signed and time-stamped RPM files are supported and can be installed. Third-party software update files are not supported
The hot fix is available for download from the HID Global Customer Portal.
The hot fix package required for migration is also available from your vendor. Please contact your vendor to obtain the update before starting the migration process.
Hot fix installation restarts appliance services
You must anticipate a service interruption if your appliance is not configured in for high availability (dual mode).
While a software update is in progress, you cannot perform any other operation with the ActivID Console (you will be redirected to the software update page)
-
Create a backup of your existing ActivID Appliance.
-
Log on to the ActivID Console and, under Appliance in the left menu, select Software Update.
-
Select the hot fix package and click Upload.
-
Click Apply.
At this point, the services are interrupted on the node.
Important:- Do NOT interrupt the update process while it is running. You must wait for the Done message to be displayed.
- Carefully read all the warning messages displayed by the update process, specifically if the process indicates that you need to reboot the ActivID Appliance.
-
When the update is complete, click Done.
-
Verify that the product version has been updated:
-
Under Configuration in the left menu, select Applications at least once after the update. This action refreshes the version.
To check the version of an application after installing a software update, log on to the application, and then select About.
-
-
Archive and purge the audit records on the appliance.
-
Restart the appliance using the ActivID Console or Terminal Console.
Alternatively, you can click Cancel if you have selected the wrong package.
Once the software update package has been uploaded successfully and is verified, then the field will be populated with the file name.
Configure the External HSM
The ActivID Authentication Services application is installed on the appliance
The hot fix (FIXS2412001) is installed
The External HSM is prepared as described in Preparing a Thales HSM for the ActivID Appliance and running
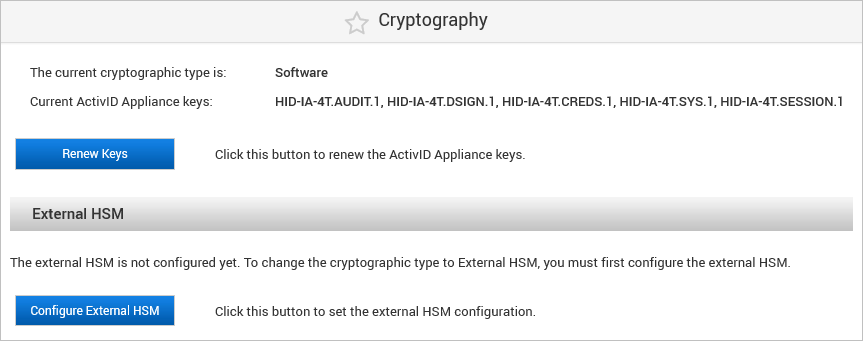
The existing cryptographic type is ‘Software’
The appliance is in single mode
Make sure you have a license for the Thales Luna HSM Client
-
Log on to the ActivID Console and, under System in the left menu, select Cryptography.
-
Under External HSM, click Configure External HSM.
-
Select Thales Luna Network HSM as the HSM type and click Next.
As the Thales Luna Network HSM integration requires the Thales Client product license, you must acknowledge that you have the required license.
If you click Decline, you will not be able to configure the HSM.
-
Click Accept to proceed.
-
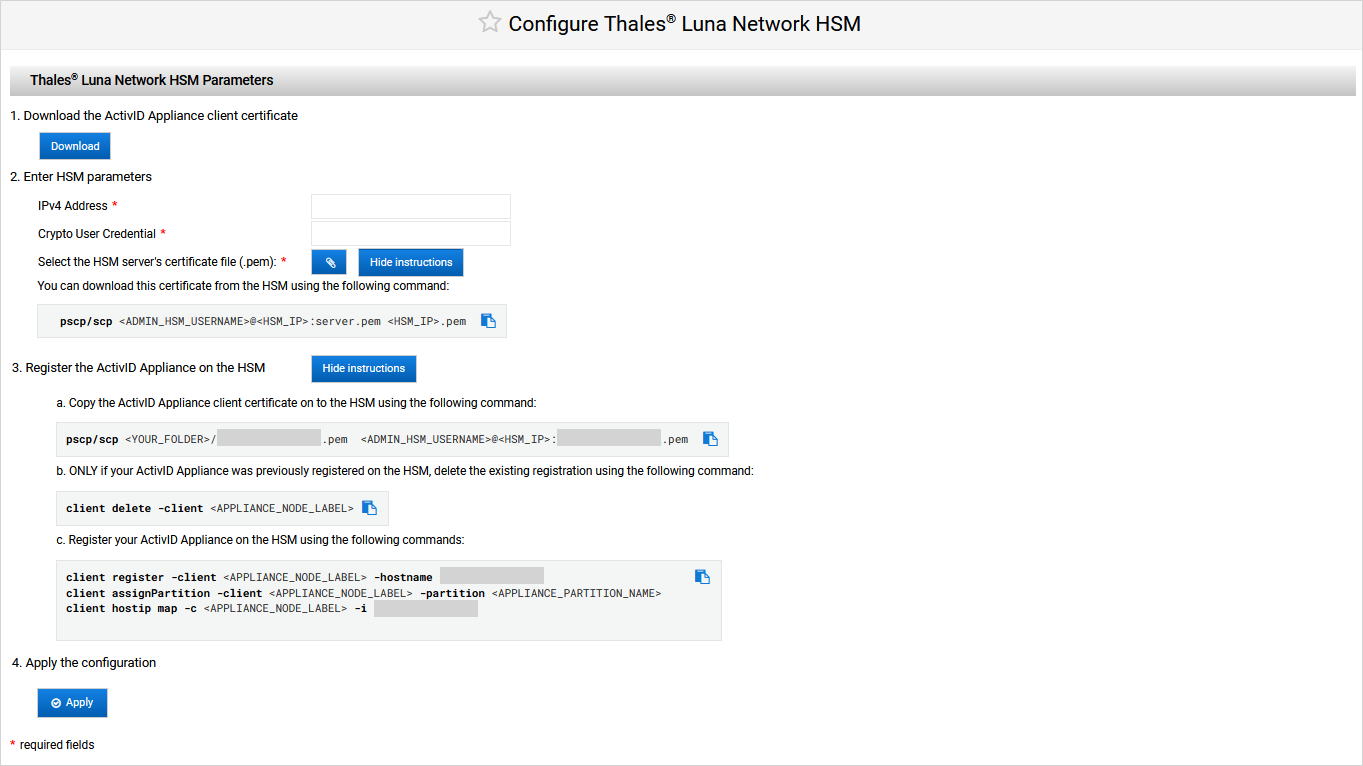
Click Download to get the ActivID Appliance client certificate that you will need to upload to the HSM later.
This certificate is valid for 10 years.
-
Enter the HSM parameters:
-
IPv4 Address
-
Crypto User Credential (as defined during the HSM preparation)
-
HSM server certificate (.pem)
Note: You can get this certificate from the HSM using one of the following commands:Where:
<ADMIN_HSM_USERNAME> is the username of the HSM admin user
<HSM_IP> is the IP address of your HSM
-
-
To register the ActivID Appliance on the HSM:
-
Copy the client certificate (that you downloaded above) to the HSM using one the following commands:
CopyOn a Microsoft Windows host:
pscp <YOUR_FOLDER>/<APPLIANCE_HOSTNAME>.pem <ADMIN_HSM_USERNAME>@<HSM_IP>:<APPLIANCE_HOSTNAME>.pemCopyOn a Linux host:
scp <YOUR_FOLDER>/<APPLIANCE_HOSTNAME>.pem <ADMIN_HSM_USERNAME>@<HSM_IP>:<APPLIANCE_HOSTNAME>.pemWhere:
-
<YOUR_FOLDER> is the directory containing the client certificate
-
<APPLIANCE_HOSTNAME> is the hostname of the ActivID Appliance (pre-populated in the console's code samples for convenience)
-
<ADMIN_HSM_USERNAME> is the username of the HSM admin user
-
<HSM_IP> is the IP address of the HSM
-
-
ONLY if the ActivID Appliance is already registered on the HSM, open an SSH terminal on the HSM using the HSM Administrator account and delete the existing registration using the following command:
Copyclient delete -client <APPLIANCE_NODE_LABEL> -
Open an SSH terminal on the HSM using the HSM Administrator account and register the client certificate using the following commands:
Copyclient register -client <APPLIANCE_NODE_LABEL> -hostname <APPLIANCE_HOSTNAME>
client assignPartition -client <APPLIANCE_NODE_LABEL> -partition <APPLIANCE_PARTITION_NAME>CopyMap a label to the IP of the ActivID Appliance
client hostip map -c <APPLIANCE_NODE_LABEL> -i <APPLIANCE_IP>Where:
-
<APPLIANCE_NODE_LABEL> is the name of node for the ActivID Appliance on the HSM
-
<APPLIANCE_HOSTNAME> is the hostname of the ActivID Appliance (pre-populated in the console's code sample for convenience)
-
<APPLIANCE_PARTITION_NAME> is the name of the partition you created on the HSM for the ActivID Appliance
-
<APPLIANCE_IP> is the IP address of the ActivID Appliance (pre-populated in the console's code sample for convenience)
-
-
-
Return to the ActivID Console and click Apply.
-
Click Done.
-
You can now migrate to the external HSM.
Migrate to the External HSM
The duration of the migration process depends on the size of the data to be signed with the new encryption keys. For a migration with existing domains, users and configuration, this could take several hours.
After migration to the external HSM, you will only be able to revert to the Software cryptographic mode by restoring from a backup of your appliance created before migration when the cryptographic type was Software.
The External HSM is configured as described Configure the External HSM
The existing cryptographic type is ‘Software’
The appliance is in single mode
Before performing a cryptographic migration, it is strongly recommended that you:
Back up the appliance to be able to revert to the Software cryptographic type if necessary
Archive the Audit records (as the Audit data is not migrated)
-
Click Yes, proceed.
Note: The migration process archives all the non-archived audit records and generates a .csv file on the appliance’s file system (named according to the Archive Now conventions). This file will be pushed to the S/FTP server and deleted from the file system at the next scheduled or on-demand archive operation.
-
Click Done when the migration process is complete.
The ActivID Appliance configuration is updated and the ActivID applications and ActivID Console are restarted.
After successful migration, the cryptographic type is now Thales Luna HSM.
-
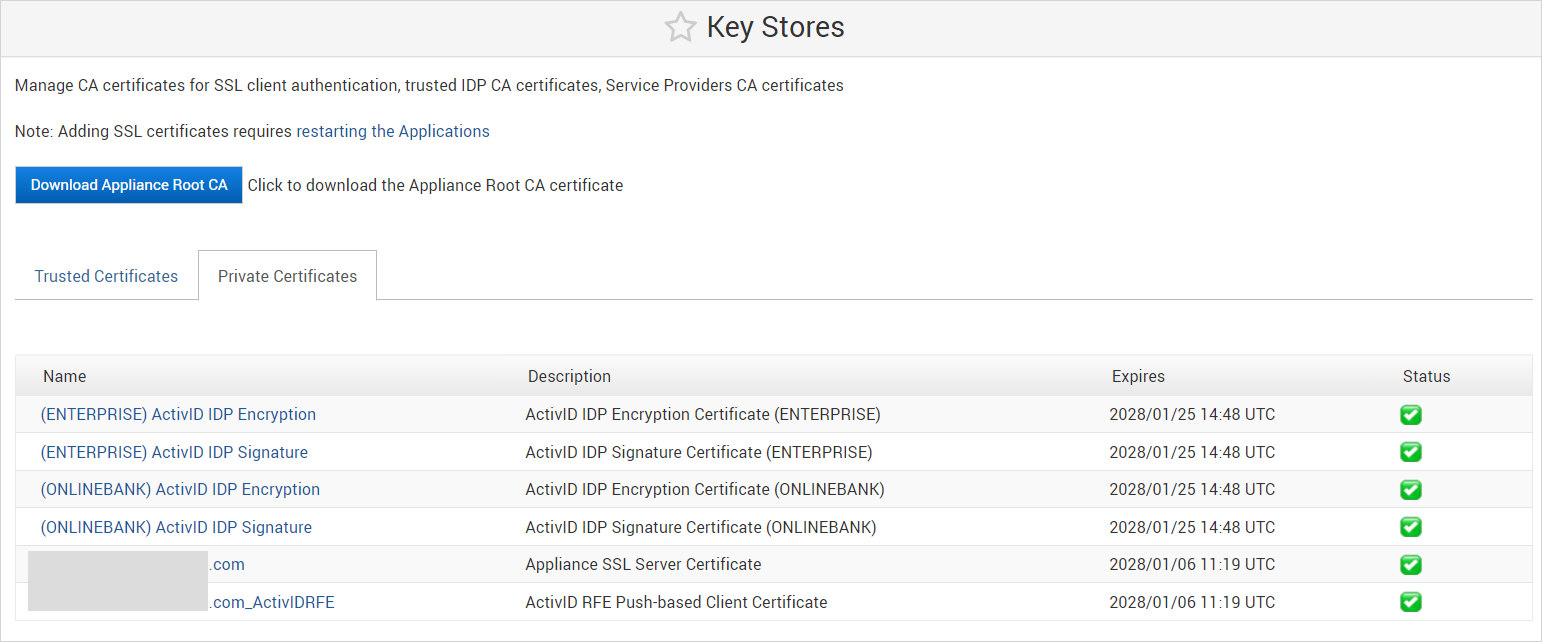
In the ActivID Console Configuration menu, select Key Stores and verify that the ActivID IDP certificates are present in the ActivID Appliance keystore.
Important: After a cryptographic migration to the external HSM, the ActivID Authentication Portal Metadata must be re-imported on each configured service provider as new IDP certificates have been created in the external HSM.
See also:


