Configure the ActivID Self-Service Portal Access
Users can access the ActivID Self-Service Portal using the portal’s designated URL in your web browser.
https://<hostname>:<port>/ssp
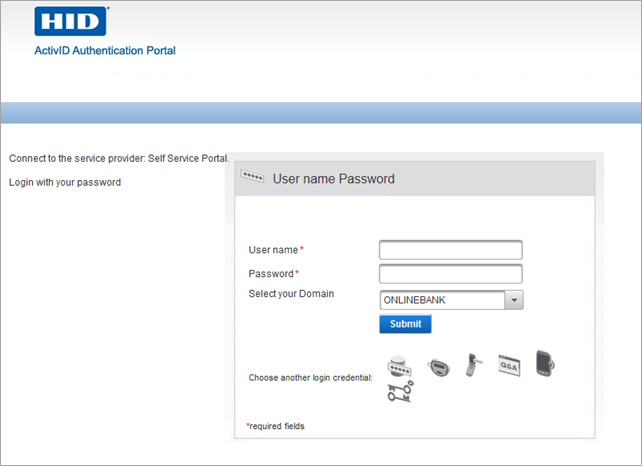
Users are prompted to log on with an existing authentication method:
![]() Static password (network credentials)
Static password (network credentials)
![]() LDAP username and password
LDAP username and password
Notes
- To create the LDAP password authentication record (for fallback/passthrough), users must first authenticate with the One-Time Password (OTP) method, and enter their LDAP password in place of an OTP.
- For subsequent LDAP password logons, users can then select the LDAP password method, and authenticate with their LDAP password.
![]() One-Time Password (OTP) generated by an authentication device
One-Time Password (OTP) generated by an authentication device
![]() PKI certificate on a smart card
PKI certificate on a smart card
![]() Security Questions and Answers
Security Questions and Answers
![]() A password delivered via email or SMS
A password delivered via email or SMS
![]() Push Authentication using HID Approve to validate the logon
Push Authentication using HID Approve to validate the logon
![]() FIDO Challenge/Response U2F Authentication using two-step authentication (for example, username/password and OTP) with a tiered authentication policy. To enable this method, see Configure Support for FIDO U2F Authentication.
FIDO Challenge/Response U2F Authentication using two-step authentication (for example, username/password and OTP) with a tiered authentication policy. To enable this method, see Configure Support for FIDO U2F Authentication.
Access with a PKI Certificate
- The user’s CA Certificate must be imported into the server truststore to enable an SSL connection.
- The user must have been assigned a certificate (private key) which can be installed in the browser certificate store – or stored on a smart card. The user’s certificate must be imported into ActivID AS during the registration of their portal PKI Login.
- The application server has a connector configured for TLS 1.1/TLS 1.2 with client authentication.
- If a smart card-based certificate is used, then a middleware – such as ActivID ActivClient® – must be installed locally on the client machine. If the certificate is password-protected, then the user will be prompted to enter the password.
- The server certificate must be installed in the browser's truststore.
- If your deployment uses TLS mutual authentication, the user will be redirected to port 8443. Make sure your reverse proxy is configured correctly.
To log on to the ActivID Self-Service Portal with PKI credentials, import the following certificates:
- Certificate Authority certificate of the CA you will use to issue the certificate for the user.
- A user certificate bundle including its intermediate CA certificates (.cer, .crt, .pem, .p7b) for the user.
- A certificate with the corresponding private key (p12 or .pfx) for the user.
Certificate Validation and Revocation Check
Users’ certificates are validated when importing the certificate and users log on.
Online Certificate Status Protocol (OCSP) and full Certificate Revocation List (CRL) can both be used to check the revocation status of a certificate. Delta and redirect CRLs are not supported.
ActivID AS supports CRL Distribution Points (CDP) specified in certificates or locally configured CDPs.
By default, OCSP is the preferred method for checking revocation status. When using CRL, the CDP URL selection rules are:
- If manually configured, CDPs specified in certificates are ignored.
- HTTP/FTP CDPs are preferred to LDAP CDPs.
- LDAP URLs without hostname are simply ignored.
The behavior of the certificate validation is configurable.
Set the ActivID Self-Service Portal Logon Methods
The ActivID Authentication Portal allows users to access the Self-Service Portal features once they have successfully authenticated.
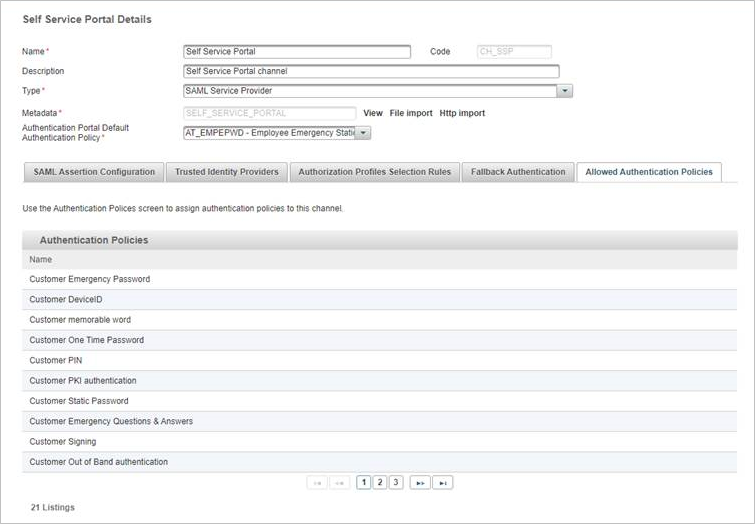
- The ActivID Self-Service Portal channel must have a set of Allowed Authentication policies.
- Authentication policy mappings must exist to display the associated logon GUI templates.
The authentication policies that are assigned to the ActivID Self-Service Portal channel are listed in the Allowed Authentication Policies tab of the channel (in the ActivID Management Console).
To modify the available logon methods:
- Log on to the ActivID Management Console as an ActivID Administrator (as you need the Update authentication policy permission).
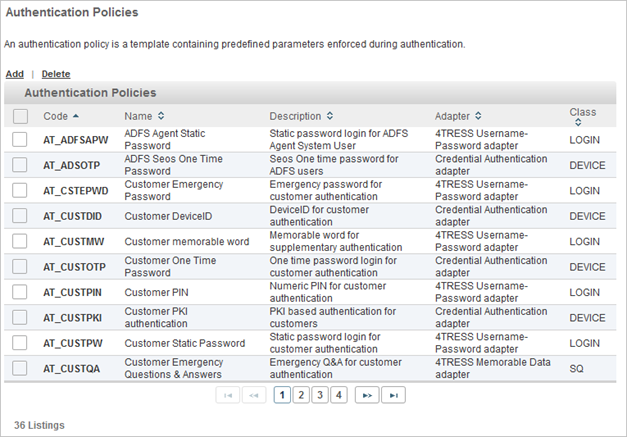
- In the Configuration tab, under Polices, select Authentication and click Authentication Policies.
- Click the Code of the authentication policy you want to use.
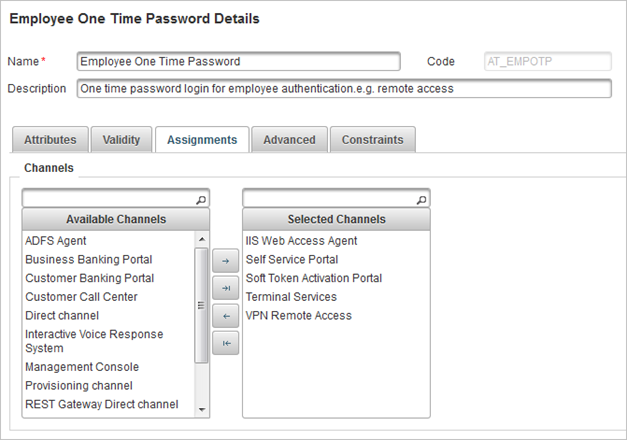
- Select the Assignments tab.
- Assign the Authentication Policy to the ActivID Self-Service Portal by moving it from the Available Channels list to the Selected Channels list.
- Click Save.
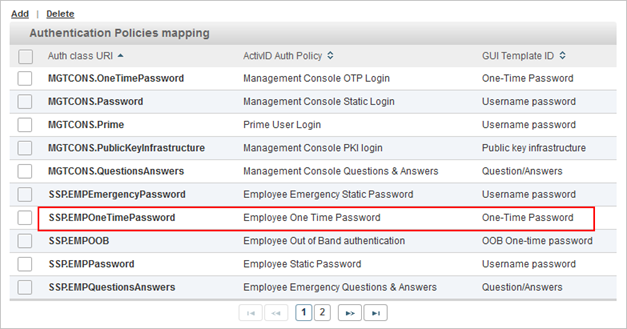
- Under Policies, select Identity Providers and then ActivID Identity Provider to check that an Authentication Policies Mapping exists for the authentication policy, in the Authentication Policies mapping list:
In this example, the authentication policy is already assigned to the ActivID Self-Service Portal.
If not, you must add a new authentication policies mapping.
You can also add support for FIDO passkeys as a second factor authentication.
Make sure that this option is not selected for users that will log on using LDAP pass-through.
Direct Access to ActivID Self-Service Portal Features
Each of the ActivID Self-Service Portal features can be accessed directly using specific links. You can integrate these links into your own applications or use them to control how end users access and use the portal.
For example, to direct end users directly to the enrollment feature via a notification email, you can provide a direct URL to that feature of the ActivID Self-Service Portal.
ActivID Self-Service Portal Direct Access Links
| Feature | Direct URL |
|---|---|
| Self-Service Portal home | https://<hostname>:<port>/ssp/home.xhtml |
| Activate my device | https://<hostname>:<port>/ssp/tab/activate-token/activateTokenHome.xhtml |
| Activate Hardware Token | https://<hostname>:<port>/ssp/tab/activate-token/activateHardwareToken.xhtml |
| Activate HID Approve mobile app | https://<hostname>:<port>/ssp/tab/activate-token/activateMobile.xhtml |
| View my devices | https://<hostname>:<port>/ssp/tab/my-devices/list/deviceList.xhtml |
| Test my device | https://<hostname>:<port>/ssp/tab/my-devices/test/testDeviceSelect.xhtml |
| Rename my device | https://<hostname>:<port>/ssp/tab/my-devices/list/renameDeviceSelect.xhtml |
| I have a problem | https://<hostname>:<port>/ssp/tab/my-problem/myProblemHome.xhtml |
| Report a device as lost, stolen or damaged | https://<hostname>:<port>/ssp/tab/my-problem/lost/deviceLost.xhtml |
| I cannot log in | https://<hostname>:<port>/ssp/tab/my-problem/cannot-login/cannotLogin.xhtml |
Domain-Specific Direct Access to ActivID Self-Service Portal Features
The direct access configuration can also be applied per domain so that a direct URL directs the end user to the chosen feature in the chosen domain.
When users log on to the ActivID Self-Service Portal using the direct link, they do not need to select their domain (the option is not available) and they are re-directed to the feature.
You can be define this property in the <ACTIVID_HOME>/ActivID_AS/applications/resources/ap/samlidp.properties file.
To define the domain direct access links, add the domain name to the feature URL.
For example, the Activate HID Approve mobile app link can be configured as
https://<hostname>:<port>/ssp/tab/activate-token/activateMobile.xhtml?domain=BANKING
The following table lists the activation options as examples.
ActivID Self-Service Portal Domain-Specific Direct Access Links
| Feature | Domain-Specific Direct URL |
|---|---|
| Activate Hardware Token | https://<hostname>:<port>/ssp/tab/activate-token/activateHardwareToken.xhtml?domain=<domainname> |
| Activate HID Approve mobile app | https://<hostname>:<port>/ssp/tab/activate-token/activateMobile.xhtml?domain=<domainname> |
ActivID AS supports the addition of the domain name in the following formats:
- Clear value of the domain name
- sha256 value of the domain name
In the examples above, domain=<domainname> can be replaced by the sha256 value of the domain name if required.
For example, the Activate HID Approve mobile app link can be configured as
https://<hostname>:<port>/ssp/tab/activate-token/activateMobile.xhtml?domain=daa1a83ff66299a0a7c4f3797cc225b7a70552b70743dbf2b4980fbd0af08d05
For further information about defining the direct access links, see Hide the List of Domains.


