Thales Luna Specific Information
This additional integration describes Thales Luna Hardware Security Module (HSM) installation considerations.
Install the Thales Luna HSM
-
Install the Thales Luna HSM based on the description in the relevant Installation Guide, and then set up the HSM based on the instructions in the HSM Setup Guide.
The HSM integrates with Validation Authority using a network interface. This does not require hardware modifications to the Validation Authority server. During HSM installation and configuration, remember the following points:
When you create a partition on the HSM for use in storing keys, you will be required to give the partition a brief label. For example, you might have created an initial partition called partition1. To determine the name of the partition in an existing Thales Luna HSM, connect to the HSM using either a serial console or ssh, and type partition –list in the HSM console:
Copy[lunasa] lunash:> partition -list
Partition: 65213001, Name: vapartitionThis example shows one partition, named vapartition. You must know the password used to connect to this partition. When the partition was created, the partition password was displayed on the HSM PIN Entry Device (PED), and the password can be changed with the following command:
Copypartition –changePwThe following example assumes that the partition password was changed to myhsmpw0.
-
When the HSM is configured, and the Validation Authority host is configured with a proper HSM client certificate and server certificate, you should be able to run the salogin and ckdemo (or ckdemo2) commands successfully:
Copy$ salogin -o -s 0 -p “myhsmpw0”
...
Login successful.
$ ckdemo
...
Starting CHRYSTOKI DEMO - SIMULATION LAB
Status: Doing great, no errors (CKR_OK)
TOKEN:
... -
There are several functions in the ckdemo/ckdemo2 test application that are useful for testing and troubleshooting the HSM connection. Specifically:
( 1) Open Session
( 3) Login
( 4) Logout
(12) Token Info
(90) Self Test
-
When you have confirmed that the HSM is operating properly and that the server can log on to the HSM successfully, you will be able to install Validation Authority and configure it to operate with the HSM as described in the rest of this chapter.
Install and Configure HSM Support on Validation Authority
-
Make sure that the architecture of Java and the HSM match. For example, if the HSM only has 32-bit libraries, then make sure to use Validation Authority with Java 32-bit.
-
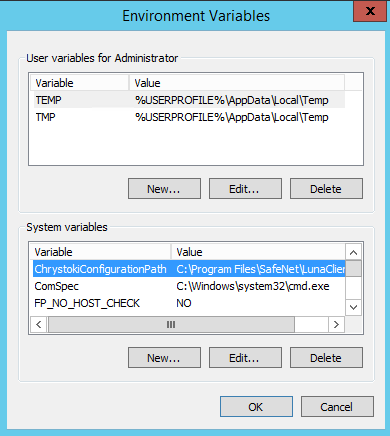
Make sure to have the ChrystokiConfigurationPath System variable set to your HSM Client path installed C:\Program Files\SafeNet\LunaClient in a Windows environment.
-
Make sure that path for the cryptoki.dll file in the crystoki.ini file under C:\Program Files\SafeNet\LunaClient is correct. The cryptoki.dll file path depends on whether the HSM libraries are 32-bit or 64-bit. For Windows 64-bit, it is usually LibNT=C:\Program Files\SafeNet\LunaClient\cryptoki.dll.
Note:If you are reconfiguring Validation Authority to use the HSM after the initial installation and configuration, then you must copy the following files from the SafeNet installation directory.
-
On Linux, the directory is usually /usr/safenet/lunaclient/jsp/lib.
-
On Windows, for 64-bit HSM libraries, this directory is usually C:\Program Files\SafeNet\LunaClient\JSP\lib.
-
On Windows, for 32-bit HSM libraries, the directory is usually C:\Program Files\LunaSA\win32\jsp.
-
LunaJCASP.jar for SafeNet 4.x
-
LunaJCESP.jar for SafeNet 4.x
-
LunaProvider.jar for SafeNet 5.x and above.
-
libLunaAPI.so (for Linux) or LunaAPI.dll (for Windows)
-
-
-
Install Validation Authority. See section Installing Validation Authority for Windows or Installing Validation Authority for Linux.
-
When prompted, enable the Install Support for an HSM option. Then, click Choose to choose the library directory for SafeNet library files. Then, click Next.
-
On Linux, this directory is usually /usr/safenet/lunaclient/jsp/lib.
-
On Windows, this directory is usually C:\Program Files\SafeNet\LunaClient\JSP\lib (for 64-bit) and C:\Program Files\LunaSA\win32\jsp (for 32-bit).
The Validation Authority installer will copy the files mentioned above from this directory into the Validation Authority library directories server\WEB-INF\lib and setup\server\WEB-INF\lib.
-
-
Continue the remaining Validation Authority installation steps and begin the Validation Authority configuration as described in sections Configure Validation Authority for Automatic Start-Up and Shut Down for Windows and Configure Validation Authority for Automatic Start-Up and Shut Down for Linux.
-
When you are prompted to configure the Keystore, select the option Thales Luna (client software 5 and later) option.
-
Select the Use an Oracle SunJCE keystore for SSL Key option. All the other keys will be stored in the keystore associated with the provider you selected above.
-
Enter the SafeNet HSM Partition Name.
-
Select the option Regenerate Keys if you want to create new keys. The Validation Authority Configuration utility will create a new set of security keys that are protected by the Thales Luna HSM. For more information on how to regenerate keys, see section Configuring the Keystore.
-
Click Next, and continue with the Validation Authority configuration.
Configure Thales Luna HSM in HA Mode
If you want to configure your Thales Luna HSM in High Availability (HA) mode, then perform the following steps using the SafeNet client command, vtl.
-
Get the serial numbers of existing physical slots:
Copyvtl listslots -
Create a new HA group:
Copylunacm:>hagroup creategroup -label <label> {-slot <slotnum> | -serialnumber <serialnum>} -
Disable physical slots:
Copylunacm:>hagroup HAOnly -enable
Now, you can configure your VA to use the HA slot by using the label "mynewHAGroup".


