Getting Started with the APIs
The following sections describe the first steps you should take when integrating the HID Authentication Service APIs:
-
Generate an access token for your application so that you can interact with HID Authentication Service APIs.
-
Test your client application's access to the APIs.
The URL of the HID Authentication Service platform (see HID Authentication Service platforms around the world)
Your tenant ID (the identifier of your tenant, starting with the letter "t", for example, t987198273d986w9869)
You have logged on to the portal and enrolled for push-based authentication with HID Approve as described in logging on for the first time
This account is the initial Organization Administrator for your tenant, a privileged user with full management permissions (users, groups, client IDs and other administrators)
Create your OpenID Client ID/Application
As explained in the basic concepts overview, each Client ID represents a unique application.
The application interacts with the HID Authentication Service to provide services, including userless administrative functions for your tenant and multi-factor authentication for your end users.
-
Log on to the HID Authentication Service.
-
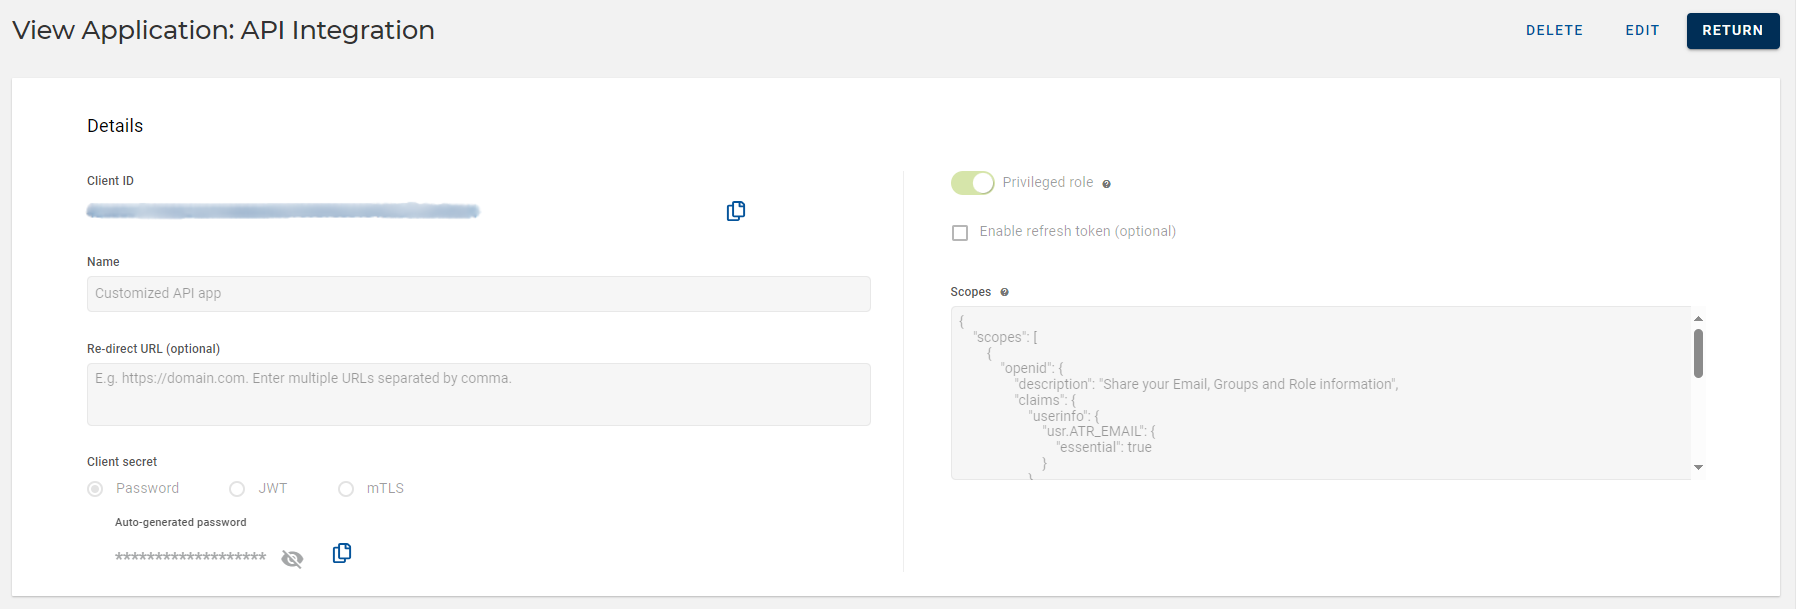
Create a new API Integration application with the following settings:
-
The Redirect URLs for applications or services where HID Authentication Service redirects the user once they are successfully authenticated
-
The Client secret which is essentially how the application will authenticate itself to the HID Authentication Service
-
For Password authentication, HID Authentication Service will automatically generate a password for the client ID
-
For Certificate authentication, upload the required certificate
-
-
The level of privileges for the application based on the role
For API integration, the following roles are available:
-
Non-privileged role to authenticate users with OpenID
-
Privileged role to manage your tenant, as well as authenticate users
Note: If you select the Privileged role, it is recommended using certificate-based authentication for the Client secret. -
-
If the client's access tokens should be automatically refreshed and the duration of the tokens
-
The scopes to control the data that is returned to your application when using the OpenID endpoints
-
When the client is successfully created, you will need the following information when using your client application with the APIs:
-
Client ID (client_id) - the generated user ID (or externalId) for your Client ID
In this example, 98798792837492342342340970879879879872342
-
Client secret (client_secret) - the generated password or uploaded certificate for your Client ID
These values can be copied from the application configuration.

This example is illustrated using password authentication (where the password is @FirstAuthentication350976?#).
Generate an Access Token
To interact with the APIs, you need to get a bearer token (access token) for your client application created above by authenticating to the HID Authentication Service.
The authentication is initiated with a simple POST request through the Token endpoint.
Request Header
The Client ID and its secret are passed to the API with the HTTP Authorization header, leveraging the HTTP basic authentication mechanism.
You must URL-encode the Client ID and its secret when passing it to the API. As they might include non-alphanumeric characters, encoding will avoid conflicting with URL-reserved characters.
If the request does contain conflicts, the authentication might be either refused by the HID Authentication Service or an error will be returned indicating that the format of the request is incorrect.
In this example, the authorization parameter is generated using the Client ID and secret (password) as:
Basic + " " + base64Encode( urlEncode( "98798792837492342342340970879879879872342" ) + ":" + urlEncode( "@FirstAuthentication350976?#" ) )Where the encoded result is:
Basic OTg3OTg3OTI4Mzc0OTIzNDIzNDIzNDA5NzA4Nzk4Nzk4Nzk4NzIzNDI6JTQwRmlyc3RBdXRoZW50aWNhdGlvbjM1MDk3NiUzRiUyMw==The result should then be passed in the request's HTTP Authorization header as:
Authorization: Basic OTg3OTg3OTI4Mzc0OTIzNDIzNDIzNDA5NzA4Nzk4Nzk4Nzk4NzIzNDI6JTQwRmlyc3RBdXRoZW50aWNhdGlvbjM1MDk3NiUzRiUyMw==Request Body
The important part of the request is in the body where the grant_type parameter should be set to client_credentials.
It indicates to the HID Authentication Service to authenticate the Client ID and to send back a corresponding access token.
POST https://[base-server-url]/{tenant}/authn/token HTTP/1.1
Authorization: Basic OTg3OTg3OTI4Mzc0OTIzNDIzNDIzNDA5NzA4Nzk4Nzk4Nzk4NzIzNDI6JTQwRmlyc3RBdXRoZW50aWNhdGlvbjM1MDk3NiUzRiUyMw==
Content-Type: application/x-www-form-urlencoded
grant_type=client_credentials
Response
The response contains the required token
{
    "access_token":"lQVC9QAAAW1ylpXBSSvQNC9dzb9PG0ttxg1G+eMh",
    "id_token":"eyJr(...)",
    "token_type":"Bearer",
    "expires_in":3600
}
Where the:
-
access_token is the value of the bearer token allowing to leverage the functions of the HID Authentication Service APIs, such as the SCIM endpoints for user, group and role management
-
id_token is the JWT-encoded information about the access_token (such as the user who retrieved the token, when it was issued, when it will expire, etc.)
-
expires_in indicates the validity of the token in seconds
Test your Access Token
You can test your client application by passing the access_token in the HTTP Authorization header of a request, with the Bearer prefix.
For example, you can create a user with basic information (username and email)
POST https://[base-server-url]/scim/tenant/v2/Users HTTP/1.1
Authorization: Bearer lQVC9QAAAW1ylpXBSSvQNC9dzb9PG0ttxg1G+eMh
Content-Type: "application/scim+json"

{
   "schemas":[
      "urn:ietf:params:scim:schemas:core:2.0:User",
      "urn:hid:scim:api:idp:2.0:Attribute",
      "urn:hid:scim:api:idp:2.0:UserDevice"   ],
   "externalId":"jsmith@company.com",
   "userName":"jsmith",
   "name":{
      "familyName":"Smith",
      "givenName":"John"   },
   "emails":[
      {
         "value":"jsmith@company.com",
         "type":"work"      }
   ],
   "groups":[
      {
         "value":"UG_ROOT"      }
   ]
}Response for the user creation request where the internal ID generated by HID Authentication Service for the user is 46052
HTTP/1.1 201 OK
{
  "schemas": [
    "urn:ietf:params:scim:schemas:core:2.0:User",
    "urn:hid:scim:api:idp:2.0:UserAttribute",
    "urn:hid:scim:api:idp:2.0:UserAuthenticator",
    "urn:hid:scim:api:idp:2.0:UserDevice"
  ],
  "id": "46052",
    "externalId": "jsmith@company.com",
    "meta": {
        "resourceType": "User",
        "created": "2023-03-27T08:41:45Z",
        "location": https://[base-server-url]/scim/tenant/v2/Users/46052,
        "version": "1"
    },
    "userName": "jsmith",
    "name": {
        "familyName": "John",
        "givenName": "Smith"
    },
    "displayName": "Smith John",
    "userType": "FTRESS",
    "active": true,
    "emails": [{"value": jsmith@company.com}],
    "groups": [ {
        "type": "Group",
        "display": "ROOT",
        "value": "UG_ROOT",
        "$ref": https://[base-server-url]/scim/tenant/v2/Groups/UG_ROOT
    }]
}
Using the internal ID (46052), you can then create authenticators for the user.
Next Steps


