Configuring Support for Microsoft Entra ID using the Portals
The integration consists of the following configuration steps using the HID Authentication Service Administration Portal and the Microsoft Entra ID admin center:
Provisioning Your Users:
Enable Support for Contactless Card Authentication:
The following configuration procedures are illustrated using Contactless Card authentication. To use a different authentication method, see Creating a New Authentication Journey.
Prerequisites
Before configuring the solution, you must have:
-
A Microsoft Azure directory with a valid license for Entra ID (P1 or P2)
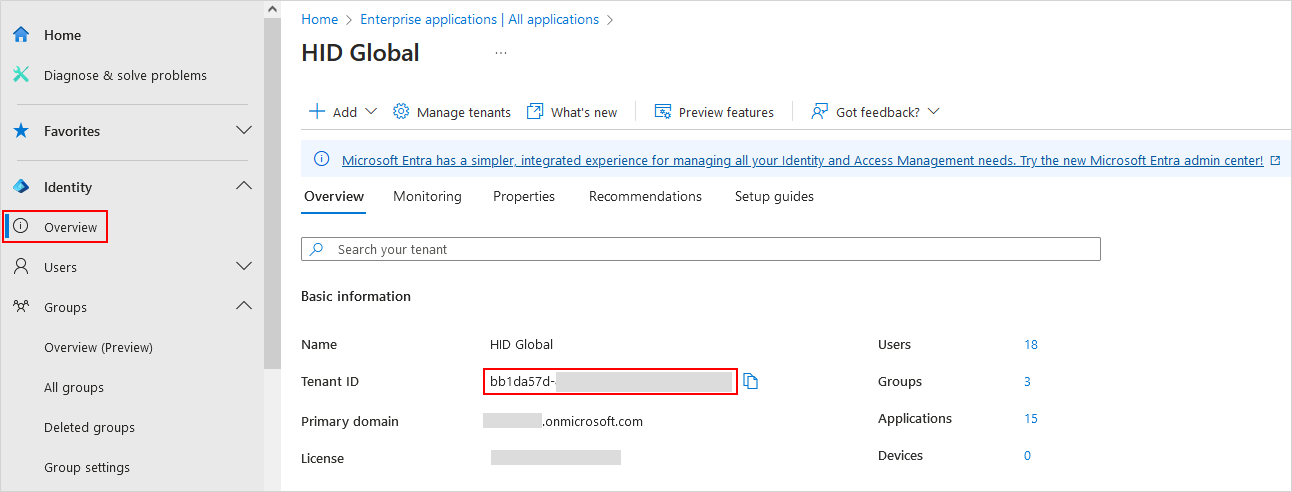
Make a note of your Entra ID Tenant ID as you will need it to configure the HID Authentication Service.
You can retrieve the ID in the Overview page of the Microsoft Entra admin center:
-
Predefined names for the following Entra ID elements:
-
Application for Contactless Card authentication via the HID Authentication Service IdP (for example, HID IDP integration)
-
External authentication method displayed in the Microsoft interface when prompting the user to verify their identity (for example, HID Contactless Card)
In the prompt, the label will be Approve with <your external method name> (for example, Approve with HID Contactless Card)
-
-
A functional HID Authentication Service tenant
You should have the following properties:
-
Your HID Authentication Service tenant ID (starting with t, for example, tb7b09f3d844646108589)
-
The Discovery Endpoint (also known as the 'Well-known' endpoint URL) for your tenant:
https://[base-server-url]/idp/{tenant}/authn/.well-known/openid-configuration
-
The Authorization Endpoint of your tenant:
https://[base-server-url]/idp/{tenant}/authn/login
For further information about the HID Authentication Service URLs, see the list of Well-known Endpoints and HID Authentication Service Platforms around the World.
-
Provisioning Your Users
Configure the User Source
-
Log on to the HID Authentication Service Administration Portal.
-
Click Settings in the left navigation bar.
-
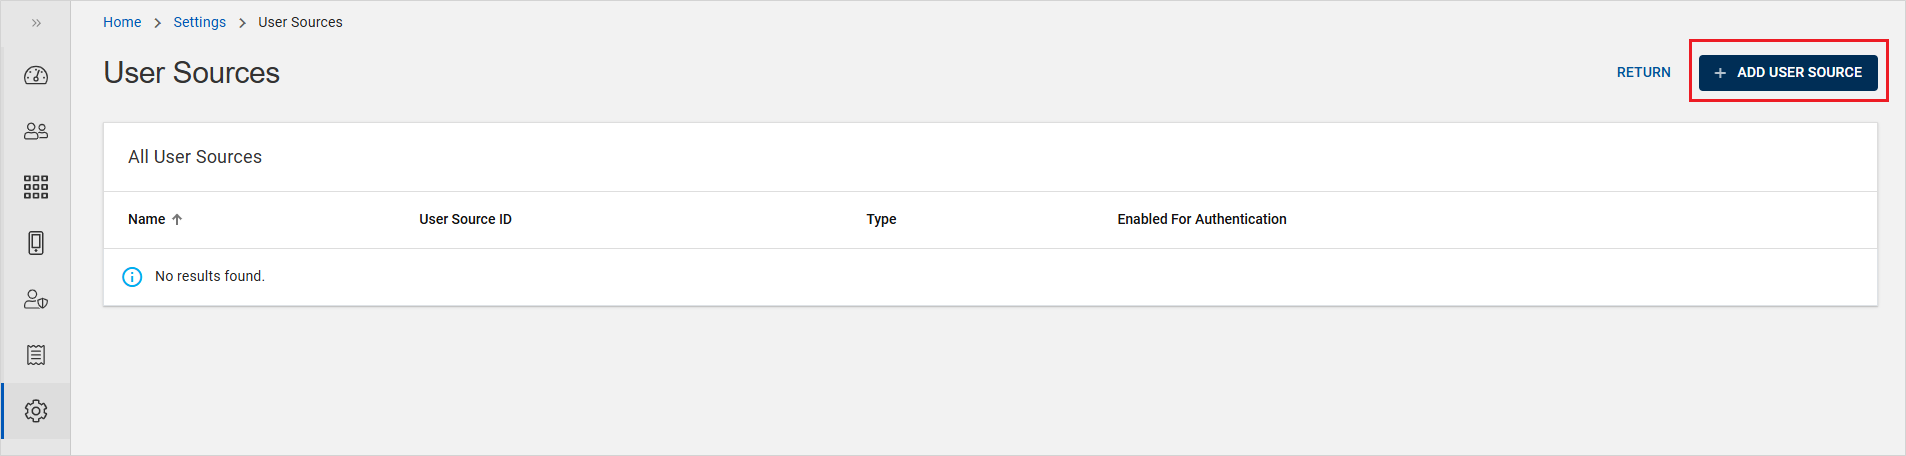
Click User Sources and then ADD USER SOURCE.
-
Enter a Name for the source.
By default, Type is set to Entra ID.

-
Leave the Enable user source for authentication option set to No for now. You will add the authentication parameters later.
-
Click
 to copy the Tenant SCIM URL.
 -
Click SAVE.
-
Click
to copy the Access Token and click CLOSE.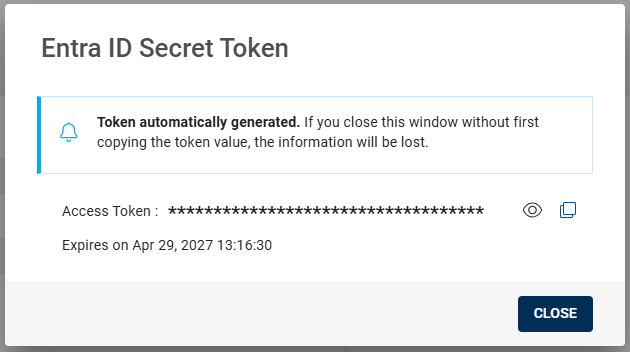 Note: The Access Token and Tenant SCIM URL are required to create a provisioning application in Microsoft Entra ID.
For further information, see Configuring User Sources.
Create an Entra ID Provisioning Application
-
Log on to the Microsoft Entra admin center as an Application Administrator.
-
Navigate to Identity, Applications and then Enterprise applications.
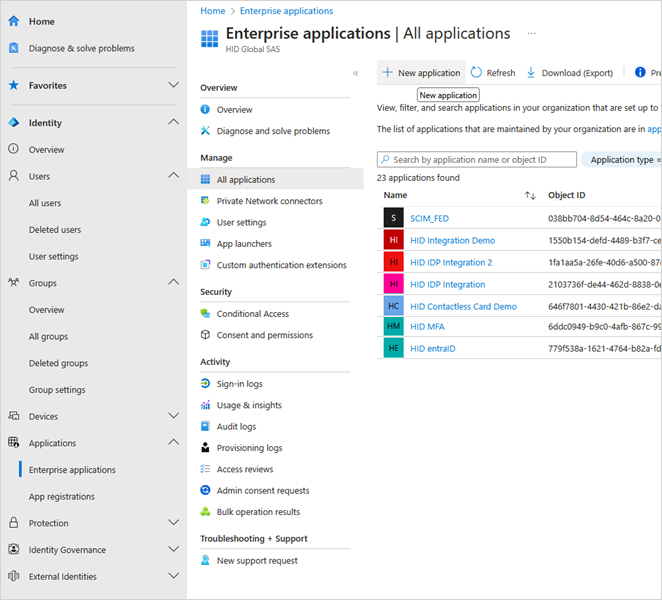
-
Click New application
-
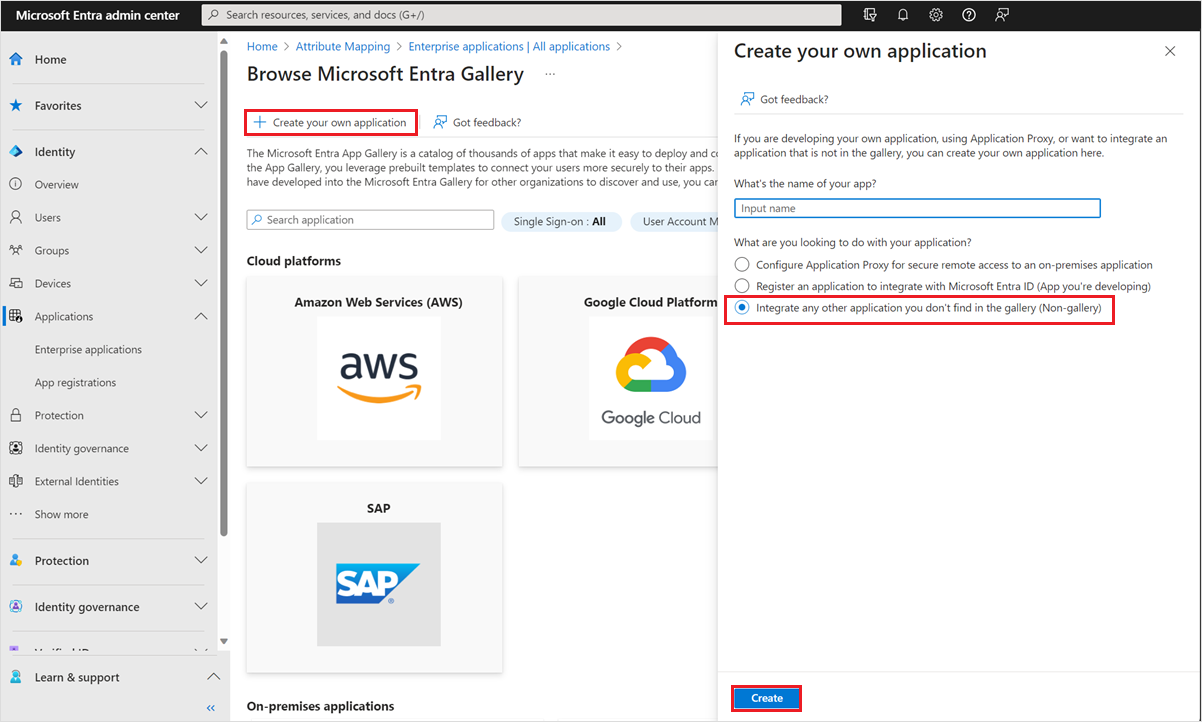
Click Create your own application.
-
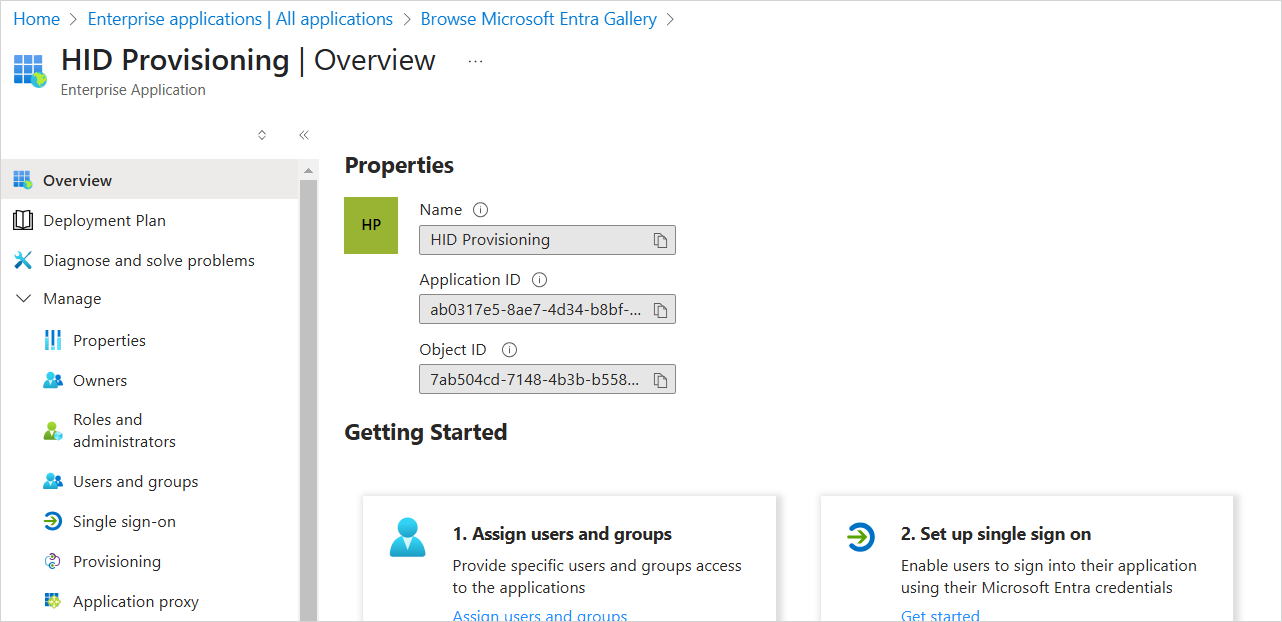
Enter a name for your application, select the Integrate any other application you don't find in the gallery option and click Create to create an app object.
The new app is added to the list of enterprise applications and opens to its app management page.
-
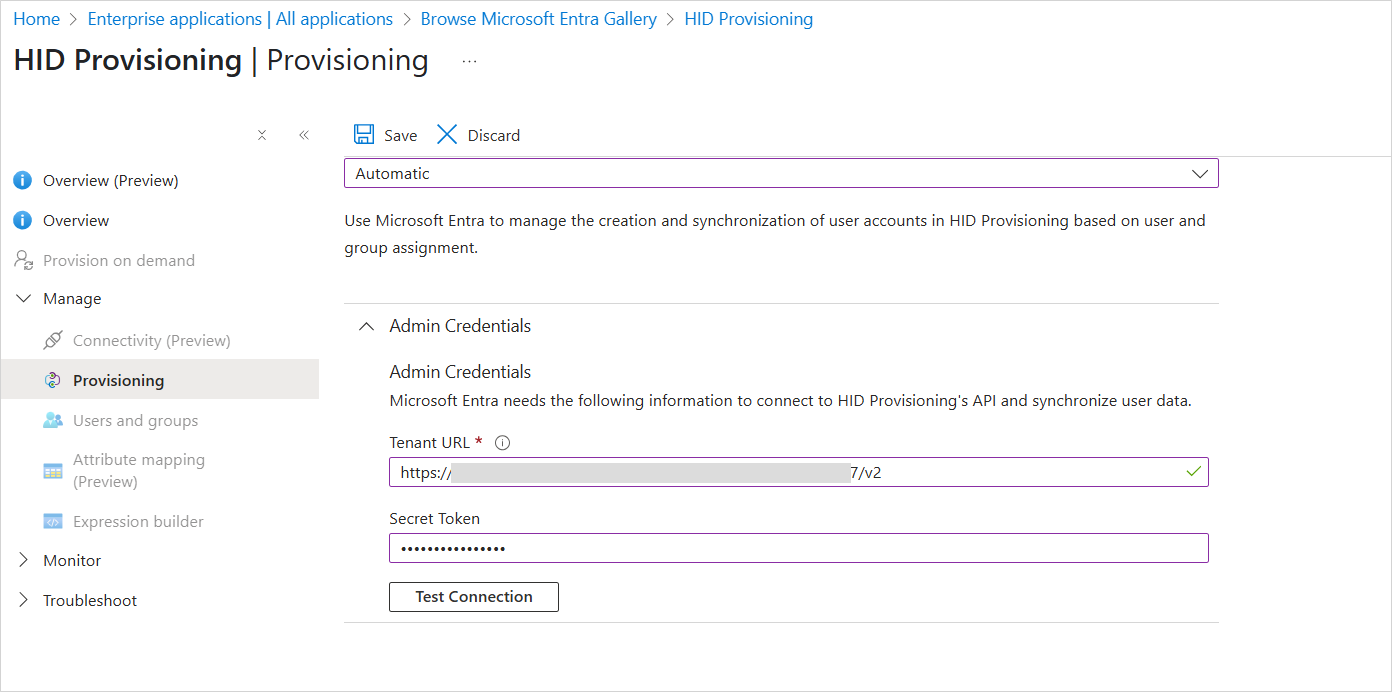
Under Manage in the left panel, select Provisioning.
-
From the Provisioning Mode drop-down menu, select Automatic.
-
Expand the Admin Credentials section and enter the parameters for the user source you created above:
-
Tenant URL - the SCIM URL in the form https://[base-server-url]/scim/{tenant}/v2, where:
- https://[base-server-url] is the fully qualified name of the HID Authentication Service
-
{tenant} is the ID of the HID Authentication Service tenant
-
Secret Token - the Access Token
-
-
Click Test Connection to verify that Microsoft Entra ID can connect to the SCIM endpoint:
-
If the attempts to connect to the application succeed, click Save to save the Admin Credentials
-
If the attempt fails, error information is displayed
-
-
Use the Microsoft Entra admin center to assign users and groups to app-roles for your application.
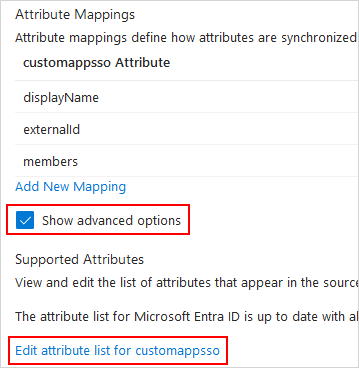
Map the Groups
-
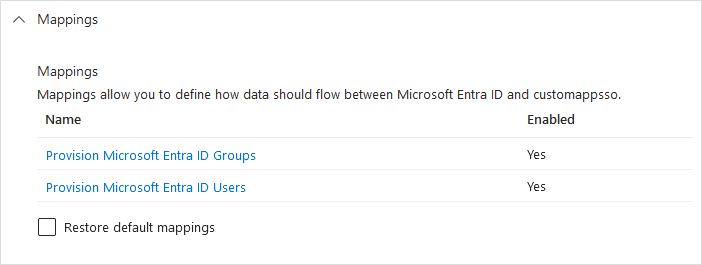
In the Provisioning menu, expand the Mappings section.
-
Click Provision Microsoft Entra ID Groups.
-
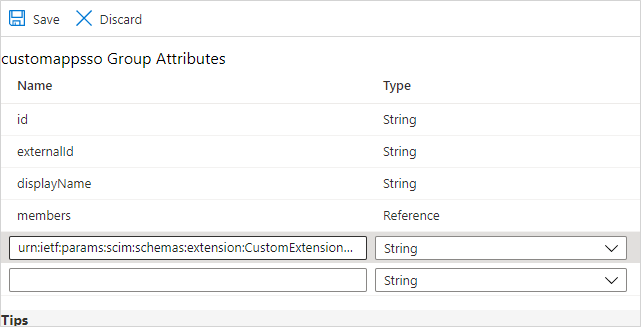
Select Show advanced options and click Edit attribute list for customappsso.
-
Add a custom attribute as follows and click Save:
-
Name - urn:ietf:params:scim:schemas:extension:CustomExtensionName:2.0:Group:groupType
-
Type - String
-
-
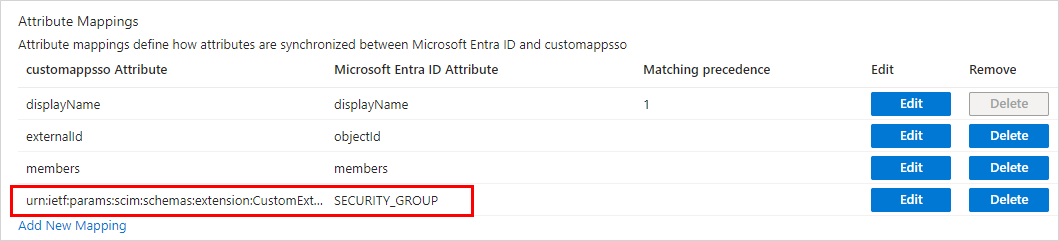
Return to the Attribute Mappings page and click Add New Mapping.
-
Map the SECURITY_GROUP constant to the custom attribute as follows:
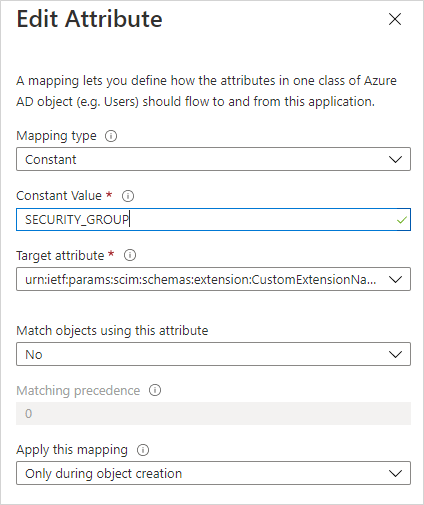
The resulting group attribute mapping should be:
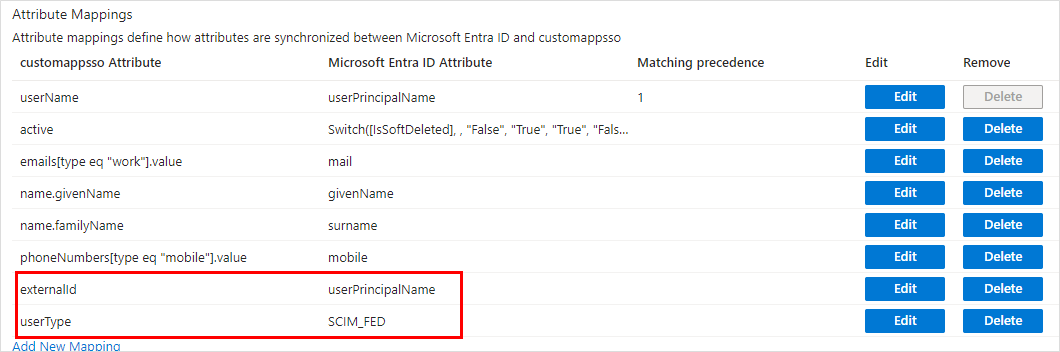
Map the Users
-
In the Provisioning menu, expand the Mappings section.
-
Click Provision Microsoft Entra ID Users.
-
If a mapping for externalId already exists, delete it.
-
Add a new mapping (or edit an existing userPrincipalName mapping) where userPrincipalName is the Source attribute and externalId is the Target attribute.
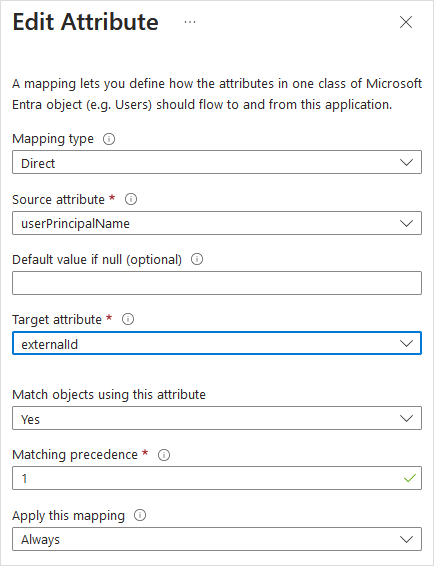
-
Click Ok to validate the mapping.
-
Add a new Constant mapping, with SCIM_FED as the value and userType is the Target attribute.
This indicates to HID Authentication Service that you are creating a federated user.
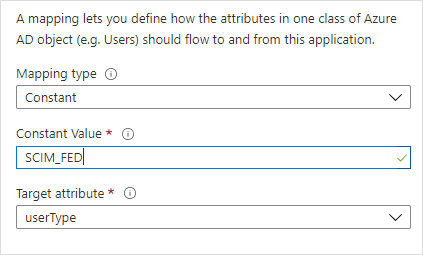
-
Click Ok to validate the mapping.
-
Click Save.
The resulting user attribute mapping should be:
Create the User Group in the Entra ID Tenant
You can create new groups and users as the target population for the integration in your Entra ID tenant.
-
In the left panel, expand Users and Groups.
-
Click Add user/group.
-
Select Security as the Group type.
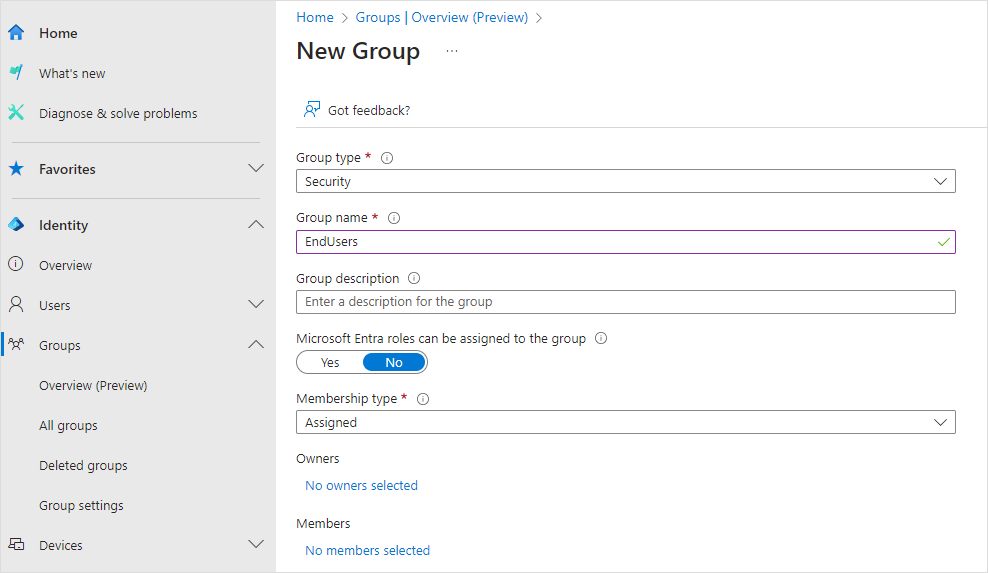
-
Enter a Group name.
-
Click No members selected.
-
Select all objects you want add to the group and click Select.
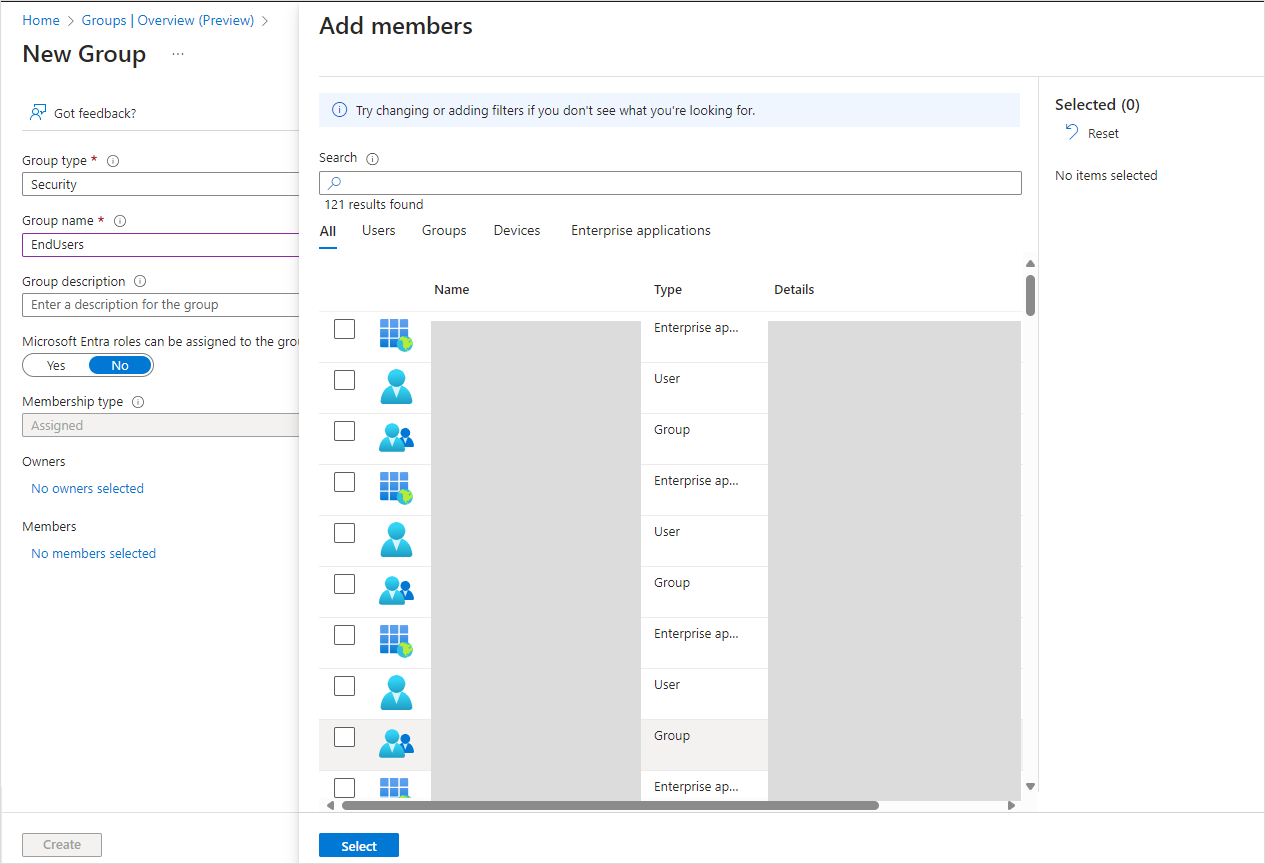
-
Click Create to finalize the group creation.
When you start the provisioning, your Entra ID users will appear in the HID Authentication Service.
Provision your Entra ID Users
Make sure each user has a valid Email address (view the user's Contact Information)
Either change the users' passwords via their Entra ID User account, or instruct users to change their passwords before they enroll their contactless card in the HID Authentication Service Self-Service Portal
-
Under Manage in the left panel, select Provisioning and click Provision on Demand.
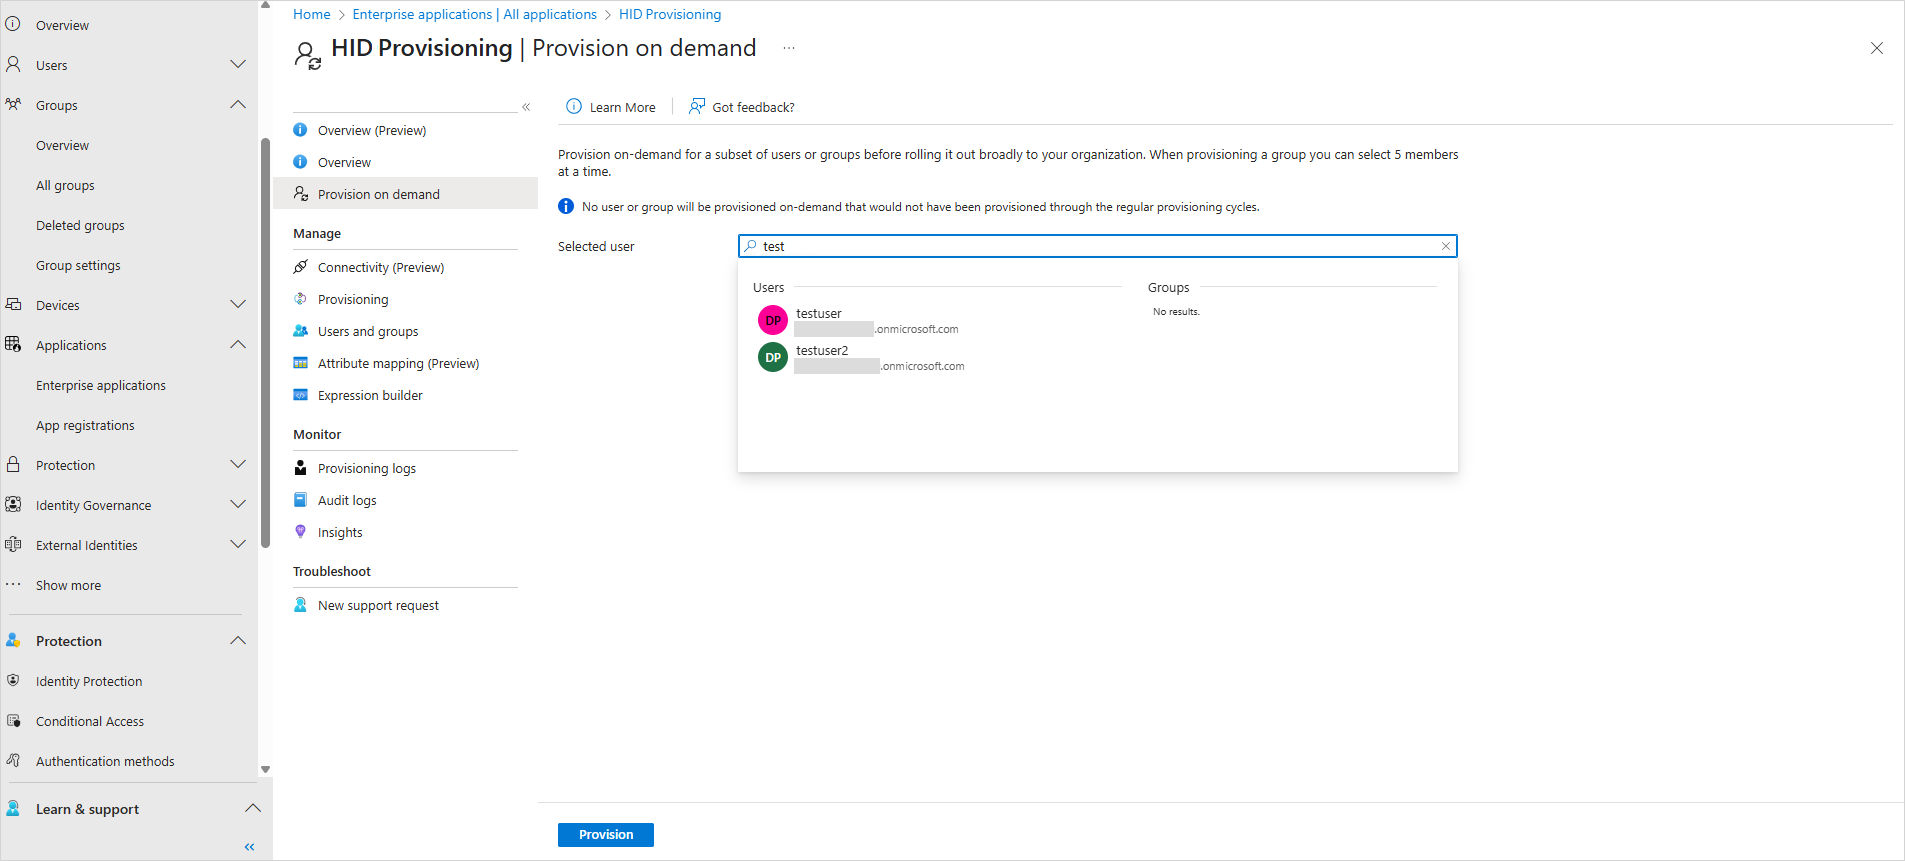
-
Select the user from the drop-down list and click Provision.
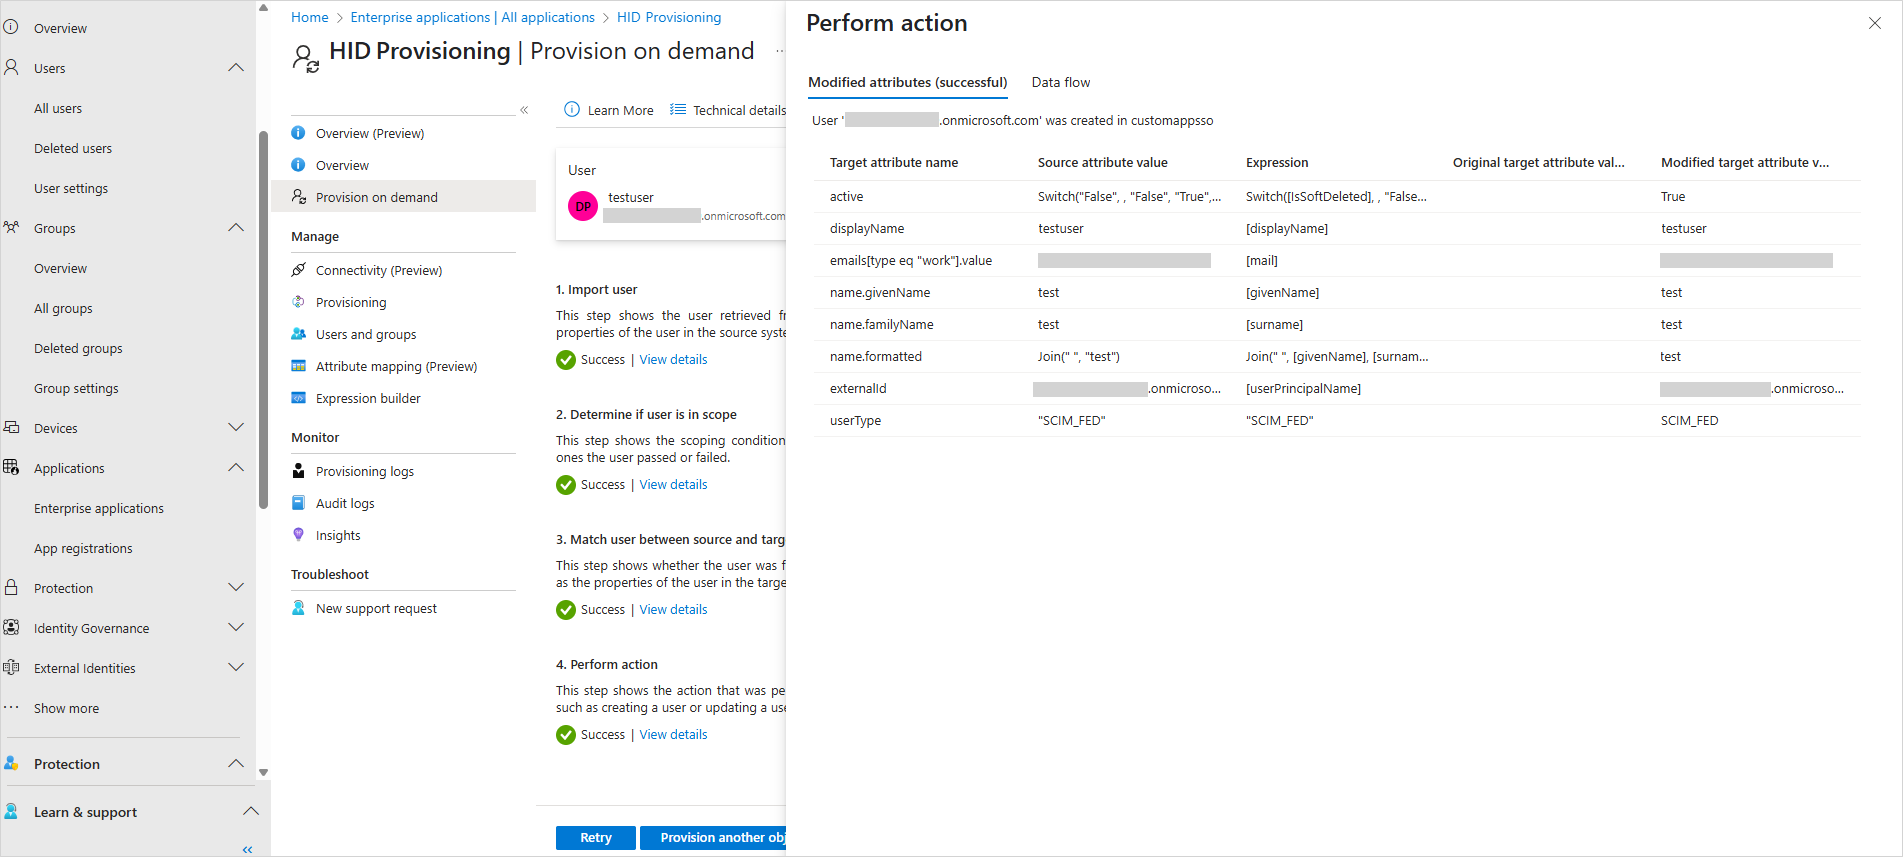
-
In the success message, verify the attributes are correct.
-
Log on to the HID Authentication Service Administration Portal.
-
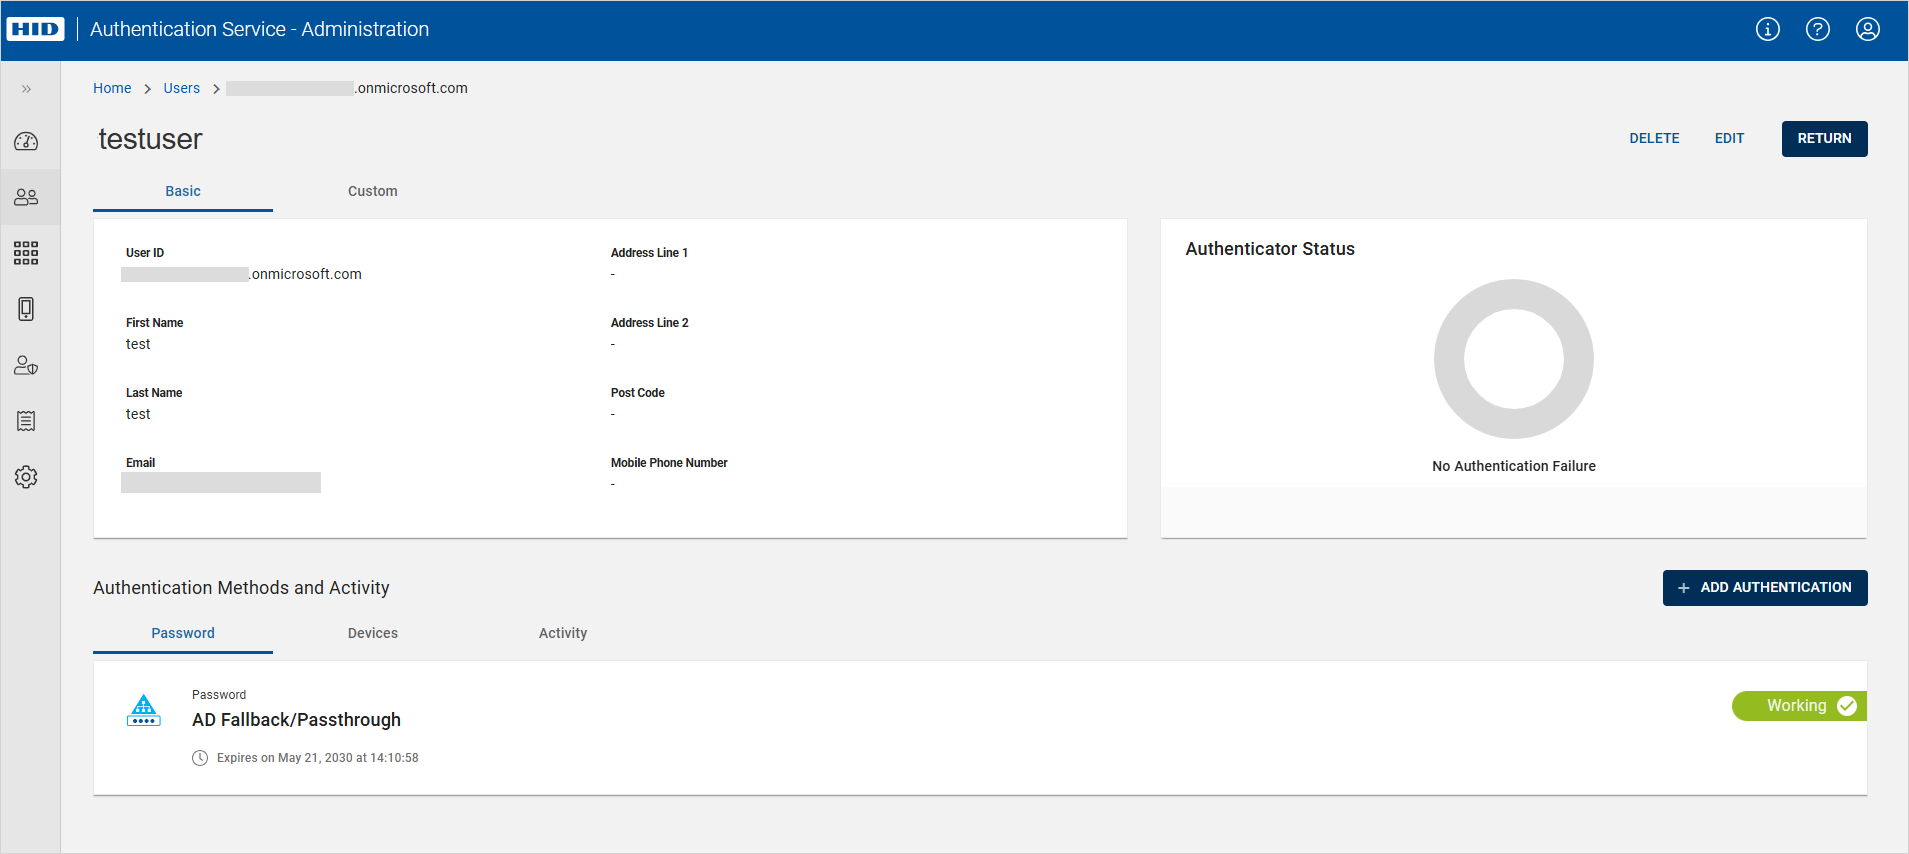
Click Users in the left navigation bar.
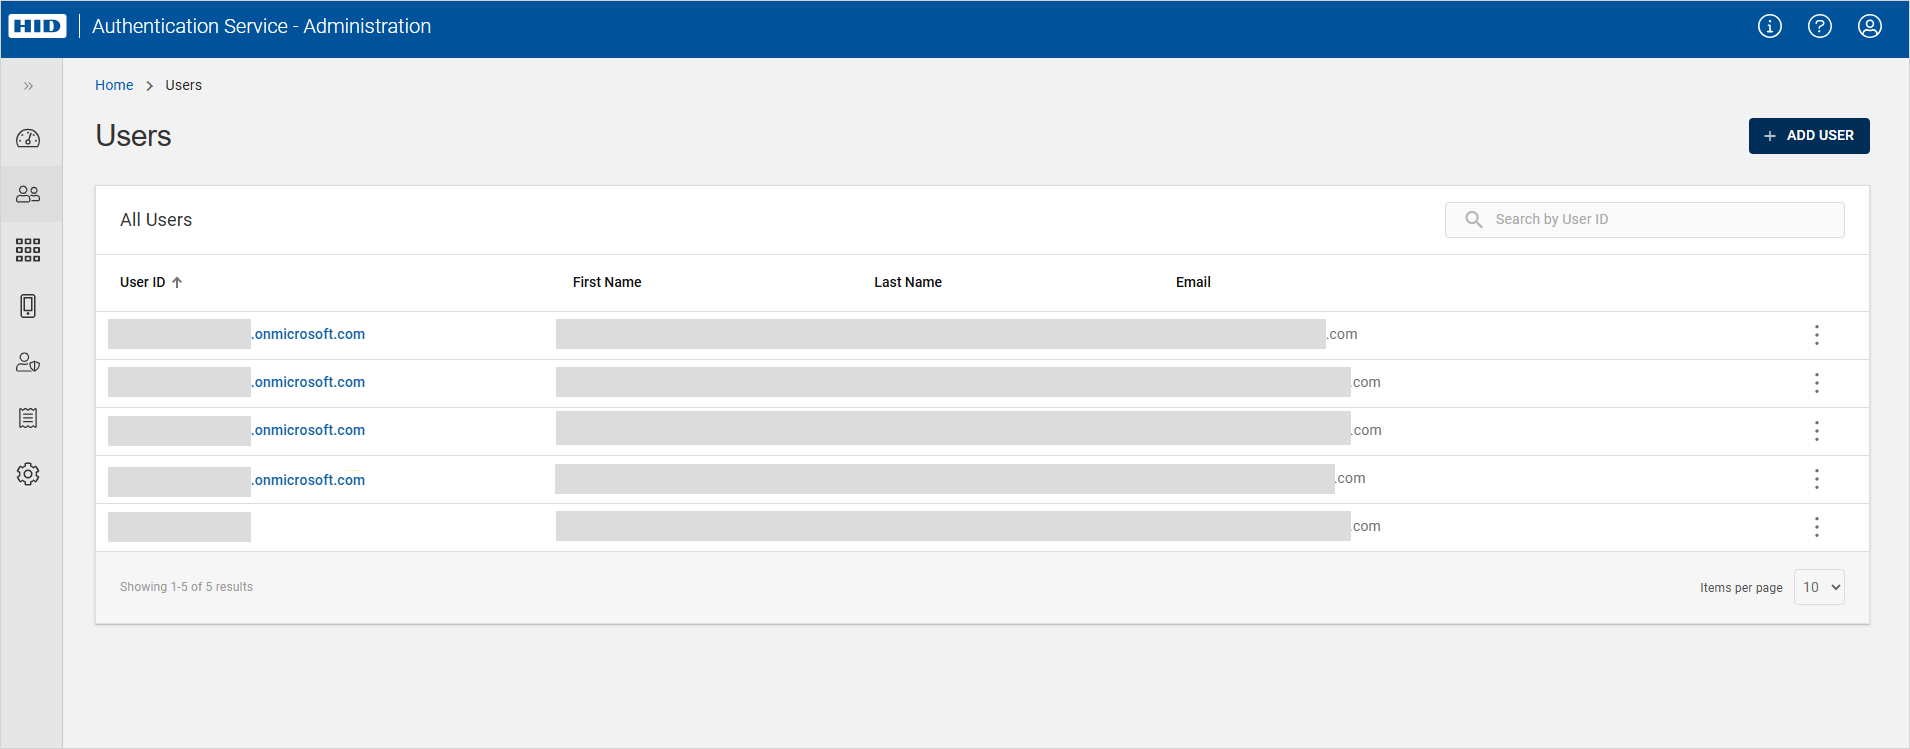
-
Select the provisioned user and verify the user has been correctly provisioned into the HID Authentication Service.
-
Repeat the provisioning steps for the other Entra ID users.
Enable Support for Contactless Card Authentication
Create the Authentication Journey
-
Log on to the HID Authentication Service Administration Portal.
-
Click Settings icon in the left navigation bar.
-
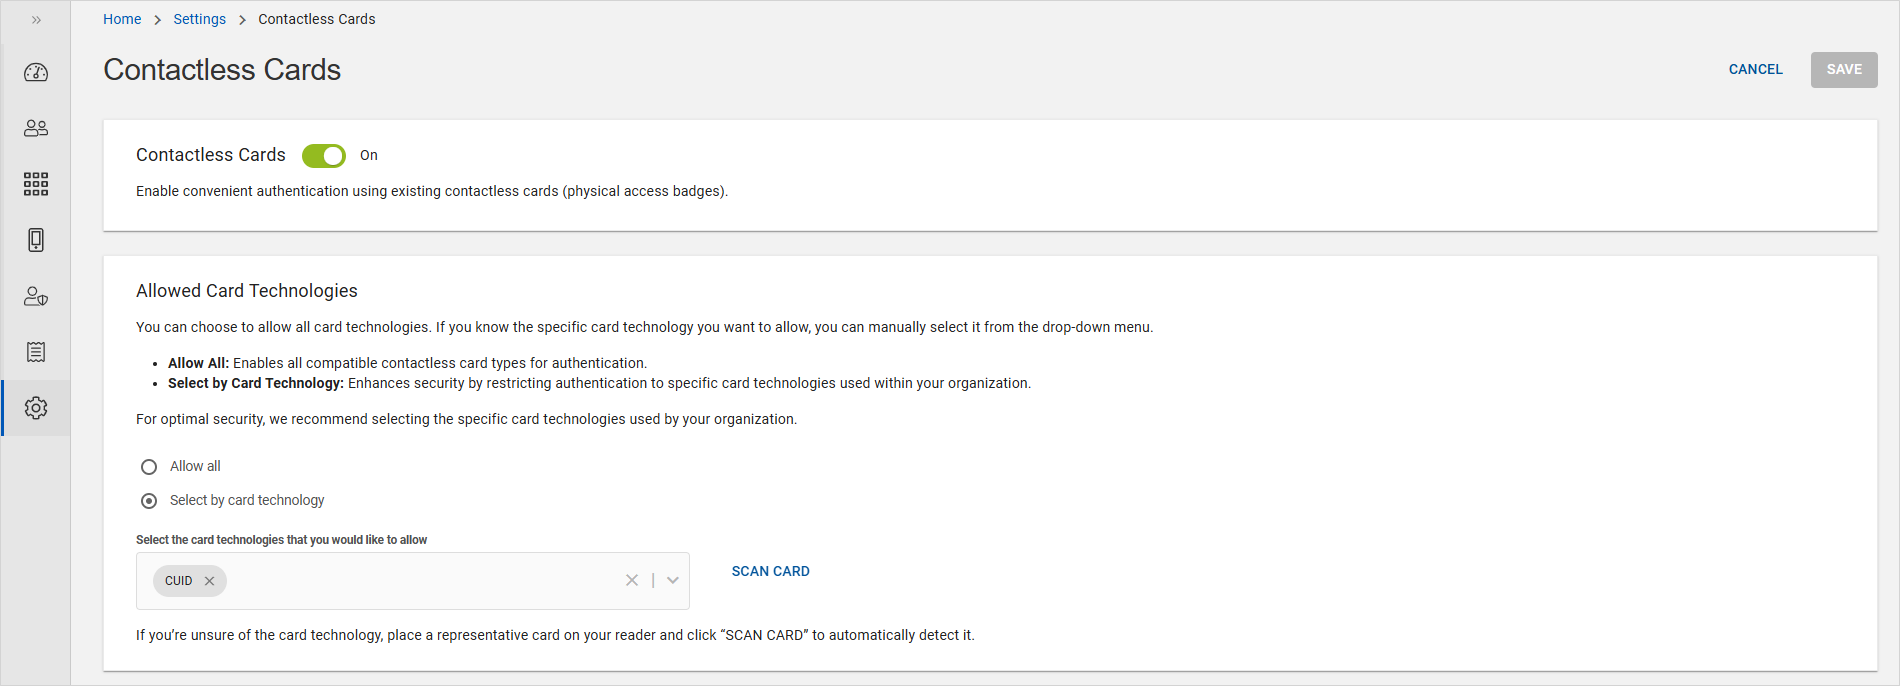
Click Contactless Card in the Settings page.
-
Click the toggle button to On to allow users to enroll contactless cards through the Self-Service Portal.
You can also select the specific card technology you want to allow.
For further information, see Configuring Contactless Card.
-
Click Authentication Journey in the Settings page and then click NEW AUTHENTICATION JOURNEY.

-
Enter a Name and Description and click CONTINUE.
-
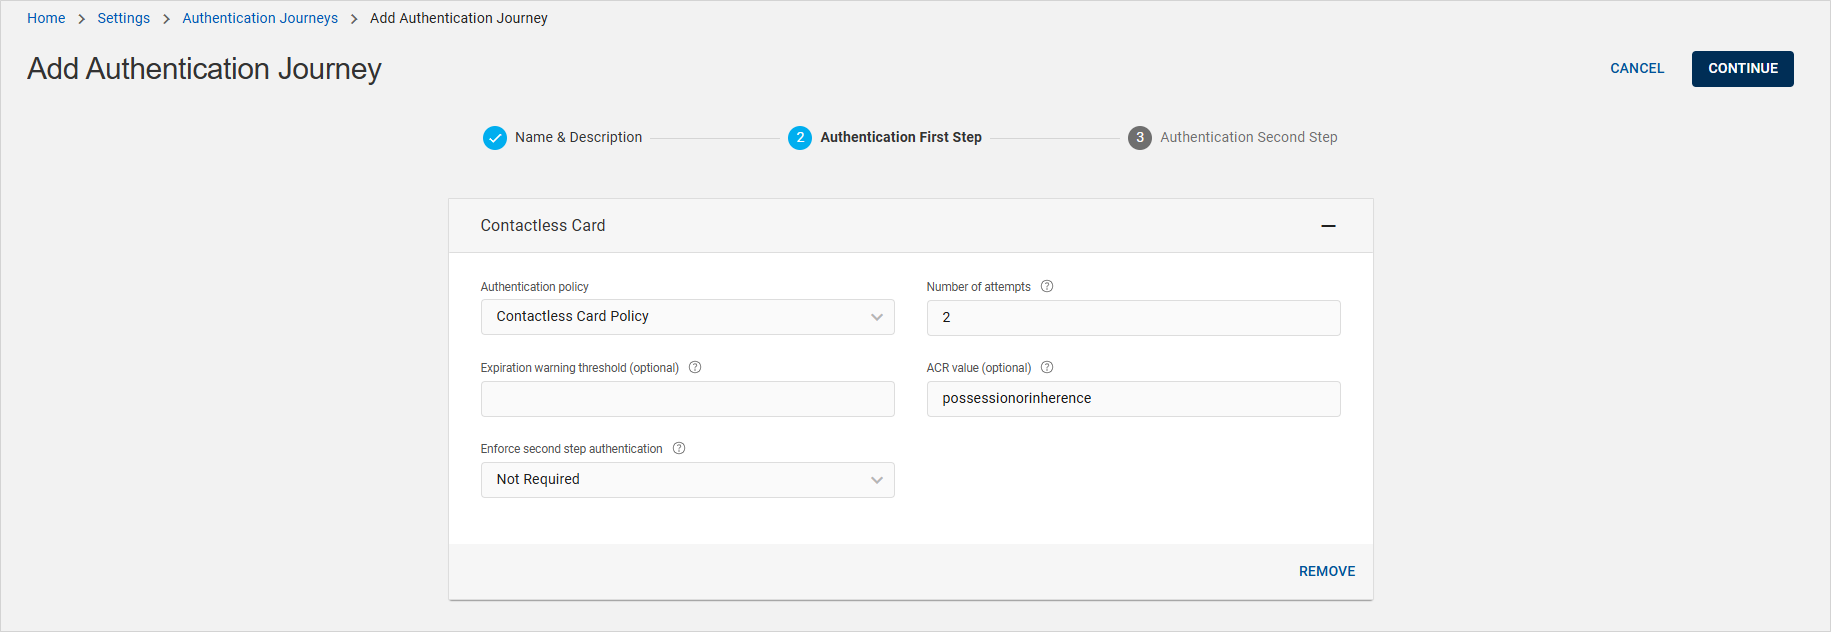
Configure an authentication journey for Entra ID with a Authentication First Step defined as follows:
-
Authentication type - Contactless Card
-
Authentication policy - Contactless Card Policy
This was created when enabling contactless card authentication above.
-
Enforce second step authentication - Not required
-
Number of attempts - 2 (or a different value as required by your deployment)
-
ACR value - possessionorinherence
-
-
Click CONTINUE.
-
Do NOT define an Authentication Second Step as this integration only supports a single step authentication journey.
-
Click SAVE.
For further information, see Creating Authentication Journey with Contactless Card.
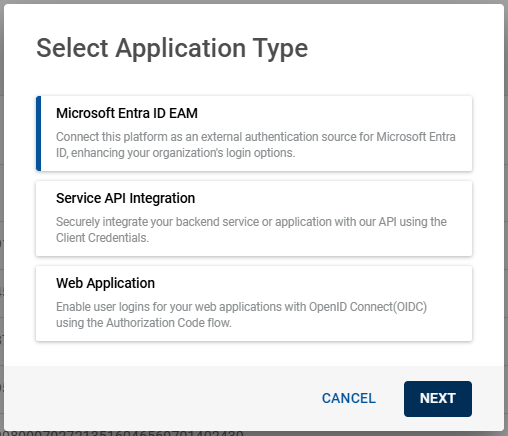
Create the Application for Microsoft Entra ID EAM
-
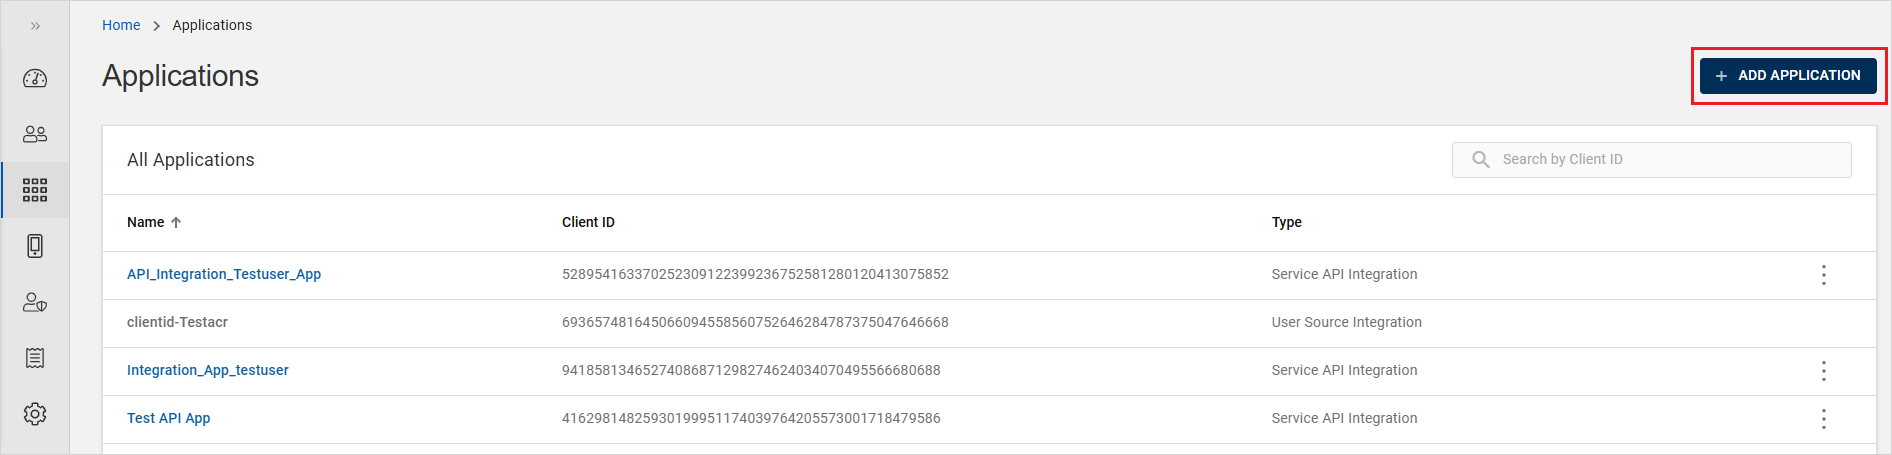
Click ADD APPLICATION.
-
Select Microsft Entra ID EAM as the Application Type and click NEXT.
-
Enter a Name for your application.
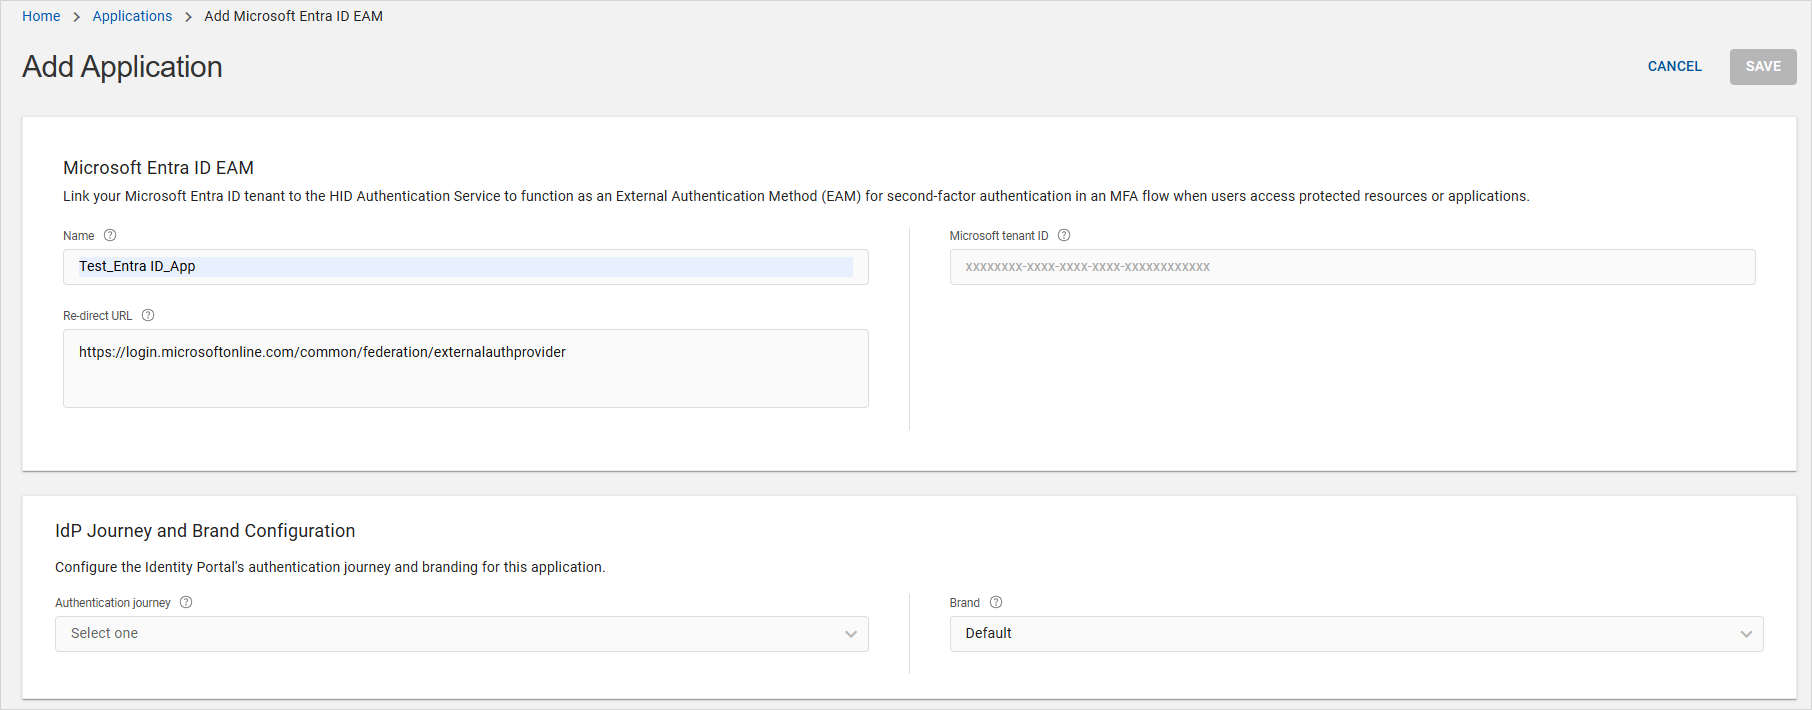
-
Enter your Microsoft tenant ID.
-
Select the Authentication journey you created above and click SAVE.
-
Wait for the summary dialog to display and then click
to copy the application’s Client ID and Discovery endpoint.Note: The Client ID and Discovery endpoint are required to configure an External Authentication Method (EAM) in Microsoft Entra ID.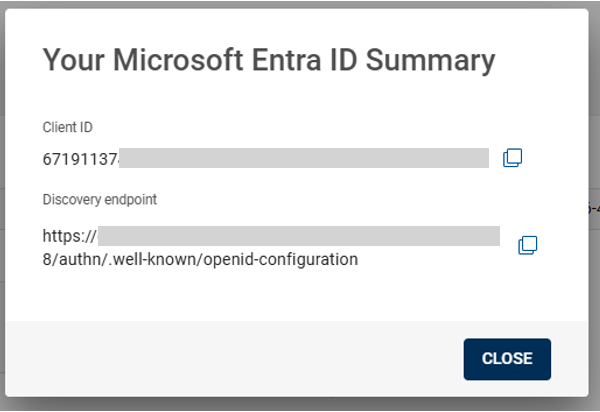
For further information, see Creating New Entra ID EAM Application.
Create the Application for HID Authentication Service Integration
-
Log on to the Microsoft Entra admin center as an Application Administrator.
-
In the left panel, select App registrations.
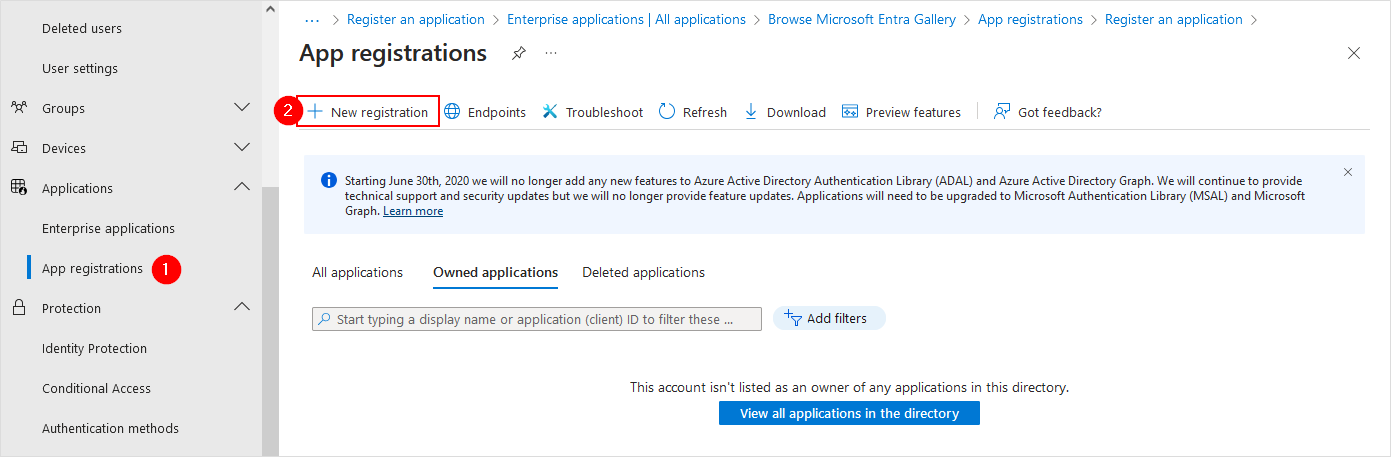
-
In the menu bar, select New registration.
-
Enter an application Name.
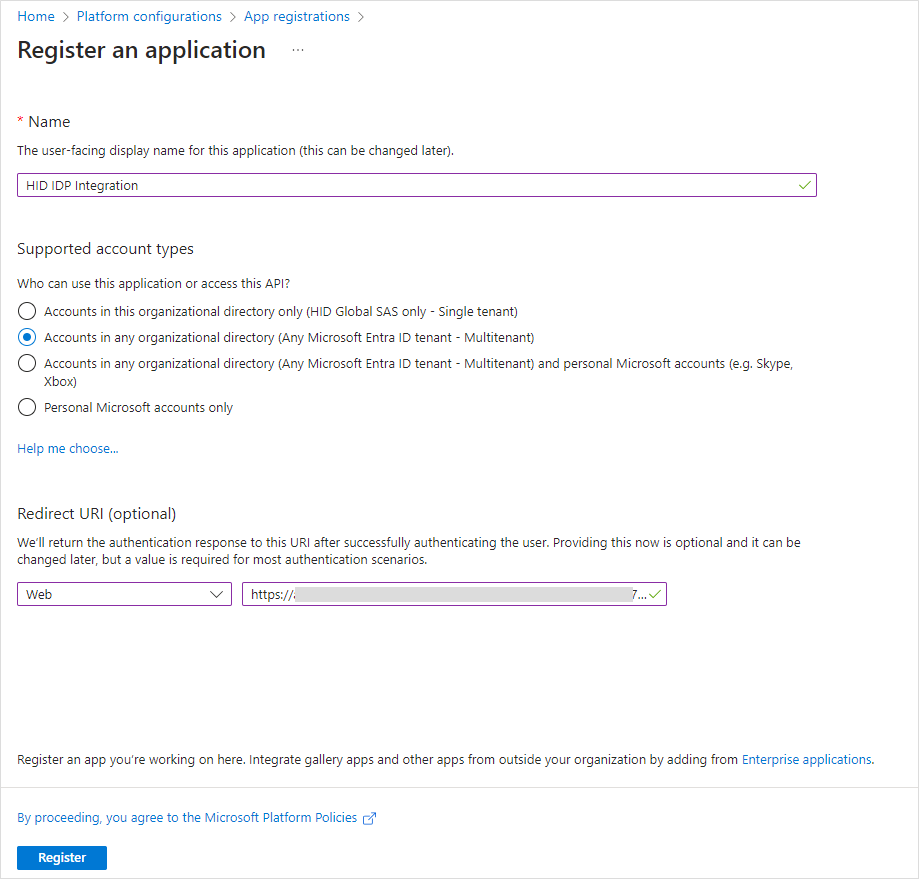
-
Select Account in any organizational directory (Any Microsoft Entra ID tenant - Multitenant) as the supported account type.
-
Set the Redirect URI:
-
In the left drop-down list, select Web.
-
Set the URI with the Authorization Endpoint of your tenant in the format https://[base-server-url]/idp/{tenant}/authn/login.
You can get this URI from the list of Well-known Endpoints.
For example, https://hidauthservice.com/idp/t69ad5jt19561874582958/authn/login
-
-
Click Register to create the application.
The new application's Overview page is displayed.
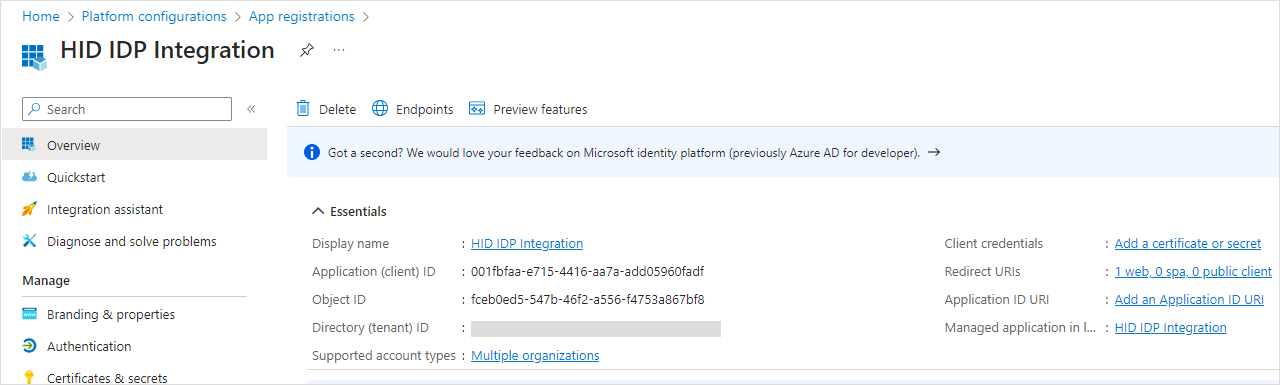
-
Make a note of the Application (Client) ID.
Note: The Application (Client) ID is required to configure an External Authentication Method (EAM) in Microsoft Entra ID.
Configure the Application Authentication
-
In the left panel, select Authentication.
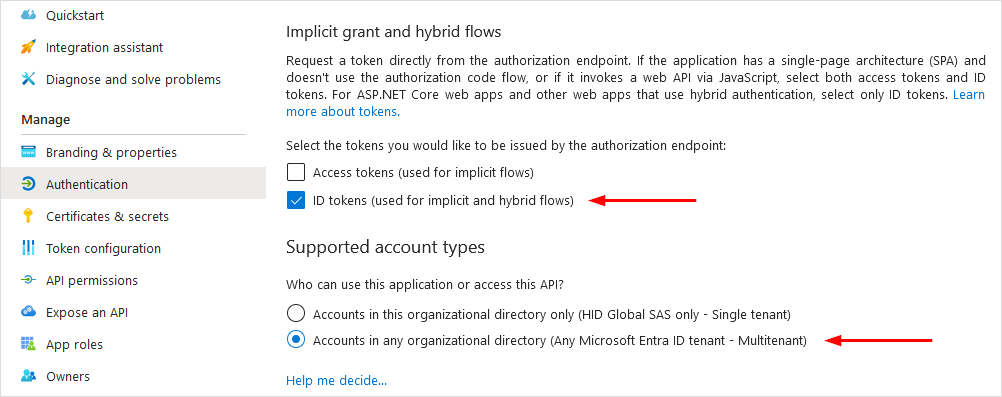
-
Scroll down and select ID tokens (used for implicit and hybrid flows).
-
Make sure Account in any organizational directory (Any Microsoft Entra ID tenant - Multitenant) is selected as the supported account type.
-
Click Save.
Add Users and Groups to the Application
Configure the groups and users who will be allowed to authenticate with this HID IDP application.
-
In the left panel, select Enterprise applications.
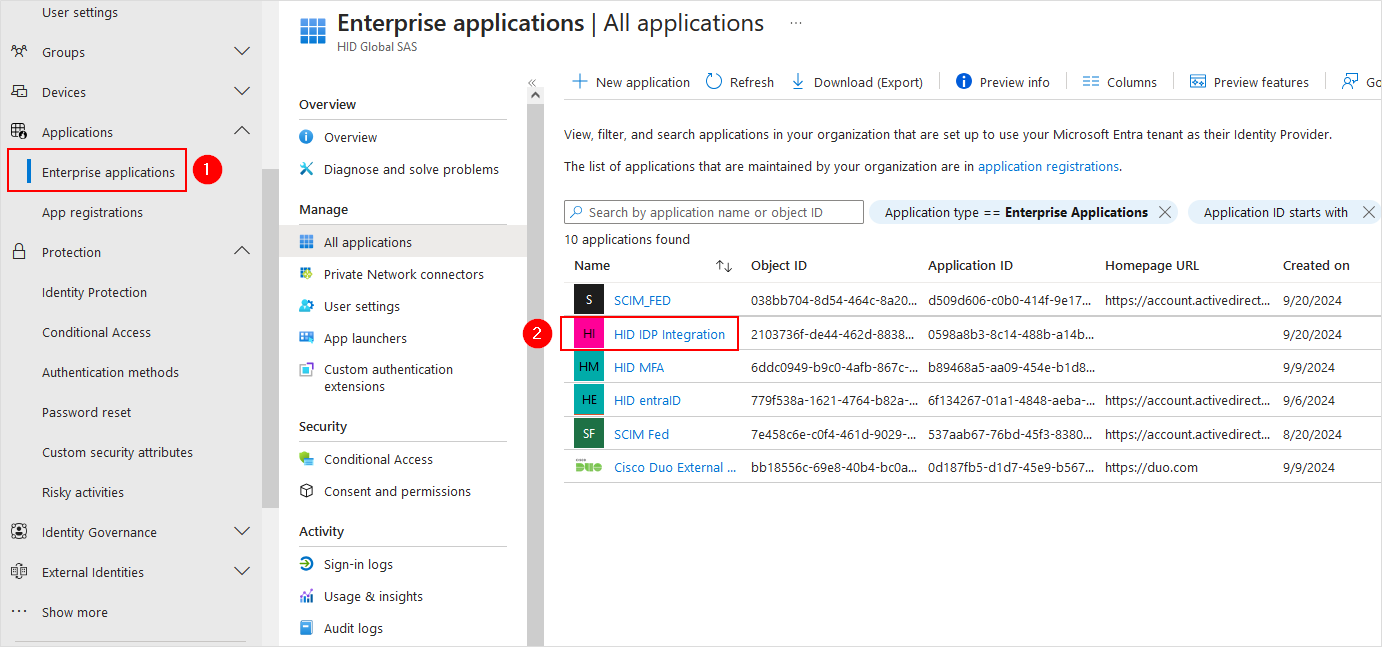
-
In the secondary left panel, select All applications and select the required application.
-
In the application Overview page, click Assign users and groups.
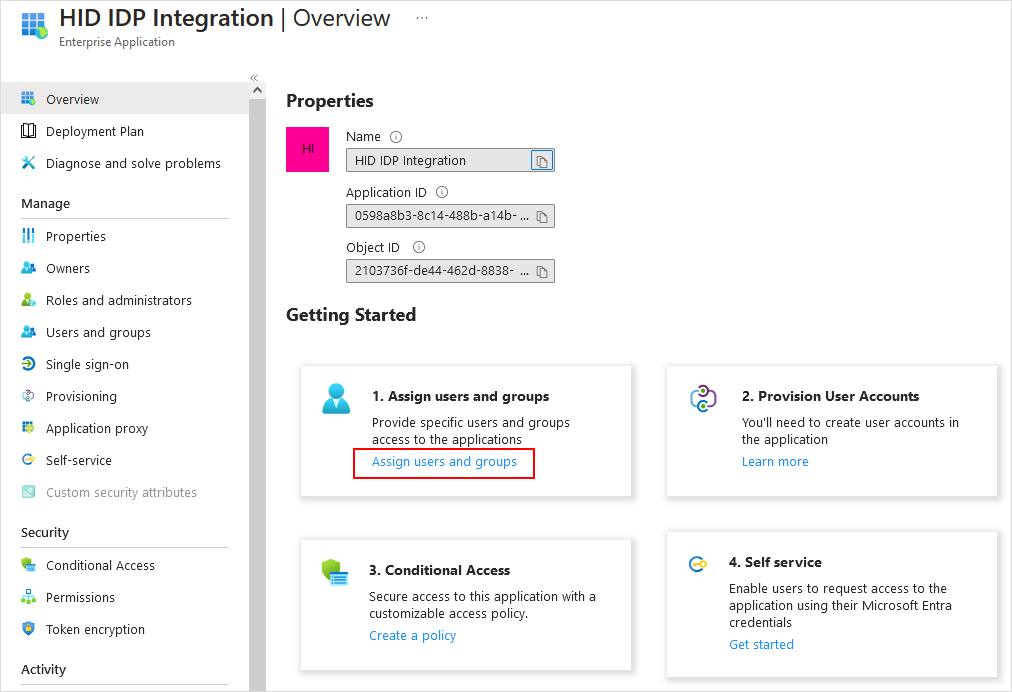
-
In the menu bar, select Add user/group.
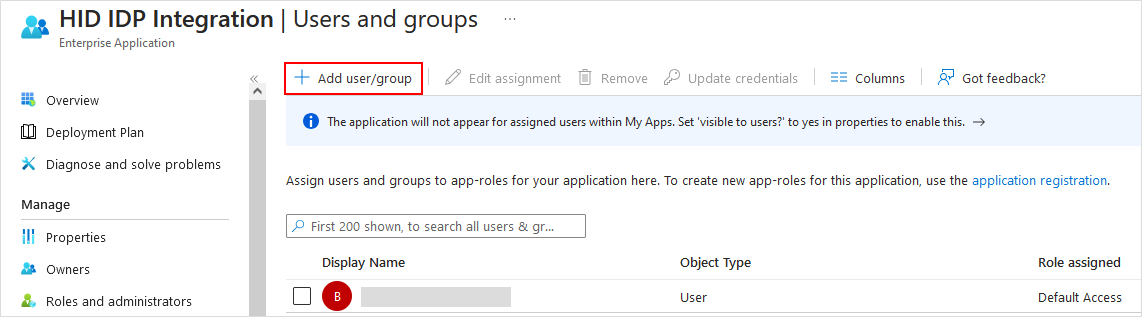
-
In the secondary left panel, select None Selected.
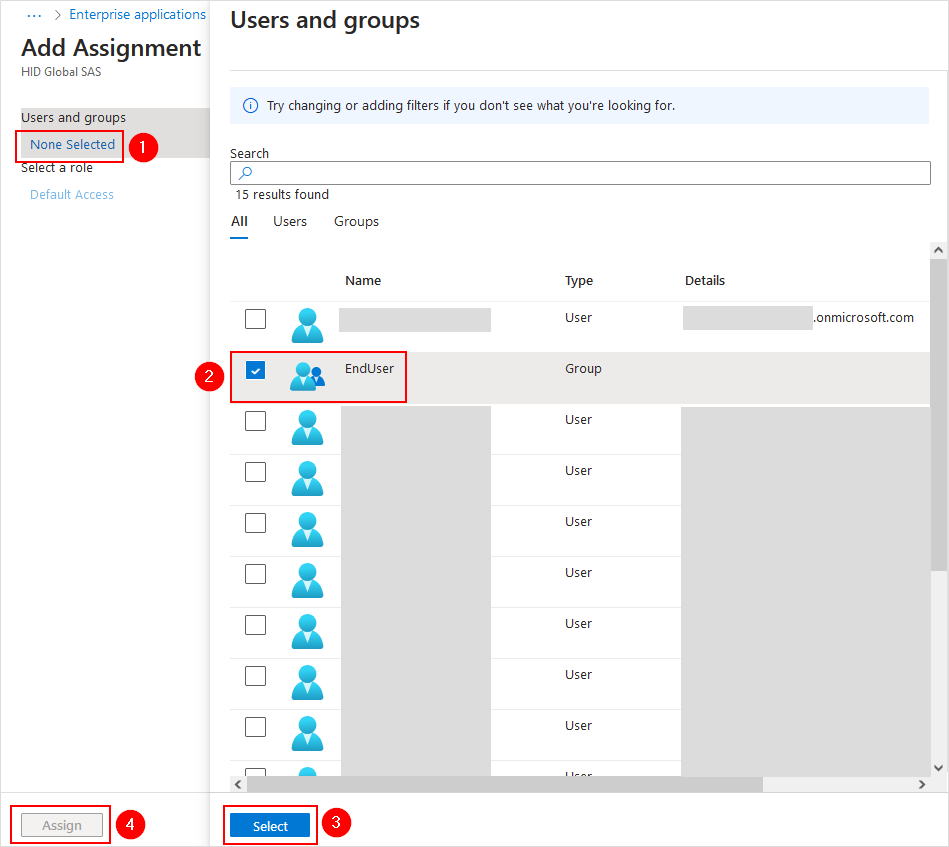
-
Select the groups and users for whom you want to enable authentication using the HID Authentication Service IdP.
-
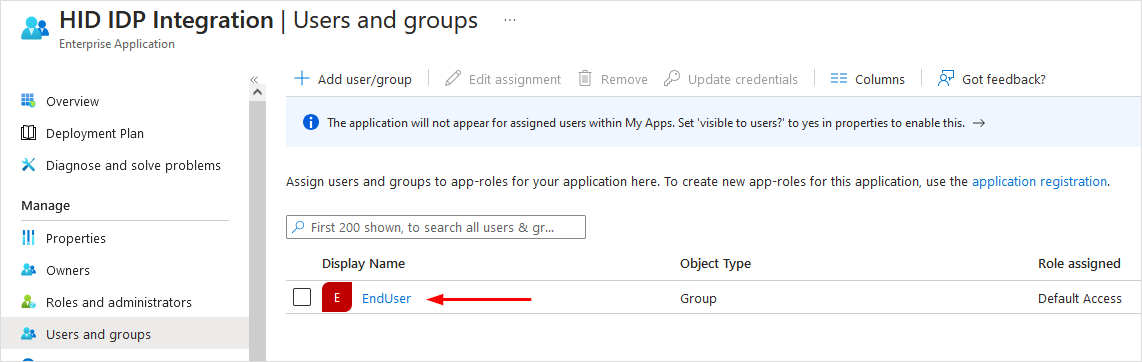
Click Select and then Assign.
The groups and users should be displayed in Users and groups.
Configure an External Authentication Method (EAM)
Add an external authentication method to the application with the HID Authentication Service server and OpenID client information.
-
In the left panel, expand Protection and select Authentication methods.
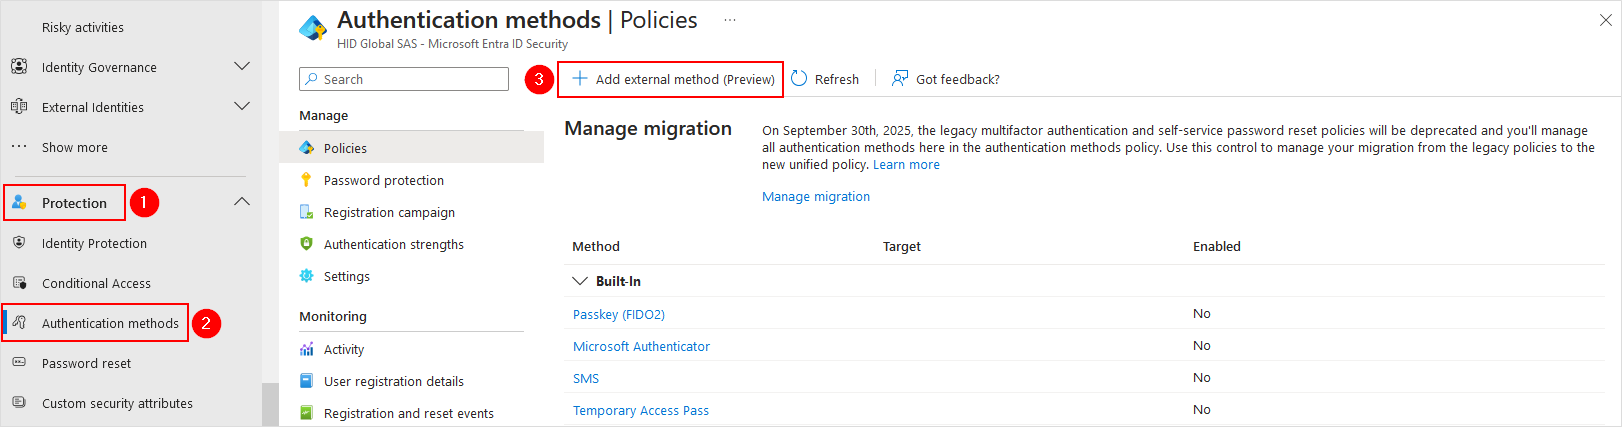
-
In the Policies page, click Add external method.
-
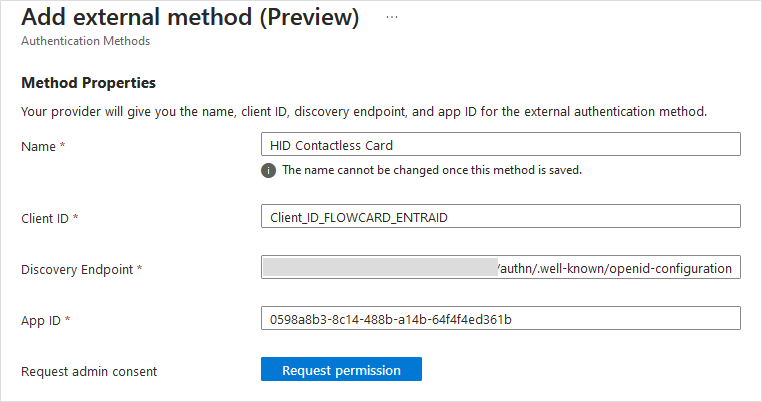
Enter the required information:
-
Name - the name of the External authentication method displayed in the Microsoft interface when prompting the user to verify their identity (for example, HID Contactless Card)
In the prompt, the label will be Approve with <your external method name> (for example, Approve with HID Contactless Card)
-
Client ID - the ID of the application created for Microsoft Entra ID in the HID Authentication Service
For reference:
-
Discovery Endpoint - the URI of the 'Well-known' endpoint of the application created for Entra ID
https://[base-server-url]/idp/{tenant}/authn/.well-known/openid-configuration
-
App ID - the ID of the application created for the HID Authentication Service in Microsoft Entra ID
For reference:
-
-
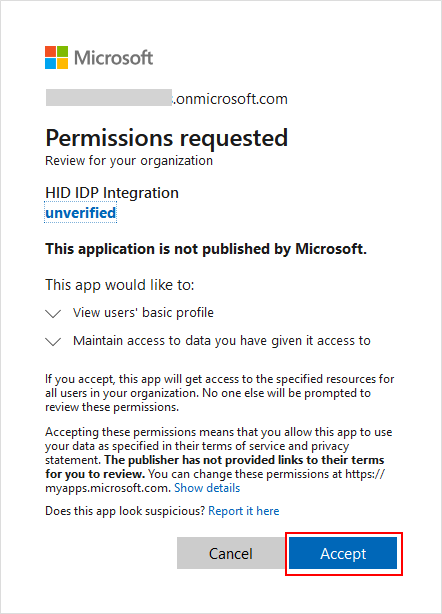
Click Request permission.
-
Select an organization's administrator user.
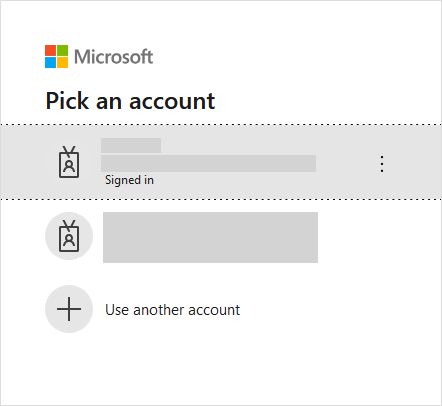
-
Click Accept to consent to the permissions request.
-
-
In the External Authentication Methods page:

-
Enable your EAM.
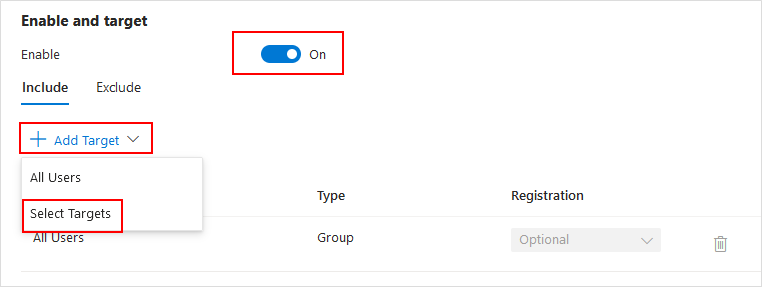
-
From the Add Target drop-down menu, select Select Targets.
-
Select the groups and users who are allowed to use the HID Authentication Service IdP for authentication.
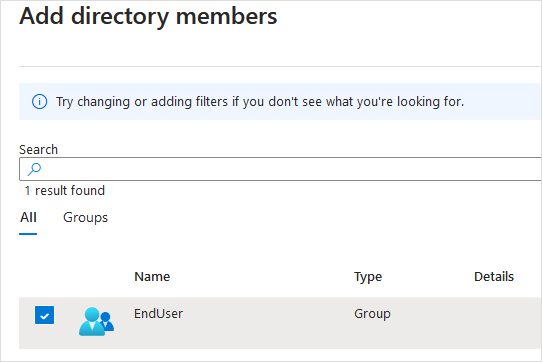
-
Click Select.
-
-
Click Save.
Configure Conditional Access
-
In the left panel, expand Protection and select Conditional Access.
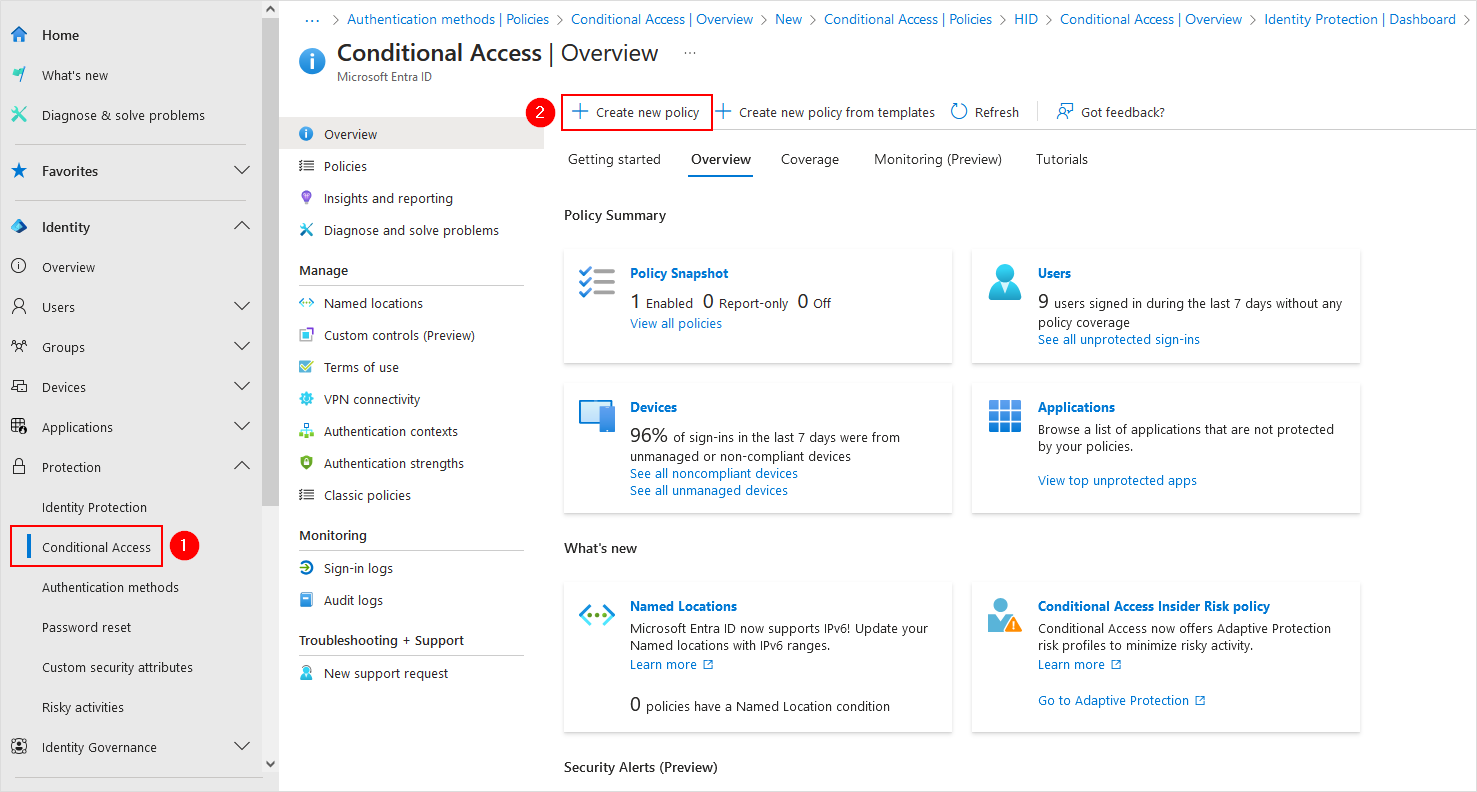
-
In the Overview page, select Create new policy.
-
Enter a Name for the policy.
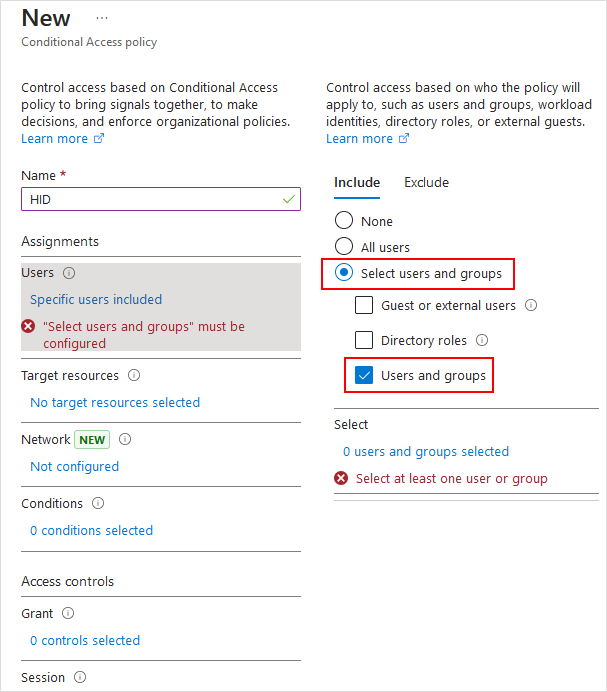
-
Click the link below Users:
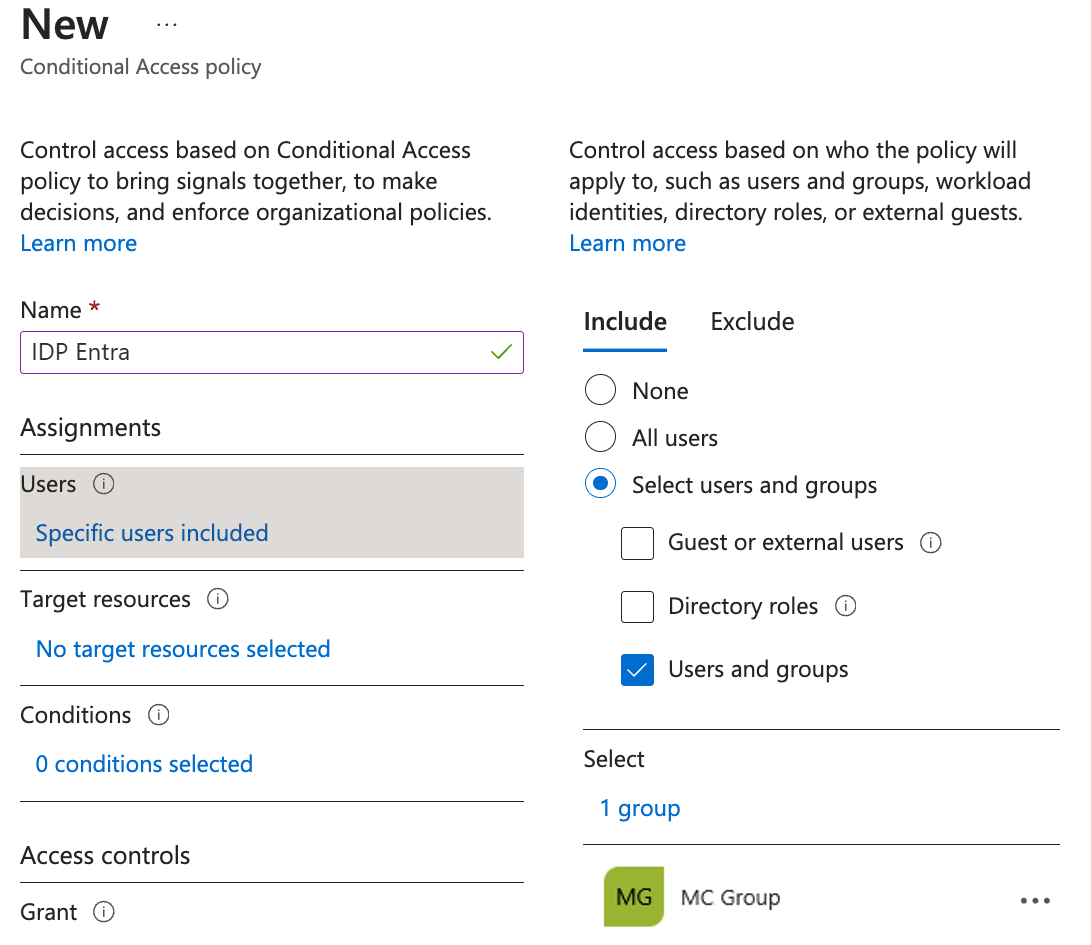
-
In the Include section, select Select users and groups.
-
Select Users and groups.
-
Select the required groups and users and click Select.
-
-
Click the link below Target resources:
-
In the Include tab, select All resources.
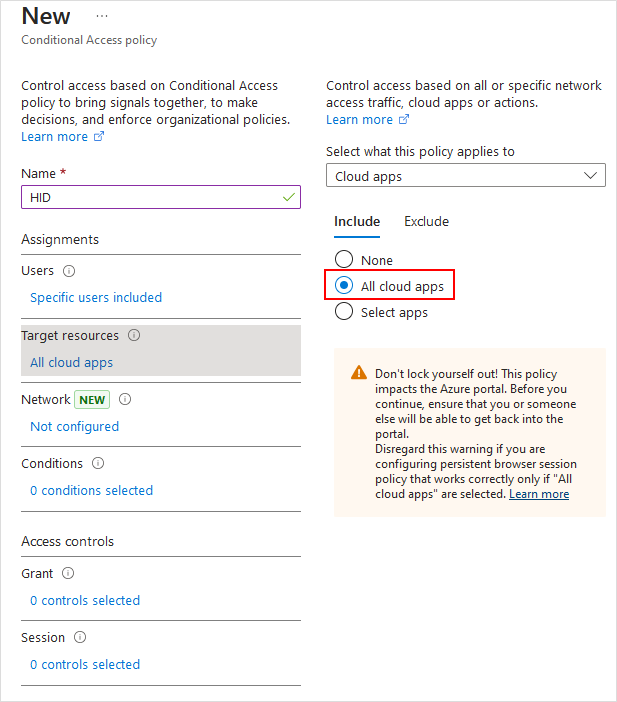
-
-
Click the link below Conditions.
The following options are displayed:
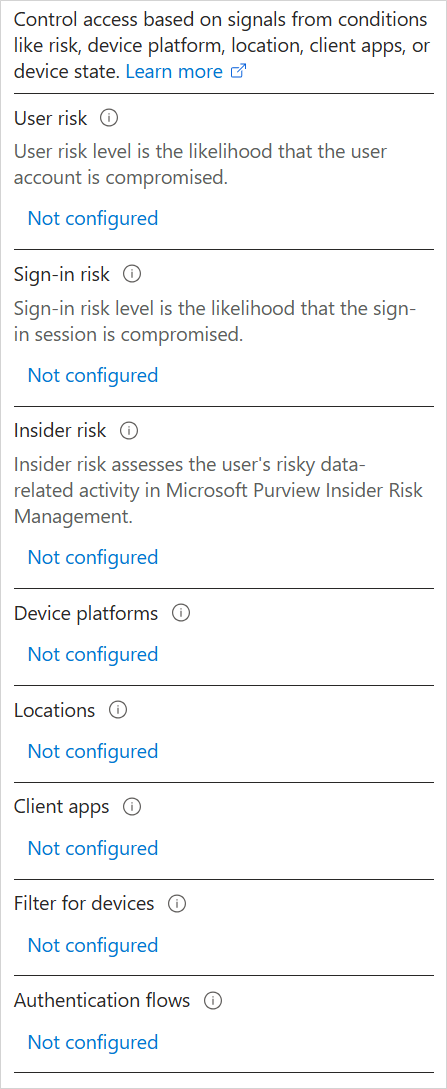
-
Click the link below Client apps.
-
Toggle Configure to Yes.
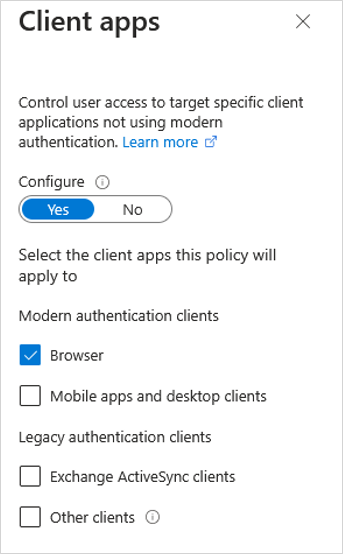
-
Under Modern authentication clients select Browser.
-
-
Click the link below Grant.
The following options are displayed:
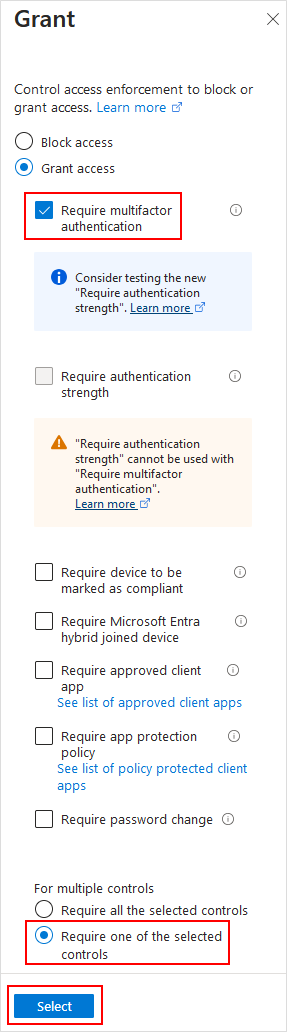
-
Enable the policy by toggling to On.
-
Click Create.
-
Enable LDAP Authentication
To allow the your synced Microsoft Entra ID users to authenticate to HID Authentication Service using an LDAP password, apply the following configuration depending on your deployment.
For New Applications
If you are configuring LDAP authentication when creating a new integration application:
-
Log on to the Microsoft Entra admin center as an Application Administrator.
-
Create an application as described in steps 2 to 4 in Create the Application for HID Authentication Service Integration.
-
Select the users or groups allowed to use this application to authenticate with their LDAP password.
-
In the left panel, select Conditional Access and click the link under Target resources.
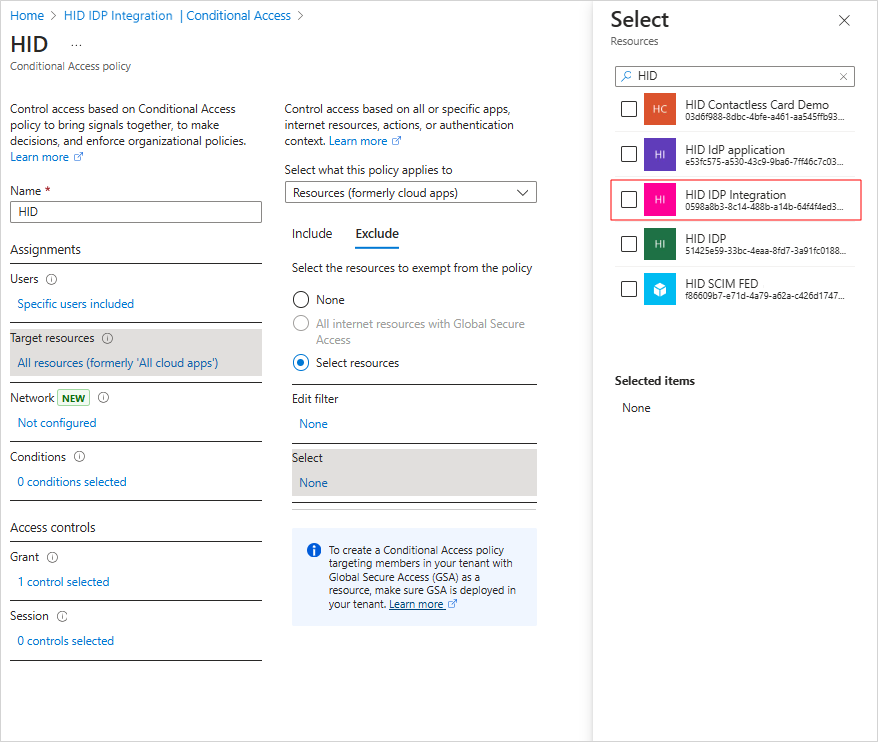
-
In the Exclude tab, select your integration application.
-
In the left panel, select Permissions.
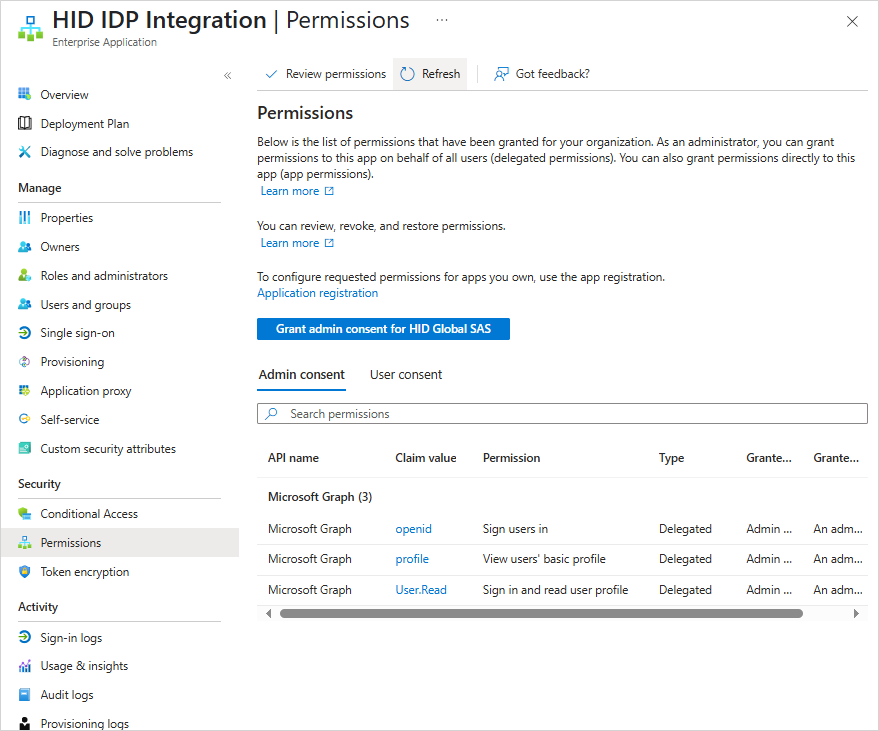
-
Assign the following permissions:
Claim value Permission openid Sign users in profile View users' basic profile User.Read Sign in and read user profile -
In the left panel, select Authentication.
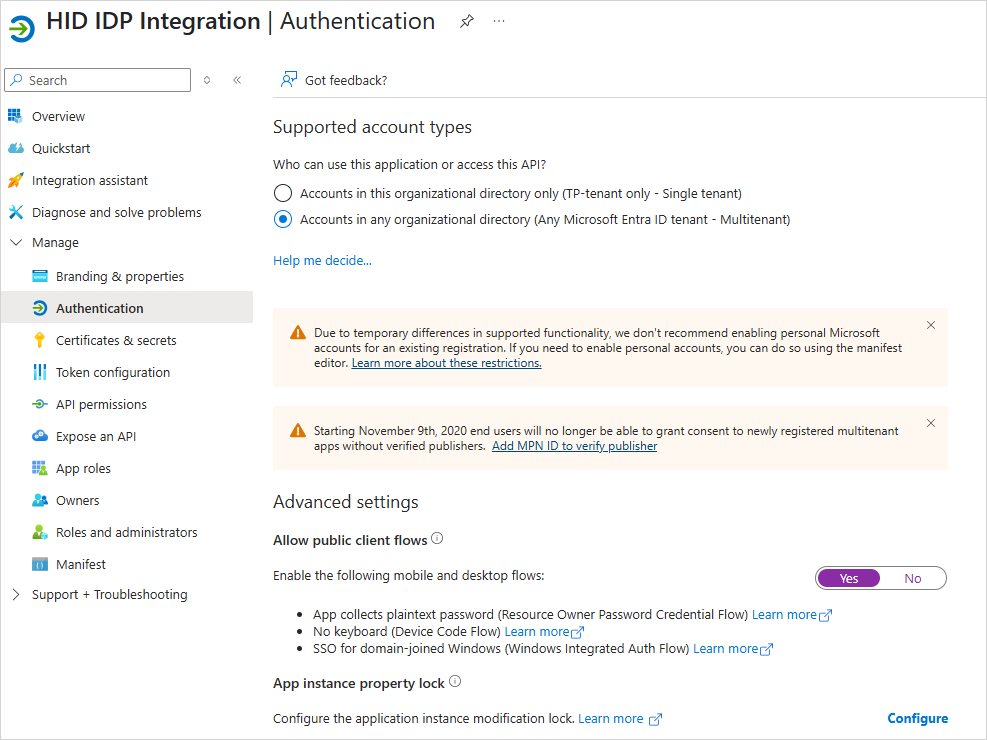
-
In the Advanced settings section, enable the Allow public client flows option and click Save.
-
Go to the application's Overview page and make a note of the Application (Client) ID.
-
Log on to the HID Authentication Service Administration Portal.
-
Click Settings in the left navigation bar and then User Sources.
-
Select the User Source your created above for the integration.
-
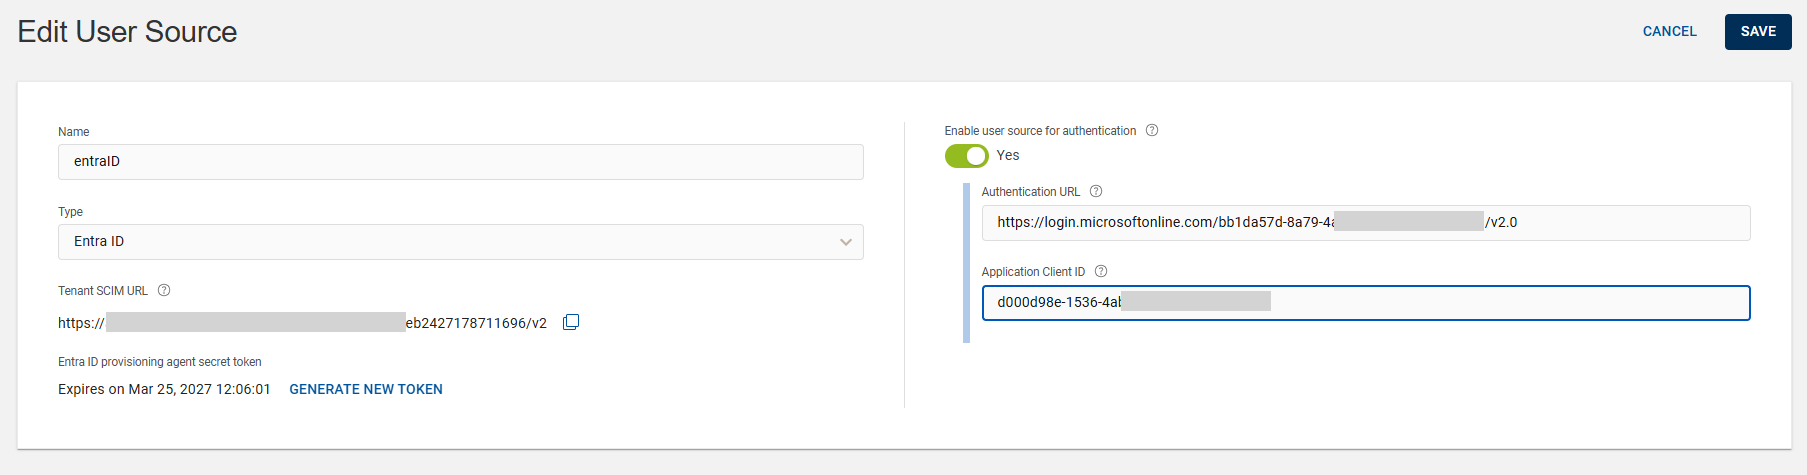
Set Enable user source for authentication to Yes.
-
Enter the Authentication URL for the application’s endpoint.
The value should be in the <Authority URL>/v2.0 format.
Note: You can get the <Authority URL> value from your application's list of endpoints: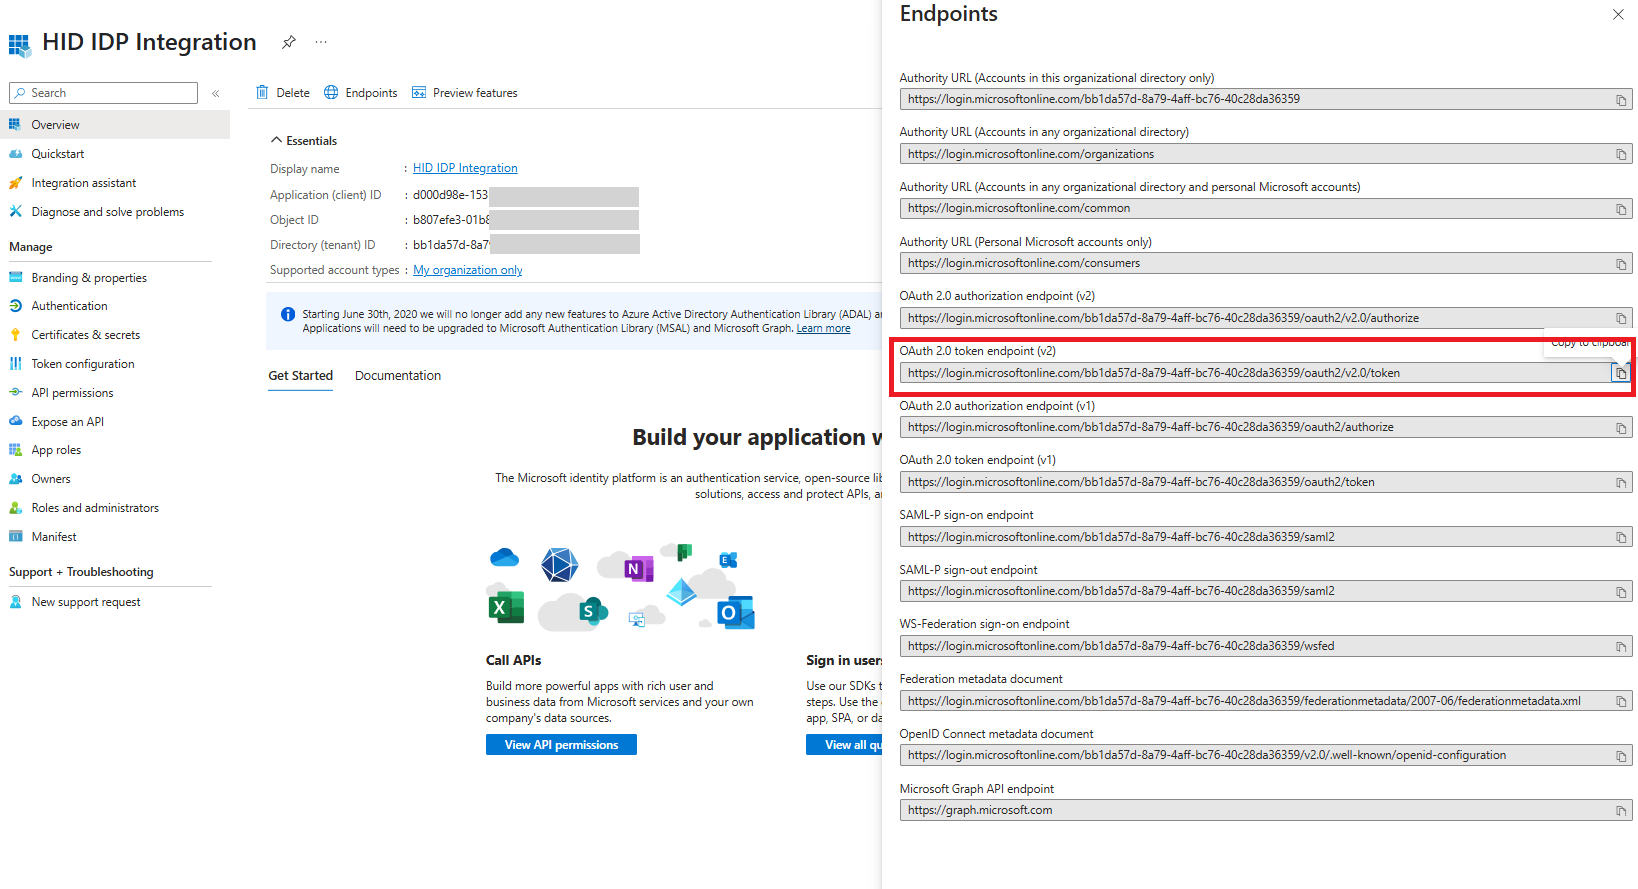
-
Enter the Application Client ID you made a note of when creating the application.
-
-
Click SAVE.
For Existing Applications
If you are configuring LDAP authentication for an existing application:
-
In the left panel, select Conditional Access and click the link under Target resources.
-
In the Include tab, select All resources.
-
In the Exclude tab, select your application for LDAP authentication and click Save.
It is also recommended reviewing Troubleshoot sign-in problems with Conditional Access | Microsoft Learn to avoid access issues.
Validate the Integration
Your users should be synchronized and available in your HID Authentication Service tenant.
For the validation purpose, you must have at least one user with an authenticator for the authentication method configured in the workflow for Entra ID.
You can test the integration by accessing a Microsoft application such as Microsoft 365 (https://www.office.com/?auth=2) using your created user.
User Enrollment and Authentication
The following sections provide an overview of the Contactless Card enrollment and authentication process for end users.
Both processes require the HID Authentication Device Client, a lightweight client application adding support for authentication using smart card credentials. This client can be installed:
-
Before enrollment - the client can be downloaded from the ActivID Customer Portal for distribution to your users
-
During enrollment - your users can download the client during enrollment as the HID Authentication Service Self-Service Portal detects that the client is not installed and prompts the user to download and install it before continuing (see Download and Install the HID Authentication Device Client)
-
The client requires 60 MB of hard disk space (110 MB during installation) and can be installed on:
-
Microsoft Windows 10 and 11 (64-bit only)
-
Microsoft Windows Server 2016, 2019 and 2022 (64-bit only)
-
-
It cannot be installed on:
-
Systems running on ARM processors
-
Servers with the domain controller role
-
Enrollment Process
Once you have deployed your workflow, notify your users that they can enroll their contactless card, and provide the URL for your organization's HID Authentication Service Self-Service Portal.
-
The user authenticates to the HID Authentication Service using their password.

-
The user clicks ADD AUTHENTICATION.
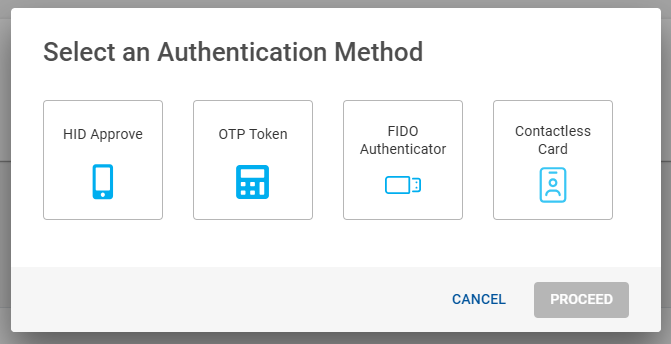
-
The user clicks Contactless Card and is directed to the enrollment process.
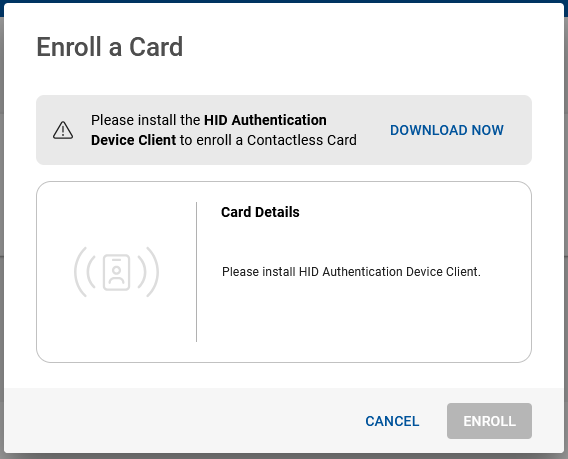
-
If the portal detects that the HID Authentication Device Client is not installed on the computer, the user is prompted to download and install it.
-
The portal guides them through the process, based on the settings and criteria you have defined in the enrollment workflow.
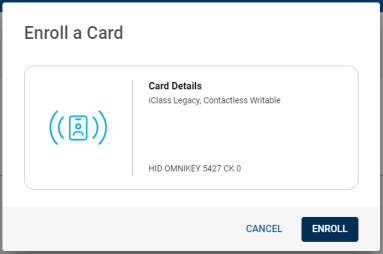
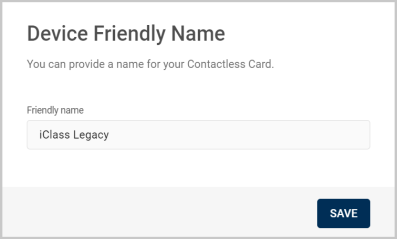
-
If the enrollment is successful, the HID Authentication Service creates a new authenticator, device and credential (based on the card authentication policy, device and credential type parameters) for the user.
For further information, see Contactless Card Enrollment.
Authentication Process
To authenticate with their enrolled card in the Entra ID flow, the user experience depends on the settings and criteria you have defined in the authentication workflow.
-
The user first authenticates to the application (for example, Microsoft 365) with their password as the first factor.
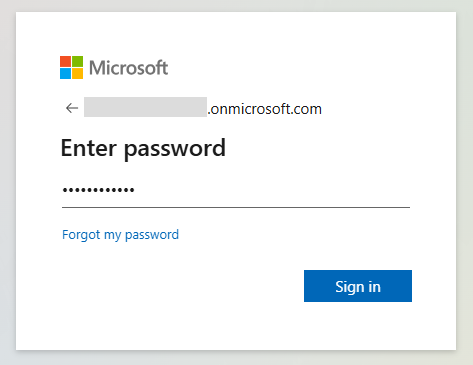
-
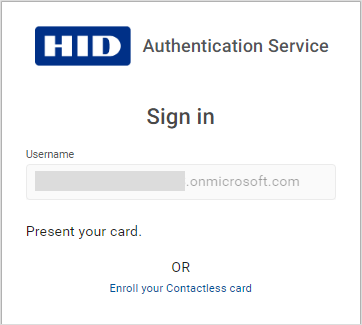
As the second factor, the user is prompted to verify their identity using their enrolled Contactless Card.
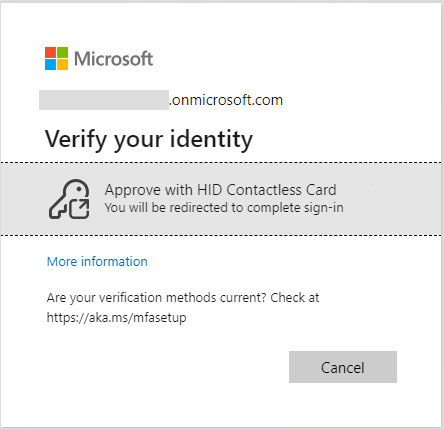
-
The user click Continue and the application redirects the user to the HID Authentication Service authentication workflow.
-
If card authentication is configured, the HID Authentication Service checks if the user has an enrolled card credential.
-
If the user has a credential, the authentication is allowed and the HID Authentication Service displays the authentication prompt.
 Note: If the user does not have an enrolled card credential, authentication is not allowed. Depending on the defined workflow, the user can either enroll a card or authenticate with another method if available.
 -
As the Username (User ID) is included in the request, the user does not need to enter it and is simply prompted to present their card for authentication.
-
The user taps or inserts their card into the reader.
Note: The required action depends on the type of card and reader. -
On successful authentication, the user is redirected back to the requested application.


